
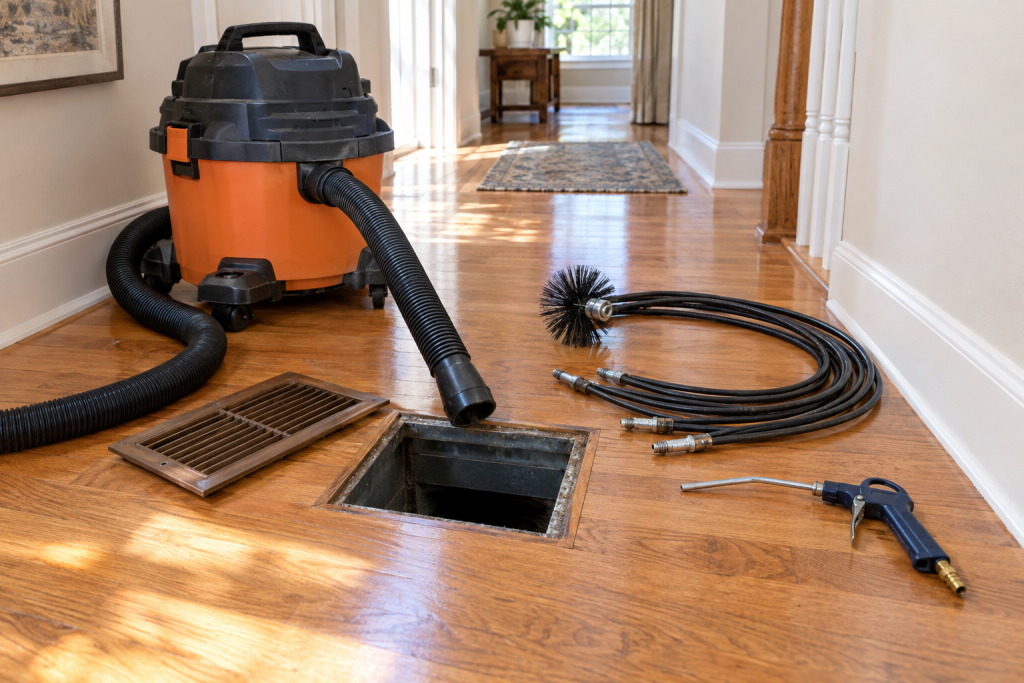
A DIY duct cleaner setup is a HEPA-filtered shop vac, a drill-driven rotary brush on flexible rods, and a compressor with a blow gun, and together they will clear the first 10 to 20 feet of every duct run in your house in an afternoon. That covers the registers, boots and branch lines where most dust, pet hair and construction debris actually sits. The main trunk, the blower and the evaporator coil take a bit more care, and this guide walks through all of it in order.
Quick steps: clean your ducts with DIY tools
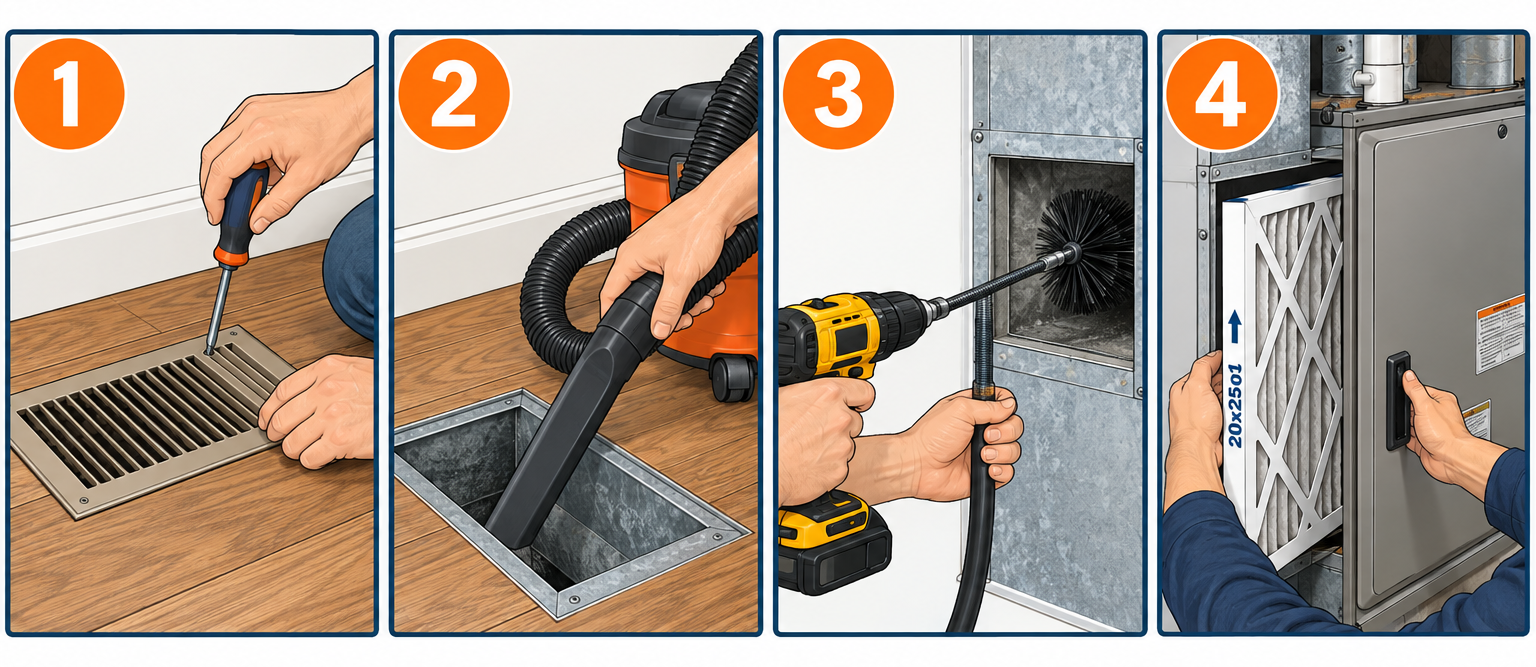
- Shut the system off at the thermostat and the furnace switch, then pull the air filter.
- Unscrew every supply register and return grille and wash them in the tub.
- Cover the open supply boots with cheap paper towels or plastic to see which runs blow dust.
- Vacuum each boot and the first few feet of duct with the shop vac and a crevice tool.
- Feed the rotary brush down each run on the drill at low speed, pulling debris back toward the vac.
- Blow out the stubborn corners with compressed air while the vac hose sits in the opening.
- Vacuum the return trunk, the blower compartment and the dryer vent.
- Reinstall grilles, fit a new filter, and run the fan for 15 minutes with windows open.
Tools and materials
- Wet/dry shop vac, 12-16 gallon, 5+ peak HP, with a HEPA cartridge filter and dust collection bag
- Rotary duct brush kit: flexible rods (12-24 ft total) with 4-inch and 6-inch nylon brush heads, 1/4-inch hex drive
- Cordless drill with a clutch and variable speed
- Pancake compressor (6 gallon, 150 psi) with 25 ft hose and a blow gun with a 12-inch extension nozzle
- Shop vac extension hose, 10-20 ft, plus crevice and round brush attachments
- Screwdriver or 1/4-inch nut driver for register screws
- N95 or P100 respirator, safety glasses, nitrile gloves
- Headlamp and a borescope or phone camera on a stick
- Microfiber cloths, bucket, dish soap, white vinegar
- UL 181 foil HVAC tape and a tube of water-based duct mastic
- Replacement furnace filter, MERV 8-11, in your exact size
- Roll of painter’s plastic and masking tape
Calculators for this job
Safety first
Turn the furnace off at its service switch and flip the breaker before opening the blower compartment, and never spray water or cleaner near the control board or capacitor. Wear a P100 respirator; old ducts can hold rodent droppings, fiberglass fibers and, in homes built before 1980, asbestos on tape and insulation. If you see white or gray crumbly tape wrap, stop and get it tested.
The 7 duct cleaner tools and what each one actually does
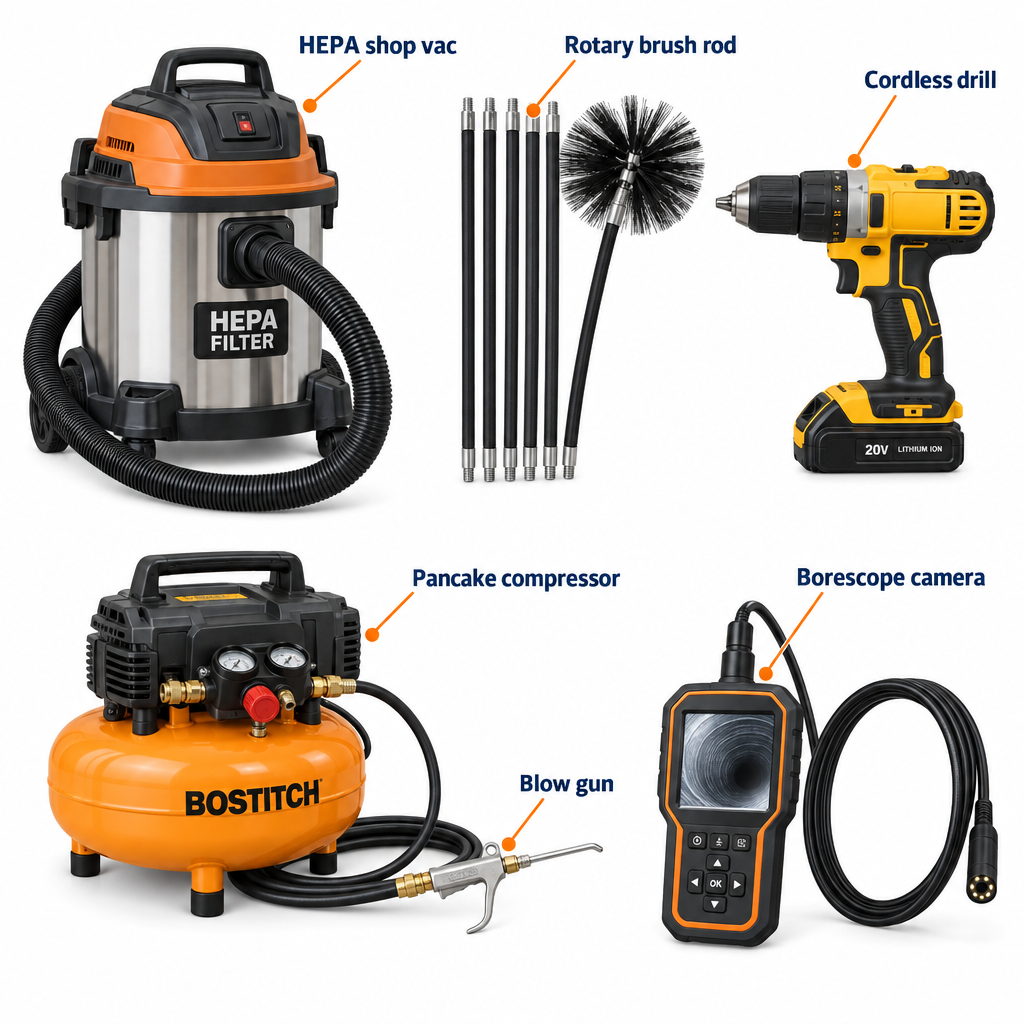
Professional crews use a negative air machine that pulls 2,000 to 4,000 cubic feet per minute through the whole system while they agitate every run. You cannot buy that for home use at a sane price, so the DIY version splits the job into suction, agitation and air pressure, and does one duct at a time.
| Tool | Spec that matters | Typical price | What it does |
|---|---|---|---|
| Shop vac | 12-16 gal, HEPA cartridge, 2.5-inch hose | $80-160 | Pulls loosened dust out of the boot and the first 20 ft of duct |
| Rotary brush kit | 4 and 6-inch nylon heads, 1/4-inch hex rods | $25-50 | Knocks caked dust off duct walls so the vac can grab it |
| Cordless drill | Clutch setting, 300-600 rpm low range | $60-120 (or owned) | Spins the brush without whipping the rods apart |
| Compressor and blow gun | 6 gal, 90-150 psi, 12-inch nozzle | $100-180 (or $30 rental) | Blasts corners, elbows and the duct boot seams |
| Extension hose | 10-20 ft, 2.5-inch, with reducer | $20-35 | Lets the vac reach past the first elbow |
| Borescope | 16 ft cable, 8 mm camera, phone app | $25-40 | Shows you what is in there and whether you got it |
| HEPA filter and bags | Rated for the vac model | $30-45 | Keeps fine dust from blowing back into the room |
Two things in that list are not optional. The HEPA cartridge is the difference between a cleaner house and a dustier one, because a standard foam or paper filter passes the fine particles straight through the exhaust. The nylon brush, rather than a wire one, is what keeps you from scoring sheet metal or tearing the inner liner of flex duct.
Skip the handheld “air duct cleaning” sprays and foggers sold next to these kits. The EPA only allows sanitizers that are specifically registered for use inside HVAC ducts, and the retail cans generally are not. They also do nothing for the dust that is still stuck to the metal.
Step 1: Decide whether the ducts need a duct cleaner at all
The EPA’s position is blunt: there is no evidence that routine duct cleaning improves health, and it only recommends cleaning when there is visible mold, a rodent or insect infestation, or so much dust that it blows out of the registers. That is the right filter for your weekend too. If the registers are clean and you change the filter on schedule, spend the afternoon on something else.
Pull one supply register in a bedroom and one return grille, and look inside with the headlamp. You are judging three things.
- Dust depth. A gray film is normal. A quarter inch of felted dust, pet hair or drywall sanding powder means a cleaning will make a difference you can see.
- Debris. Toys, drywall screws, sawdust and dead insects collect in the boot under floor registers. New construction and post-remodel houses are the worst offenders.
- Moisture signs. Black speckling, a musty smell, rust streaks or a wet boot point to a bigger problem than dust.
If you find mold on bare sheet metal, you can clean it with the steps below and a diluted detergent wipe, then fix the moisture source. If the duct is lined with fiberglass or is fiberglass duct board and it is moldy or wet, cleaning does not work. The EPA says that material should be replaced, and that is a licensed HVAC job.
Run the borescope 10 to 15 feet into a couple of runs while you are at it. Many systems look terrible at the boot and nearly clean three feet in, because the boot is where things fall and the vertical drop is where dust settles. That tells you the DIY approach will get most of what matters.
Step 2: Shut the system down and map the registers
Set the thermostat to off, then flip the furnace service switch (the light-switch-style toggle on or near the furnace cabinet) and the breaker. Pull the air filter out so it does not get loaded with everything you knock loose on the return side.
Walk the house and count registers. A typical two-story home has 10 to 14 supply registers and 2 to 4 return grilles. Note which ones are floor, wall and ceiling, because floor boots collect debris and ceiling runs mostly hold hanging dust.
Tape a half sheet of paper towel over every supply register except the one you are working on. This does two jobs. It stops dust you push with compressed air from puffing out somewhere else, and when you finish and run the fan, any towel that turns gray tells you which run still needs attention.
Lay painter’s plastic under each register you open. Floor registers in carpet are the messiest, since years of crumbs and hair sit in the gap between the boot and the subfloor.
Step 3: Pull and wash the registers and grilles
Supply registers are held by two screws through the face, and most come out with a 1/4-inch nut driver or a Phillips screwdriver. Return grilles use four screws or spring clips. Bag the screws per register, because sizes and lengths vary from room to room.
Wash everything in the tub with hot water, a squirt of dish soap and a cup of white vinegar. A soft brush gets between the louvers. Painted steel registers can rust at the edges if you leave them wet, so dry them on a towel in the sun. Plastic ceiling diffusers often have a damper that pops out for cleaning; note which way it faces before you remove it.
Check the duct boot while the register is off. The boot is the sheet metal box the register screws into, and in a lot of houses it is not sealed to the drywall or subfloor. A gap there pulls attic or crawl space air into the system every time the blower runs. Seal it with mastic or foil tape once it is clean; that single fix cuts future dust more than the cleaning does.
Pro tip
Vacuum the boot before you touch anything else, then take a phone photo of it. After the brush pass and the air blast, take another photo. If the second one is not noticeably cleaner, your vac hose is not close enough to the opening and the dust is going back in instead of out.
Step 4: Vacuum the boots and the first few feet
Start with the shop vac and the crevice tool in each boot. Scrape the corners, because the seams hold caked dust that a brush will skip. Then switch to the round brush attachment and work the first foot of duct, which is usually a vertical drop or a short horizontal piece before the first elbow.
Push the extension hose in as far as it will go without force. On rigid sheet metal you can usually get 6 to 10 feet before an elbow stops it. On flex duct, which looks like a coiled wire spring inside a plastic liner, go gently; the hose end catches the ribs and a hard shove can tear the liner.
Do the big items by hand. A drywall screw or a toy car will clog a 2.5-inch hose and you will spend ten minutes disassembling the vac. Reach in with gloves or a grabber tool first.
Check the vac filter after every three or four registers. A loaded HEPA cartridge drops suction fast, and you will feel it in the hose. Tap it out into a trash bag outdoors, or swap in a second cartridge if you bought one.
Step 5: Run the rotary brush down each supply run
This is the agitation step that separates a real cleaning from a quick vacuum. Chuck the first rod section into the drill, snap on the brush head that is slightly larger than the duct (the 6-inch head for a 6-inch round duct, so the bristles press lightly against the wall), and set the drill to its low gear.
Set the drill clutch to a mid setting rather than drill mode. If the brush snags on a seam or an elbow, the clutch slips instead of unscrewing the rods inside the duct. Rods that come apart 15 feet into a run are the single most common DIY duct cleaning disaster, and fishing them out means cutting the duct.
Feed the brush in slowly while the drill turns at 300 to 500 rpm, forward only. Most rod kits are threaded so that forward rotation keeps them tight and reverse loosens them. Add a rod section every two feet until you feel the elbow, work the brush back and forth a few times there, then withdraw it while it is still spinning. The spinning brush pulls debris toward you.
Have the vac hose sitting in the boot opening the whole time, running. Debris falls to the low point in the duct and a horizontal run has nowhere for it to go unless suction is pulling. A second person holding the hose while you drive the drill makes this twice as effective.
For rectangular trunk lines and wall stacks (the flat 3.25 by 10-inch or 3.25 by 14-inch ducts inside walls), the round brush only touches the middle. Use the 4-inch head and sweep it across the width in several passes, or rely on compressed air for those.
On flex duct, use the brush only if the liner is intact and you keep the speed under 300 rpm. The nylon bristles are fine, but the rods can poke through a brittle old liner. If the borescope shows the liner is already torn or the insulation is visible, stop brushing that run. It needs replacing.
Fiberglass duct board and internally lined ducts, common in southern and older houses, need the softest touch. Brushing hard tears the fiber surface and releases fibers into the airstream. Vacuum with the round brush tool and leave the rotary brush out of those.
Pro tip
Wrap a strip of electrical tape around each rod joint before you feed it in. It adds nothing to the strength but it makes the joint obvious when you pull the rods back out, and if a joint feels loose on the way out you catch it before the next run instead of inside a duct.
Step 6: Blow out the corners with compressed air
Compressed air does what the vac and brush cannot: it reaches the elbows, the inside of the boot seams and the spots where a horizontal run meets a vertical one. Set the regulator to about 90 psi for sheet metal and 50 to 60 psi for flex duct.
The method is simple but the order matters. Put the vac hose in the boot opening first and turn it on. Then slide the blow gun’s extension nozzle past the hose, aim it down the run and pulse it in one-second bursts. Long blasts just stir up a cloud that drifts back out past the hose. Short bursts kick dust off the walls and the vac catches it as it falls.
Work from the far end of the run back toward you. If you have a 12-inch nozzle extension you can reach the first elbow in most runs; a length of 1/4-inch poly tubing pushed onto the nozzle gets you another few feet.
Expect this to send some dust into the room despite your efforts. Keep the respirator on and the door closed, and run the vac in the room for a minute after each register. Those paper towels on the other registers are earning their keep right now.
Pros do this same thing with an “air whip” or a “skipper ball,” a nozzle on a long hose that thrashes through the duct at anywhere from about 90 psi up to 200 psi or more, depending on the tool. A small pancake compressor cannot feed one of those for more than a few seconds, so stick with the blow gun.
Step 7: Clean the return side, the blower and the coil
Returns pull air, so they collect more dust than supplies, and the big return grille near the thermostat usually hides a cavity you can reach into with your whole arm. Vacuum the grille opening, then use the extension hose and the rotary brush down the return trunk toward the furnace, exactly as you did the supplies. The vac has an easier time here because the trunk is usually larger and straighter.
Return paths are often not even ducts. In a lot of houses the builder used a framed wall cavity or a floor joist bay with sheet metal panned across the bottom. If your borescope shows wood framing and drywall paper inside the “duct,” that cavity is also pulling air through every gap in it. Vacuum what you can and seal the joints with mastic where you can reach.
Now the furnace. With the power off at the switch and the breaker, remove the lower door (the blower compartment). Confirm the system is dead by checking that the blower does not run when you briefly flip the thermostat fan to on; set it back to auto before you continue.
Vacuum the floor of the compartment, the housing and the outside of the squirrel-cage blower wheel. The wheel itself is where years of fine dust collect, and a dirty wheel moves measurably less air. You can clean the exposed fins with the vac brush and a soft paintbrush. Pulling the whole blower assembly for a full wheel cleaning is doable on most furnaces with four screws and two wire plugs, but if you have never done it, leave it; a wheel reinstalled off-center rattles and shortens the motor’s life.
Look up above the blower, past the heat exchanger, at the evaporator coil if the house has central AC. Shine the headlamp through the fins. A clean coil shows light; a gray mat means it is restricting airflow and should be cleaned with a no-rinse foaming coil cleaner. You spray it from a can through the access panel, let it foam and drip into the condensate pan, and it does not need rinsing. If the coil is behind a sealed panel or the access requires cutting duct, that is a service call.
Do not use compressed air inside the furnace cabinet. The control board, the flame sensor and the pressure switch tubing all live in there and a blast of air at 90 psi will move dust into places that cause intermittent faults.
Step 8: Do the dryer vent while the tools are out
The same rod kit with the 4-inch brush is sold as a dryer vent cleaning kit, and this is the one duct in the house where cleaning is a genuine safety item rather than a comfort item. The U.S. Fire Administration lists failure to clean as the leading cause of home dryer fires, and the lint is the fuel.
Unplug the dryer (or shut the gas valve and unplug it if it is gas), pull it out and disconnect the 4-inch duct from the back. Vacuum the dryer’s own exhaust port, then feed the brush on the drill into the wall duct from inside and work it toward the outside. Go outside, pop the hood or louvers off the termination, and brush from that end too. The two directions meet in the middle on runs up to about 25 feet.
If the dryer connector is white vinyl or foil accordion duct, replace it with semi-rigid aluminum. Vinyl is a fire hazard and the ribbed foil traps lint on every ridge. Clamp the new piece with 4-inch worm-drive clamps, not screws, because screw tips inside the duct snag lint.
Check the outside flap afterward. It should swing freely and close on its own. A flap stuck half open lets in cold air and birds; a flap stuck shut backs up moisture into the dryer and makes clothes take two cycles. Tape off the paper towel test on this one and instead run the dryer on air fluff and feel for strong airflow at the hood.
Step 9: Seal, filter and run the system
Put the registers back with their matching screws. Before each one goes on, seal the boot-to-drywall or boot-to-subfloor gap with a bead of mastic applied with a cheap chip brush. Mastic stays flexible and lasts decades; the gray cloth “duct tape” fails in a couple of years and should not be anywhere in a duct system.
Fit a new filter. A MERV 8 pleated filter catches the dust that matters without starving the blower, and MERV 11 is the practical ceiling for most residential systems unless the furnace is specified for a thicker media filter. Note the airflow arrow on the frame; it points toward the blower.
Pull the paper towels off the registers, open a few windows, and run the fan (thermostat fan setting to on, not auto) for 15 minutes. You will see a little puff from a couple of registers in the first minute; that is normal. Any register that keeps blowing visible dust after five minutes has a run you missed or a boot you did not seal, so go back to it.
Take one more borescope look at the two runs you photographed before you started. That is your proof the job worked, and it is the same comparison a reputable company would show you.
What a DIY cleaning gets and what it misses
Being honest about the limits keeps you from redoing a job that needed a different tool in the first place.
| Part of the system | DIY result | What a NADCA-standard pro does differently |
|---|---|---|
| Register boots and first 10-20 ft | Thorough | Same, but with a whip under negative pressure |
| Long trunk lines past 20 ft | Partial | Cuts access holes, runs the whip the full length, patches with sheet metal plates |
| Vertical wall stacks | Mostly surface dust removed | Reaches with a long whip; still a weak spot for everyone |
| Blower wheel | Exterior only | Pulls the assembly and washes the wheel |
| Evaporator coil | No-rinse foam from the access side | Pulls the coil cover and cleans both faces |
| Whole-house dust capture | Room by room with a shop vac | Negative air machine at the plenum captures everything released, including what you knock loose on the return side |
| Mold on lined duct | Cannot be fixed by cleaning | Also cannot be fixed by cleaning; replacement is the standard |
The National Air Duct Cleaners Association publishes its ACR Standard for assessment, cleaning and restoration of HVAC systems, and the core of it is source removal: physically agitating every surface while the whole system is under suction, then verifying it visually. Your afternoon follows the same logic one duct at a time. The pro version is faster, more complete on long runs, and is the only reasonable choice for a house with a crawl space full of flex duct you cannot reach.
If you want the middle option, equipment rental yards sometimes carry a negative air machine (a HEPA fan unit used for abatement) for roughly $80 to $150 a day. Connect it to the return plenum with a cut-in collar and foil tape, seal the supply registers, and it turns your brush-and-air work into something close to a professional process. It is a big, noisy box and you will need to patch the plenum afterward, so it only makes sense for a large house.
Troubleshooting
| Symptom | Likely cause | Fix |
|---|---|---|
| Rods unscrewed and the brush is stuck in the duct | Drill ran in reverse, or no clutch and it caught a seam | Feed a second rod set in with a hooked end, or fish with the borescope and a grabber; last resort is cutting the duct at the nearest accessible point and patching with a sheet metal plate and foil tape |
| Dust puffs out of a register you have not opened | Air pressure found an unsealed boot or an open branch | Tape every register before using air, and seal boots with mastic |
| Shop vac blows fine dust out the exhaust | Standard filter, not HEPA, or the cartridge is torn | Fit a HEPA cartridge and a collection bag; check the cartridge seal gasket |
| Vacuum suction drops to nothing | Clogged hose from debris, or loaded filter | Disconnect and shake the hose from the far end; tap out the cartridge outdoors |
| Brush spins but feels loose, no scrubbing | Brush head too small for the duct | Step up to the 6-inch head, or add a second head if the kit allows |
| Musty smell returns within a week | Moisture source at the coil, drain pan or a crawl space duct | Check the condensate drain for a clog, inspect pan for standing water, look for wet insulation on ducts |
| Airflow at registers feels weaker after the cleaning | Filter installed backward or wrong size, or blower door not seated | Reinstall the filter with the arrow toward the blower; make sure the blower door safety switch is pressed |
| One room still blows dust after everything | Torn flex duct liner or disconnected boot in the attic | Inspect from the attic side; replace the flex run or reconnect and strap the boot |
| Dryer takes two cycles after the vent cleaning | Lint plug pushed to the termination, or flap stuck | Brush again from the outside and clean the hood; replace a stuck flap |
When to call a pro
Call a NADCA-member duct cleaner if the runs are mostly flex duct in a crawl space or attic you cannot reach, the house has more than about 15 registers, or you find mold on fiberglass-lined duct or duct board. Call a licensed HVAC contractor, not a cleaner, for a coil you cannot access, a blower that needs pulling and you are unsure, a rodent-chewed or disconnected duct, or anything involving the gas burner and vent side of the furnace. Stop immediately and call an asbestos testing lab if you find gray or white crumbly wrap or tape on pre-1980 ducts. Expect a legitimate whole-house cleaning quote to land in the several-hundred-dollar range, and treat any “$49 whole house” offer as a sales call for add-ons.
FAQ
How often should ducts be cleaned?
Only when they need it. The EPA does not recommend routine cleaning, so inspect a register and a return every couple of years and act when you see thick dust, debris or mold. Change the filter every 1 to 3 months and most houses never build up enough to justify the job. New construction, a big remodel, a rodent problem or buying a house with pets are the usual triggers.
Can I clean air ducts with just a vacuum cleaner?
A household vacuum with a hose will clean the boot and the first foot or two, and that removes the debris that falls out when you pull a register. It does not reach the dust on the duct walls past the first elbow. The drill brush is the $30 upgrade that makes the biggest difference, and the HEPA shop vac keeps what you loosen from going back into the room.
Will a clean air duct cleaner job lower my energy bill?
Cleaning ducts alone will not, and the EPA says so directly. Cleaning the blower wheel and the evaporator coil can, because both restrict airflow when they are matted with dust. Sealing the boots and duct joints with mastic while the registers are off is the real efficiency win in most houses, since leaky ducts can lose a meaningful share of the conditioned air into the attic.
Is it safe to use a rotary brush on flex duct?
Only on intact flex duct, with a nylon brush, at low drill speed, and with a light touch. The inner liner is a thin plastic film over a wire helix, and the rods can poke through it. If the borescope shows tears, sagging or the insulation showing through, skip the brush and plan to replace that run; flex duct is cheap and a torn run is leaking air anyway.
Should I use a sanitizer or deodorizer in the ducts after cleaning?
No, unless the product is specifically registered with the EPA for use inside HVAC ducts, and most consumer cans are not. Sealants sprayed inside ducts are also not recommended by the EPA because they can trap debris and are hard to remove. A clean duct does not smell. If it still does, the source is moisture at the coil or drain pan, not something a spray will fix.
What is the difference between duct cleaning and dryer vent cleaning?
They use the same rod and brush kit but they are different ducts with different stakes. HVAC ducts carry conditioned air and get cleaned for dust and comfort. The dryer vent carries hot, moist, lint-laden air outside, and cleaning it once a year is a fire prevention task. If you only have time for one, do the dryer vent.