
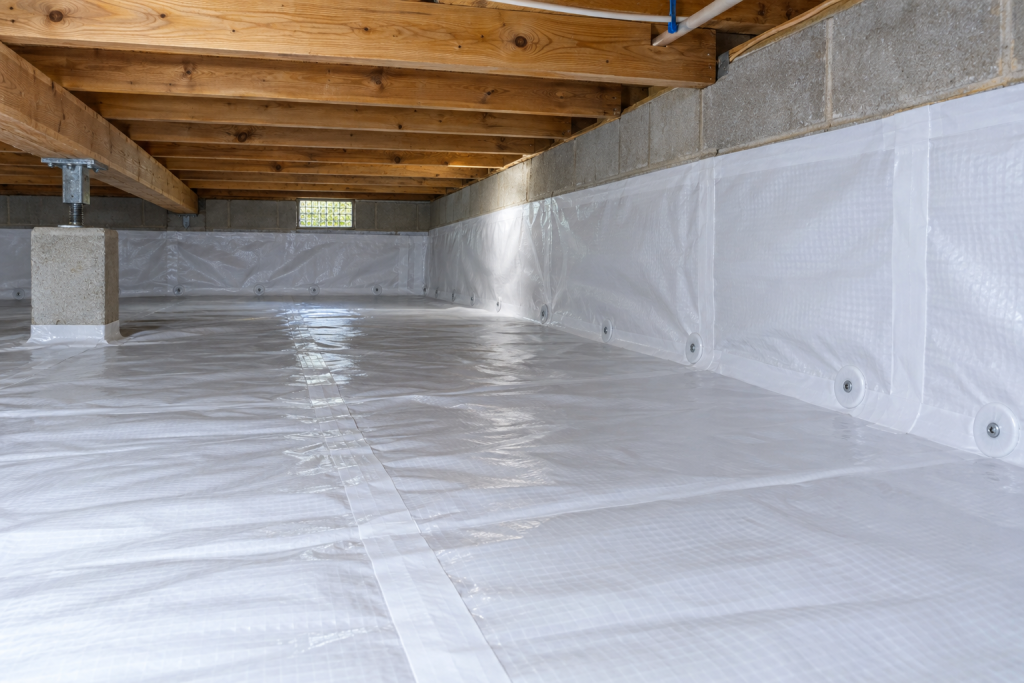
A crawl space vapor barrier is a sheet of 10- to 20-mil polyethylene laid over the dirt floor, overlapped 6 to 12 inches at the seams, taped, and run at least 6 inches up the foundation walls. Done right, it stops ground moisture from evaporating into the house, which is where most musty smells, cupped hardwood floors and joist rot start. Two people can cover a typical 1,500-square-foot crawl space in a weekend for $500 to $900 in materials.
Quick steps: install a crawl space vapor barrier
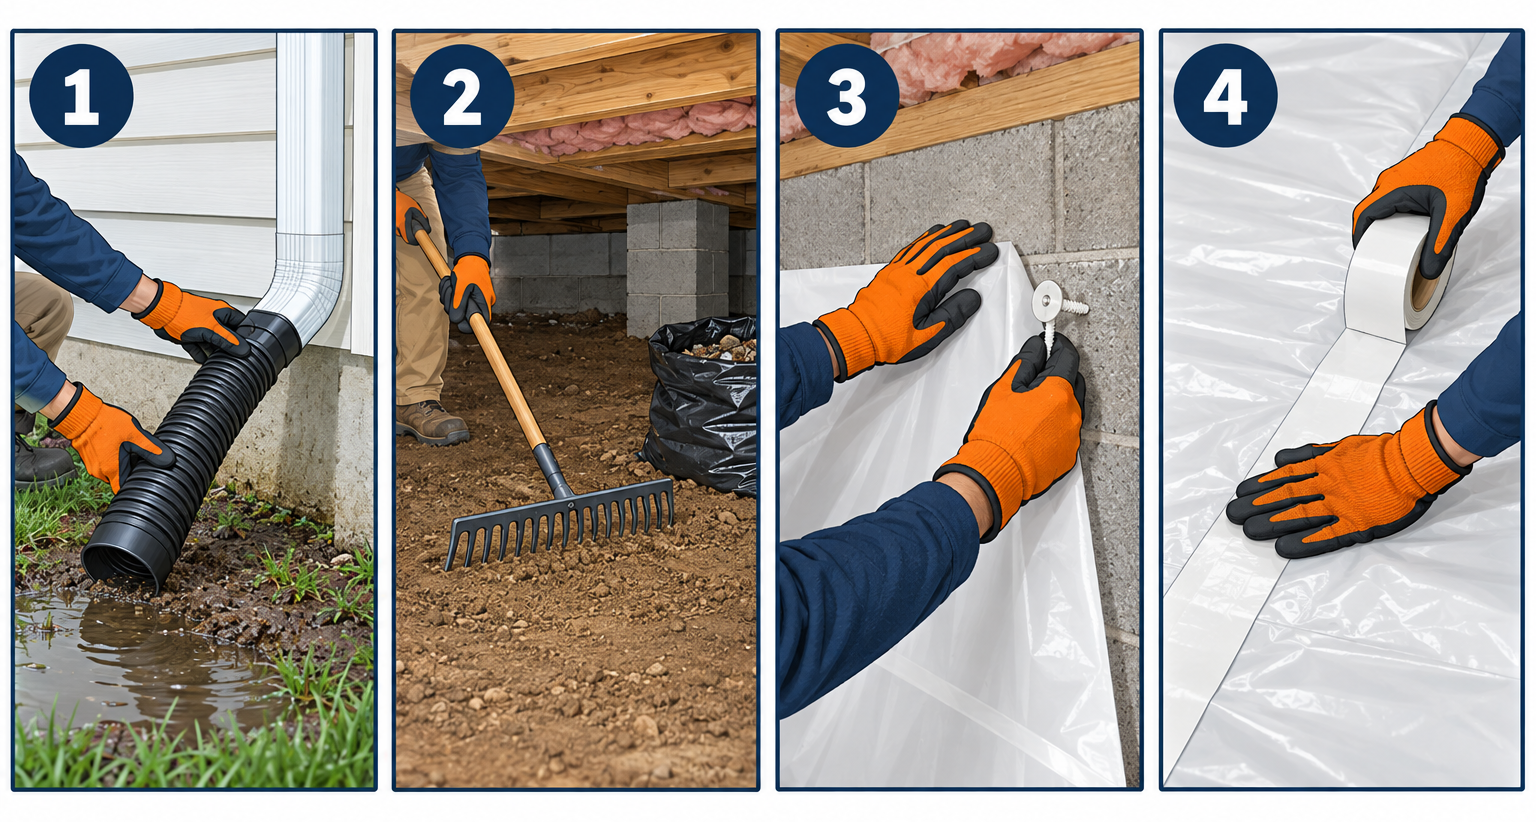
- Fix standing water and drainage problems first.
- Remove debris, old plastic and wet insulation, then rake the floor smooth.
- Measure the floor and walls, add 20 percent, and buy 12-mil reinforced poly.
- Run the wall pieces first, 6 to 12 inches up, fastened with butyl tape and anchors.
- Lay floor sheets with 12-inch overlaps and cut around piers.
- Tape every seam with 4-inch poly seam tape and seal around piers and penetrations.
- Leave a 3-inch termite inspection gap at the top of the wall.
- Add a dehumidifier or close the vents per code, then recheck humidity in a week.
Tools and materials
- 12-mil reinforced polyethylene vapor barrier (10 ft x 100 ft rolls, ASTM E1745 Class A)
- 4-inch poly seam tape (2-3 rolls per 1,500 sq ft)
- 2-inch double-sided butyl tape (enough for the full wall perimeter)
- Plastic foundation anchors (“Christmas tree” fasteners) or a termination bar with 1/4-inch masonry screws
- Hammer drill with 1/4-inch masonry bit
- Utility knife with hook blades, plus spare blades
- 25-foot tape measure and a chalk line
- Garden rake and flat shovel
- Contractor trash bags and a few 5-gallon buckets
- Spray foam (fire-rated) for penetrations
- Headlamp, knee pads, nitrile gloves, Tyvek coveralls, P100 respirator
- Pin-type moisture meter (optional but useful)
- Digital hygrometer for the follow-up check
Calculators for this job
Safety first
Wear a P100 respirator and coveralls; crawl spaces hold mold spores, rodent droppings and insulation fibers. Kill power to any open junction boxes or hanging wires you have to work around, and never seal crawl space vents if a gas furnace or water heater draws combustion air down there until an HVAC pro has confirmed it has a dedicated air supply.
Pick the right thickness before you buy anything
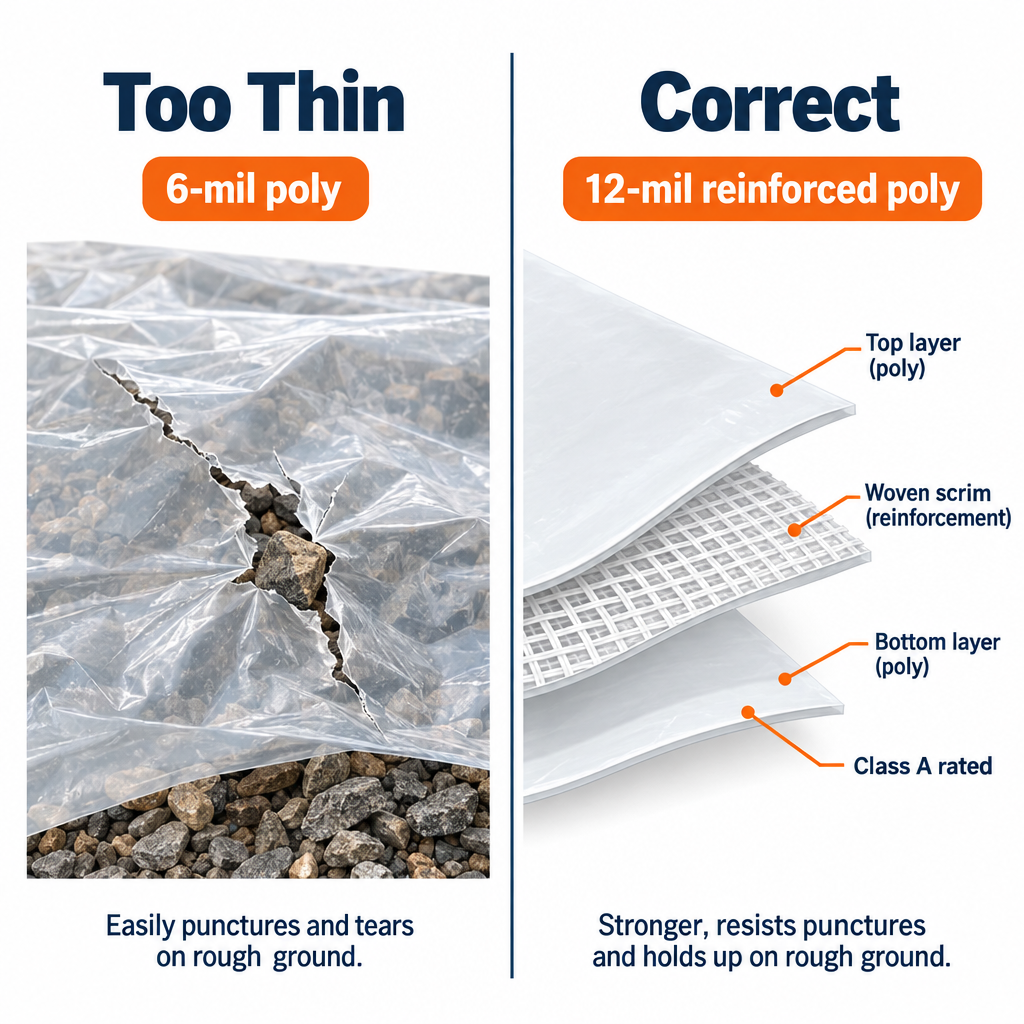
Builders slap 6-mil poly on the dirt because the IRC accepts it. It tears the first time you drag a bucket across it, and the plumber will shred it in a year. Skip it unless the crawl space is nothing more than a storage void you will never enter again.
| Thickness | Puncture resistance | Typical cost per sq ft | Best use |
|---|---|---|---|
| 6-mil unreinforced | Low, tears on gravel | $0.05-0.08 | Minimum code compliance, rarely accessed spaces |
| 10-mil reinforced | Good | $0.12-0.18 | Budget encapsulation with a smooth floor |
| 12-mil reinforced | Very good | $0.18-0.25 | The standard for DIY encapsulation |
| 20-mil reinforced | Excellent | $0.30-0.45 | Rocky soil, spaces used for storage or trades access |
Reinforced means a woven scrim is laminated between two layers of poly. That scrim is what keeps a small nick from zipping into a 3-foot tear. Look for ASTM E1745 Class A on the spec sheet; Class A has the highest tensile strength and puncture rating of the three classes. White or light gray material also makes the space far easier to inspect with a headlamp than black.
Whatever you choose, it must be a Class I vapor retarder, meaning a perm rating of 0.1 or less. Every product sold specifically as a crawl space moisture barrier meets that; general-purpose painter’s plastic sometimes does not.
Step 1: Fix the water first
A vapor barrier handles water vapor rising out of the soil. It does nothing for liquid water running in from outside, and if you lay plastic over a crawl space that floods, you will end up with a swimming pool on top of the sheet.
Get under the house after a hard rain and look. Standing water, mud that squishes underfoot, or a tide line on the block wall all mean you have a drainage problem to solve before you unroll anything. Check these in order:
- Gutters and downspouts. Downspouts should discharge at least 6 feet from the foundation, 10 is better. Splash blocks do not count. Use 4-inch corrugated extensions or buried solid PVC.
- Grading. Soil should fall 6 inches over the first 10 feet away from the house. Add fill dirt (not topsoil or mulch) against the wall if it has settled flat or slopes toward the house.
- Interior drainage. If water still shows up after the first two fixes, you need an interior perimeter “french drain” draining to a sump basin with a pump. The sump basin and pump go in before the barrier, and the plastic is later sealed to the basin lid.
Also look for a “clothes dryer vent” that was never run outside and simply dumps into the crawl space. A dryer pushes out roughly a gallon of water per load, and no barrier will keep up with that. Reroute it through the rim joist before you go further.
Wait a week of dry weather after any drainage work, then confirm the floor is damp at worst, not wet, before you move on.
Step 2: Clear and prep the crawl space
This is the ugly part and it takes longer than the install itself. Budget 3 to 6 hours for a typical space.
Pull out every piece of construction debris, lumber scrap, old duct, bottle and rock bigger than a golf ball. Old 6-mil plastic should come out too; it traps mud and insects underneath and makes a lumpy base. Bag the small stuff and drag it to the access door in buckets.
Fiberglass batts hanging from the joists get a hard look. If they are dark, sagging or wet to the touch, cut them down with a utility knife and bag them. Dry, clean batts can stay, though many encapsulation contractors remove them so the wood dries evenly and inspectors can see the joists.
Now rake. You want a flat, smooth floor with no sharp stones, wire stubs or forgotten anchor bolts. Fill any holes and trenches left from plumbing work. If the soil is rocky, spread an inch of sand over the worst spots; it costs about $5 per 50-pound bag and saves a lot of patching later.
Finally, check the wood. A pin moisture meter pressed into a joist should read under 19 percent. Readings over 20 percent mean the framing has been wet long enough for decay fungi to start, and that is worth a closer look at every joist and the sill plate with a screwdriver before you cover the floor and forget about it.
Pro tip
Hang a $20 clamp light or a string of LED shop lights from the joists at the access door before you start hauling debris. A headlamp alone makes you miss half the junk, and you will not want to crawl back in for the pieces you left.
Step 3: Measure and cut the sheets
Measure the length and width of the crawl space, then multiply for the floor area. A 30-by-50-foot footprint is 1,500 square feet. Add 20 percent for overlaps and waste, and then add the wall area: perimeter in feet times 2 feet of rise. For that same house, the perimeter is 160 feet, so the wall pieces need 320 square feet.
That comes to roughly 2,100 square feet total, or three 10-by-100-foot rolls of 12-mil at about $200 to $250 each. Buying one roll short is the most common mistake on this job, and a 100-pound roll is not something you want to drive back for on a Sunday afternoon.
Cutting a 100-foot roll in a crawl space is miserable, so cut outside on a driveway or lawn. Unroll the length you need, snap a chalk line, and cut with a hook blade. Roll each piece back up loosely and label it with a marker so you know which wall or run it belongs to. Fold the long floor pieces accordion-style instead of rolling; they unfold in a straight line with far less fighting.
For the walls, cut strips 24 inches tall. That gives you 12 inches up the wall, a 3-inch inspection gap at the top, and the rest lying flat on the floor as a lap for the floor sheets.
Step 4: Run the barrier up the walls and around piers
Walls go in before the floor so the floor sheets lap over them and any water that does show up runs onto the plastic instead of under it.
Start at a corner. Brush loose dust off the block with a stiff broom. Press a continuous run of 2-inch double-sided butyl tape along the wall at the 12-inch height mark, peel the release paper a few feet at a time, and press the top edge of the wall strip into it. Smooth it hard with your palm; butyl needs pressure to bond.
Butyl tape alone will let go in a humid crawl space within a couple of years, so back it up mechanically. Drill 1/4-inch holes through the plastic into the block every 24 inches along the top edge and tap in plastic foundation anchors. A termination bar (a strip of aluminum with pre-drilled holes, screwed every 12 inches with 1/4-inch masonry screws) looks cleaner and holds better on crumbly old block, at roughly $1 per foot.
Leave a 3-inch gap between the top of the plastic and the sill plate. Termite inspectors need to see that strip of bare block to spot mud tubes, and some pest control companies will void a termite bond if the barrier runs to the sill. In Southern states, many building departments require the gap outright.
Piers get the same treatment. Wrap each one with a piece of barrier taped to itself and sealed to the pier with butyl tape, running from about 3 inches below the top down to the floor with a few inches lying flat.
Pro tip
Cut the pier wraps and corner pieces at the start and set them in place before you lay a single floor sheet. Trying to fit a pier wrap after the floor is down means working on your knees on top of the barrier, which is where most puncture damage happens.
Step 5: Lay the floor sheets and overlap the seams
Begin along the wall farthest from the access door and work back toward the exit so you never have to crawl across finished sections. Unfold the first sheet along the wall, run it 6 inches up over the wall strip, and kick the fold out flat with your boot. Do not stretch it tight; it will shrink slightly in cold weather and pull at the seams.
Each following sheet overlaps the previous one by 12 inches. Code requires 6, but 12 gives the tape a clean, dust-free zone to grab, and it covers the small gaps that open as you drag the sheet around. Lap the uphill sheet over the downhill one if the floor slopes, the same way you would shingle a roof.
Where a sheet meets a pier, cut a slit from the edge to the pier, slide the sheet around, and leave the cut edges overlapping the pier wrap by at least 6 inches. Do the same for plumbing stacks and support posts. Relief cuts are fine; cutting out a square hole is not, because you can never seal the back side.
Weigh down loose edges with bricks or bags of sand as you go so a breeze through the vents does not lift the whole run. Pull the weights as you tape.
Step 6: Tape and seal every seam
Taping is what separates a crawl space moisture barrier from a plastic drop cloth. An untaped lap lets soil vapor out at every edge, and vapor only needs a few hundredths of an inch to get through.
Wipe each seam with a dry rag; poly seam tape does not stick to dust or damp plastic. Peel the 4-inch tape in 3-foot lengths, center it over the seam, and press it down with a J-roller or the heel of your hand along the whole length. Pinch any wrinkles in the tape flat right away; a ridge in the tape is a channel for air.
Seal in this order:
- Floor-to-floor laps.
- Floor-to-wall laps.
- Pier wraps and penetrations.
- The top edge of the wall strip over the termination bar or anchors.
Plumbing pipes, electrical conduit and sump discharge lines get a collar of tape around their base, then a bead of fire-rated spray foam where the plastic cannot conform. If you have a sump basin, cut the barrier to lap onto the lid and tape it down so the pit becomes part of the sealed system. That also matters for radon: a sealed barrier with a taped sump lid is the foundation of any later radon mitigation system.
Expect to use about one 180-foot roll of seam tape per 700 to 800 square feet of floor. Run short and the last seams go untaped, which is exactly where the moisture problem will return.
Step 7: Control the air, not just the ground
Covering the dirt stops the biggest moisture source, but outside air still comes in through the vents. In humid climates, summer air entering a 65°F crawl space condenses on the cool ducts and joists, and a vapor barrier alone will not fix that.
You have two code-compliant paths once a Class I barrier is down.
Keep the vents open (vented crawl space). The IRC allows the vent area to drop from 1 square foot per 150 square feet of floor to 1 per 1,500 once the ground is covered. For a 1,500-square-foot space, that is a single square foot of vent, and in a dry Western climate it works well. In the Southeast and Mid-Atlantic, open vents in July pull in more moisture than they remove.
Close the vents (unvented or conditioned crawl space). This is what full encapsulation means. Seal the vents with foam board and spray foam, then provide one of these per IRC R408.3: a continuously running exhaust fan at 1 CFM per 50 square feet of floor, a conditioned air supply from the HVAC system at the same rate, or a dehumidifier sized for the space. A dedicated crawl space dehumidifier in the 70- to 90-pint range runs $1,000 to $1,800 and is the choice most homeowners make, because it works regardless of what the furnace is doing. Set it to 50 to 55 percent relative humidity and plumb the drain to the sump or a condensate pump.
Closing the vents also triggers the wall insulation requirement in most climate zones, usually 2-inch rigid foam board on the stem wall. Foam board exposed in a crawl space needs an ignition barrier unless it carries a rating for exposed use, so read the product data sheet before you buy.
Whichever path you choose, hang a $15 digital hygrometer near the center of the space and check it a week after you finish. Under 60 percent is acceptable; 50 to 55 is the target.
Troubleshooting
| Symptom | Likely cause | Fix |
|---|---|---|
| Water pooling on top of the barrier after rain | Liquid water entering, not vapor | Stop and fix grading, downspouts or install a drain and sump before continuing |
| Seam tape peeling within weeks | Taped over dust or damp plastic | Lift the tape, wipe the plastic with a dry rag, retape with fresh tape and firm pressure |
| Humidity still over 65 percent after two weeks | Open vents in a humid climate or a missed moisture source | Close vents and add a dehumidifier; check for a dryer duct, leaking supply line or condensing AC ducts |
| Wall strip sagging off the block | Butyl tape alone, no mechanical fastening | Add a termination bar or anchors every 12 to 24 inches |
| Musty smell persists | Mold on joists was never cleaned, or wet batts were left in place | Remove remaining batts; clean joists with a borate solution or hire a remediation company if growth covers more than 10 square feet |
| Barrier torn or punctured | Sharp debris under the sheet, or trade traffic | Patch with a square of barrier at least 6 inches larger than the tear, taped on all four sides |
| Condensation on ducts above the barrier | Warm humid air hitting cold metal | Seal vents, dehumidify, and insulate ducts with R-8 wrap |
| Pest control flags no inspection gap | Plastic run up to the sill plate | Trim the top edge 3 inches below the sill and re-fasten |
When to call a pro
Call a foundation or waterproofing contractor if the crawl space has standing water you cannot drain, bowed or cracked block walls, or a sill plate soft enough to push a screwdriver into. Call a licensed HVAC contractor before sealing vents in any crawl space with a gas furnace or atmospheric-vented water heater; those appliances need combustion air, and sealing the space can backdraft carbon monoxide into the house. Mold covering more than about 10 square feet of framing belongs to a remediation company, and any radon reading above 4 pCi/L should go to a certified mitigator.
What a full job costs compared with hiring it out
A DIY vapor barrier on a 1,500-square-foot crawl space runs $400 to $900 in 12-mil material, tape, fasteners and foam. Add a dehumidifier and foam board on the walls and the full encapsulation lands around $2,000 to $3,000 in materials.
Contractors charge $1,500 to $4,000 for a barrier alone and $5,000 to $15,000 for full encapsulation with wall insulation, a dehumidifier and sump, depending on size, access and how much cleanup the space needs. The labor is unskilled but brutal, which is why pros charge what they do. If your crawl space has 30 inches or more of headroom and no water problem, the savings are real and the work is well within reach of a careful homeowner.
The payoff is more than a dry smell. A sealed, dehumidified crawl space typically trims 10 to 15 percent off heating and cooling bills in mixed and humid climates, keeps floor framing below the 19 percent moisture content where decay starts, and usually ends the seasonal gapping and cupping in hardwood floors above it.
FAQ
Does a basement with a crawl space section need a vapor barrier in both areas?
The crawl space section does; the finished basement floor is already a slab with its own barrier underneath. Run the crawl space sheet up and over the step between the two areas and tape it to the slab edge with butyl tape so moisture cannot migrate through the transition.
Can I lay a new vapor barrier over the old 6-mil plastic?
You can, but you should not. Old plastic traps mud, insect nests and sometimes rodent remains underneath, and it is rarely flat enough to keep the new seams from lifting. Pulling it out takes an hour or two and gives you a floor you can actually rake smooth.
Should the barrier go on the walls if I am not sealing the vents?
Yes. Block and poured concrete walls wick ground moisture just like the floor does, and the IRC requires a Class I barrier to extend at least 6 inches up the wall even in a vented crawl space. Running it 12 inches and leaving a 3-inch termite gap satisfies code and your pest control company at the same time.
How long does a crawl space vapor barrier last?
Reinforced 12-mil or 20-mil poly lasts 20 years or more if it is not torn by trades or rodents. Seam tape is the weak point; expect to inspect and retape a few spots every 5 years or so. Unreinforced 6-mil often fails within 5 years.
Do I still need a dehumidifier if the vents stay open?
In arid climates, usually not. Anywhere with humid summers, the hygrometer will answer the question for you. If it reads above 60 percent for more than a few days in July with the barrier down and the vents open, close the vents and add a dehumidifier.
Is a vapor barrier enough to deal with radon?
A taped Class I barrier with a sealed sump lid reduces radon entry but will not reliably bring a high reading below the EPA action level of 4 pCi/L. It is, however, the exact base a mitigator needs; a sub-membrane depressurization system draws air from under the plastic you just installed, so taping every seam now saves you money later.