
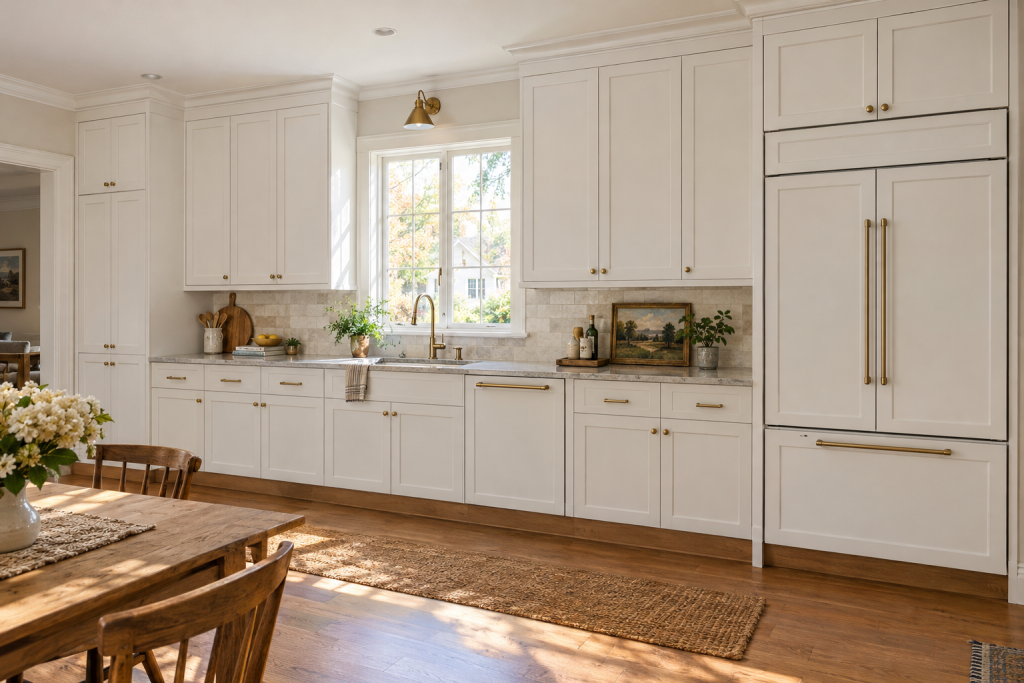
IKEA cabinets look custom when nobody can see a raw frame, a plastic leg or a standard IKEA door. We get there with full-height planning, third-party or painted fronts, a built wood toe kick, cover panels and fillers scribed to the walls, crown and light rail, and decent hardware. The SEKTION boxes stay; everything a guest can see changes.
Quick steps: make IKEA cabinets look custom
- Plan the layout to the ceiling with no stair-stepped tops and no exposed frame sides.
- Order the boxes, drawers and hinges from IKEA, but source fronts from a third party or paint-grade line.
- Build a continuous 2×4 and plywood toe kick base instead of using the plastic legs.
- Hang the suspension rail dead level and lock every box to it and to its neighbor.
- Add cover panels on every visible end, and fillers scribed tight to walls and ceiling.
- Install crown molding on a nailer strip and a light rail under the uppers.
- Drill hardware with a jig, then adjust every door and drawer to even 1/8″ reveals.
- Panel the dishwasher, build a hood cover, and finish with stone counters and LED lighting.
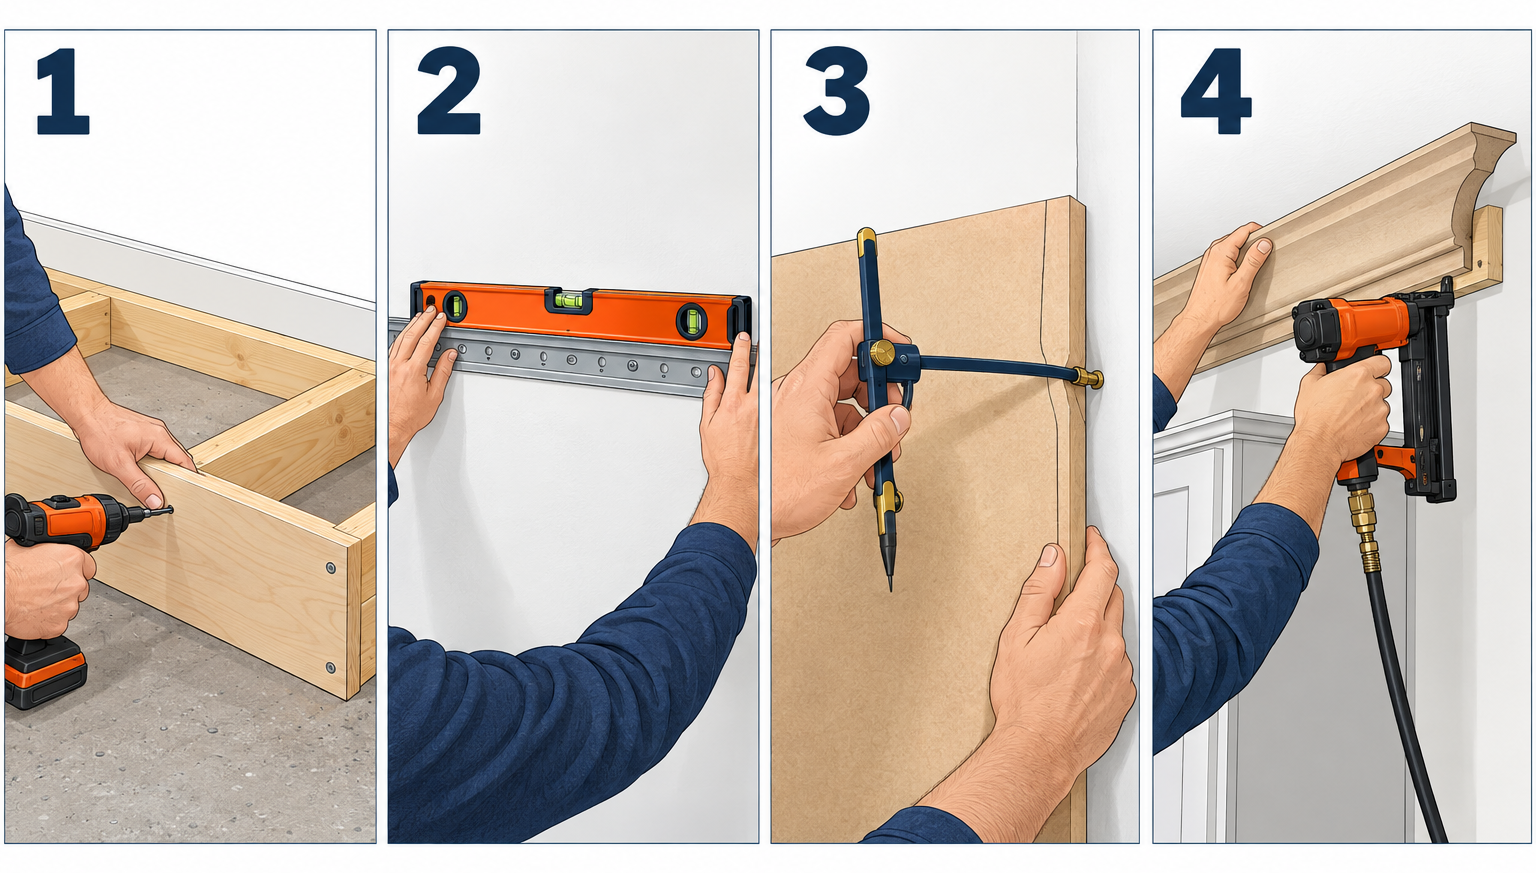
Tools and materials
- SEKTION frames, MAXIMERA drawers, UTRUSTA hinges and shelves (your IKEA plan)
- Fronts: Semihandmade, Reform, Kokeena or similar, or IKEA fronts for painting
- Cover panels (FÖRBÄTTRA or matching third-party panels), filler strips 3″ wide
- 2x4s and 3/4″ plywood for the toe kick base, plus matching toe kick board
- Primed MDF crown molding (3″ to 4 1/2″) and 3/4″ x 1 1/2″ nailer and light rail stock
- 4′ level, laser level, stud finder, tape, speed square
- Impact driver, drill, 2 1/2″ and 3″ #10 wood screws, cabinet connector screws
- 18-gauge brad nailer, wood glue, painter’s caulk, wood filler
- Track saw or circular saw with straightedge, jigsaw, block plane, scribe compass
- Cabinet hardware jig (Kreg or similar), 5/32″ and 3/16″ bits, pulls or knobs
- Shims, construction adhesive, clamps (at least four 12″ bar clamps)
- Under-cabinet LED strips with plug-in or hardwired driver
Calculators for this job
Safety first
Shut off the breaker before touching any hardwired under-cabinet lighting or outlets in the backsplash zone. MDF dust is nasty, so cut outside with a respirator, and anchor every wall cabinet rail into studs, never drywall anchors.
Step 1: Plan a layout that hides every tell
The biggest IKEA giveaway is not the doors. It’s the layout: wall cabinets stopping 18″ below the ceiling with a dusty gap on top, a visible white frame at the end of a run, and stair-stepped heights where the planner tool took the easy path.
Start in the IKEA kitchen planner, but draw the room first. Measure ceiling height at all four corners, because old houses vary by an inch or more. Mark windows, outlets, the gas line, the sink drain and the range hood duct. Those fixed points decide the layout, not the catalog.
Now run the uppers to the ceiling. SEKTION wall cabinets come in 15″, 20″, 30″ and 40″ heights. With counters at 36″ and the uppers starting 18″ above them, the bottom of the wall cabinets sits at 54″. An 8′ ceiling at 96″ leaves 42″: a 40″ cabinet plus 2″ for crown or a scribed filler. A 9′ ceiling at 108″ leaves 54″: a 30″ cabinet stacked on a 20″ cabinet gives 50″ with 4″ left for crown.
That stacked look reads as custom because real cabinetmakers stack uppers too. Put glass doors or a lift-up door on the top row if you want, or just run solid doors and store holiday platters up there.
Use tall cabinets at the ends of runs. The 80″ and 90″ SEKTION pantry and oven cabinets, sitting on a 4 1/2″ base, give you 84 1/2″ or 94 1/2″ of height. Flanking a fridge with two 15″ deep, 24″-tall uppers above, boxed in with 24″ deep panels, turns a freestanding refrigerator into a built-in look for about $300 in panels.
Plan drawers, not doors, in the base run. Three-drawer and four-drawer base cabinets with MAXIMERA soft-close drawers cost more than a door with shelves, but a wall of flat drawer fronts is the single strongest signal of a designer kitchen. Save doors for the sink base and corner.
Finally, note every end that will be visible. Each one needs a cover panel, so count them now and add them to the order. The IKEA planner does not add them automatically.
Pro tip
Order 10% more filler and cover panel stock than the plan calls for. A ripped filler that comes out 1/8″ short is the most common reason a weekend job stalls for two weeks waiting on a reorder.
Step 2: Choose fronts that don’t read as IKEA
IKEA’s own fronts are fine, and a few of them pass as custom in the right color. BODBYN and AXSTAD are proper shaker profiles, ENKÖPING does a convincing walnut-effect shaker, and VOXTORP in walnut effect works in a flat-panel modern kitchen. The problem is that we have all seen VEDDINGE white slab doors in a hundred rentals.
The reliable move is to buy the boxes, drawers, hinges and interiors from IKEA, then order fronts from a company that builds doors specifically for SEKTION. Semihandmade is the largest and has been doing this for over a decade. Reform, the Danish company, sells designer-collab fronts on IKEA boxes. Kokeena in Portland does the same. All of them pre-drill the 35mm hinge cups and the IKEA hole pattern, so the UTRUSTA hinges snap straight in.
Budget roughly 1.5 to 2.5 times what IKEA fronts would have cost, depending on finish. A paint-grade MDF shaker is the cheap end; real wood veneer slabs, fluted fronts or colored laminate with matching edgebanding sit at the top. Order samples first and look at them in the kitchen’s actual light, not the showroom.
If you’d rather paint, Semihandmade’s DIY line ships unfinished and primed-ready, and that gets you any Benjamin Moore or Sherwin-Williams color for the price of a quart of paint. Spray them if you can. A $150 HVLP sprayer and a cabinet enamel like Benjamin Moore Advance or Sherwin-Williams Emerald Urethane gives a factory-smooth finish that a brush never will.
Can you paint IKEA’s own doors? The foil-wrapped ones, like VEDDINGE, take paint badly. They need a bonding primer, and chips show the white foil underneath forever. Painted MDF or wood fronts are a better base, which is why most people who want a custom color skip the IKEA door entirely.
One more detail: order drawer fronts and door fronts in the same batch. Finishes vary slightly between production runs, and a drawer stack that’s a hair whiter than the doors beside it is exactly the kind of thing a custom shop would never ship.
Step 3: Build a continuous toe kick base
IKEA base cabinets stand on four adjustable plastic legs with a snap-on plastic toe kick. It works, but the toe kick clips to the legs with visible seams, it flexes when a vacuum hits it, and it never sits perfectly tight to the floor.
Custom shops set cabinets on a built base, so we do the same. Frame a ladder from 2x4s on edge, screwed together with 3″ screws every 16″, then cap it with a strip of 3/4″ plywood. That gives 4 1/4″ of height, close enough to IKEA’s 4 1/2″ leg setting that the counters still land at 36″ with a 1 1/2″ slab.
Set the front of the base 3″ back from where the door faces will sit, which is the cabinet front plus the 3/4″ thickness of the door. Run it full length along the wall, including under the dishwasher and range, so the finished toe kick is one unbroken line.
Level it before any cabinet goes on. Find the high point of the floor with a laser level, set the base there, and shim the rest up to match with composite shims under the 2x4s. Screw the base to the floor through the shims, or through the sleepers into the subfloor with 2 1/2″ screws. On a slab, use construction adhesive and a few Tapcons.
Cabinets then sit directly on the base and screw down through their bottoms with 1 1/4″ screws. Keep the legs in the box for the day; you won’t need them.
The finished toe kick board goes on last. Use a strip of the same front material, or 1/2″ plywood painted to match, attached with brad nails and construction adhesive. Scribe it to the floor if the floor rolls more than 1/8″ over the run. A base that sits tight to tile or hardwood with no visible gap is one of those details nobody consciously notices and everybody registers.
Pro tip
Leave a 1/4″ gap between the top of the base and the bottom of the toe kick board, then nail the board so it sits 1/8″ off the floor. Run a bead of paintable caulk in that bottom gap. It hides floor irregularities and lets the board breathe without cracking the finish.
Step 4: Hang the rail and set every box level
SEKTION mounts on a steel suspension rail for both wall and base cabinets. This is actually an advantage over face-frame cabinets: we level one rail once, and every box hanging from it is level by default.
Find and mark every stud with a stud finder, then confirm with a finish nail before drilling. Snap a laser line at the rail height from the IKEA plan. For wall cabinets starting at 54″ with 40″ tall boxes, that’s typically around 93″ to the top of the rail; check the installation sheet for your exact box, because the rail position depends on cabinet height.
Fasten the rail with #10 x 3″ wood screws into every stud it crosses. Never rely on drywall anchors for uppers. A 40″ wide cabinet full of dishes can top 150 lbs, and the rail carries all of it.
Hang the wall cabinets first, before the bases are in the way. Hook each box onto the rail, snug the adjustment screws inside the top corners, and check the face for plumb with a 4′ level. Clamp adjacent boxes together with the faces flush, then join them with the IKEA connector screws through the frame sides, two per joint. Add a third screw at the back on anything wider than 24″.
For base cabinets on our built base, the rail still goes on the wall as a tie-back. Screw the cabinet backs to it, then shim any gap between the cabinet side and the next box before adding connector screws. The goal is a run that behaves like one long piece of furniture.
Check the faces with a straightedge across three cabinets at a time. If the front edges are not in a single plane, the doors will never line up no matter how much hinge adjustment you throw at them. Fix it now with shims behind the rail or under the base, not later with the hinges.
Step 5: Panel every end and scribe every filler
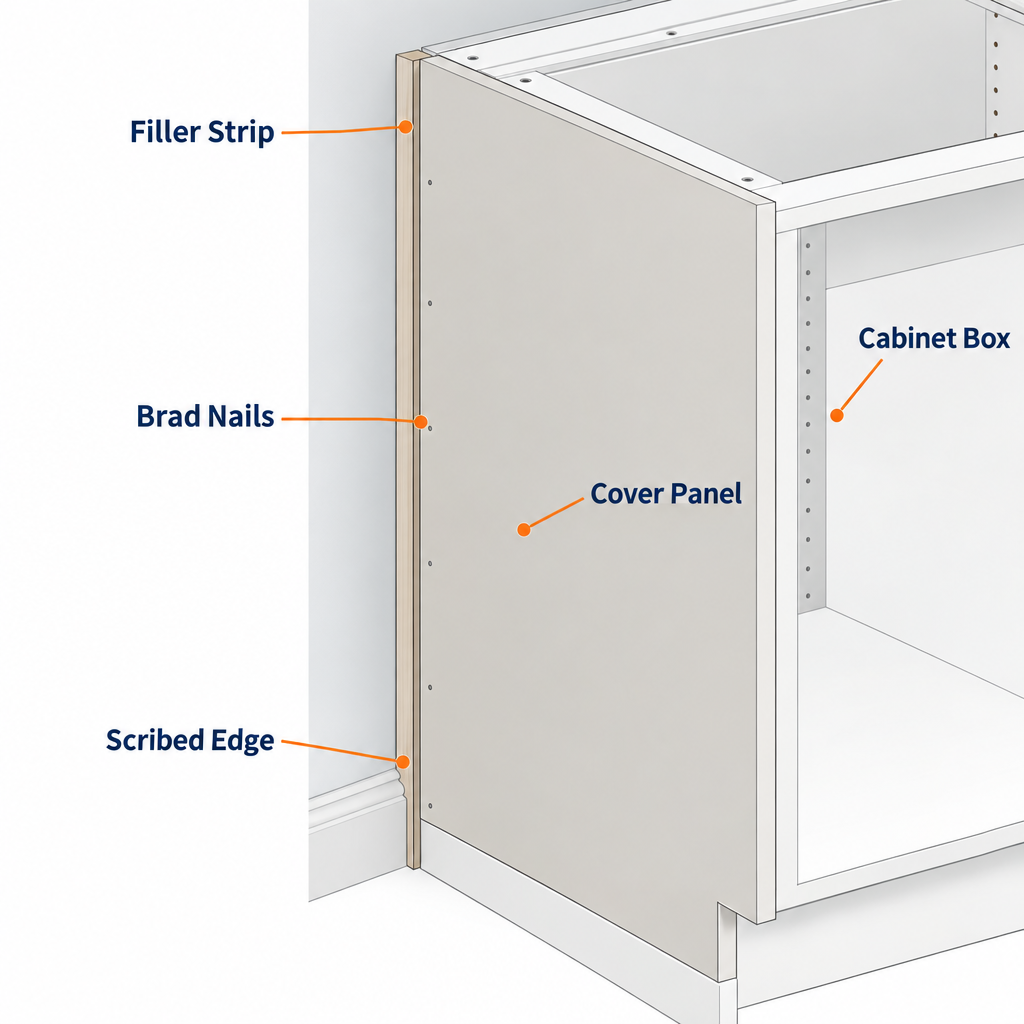
An exposed SEKTION frame side is the single biggest giveaway, and a nearly free fix. Every end a person can see gets a cover panel, finished to match the doors.
IKEA sells FÖRBÄTTRA cover panels in its own finishes, and every third-party front company sells panels in theirs. Common sizes cover a 30″ base, a 40″ wall cabinet, an 80″ or 90″ tall cabinet, and a 25″ x 96″ full-height panel for refrigerator surrounds and ends of tall runs. Buy the next size up and cut down; you can’t stretch a short one.
Attach panels with construction adhesive and a few 1″ screws driven from inside the cabinet, where the shelf pins and drawer slides will hide them. Clamp while the adhesive grabs. The panel should sit flush with the door faces, not the frame, so it projects 3/4″ past the box. That tiny proud edge is what turns a box into cabinetry.
Where a run meets a wall, we need a filler. Never butt a door directly against drywall; the door needs about 1 1/2″ of clearance to swing past the baseboard and door casing, and walls are never straight. Order filler strips 3″ wide in the door finish, and plan 1 1/2″ to 2 1/2″ of filler at each wall.
Scribe the filler to the wall. Hold it plumb against the cabinet face, set a scribe compass to the widest gap, and run it down the wall to trace the wall’s profile onto the filler. Cut just outside the line with a jigsaw, then plane down to it with a block plane. Back-bevel the cut a few degrees so only the front edge touches. A scribed filler with a hairline joint to a wavy plaster wall is the kind of thing people pay custom shops for.
Attach fillers from inside the cabinet with 1 1/4″ screws through the frame side, after gluing a 3/4″ cleat behind the filler so the screws have something to bite. Keep the filler face flush with the door faces.
The same logic applies at inside corners, between a cabinet and a window casing, and above a tall cabinet where it meets the ceiling. If something would otherwise show a raw edge or an open gap, it gets a finished piece scribed to fit.
Step 6: Add crown molding and a light rail
SEKTION has no face frame and no built-in crown profile for the US market, which is why so many IKEA kitchens end with a flat box top and a shadow line. Standard crown molding fixes it in an afternoon.
Glue and screw a nailer strip, 3/4″ thick by 1 1/2″ tall, along the top front edge of the upper cabinets, flush with the door faces. Use 1 1/4″ screws from inside the cabinet top, where a shelf will hide them. The crown then nails to this strip with 18-gauge brads, since there’s no solid wood in the cabinet itself to hold a nail.
Pick a crown size that fits the gap. Under an 8′ ceiling with 40″ uppers, a 2 1/4″ to 3″ crown spans the 2″ gap and lands on the ceiling. With a 9′ ceiling and stacked 30″ plus 20″ uppers, a 3 1/2″ to 4 1/2″ crown fills the 4″. Primed MDF crown costs around $2 to $4 per foot at the home center and takes paint well. If the fronts are a wood finish, order crown from the front company or use a plain flat stock in the same material rather than a fussy profile.
Cut outside corners at 45 degrees on a compound miter saw with the crown held upside down against the fence, the way it sits on the cabinet. Inside corners get a coped joint, which hides the inevitable out-of-square wall. Dry-fit, then glue the miters and nail every 12″.
If the ceiling isn’t flat, scribe the crown’s top edge the same way as a filler, or run a flat 3/4″ cap board to the ceiling and caulk the joint. Painter’s caulk at the ceiling and a filled nail hole every foot are standard practice in custom work, so don’t feel like you’re cheating.
Under the uppers, add a light rail. It’s a strip of 3/4″ x 1 1/2″ matching stock, glued and nailed to the bottom front edge of the wall cabinets, hanging down just far enough to hide an LED strip. Without it, every LED fixture and its wire is visible from the breakfast table. With it, the counters glow and the fixtures disappear.
Step 7: Hardware and the 1/8″ reveal
Hardware is where a lot of IKEA kitchens quietly fail. The free IKEA pulls are fine objects, but they’re recognizable, and the lightweight ones feel it. Spending $10 to $50 per pull on solid brass or steel hardware from Rejuvenation, Emtek, Top Knobs or even the better Amazon brands changes how the kitchen feels every time a drawer opens.
Pick a standard center-to-center size. Most pulls are 96mm, 128mm, 160mm or 192mm; wider drawers look better with longer pulls, and a 30″ drawer front with a 3″ pull looks lost. A simple rule: pulls about one-third the width of the drawer front. Knobs on doors, pulls on drawers is the classic combination and still works.
Drill with a jig. A Kreg cabinet hardware jig or similar costs around $30 to $40 and guarantees that every handle sits in the same spot on every door. Set it once for doors (typically 2 1/2″ to 3″ from the bottom corner on uppers, the top corner on bases) and once for drawers (centered on the front), tape the exit side of each door to stop blowout, and drill with the door off the cabinet on a flat surface.
Now the part that separates a tidy job from a custom one: adjusting the doors. UTRUSTA hinges adjust in three directions. The front screw moves the door side to side, the rear screw moves it in and out toward the cabinet, and the mounting plate slot moves it up and down. We want 1/8″ of gap between every pair of doors and drawer fronts, top to bottom, with all faces in one plane.
Work left to right along the run. Set the first door square to its box, then set each neighbor to a 1/8″ gap using a stack of two business cards or a 1/8″ drill bit as a spacer. Step back ten feet and sight down the run. Any door that’s proud or tipped will show. Drawer fronts on MAXIMERA adjust with the two cams on the front brackets; a quarter turn moves them about 1/16″.
Install soft-close dampers on every door if they didn’t come integrated. The UTRUSTA hinges with built-in soft close are worth the small upcharge, because a kitchen full of silently closing doors is another thing people associate with high-end work.
Pro tip
Adjust doors after the counters are on, not before. Setting a heavy slab tweaks the base run slightly, and every hinge adjustment you made beforehand will need a second pass.
Step 8: Panel the dishwasher and build a hood cover
Nothing says custom like a dishwasher nobody can find. A panel-ready dishwasher accepts a door front from your cabinet line, so it vanishes into the base run. Bosch, Fisher & Paykel, Miele and several other brands sell panel-ready models, and third-party front companies all offer a dishwasher panel in each finish. Order the panel in the same batch as the doors.
The panel needs a cutout or a handle solution that matches the kitchen. Most panel-ready machines are top-control, so the panel is a plain slab and the pull mounts to it like any other door. Mount the panel with the brackets the dishwasher brand provides, then adjust the dishwasher’s leveling legs so the panel sits flush with the drawers on either side.
The same trick works on the refrigerator with a counter-depth or panel-ready model, but the budget jumps fast. A more realistic approach is the fridge surround from Step 1: deep panels on each side and a cabinet above, so a standard stainless fridge looks intentional.
For the range hood, build a cover. A 30″ hood insert or liner from Broan, Zephyr or Cosmo drops into a plywood or MDF box we build to match the cabinets; Broan’s 30″ inserts run around 300 to 380 CFM, while Zephyr and Cosmo offer models in the 400 to 600 CFM range that suit a residential gas range. Frame the box from 3/4″ material, sized to the liner’s cutout plus 1/2″ clearance, and skin the face with a panel in the door finish or a painted shaker-style frame.
Mount the hood box to the wall studs with a French cleat and screw it to the neighboring upper cabinets. Duct it with rigid 6″ or 7″ metal pipe to the outside, never flex duct. A hood cover with a slightly tapered chimney or a flat slab front, flanked by uppers that step to the ceiling, is a focal point that nobody will trace back to a flat-pack store.
Step 9: Counters, lighting and finishing touches
The counter carries more visual weight than anything else in the room, and laminate on custom-looking cabinets undoes all the work. Quartz countertops are the usual pairing for an IKEA build because they’re consistent, tough and available in slab forms that suit both shaker and slab-front kitchens. A 2 cm or 3 cm slab with an eased or mitered edge looks far more expensive than it costs. Have the fabricator template after the cabinets are installed and shimmed, never from the plan.
Add a waterfall edge on an island if the budget allows. It costs an extra slab’s worth of material plus the mitered seam, but it’s a signature of high-end design.
Under-cabinet lighting goes behind the light rail from Step 6. IKEA’s own MITTLED LED strips are decent and plug into a low-voltage driver, so no electrician is needed if there’s an outlet in a cabinet. For a cleaner install, run a hardwired driver to a switch on its own, which does require opening a wall and possibly a permit. Pick warm white, around 2700K to 3000K, so the counters don’t look like a lab.
Finish the small things. Paint or stain the inside edges of open shelving. Install a FÖRBÄTTRA or matching panel on the back of an island so the frames don’t show from the living room. Caulk the joint between the backsplash and the counter. Add felt bumpers on every door, and replace the stock IKEA shelf pins with metal ones if the shelves wobble.
Then clean the inside of every cabinet, because sawdust in a drawer on move-in day is the fastest way to make a new kitchen feel like a project instead of a finished room.
Troubleshooting
| Symptom | Likely cause | Fix |
|---|---|---|
| Doors won’t line up along a run | Cabinet faces not in one plane | Loosen connector screws, shim behind the rail or under the base, re-clamp faces flush, re-tighten |
| 1/4″ or larger gap between filler and wall | Filler not scribed, or wall badly out of plumb | Pull the filler, scribe to the wall profile, plane to the line with a back bevel |
| Crown molding gap at the ceiling | Ceiling dips or wall cabinets not level | Scribe the crown’s top edge, or add a flat cap board and caulk the joint |
| Toe kick shows a gap at the floor | Floor rolls more than the shim allowance | Scribe the kick board to the floor and caulk the bottom edge |
| Drawer front sits proud of the doors | Drawer front cams not adjusted, or slide not seated | Pull the drawer, reseat the slide, turn the front cams until the face is flush |
| Third-party door won’t take the hinge | Wrong hole pattern or 35mm cup drilled at the wrong depth | Check that fronts were ordered for SEKTION specifically; cups should be 1/2″ deep at 7/8″ from the edge |
| Painted DIY doors chipping at edges | No bonding primer, or edges not sanded before paint | Sand to 220, prime with a shellac or bonding primer, two coats of cabinet enamel, cure 7 days before hanging |
| Dishwasher panel sits back from the drawers | Dishwasher legs not adjusted forward | Raise or lower the rear legs so the unit tips slightly forward until the panel is flush |
| Wall cabinet sagging off the rail | Rail screws missed studs | Pull the cabinet, relocate screws into solid studs, add screws at every stud |
| Visible seam where cover panel meets filler | Panel and filler cut from different runs or not flush | Order both from the same batch; shim the panel out to match the filler face |
When to call a pro
Call a licensed electrician for any new circuit, hardwired under-cabinet lighting or a dishwasher that’s not already on its own outlet. Call a licensed plumber or gas fitter if the range, sink or dishwasher moves more than a few inches from where it is now. Call a contractor or structural engineer before removing any wall between the kitchen and another room, even a short one. Hire a countertop fabricator for stone; templating and seams are not a DIY job.
FAQ
Are IKEA cabinets good enough quality to dress up like custom?
Yes. SEKTION frames are melamine-coated particleboard with a 25-year limited warranty, and the MAXIMERA drawers run on Blum-made soft-close slides, the same hardware many mid-range custom shops use. The boxes are not the weak point. The stock fronts, legs and hardware are where the look falls short, and those are exactly the parts we replace.
How much does it cost to make IKEA cabinets look custom?
For a 10×10 kitchen, IKEA’s SEKTION materials typically run $2,000 to $4,000, and buying only the boxes, drawers and interiors without IKEA fronts lands toward the lower end of that range. Third-party fronts add roughly $2,000 to $6,000 depending on material, and panels, fillers, crown, hardware, lumber and lighting add another $800 to $1,500. That lands most projects between $6,000 and $12,000 for cabinetry, which is still well under half of a comparable custom kitchen. IKEA runs kitchen sale events a few times a year; the current Dream Kitchen Event gives IKEA Family members 10% off SEKTION kitchen purchases of $3,000 or more, so time the order if you can.
Do third-party doors void the IKEA warranty?
The warranty covers the IKEA parts you keep: frames, drawers, hinges, shelves. Putting a Semihandmade or Reform door on an IKEA hinge doesn’t change the frame or the hinge. The third-party company warranties its own fronts, typically for 5 to 10 years. Keep the receipts from both.
Can I just paint IKEA’s VEDDINGE or other foil doors?
You can, but it’s the least durable option. Foil-wrapped doors need a bonding primer, and any chip exposes the white foil underneath. A paint-grade MDF front from a third party, or an unfinished IKEA wood door, holds paint far better. If painting is the plan, buy fronts meant for paint.
How long does an IKEA kitchen order take?
In-stock SEKTION frames and IKEA fronts often ship within a week or two, while some fronts and specialty items run six to eight weeks, and third-party fronts usually take four to ten weeks from order. Order the fronts first, then schedule the IKEA delivery so the boxes aren’t stacked in the living room for two months.
Should the toe kick be flush with the doors or recessed?
Recessed. A 3″ setback and 4 1/4″ to 4 1/2″ height is the standard that custom shops use, and it’s what people’s feet expect. A flush toe kick with a baseboard is a furniture-style look that works in some traditional kitchens, but it’s harder to pull off and the base run then needs to be perfectly straight.
What’s the single most effective upgrade if the budget is tight?
Cover panels and fillers. For a couple hundred dollars, every visible frame disappears and every run meets the wall cleanly. Do that, swap the pulls, and adjust every door to a 1/8″ reveal, and even stock IKEA fronts look like somebody who cared installed them.