
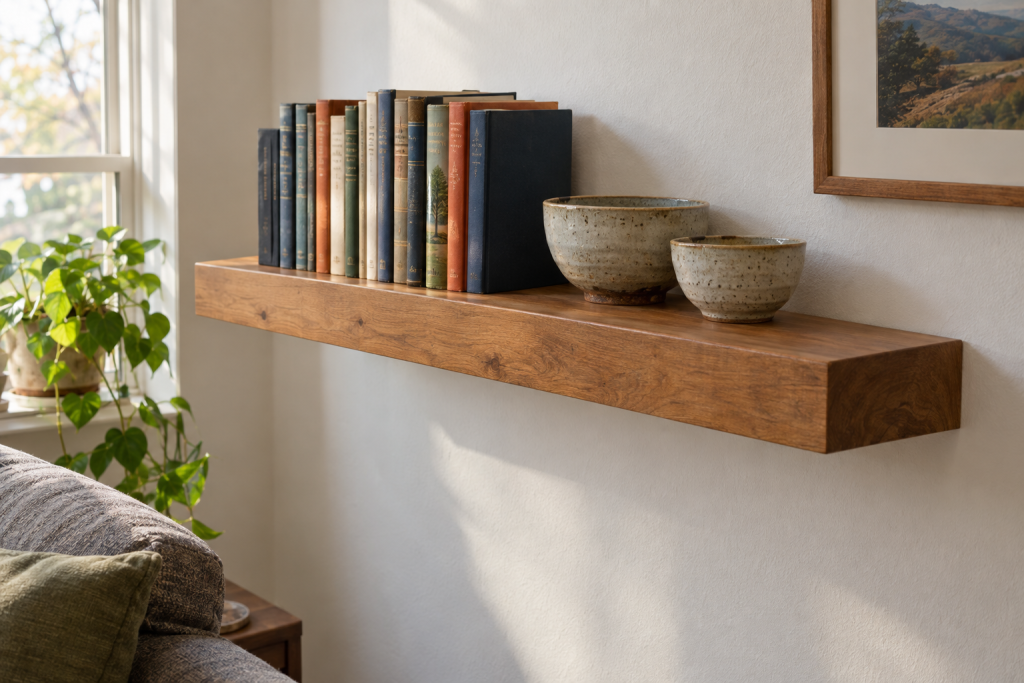
Floating shelves hold serious weight when three things line up: a solid shelf at least 1.5 inches thick, a steel rod bracket, and lag screws driven into wall studs. Get those right and a 36-inch shelf will carry a full row of hardcover books or a stack of stoneware without tilting. Skip any one of them and the shelf starts sagging forward within a few months.
Quick steps: install a floating shelf that holds weight
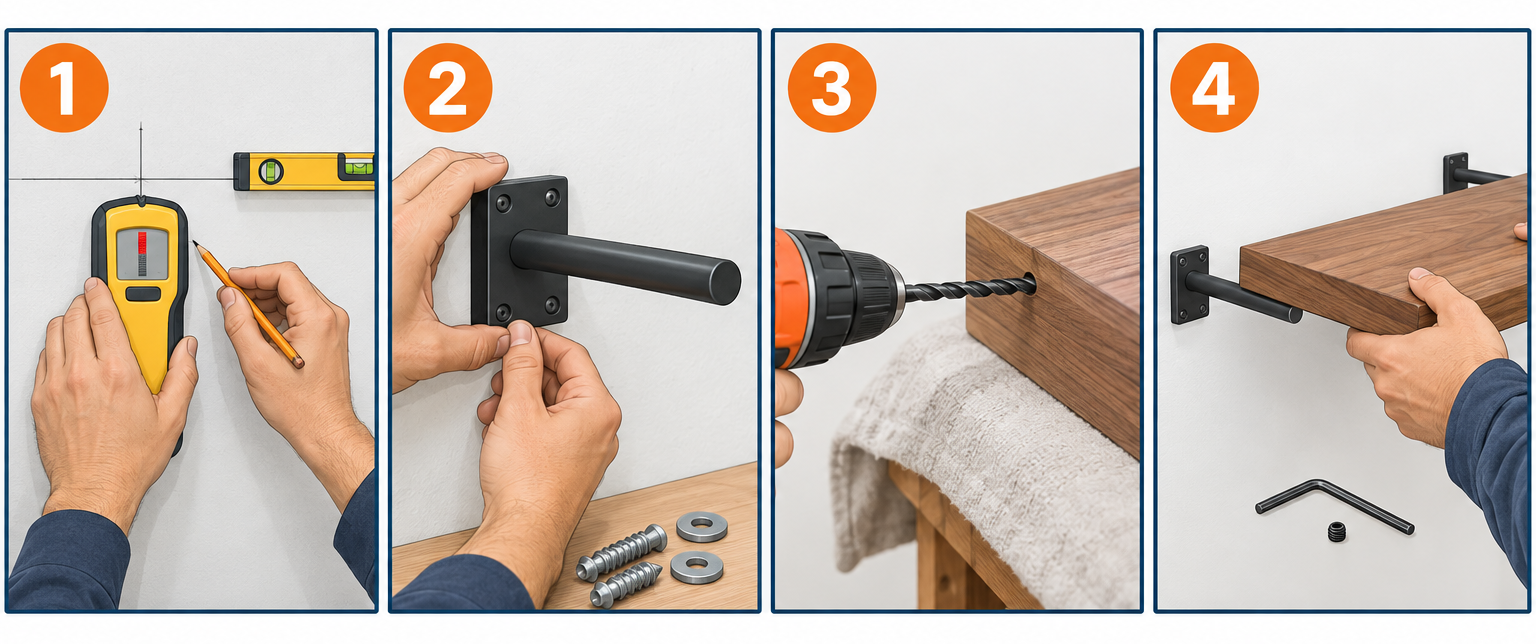
- Find the studs with a deep-scan stud finder and confirm with a small test hole.
- Draw a level line at shelf height and mark where each stud crosses it.
- Pick a welded rod bracket that lands on at least two studs, and the right lag screws.
- Drill pilot holes into the studs, then bolt the bracket on with 1/4″ or 5/16″ lags.
- Check the bracket for level and for plumb, and shim it if the wall bows.
- Drill or verify the rod holes in the shelf, slightly deeper than the rods.
- Slide the shelf over the rods and lock it with set screws or adhesive.
- Load it gradually and check for movement before you trust it.
Tools and materials
- Deep-scan stud finder (Franklin ProSensor 710, Zircon MultiScanner, or similar)
- 24″ or 48″ level, tape measure, pencil, painter’s tape
- Drill/driver and an impact driver or ratchet with 7/16″ socket (for 1/4″ lags) or 1/2″ socket (for 5/16″ lags)
- 1/8″ bit for test holes, 5/32″ pilot bit for 1/4″ lags, 7/32″ for 5/16″ lags
- Brad-point or Forstner bit matching your rod diameter (usually 1/2″, 5/8″ or 3/4″)
- Lag screws, 1/4″ x 3″ or 5/16″ x 3-1/2″, with flat washers, or structural screws like GRK RSS
- Snaptoggle 1/4-20 toggle anchors for any bracket hole that misses a stud
- Welded steel floating shelf bracket (flat bar with rods) sized to your shelf
- Solid wood shelf, 1.5″ to 2″ thick, 8″ to 12″ deep
- Wood shims or washers, wood glue or construction adhesive
- Safety glasses and a dust mask
Calculators for this job
Safety first
Scan the wall for wiring and pipes before drilling, and avoid drilling in the vertical path directly above or below an outlet or switch. If a bit hits something metal or suddenly drops into a void, stop and investigate. Wear eye protection when drilling overhead or into masonry.
How much weight a floating shelf really holds
A floating shelf is a cantilever. Every pound you set on it pushes down at the front and pries the bracket out of the wall at the top. That prying force is what fails first, not the shelf itself.
The math is simple enough to do in your head. A 10-inch-deep shelf with a 20-pound vase sitting 8 inches from the wall puts 160 inch-pounds of twist on the bracket. The same vase pushed back against the wall puts almost none. This is why manufacturers rate shelves for “evenly distributed” loads, and why your real-world capacity depends heavily on where you put heavy items.
Here is what different builds can actually carry, assuming a 36-inch shelf lagged into two studs:
| Shelf and bracket | Realistic load | What that looks like |
|---|---|---|
| Hollow particleboard shelf, plastic wall anchors | 10-20 lbs | A few paperbacks and a photo |
| Hollow shelf, screwed into studs | 25-40 lbs | Light decor, small plants |
| 1.5″ solid pine, 1/2″ rod bracket on studs | 60-90 lbs | A full row of paperbacks |
| 1.75″ solid maple or oak, 1/2″ rod bracket on studs | 100-150 lbs | Hardcover books end to end |
| 2″ solid hardwood, 3/4″ rod bracket on studs | 150-250 lbs | Stacked dinner plates and cast iron |
Hardcover books weigh roughly 20 to 25 pounds per linear foot, so a 36-inch shelf of them lands around 60 to 75 pounds. Eight stoneware dinner plates run about 10 to 12 pounds. A 12-inch cast iron skillet is 6 to 8 pounds on its own.
Two more things cut capacity fast. Depth beyond 10 inches increases leverage without adding support, so a 12-inch shelf should get bigger rods than an 8-inch one. And shelf length matters because the wood between brackets will sag under load: 1.5-inch pine starts to bow noticeably over a 48-inch span, while 2-inch hardwood stays straight.
Choosing a shelf that can take the load
Solid wood beats hollow every time
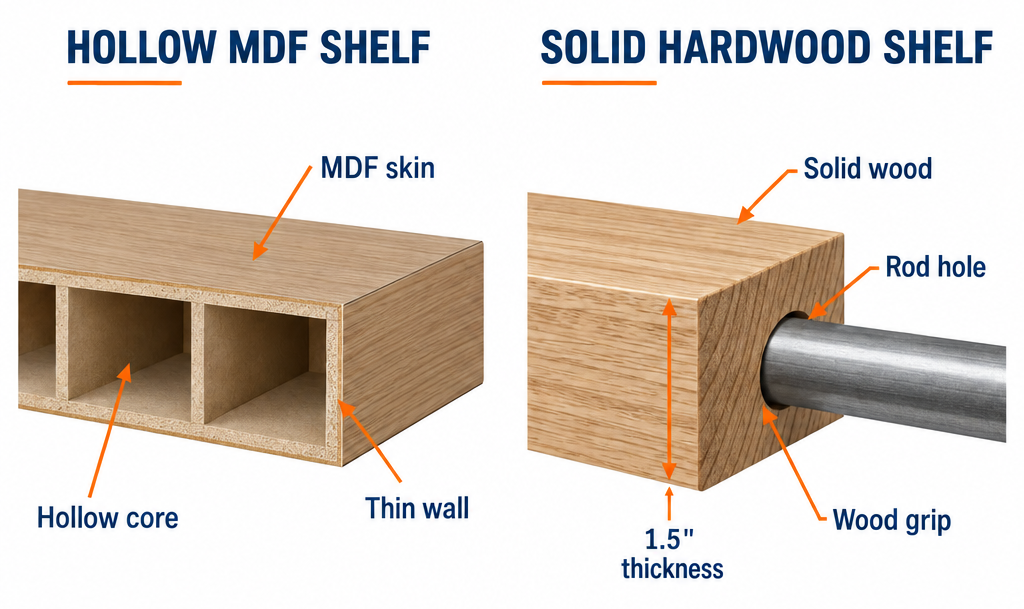
Most of the floating shelves sold in big box stores and online are hollow boxes of MDF or particleboard with a veneer skin. They are light, cheap, and usually rated for 15 to 35 pounds across the whole length, with that rating only valid if you hit studs. They work fine for picture ledges. They do not work for books or dishes.
A solid shelf is a single thick board, or two boards glued face to face, with holes drilled into the back edge for the bracket rods. The wood itself clamps around the rods and resists the twisting force. Solid maple, white oak, walnut and ash are the species most custom shops sell because they are hard, straight-grained and stable. Pine and poplar are softer and cost less, and they still work at 1.5 inches thick if you keep spans under 36 inches.
Thickness and depth that work
Rod brackets need wood on both sides of the rod to grip. A 1/2-inch rod in a 1.5-inch shelf leaves 1/2 inch of wood above and below, which is the practical minimum. A 3/4-inch rod wants a 2-inch shelf. If you are buying a shelf, look for thickness listed as 1.5, 1.75 or 2 inches. Shops that mill their own typically land at 1.75 inches because that is what 8/4 rough hardwood planes down to.
Depth drives both looks and load. Eight inches holds most books and is forgiving on the bracket. Ten inches is the all-around size for kitchens and living rooms. Twelve inches fits dinner plates flat but needs 3/4-inch rods and 2-inch wood to hold the same weight as a 10-inch shelf with 1/2-inch rods.
Wood vs. metal shelves
Steel floating shelves are a single folded or welded piece, usually 1/4 inch to 3/8 inch thick at the edge, with a hidden mounting plate that screws to the wall. They look thin, which is the point, and they hold weight well because the whole shelf is the bracket. The tradeoff is cost and finish: powder-coated black or white is common, and scratches show. They are a good fit for a modern kitchen or a bathroom where thick wood would look heavy.
For most rooms, wood in a natural or light finish is easier to live with and easier to repair. If you want the thin look in wood, a 1.5-inch shelf with a beveled underside reads thinner than it is.
Buying vs. building the blank
A finished 36 x 10 x 1.75-inch maple shelf from a custom shop runs $120 to $250 depending on species, finish and whether the bracket is included. Many shops cut to the inch and ship in a week or two, which is worth it for an odd alcove.
Building your own blank is cheaper. A 2×10 from the lumber yard is actually 1.5 x 9.25 inches, so one 8-foot board makes two 36-inch shelves for under $30. Pick the straightest board on the rack, sight down its length, and reject anything with a twist. Glue two 3/4-inch hardwood boards face to face with Titebond III and clamps if you want a hardwood shelf at 1.5 inches without buying 8/4 stock. Sand to 150 grit, break the edges with a block plane or sandpaper, and finish with hardwax oil like Rubio Monocoat or Osmo before you drill the rod holes.
Choosing the bracket and fasteners
Welded rod brackets
The bracket that holds real weight is a steel flat bar, usually 1/4 inch thick and 1.5 to 2 inches tall, with two to four solid rods welded to it. The bar screws to the wall through countersunk holes, and the rods slide into the shelf. Shelfology, Federal Brace and Sheppard Brackets all sell versions, and welding shops will make a custom one.
Match the bracket to the shelf:
| Shelf depth | Rod diameter | Rod length | Rods per 36″ |
|---|---|---|---|
| 6-8″ | 1/2″ | 5-6″ | 2 |
| 10″ | 1/2″ or 5/8″ | 7-8″ | 3 |
| 12″ | 3/4″ | 9-10″ | 3-4 |
Rods should reach at least two-thirds of the shelf depth. Short rods in a deep shelf let the front tilt down and crack the wood around the hole. Mounting holes in the bar should be spaced so that two of them, at minimum, land on studs. Brackets with slotted holes give you a half inch of wiggle room, which helps when studs are not exactly 16 inches apart.
Individual rod supports
Rockler, Hafele and Lee Valley sell single-rod “blind shelf supports.” Each is one rod with a small plate that screws to the wall, or a rod that threads into a lag-style base. They work for shelves up to 24 inches and around 40 to 60 pounds, with one rod per stud. For anything longer or heavier, the welded bar is stiffer because the rods cannot rotate independently.
Screws that matter
The screw holding the bracket to the stud is the weak link in most installs. Drywall screws are brittle and snap under prying loads. Use lag screws, 1/4 x 3 inches for 1/2-inch rods and 5/16 x 3-1/2 inches for 3/4-inch rods, with a flat washer under the head. Structural screws like GRK RSS 5/16 x 3-1/8 or Simpson SDWS drive faster with a Torx bit and hold just as well.
Three inches gets you through 1/2-inch drywall, through the 1/4-inch bracket bar, and about 2 inches into the stud. That is the minimum. If you have 5/8-inch drywall or plaster, go to 3-1/2 or 4 inches.
Fasteners for walls without wood studs
| Wall type | Fastener | Notes |
|---|---|---|
| Drywall on wood studs | 1/4″ or 5/16″ lag screws | Standard, strongest option |
| Drywall where a hole misses the stud | Snaptoggle 1/4-20 | Hundreds of pounds in tension per anchor in 1/2″ drywall; still use studs for most holes |
| Drywall on metal studs | Snaptoggle through the stud flange, or add plywood blocking | Metal studs crush under lag screws |
| Plaster and lath | 5/16″ x 4″ lag into stud | Drill a clean 1/4″ hole through plaster first to avoid cracking |
| Brick, block, concrete | 1/4″ x 2-3/4″ Tapcon or 3/8″ sleeve anchor | Use a hammer drill and carbide bit |
| Tile over drywall or cement board | Lag or Tapcon into stud behind | Drill tile with a diamond core bit, then switch bits |
Step 1: Find the studs and mark the shelf line
Run a deep-scan stud finder across the wall at the height you want the shelf. Mark each edge of each stud with painter’s tape, then mark the center. Studs are nominally 1.5 inches wide, so if your “stud” reads 3 inches wide, you have found a doubled stud or a pipe, and if it reads 3/4 inch wide, you have found a metal corner bead or a seam.
Stud finders lie often enough that you should confirm with a test hole. Drill a 1/8-inch hole at your marked center, where the bracket bar will cover it later. Wood shavings on the bit mean a stud. White dust and the bit dropping into air mean drywall only. If you hit nothing, probe 3/4 inch left and right with a finish nail until you find the edges, and recenter.
Once you know where the studs are, decide the shelf height. Common numbers: 18 to 20 inches above a kitchen counter for the lowest shelf, 12 to 15 inches between stacked shelves, and 54 to 60 inches to the top of a single living room shelf. Use the level to draw a light pencil line at the height of the bottom of the bracket bar, which is the bottom of the shelf. Mark where each stud center crosses the line.
Pro tip
Hold a strong magnet against the wall and slide it along your line. It will stick to the drywall screw heads, which sit on the stud centers every 12 to 16 inches vertically. This confirms a stud finder reading for free and works on plaster walls where electronic finders struggle.
Step 2: Fit the bracket to the studs
Hold the bracket against the wall with its bottom edge on your line. Check which mounting holes land over stud centers. You want at least two on studs for a shelf up to 36 inches, and three for 48 inches. Slide the bracket left or right until the most holes line up, then check that the shelf will still be centered on the wall or over whatever it sits above.
If the bracket holes do not cooperate, you have three options. Drill new holes in the bracket bar on a drill press with a 5/16-inch cobalt bit, using cutting oil. Use a Snaptoggle in the holes that miss, as long as the end holes hit wood. Or open the wall and add blocking, which is covered below.
Mark each hole position on the wall through the bracket with a pencil or a nail set. Remove the bracket and double-check that the marks are on your level line and that the distance between them matches the bracket.
Step 3: Drill pilot holes
Pilot holes stop lag screws from splitting the stud and make them drive straight. For a 1/4-inch lag in a softwood stud, use a 5/32-inch bit. For 5/16-inch lags, use 7/32 inch. Drill the full depth of the screw, about 3 inches, and keep the bit perpendicular to the wall. A scrap of 2×4 with a hole drilled on a drill press makes a decent guide if your freehand drilling wanders.
For holes that use Snaptoggles, drill a 1/2-inch hole for the 1/4-20 version. Push the metal channel through, slide the plastic cap flush to the wall, and snap off the straps. Leave the bolt out until the bracket goes on.
On plaster walls, drill through the plaster with a 1/4-inch masonry bit first, with the drill set to rotation only, then switch to the wood pilot bit for the lath and stud. This keeps the plaster from chipping out in a saucer around the hole.
Step 4: Mount the bracket
Set the bracket on the wall with the bottom edge on your line. Start the lag screws by hand with washers under the heads, then drive them with a ratchet or an impact driver on a low setting. Alternate between screws so the bar pulls in evenly rather than racking.
Tighten until the washer bites into the bracket and the bar is tight to the drywall. Then stop. Overtightening crushes the drywall behind the bar and can strip the stud, which you will feel as the screw suddenly turning freely. If that happens, back it out, squirt wood glue into the hole, drive a couple of wood matchsticks or a golf tee in, let it set for an hour, and redrill.
Now put the level on the bracket bar and on the rods. The bar needs to be level along its length, and the rods need to be level front to back. Walls are rarely flat, and a bar pulled tight against a wall that bows out at one stud will point the rods slightly up or down. Loosen the screw at the low spot, slip a washer or a wood shim behind the bar, and retighten. Check again. A rod that is off level by 1/8 inch over 7 inches puts the front of a 10-inch shelf 3/16 inch off, which is visible.
Pro tip
Before you tighten everything, slide the shelf onto the rods as a dry fit and set a level on top of it. The shelf exaggerates any error in the bracket, and it tells you whether the shelf’s back edge sits tight to the wall. Shimming is easy now and annoying later.
Step 5: Prepare the shelf
If you bought a shelf and bracket as a set, the holes are already drilled and you can skip to step 6. If you built the shelf or bought the bracket separately, you need holes that match the rods exactly.
Transfer the rod positions from the bracket to the back edge of the shelf. Measure from one end of the bar to each rod center, and measure the rod height from the bottom of the bar. Mark the same points on the shelf’s back edge, with the shelf’s bottom face corresponding to the bottom of the bar. Draw crosshairs with a square.
Pick a bit 1/32 to 1/16 inch larger than the rod. A 1/2-inch rod gets a 17/32 or 9/16-inch bit; a 3/4-inch rod gets a 25/32 or 13/16-inch bit. Brad-point bits track straightest in hardwood. Forstner bits cut cleaner but drift in a handheld drill, so use them on a drill press or in a drill guide.
Depth should be the rod length plus 1/4 inch. Wrap tape around the bit at that depth or use a depth stop collar. Drill straight into the back edge, square to the face and square to the end. A doweling jig or a portable drill guide like the Milescraft DrillMate keeps the hole from wandering. If a hole goes slightly off, it is usually fixable by opening it up another 1/16 inch rather than drilling a new one.
Dry fit the shelf. It should slide onto the rods with firm hand pressure and seat flush against the wall. If it binds, check which rod is fighting by pulling the shelf off and looking for shiny rub marks inside the holes, then relieve that hole slightly with a round file.
Step 6: Install and lock the shelf
Slide the shelf fully onto the rods. Most brackets rely on friction alone, and for shelves over 10 inches deep or in bathrooms where humidity moves the wood, friction is not enough over time.
Two ways to lock it. Many brackets come with set screws: drill a 1/8-inch pilot from the underside of the shelf into each rod location, about 1 inch from the wall, then drive a #8 x 1-1/4-inch screw up through the shelf so it bears against the rod. Or run a bead of polyurethane construction adhesive or epoxy inside each hole before the final push. Adhesive is permanent, so only use it if you never plan to pull the shelf.
A third option is a tiny bead of clear silicone where the shelf meets the wall. It is cosmetic, it seals the gap, and it adds a little grip against vibration.
Step 7: Load test
Set the level on the shelf one more time. Then load it in stages. Put about half the planned weight on, spread along the length and toward the back, and leave it for ten minutes. Push down on the front edge with moderate pressure. The shelf should not move, creak or show a gap opening at the top where it meets the wall.
Add the rest of the weight. Look at the top rear edge again after an hour and again the next day. A hairline gap appearing between the wall and the top back edge of the shelf means the bracket is rotating, which is a fastener problem, not a shelf problem. Unload it and go back to step 4.
Keep the heaviest items closest to the wall. Books against the back, cast iron against the back, vases and lighter things out front. That alone can double what the install tolerates.
Special cases
Adding blocking when the studs are in the wrong place
Sometimes the studs land at 12 and 28 inches on a 36-inch shelf and nothing centers. The fix is blocking, and it is a 90-minute job. Cut out a strip of drywall 4 inches tall and spanning from the center of one stud to the center of the next, at shelf height. Cut a piece of 2×6 to fit tightly between the studs, set it flush with the stud faces, and fasten through the studs into the ends with three 3-inch screws each, or toenail with structural screws if you cannot get at the sides.
Patch the drywall with the piece you cut out, tape and mud the seams, and sand. Now the whole span is solid wood and the bracket can go anywhere. Paint touch-up is the only visible evidence.
If the wall is going to get a thick shelf in a kitchen remodel, add 3/4-inch plywood between the studs before drywall goes up, from 18 to 36 inches above counter height. Future you will be grateful.
Corner floating shelves
A corner shelf is an L or a triangle, and the weak spot is the outside corner. The bracket needs rods going into both walls, which usually means two separate flat bars that meet at the inside corner. Mount the first bar, then hold the second against the adjacent wall and use the shelf as a template to get the rods aligned. One-piece corner brackets exist but require the walls to be a true 90 degrees, which they rarely are.
Tile backsplash
Drill through tile with a diamond core bit for glass or porcelain, or a carbide spade-point bit for ceramic, at low speed with a squirt of water to keep it cool. Once through the glaze, switch to the wood pilot bit and continue into the stud. Do not drive a lag through tile without a clearance hole; the tile will crack. The bracket bar sitting on tile will not seat flat against grout lines, so plan on washers behind the bar to level it.
Metal studs
Commercial buildings and some newer apartments have steel studs, which show up as a stud finder hit with a magnet pull along the whole height instead of just at screw heads. Lag screws strip out of the thin steel. Use Snaptoggles drilled through the stud flange, which clamp onto the steel and hold well, or open the wall and screw a 3/4-inch plywood backer across the studs with #10 self-drilling screws.
Brick and concrete
Use a hammer drill with a 3/16-inch carbide bit for 1/4-inch Tapcons, drilling 1/4 inch deeper than the screw. Blow the dust out with a straw or compressed air before driving. For really heavy shelves, 3/8-inch sleeve anchors in a 3/8-inch hole hold more. Mortar joints are softer than the brick itself, so aim for the brick face when possible. Old soft brick crumbles, and in that case epoxy anchors or longer sleeve anchors are the answer.
Troubleshooting
| Symptom | Likely cause | Fix |
|---|---|---|
| Front edge tilts down under load | Rods too short, shelf too thin, or lag screws only in drywall | Unload; confirm screws hit studs; upgrade to longer rods or thicker shelf |
| Gap opens at top back edge | Bracket rotating on undersized or stripped screws | Replace with 5/16″ lags, repair stripped holes with glue and dowels |
| Shelf will not slide on | Rod holes slightly off or undersized | Open holes 1/32″ at a time with a round file or next bit size |
| Shelf rocks side to side | Bracket bar shimmed unevenly or holes oversized | Reshim; add set screws through the underside into each rod |
| Shelf sags in the middle between rods | Span too long for shelf thickness | Add a center rod on a stud, or shorten the shelf |
| Shelf pulled off the rods | Friction fit only, in a humid room | Add set screws or epoxy in the rod holes |
| Drywall crushed behind bracket | Overtightened lags | Back off slightly, add fender washers behind bar at each screw |
| Screw spins freely in stud | Stripped or hit a knot | Plug with glue and hardwood dowel, let cure, redrill |
| Cracked wood around a rod hole | Hole too close to top or bottom face | Fill with epoxy, clamp, or replace shelf with thicker stock |
When to call a pro
Call a licensed electrician if your test hole reveals wiring in the shelf zone, since relocating or protecting it is not a shelf job. Call a general contractor or finish carpenter if the wall is exterior with no accessible studs, if the shelves need to carry commercial loads like a bar’s liquor display, or if you are opening a wall that could contain plumbing. Shelves on a shared condo wall or a fire-rated wall may need building approval before you cut drywall for blocking.
FAQ
How much weight can a floating shelf hold?
A hollow shelf on anchors holds 10 to 20 pounds. A solid 1.75-inch hardwood shelf on a welded 1/2-inch rod bracket lagged into two studs holds 100 to 150 pounds spread along its length. Weight near the front edge counts roughly double because of leverage, so keep heavy items against the wall.
Can I install floating shelves without studs?
Yes for light decor, using Snaptoggles or similar heavy-duty toggle anchors, which hold far more than plastic plugs. No for books or dishes. Drywall alone cannot resist the prying force a loaded cantilever puts on it, and the anchors will slowly oval out the holes until the shelf tilts.
What thickness should a floating shelf be?
At least 1.5 inches for 1/2-inch rods, and 2 inches for 3/4-inch rods. Anything thinner does not leave enough wood above and below the rod to grip it. Custom shops typically sell 1.75-inch shelves because that is what 8/4 hardwood planes to.
How deep can floating shelves go?
Ten inches is the practical limit for 1/2-inch rods. Twelve inches works with 3/4-inch rods and a 2-inch shelf. Past 12 inches you are into countertop-style supports with steel plates let into the shelf, which is a different bracket system.
How far apart should the rods be?
Every 16 inches, with a rod on each stud, and never more than 8 inches of unsupported shelf hanging past the last rod at each end. A 36-inch shelf needs three rods; a 48-inch shelf needs three or four.
Will floating shelves work in a bathroom or over a stove?
Yes, with a finished solid shelf and set screws rather than friction fit. Humidity and heat move wood, and a friction-fit shelf can creep off its rods over a year. Keep a wood shelf at least 24 inches above a cooktop, and use a steel shelf closer than that.
Can I take a floating shelf down and move it?
If it was friction fit or set-screwed, pull the set screws and work the shelf straight off the rods. Remove the lag screws, patch the holes with spackle, and reuse everything. If you epoxied the rods, the shelf and bracket come off as one unit and you will need to cut the rods to separate them.
Are metal floating shelves stronger than wood?
For the same depth, a 1/4-inch steel shelf with a welded mounting plate holds as much as a 2-inch hardwood shelf on a rod bracket, and it is thinner. The limit on both is the wall fastening, not the shelf. Pick based on the look you want, then install either one into studs.