
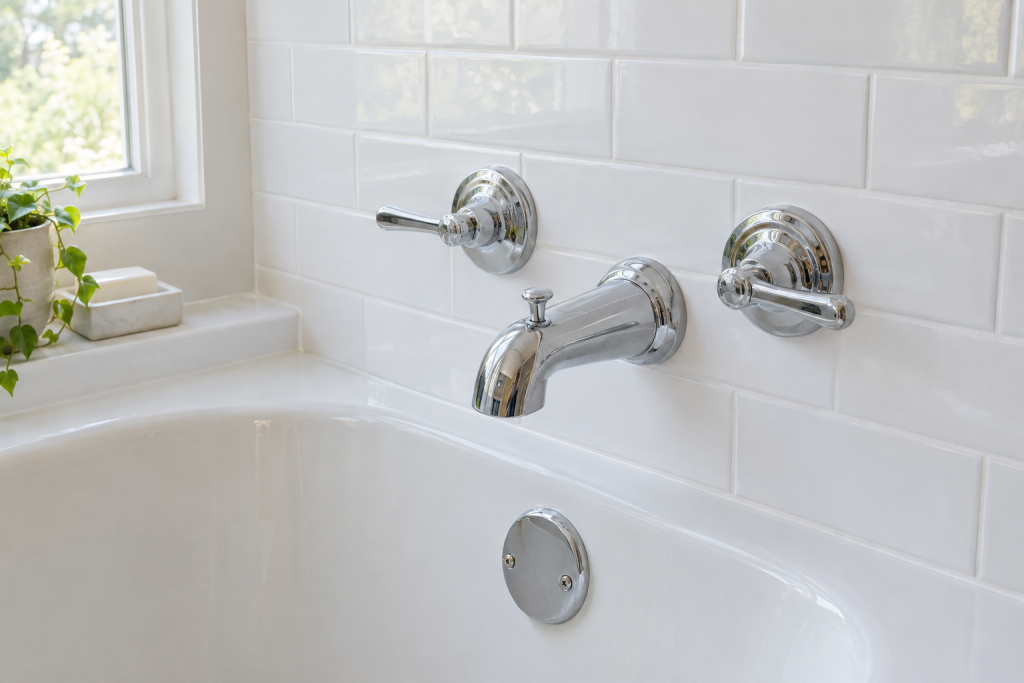
Most bathtub faucet replacement jobs come down to unscrewing or unclipping the old spout, matching the pipe connection behind it, and threading or sliding on the new one. A spout swap takes under an hour with a $20 to $60 part; handles and trim add another hour, and only a cracked or obsolete valve body means opening the wall. This guide covers all three mounting styles so you can finish the job and stop mid-way if it turns into a pro call.
Quick steps: replace a wall-mount tub faucet
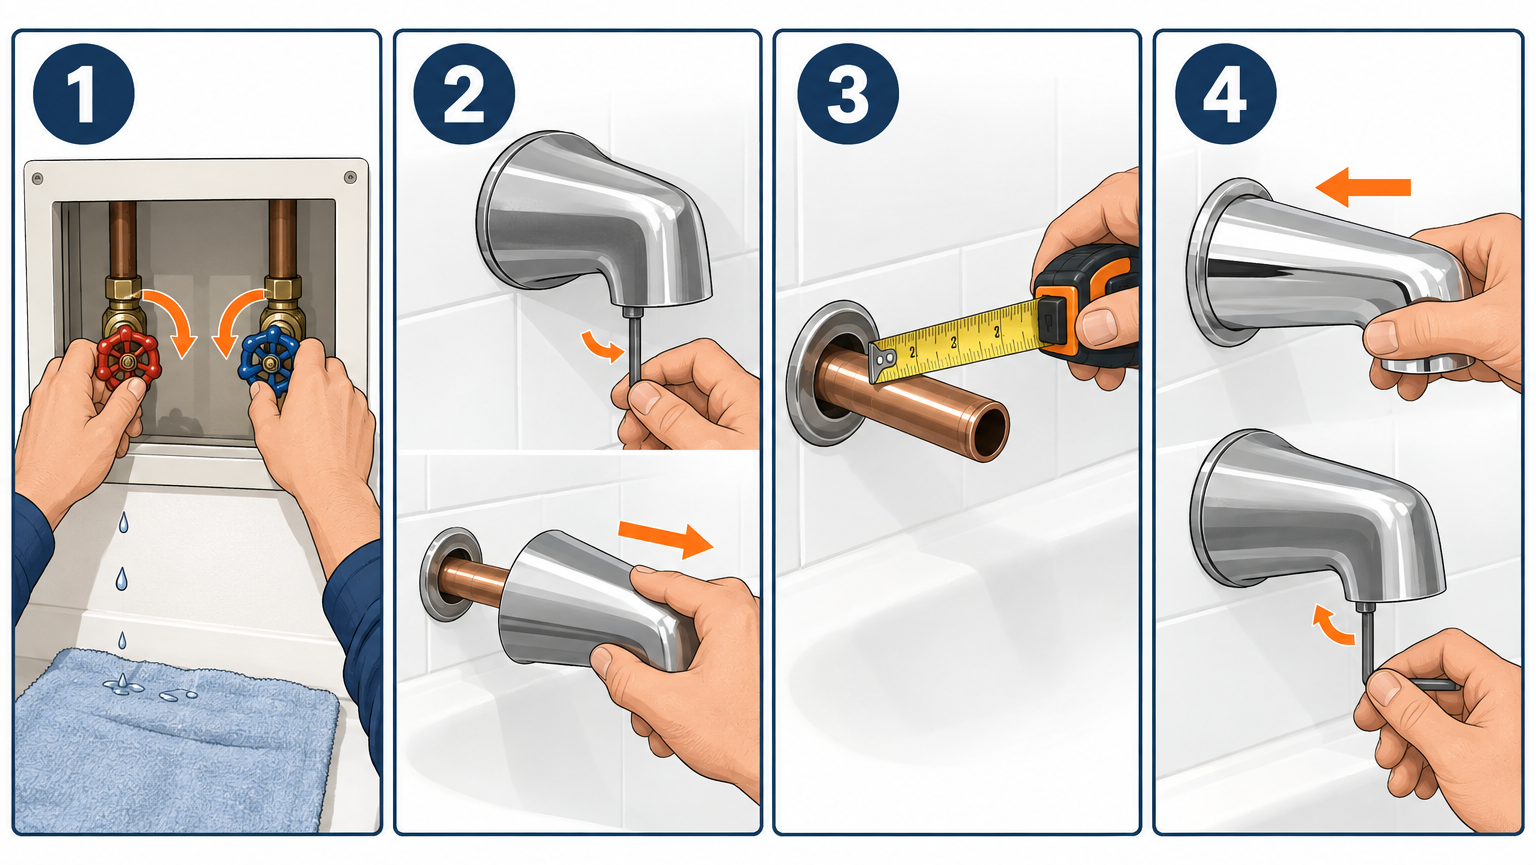
- Shut off the water at the tub stops or the main and open the tub to drain pressure.
- Pull the spout: loosen the set screw underneath or unscrew it counterclockwise.
- Identify the pipe (1/2″ copper stub, 1/2″ threaded nipple or 3/4″ nipple) and measure how far it sticks out.
- Buy a spout that matches the connection and the length; match the finish to the new trim.
- Wrap threads with PTFE tape or tighten the slip-fit set screw onto the copper stub.
- Pull the handle covers, unscrew the handles, remove the old escutcheons and fit the new trim kit.
- Turn the water on slowly and run hot and cold, then run the shower diverter.
- Caulk the top and sides of the spout and escutcheons, leaving the bottom edge open.
Tools and materials
- Replacement tub spout (slip-fit or threaded, match the pipe) with or without diverter
- Trim kit or handle kit matched to your valve brand (Moen, Delta, Pfister, Kohler, American Standard)
- Hex keys (3/32″ and 1/8″ for most slip-fit set screws)
- Phillips and flat screwdrivers
- Adjustable wrench or 10″ channel-lock pliers
- Tape measure
- Pipe wrench or strap wrench for a stuck threaded spout
- PTFE thread tape (1/2″ width) and pipe thread sealant
- 100% silicone bathroom caulk (clear or white) and a caulk gun
- Utility knife and plastic putty knife
- Rag and a towel to pad the tub
- Flashlight
- Shop vacuum (optional, for debris in the tub)
- Deck-mount or freestanding jobs: basin wrench, 1/2″ compression supply lines, mounting hardware from the faucet box
Calculators for this job
Safety first
Shut off the water before loosening any spout or stem, because a stuck spout can snap a corroded nipple and you will not be able to stop the flow. Wear safety glasses when working under the tub deck or cutting old caulk, and never sweat copper near wall framing without a heat shield and a spray bottle on hand.
First, figure out which bathtub faucet you have
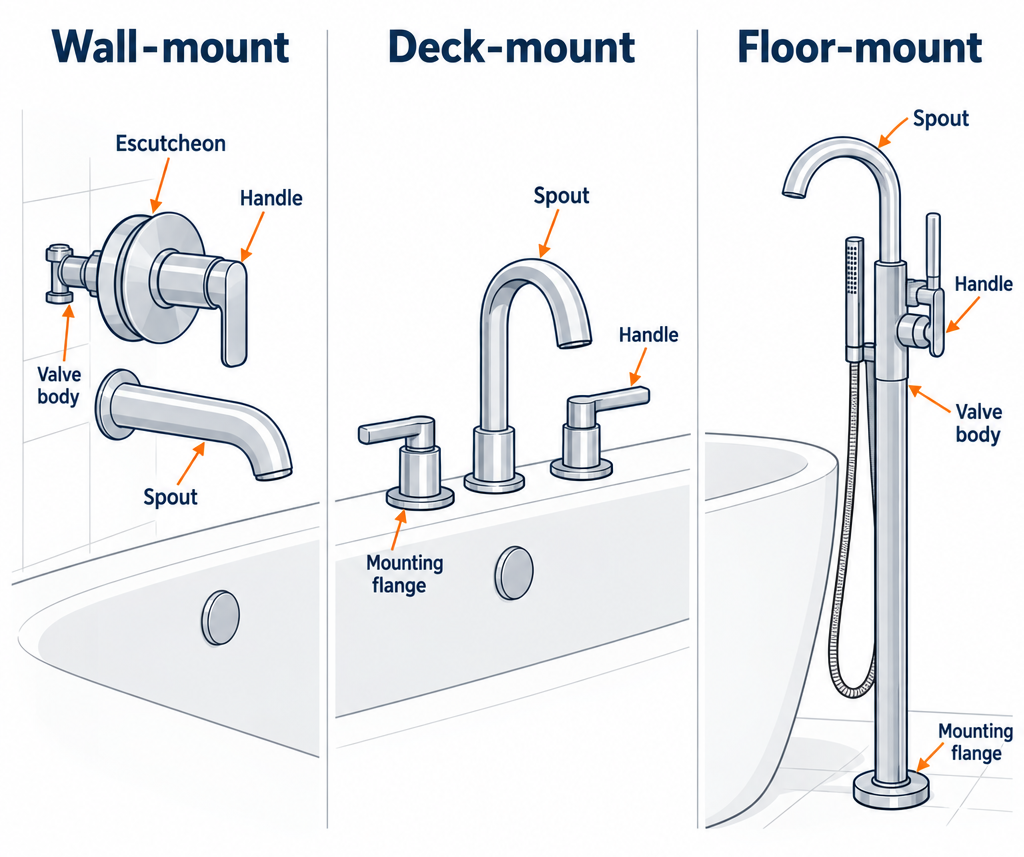
Walk into the bathroom and look at where water comes out and where the handles sit. That tells you which of the three mounting styles you have, and that decides the whole job.
| Faucet type | How to spot it | What you usually replace | Typical part cost |
|---|---|---|---|
| Wall-mount spout with single handle | One lever or knob centered above the spout, often shared with a shower | Spout, handle, escutcheon; valve stays | $25-60 spout, $60-250 trim kit |
| Wall-mount spout with three handles | Hot, diverter and cold handles in a row | Spout, three stems or washers, handles and escutcheons | $20-50 spout, $40-150 handles and stems |
| Deck-mount (Roman tub) | Spout and two handles bolted through the tub rim or a tile deck, usually on 8″ or 16″ centers | Whole faucet set, sometimes the under-deck rough valve | $150-700 |
| Freestanding floor-mount filler | A tall pipe rising from the floor beside a standalone tub, often with a hand shower | Whole filler, mounting flange, sometimes the under-floor rough-in | $350-1,800 |
| Tub-only wall spout, no shower | Spout with no diverter and handles on the wall or tub rim | Spout, handles | $15-40 spout |
Roughly four out of five bathrooms in the US have a wall-mount tub and shower combo, so that is where most of this article lives. Deck-mount and freestanding tubs get their own sections further down.
One more distinction matters. A trim kit is the visible metal: handle, escutcheon plate, spout and showerhead. The valve is the brass body inside the wall that mixes hot and cold. Nearly every bathtub faucet replacement that homeowners do is a trim swap, not a valve swap, and that is why it stays DIY.
Fix the leak before you replace anything
If the only problem is a drip from the spout or a drip at the handle, you probably need a $15 to $40 repair part, not a full tub faucet replacement. Replace the faucet if the finish is pitted, the diverter no longer sends water up to the shower, the spout is cracked, or you are updating the look of the room.
Here is what cures the common leaks on each handle style:
- Single-handle cartridge valves. A drip from the spout while the handle is off means the cartridge is worn. Moen Posi-Temp valves use the 1222 cartridge, Moen Moentrol and standard single-handle valves use the 1225 (most made after about 2010 use the 1255 Duralast), and Delta Monitor 1300 and 1400 series valves made before March 2007 use the RP19804 cartridge, while later ones use the RP46074. Pull the handle, remove the retaining clip, pull the cartridge with the puller sold for that brand, and press in the new one. The same procedure applies whether the valve feeds a tub spout or a shower head, and our guide on replacing a shower cartridge walks through each brand in detail.
- Three-handle compression valves. These use rubber washers and brass seats. A drip from the spout means a washer on the hot or cold stem has failed, or the seat is scored. Shut the water, unscrew the stem with a deep socket (shower valve sockets come in sets for $10 to $15), swap the washer, and replace the seat with a seat wrench if it feels rough under a fingertip.
- Diverter failures. On a pull-up spout diverter, water that keeps coming out the spout while the shower runs means the diverter gate inside the spout is worn. That is not repairable; you replace the spout. On three-handle valves, the center diverter stem is a separate part you can replace.
- Leaks behind the handle. Water running down the wall when the valve is on is usually the stem packing or cartridge O-rings. Tighten the packing nut a quarter turn on a compression valve or replace the cartridge on a single-handle valve.
Test the repair. If the drip stops, you are done for $30. If it does not, or the valve body is weeping around its own seams, move on to the full job.
Step 1: Shut off the water and set up the tub
Look for a pair of stop valves behind an access panel on the wall opposite the faucet, often in a closet or the next room. Many bathrooms have no tub stops at all, so you will turn off the main water valve where the line enters the house. Quarter-turn ball valves move 90 degrees; older gate valves turn clockwise until they stop, then back off a quarter turn so the stem does not seize.
Open the tub faucet to bleed pressure. Run both hot and cold until the flow stops, then push the diverter up and down to drain the shower riser. Leave the handle open.
Close the tub drain and lay a folded towel over the drain area. Dropped screws and set screws disappear down an open drain in a second, and a slipped wrench chips a porcelain tub.
Take a photo of the faucet before you touch it. You will want to see how the escutcheons sat and how far the spout stood off the wall when you buy parts and when you reassemble.
Step 2: Remove the old tub spout
Shine a flashlight under the spout close to the wall. You are looking for a small hole with a set screw inside, usually on the bottom. That hole is the whole story.
Slip-fit spout (set screw present). Loosen the screw with a 3/32″ or 1/8″ hex key. Two to three turns is enough; do not remove it. Then twist the spout gently side to side and pull it straight off the copper stub. If it will not budge, it has corroded to the pipe. Work a drop of penetrating oil into the joint, wait ten minutes, and twist again. Never pry against the wall with a screwdriver, because you will crack the tile.
Threaded spout (no set screw). Grip the spout close to the wall and turn it counterclockwise. A padded strap wrench or a rag wrapped around the spout under channel-locks protects the finish, though on an old spout the finish does not matter. Keep the spout level as it comes off so you do not bend the nipple. If a pipe wrench is needed, put it on the spout body, not the pipe.
Here is where the job goes wrong. If the threaded spout turns and the whole pipe turns with it, you have a nipple that is unscrewing from the fitting inside the wall. Stop and look. If the nipple is brass and comes out clean, that is good news: you will install a new one. If it is galvanized steel and crumbling, you may have a rusted fitting that needs a plumber or an access hole.
Once the spout is off, scrape the old caulk and any gasket residue from the wall with a plastic putty knife. Clean the pipe with a rag. If a slip-fit stub has green or white crust on it, polish it with fine emery cloth until the copper is bright, because the new spout’s O-ring needs a smooth surface to seal.
Pro tip
If a threaded spout spins freely but will not come off, the inner threads have stripped. Slide a hacksaw blade (no frame) inside the spout opening and cut a slit along the top of the brass collar, then pry the collar open with a flat screwdriver. The spout drops off in two minutes and the nipple survives.
Step 3: Identify the pipe and measure it
Now that the spout is off, you can see one of four things sticking out of the wall. Match it to the table and measure before you shop, because the spout aisle has thirty options and only a few fit your pipe.
| What you see | Connection type | What the spout needs | Notes |
|---|---|---|---|
| Smooth 1/2″ copper pipe, no threads | Slip-fit | Slip-on spout with O-ring and set screw | Most common on homes built after 1990 |
| Threaded brass or galvanized pipe, threads at the end | 1/2″ IPS, front threaded | Spout with internal threads at the back | Common on older homes and most three-handle setups |
| Short pipe with threads right at the wall | 1/2″ IPS, rear threaded | Spout threaded at the wall end | Nipple length is critical here |
| Larger threaded pipe, close to 1″ outside diameter | 3/4″ IPS | 3/4″ spout or a 3/4″ x 1/2″ brass bushing | Found on some Kohler, Symmons and older American Standard valves |
| Copper pipe with a brass adapter soldered on | Threaded adapter | Treat as 1/2″ IPS | Do not twist hard; the solder joint is in the wall |
Measure the length of pipe from the finished wall surface to the end of the pipe. Write it down. Each spout’s instruction sheet lists an acceptable pipe length range, and the ranges are not interchangeable between brands or even between models from the same brand.
For slip-fit spouts the copper stub typically needs to stand somewhere between about 1 and 2 inches past the wall. Too short and the set screw misses the pipe. Too long and the spout will not seat against the wall. For threaded spouts, a 1/2″ brass nipple of the right length can be swapped in cheaply: a 2-1/2″ nipple costs around $3 and a 4″ nipple around $4 at any hardware store, and galvanized is never the right choice for this spot because it rusts and binds.
Also check whether you need a diverter. If a shower head shares the valve, you need a spout with a pull-up diverter (sometimes called a diverter spout). If the tub has no shower or the diverter is in the valve handles, buy a non-diverter spout. A diverter spout on a tub with no shower will not hurt anything, but a non-diverter spout on a tub and shower combo leaves you without a shower.
Universal spouts exist. Danco, Moen and Delta all sell “universal” or “combo” spouts that come with both a threaded adapter and a slip-fit insert, and these run $25 to $45. They bail you out if you measured wrong, but a dedicated spout matched to your pipe sits more securely and looks cleaner.
Step 4: Install the new spout
Dry fit first. Slide or thread the new spout on without tape or sealant and confirm that it reaches the wall, hangs level and sits flat. If a threaded spout stops with the opening pointing sideways when it is tight, the nipple is the wrong length. Adjust by changing the nipple, never by backing the spout off more than a quarter turn.
Slip-fit install. Check that the O-ring inside the spout is seated and lightly lubricated with the silicone grease supplied (plumber’s grease from a tube works too). Push the spout straight onto the copper until it bottoms out against the wall. Rotate it so the set screw hole faces straight down, then tighten the set screw until it bites the pipe plus a quarter turn. Overtightening cracks the brass collar on cheaper spouts and dents the copper so the O-ring can no longer seal.
Threaded install. Wrap PTFE tape three or four times clockwise around the nipple threads as you look at the pipe end, so the tape tightens rather than unwinds as the spout screws on. A thin smear of pipe thread sealant over the tape is belt and suspenders. Thread the spout on by hand until it is snug, then finish with a rag-wrapped wrench until the spout points straight down and sits against the wall. Expect three to five full turns of engagement.
Do not caulk yet. You want to run water and check for leaks at the joint first, and caulk would hide a slow drip.
Pro tip
Keep the spout opening dead center over the drain when you tighten. A spout that points two degrees off looks crooked from across the room, and it is the first thing a buyer notices during a showing.
Step 5: Replace the handles and trim
The spout is the cheap half of the job. Handles and escutcheons are where a bathtub faucet replacement starts to change the look of the room, and where you must match the valve brand.
Find the brand first. It is often stamped on the escutcheon, printed on the cartridge under the handle, or embossed on the valve body visible through the escutcheon hole. Moen Posi-Temp, Delta MultiChoice and Monitor, Pfister 0X8 and Kohler Rite-Temp cover most homes built since the mid 1990s. A trim kit from the valve’s own brand bolts on in an hour. A trim kit from a different brand does not fit, full stop, so there is no mixing a Delta handle onto a Moen valve.
Single-handle valves
- Pry off the decorative cap on the handle with a fingernail or a flat screwdriver wrapped in tape.
- Remove the handle screw. Moen typically uses a Phillips screw; Delta uses a 1/8″ hex set screw on the side of the lever.
- Pull the handle straight off the stem. If it is stuck, a handle puller ($10) does the job without cracking the handle.
- Unscrew the escutcheon plate. Two long screws thread into the valve body. Note the plastic sleeve or stop limiter behind it.
- Clean the wall and old caulk.
- Set the new temperature limit stop if the kit includes one. On Moen Posi-Temp, that is the toothed plastic ring; turn it a notch or two toward cold if the old setting ran hot. Code limits delivery to 120°F.
- Install the new escutcheon with the supplied foam gasket, snug the screws evenly, then fit the handle adapter and handle.
Delta MultiChoice valves let you swap the cartridge to change function, so if you want a single-handle valve to go from pressure balance to thermostatic, you change the cartridge and the trim kit rather than the valve. That is the main reason that valve is so popular with remodelers.
Three-handle valves
Three-handle setups are mostly compression stems from Pfister, Gerber, Central Brass, Sterling or Delta’s older lines, and the valve bodies last decades. Danco and BrassCraft sell replacement stems and universal handle kits by brand, which means you can give a 1978 valve new chrome handles for under $60.
- Pop the index caps, remove the handle screws, and pull the three handles.
- Unscrew or pull the three escutcheon tubes and plates. Some thread onto the stems; some are held by a sleeve nut.
- Unscrew each stem with a shower valve socket. Note which stem is hot, cold and diverter; the diverter is the center one and is longer.
- Replace washers and seats while you are in there, or replace the full stems if the threads are worn.
- Thread the stems back in, snug with the socket, and install the new escutcheons and handles.
If the stems are a brand you cannot identify, take one to a plumbing supply counter, not a big box store. A counter person can match stem number and broach count in a minute, and the stem will cost $15 to $30.
Shower head and arm
If the trim kit includes a shower head, swap it now while the water is off. Unscrew the old head with a padded wrench, clean the arm threads, wrap fresh tape clockwise, and thread on the new head. The 1/2″ IPS shower arm thread is universal, so any head fits any arm.
Step 6: Replace the valve body only if you have to
Replace the valve itself when the body is cracked, the cartridge seat is so scored that a new cartridge still drips, the brand is dead and no trim is available, or you are converting from three handles to a single handle. That last one is common in a remodel because the single-handle trim covers the old handle holes with a large remodel plate.
Valve replacement is the point where the job becomes plumbing. You will cut an access hole, either through the back wall (ideal, because it can be patched with drywall and a panel) or through the tile surround (which means breaking tile). The valve connects to 1/2″ copper, CPVC or PEX supply lines plus a 1/2″ shower riser and a 1/2″ tub drop to the spout.
The sequence is: shut the water, cut the old supply lines, pull the old valve, mount the new valve to blocking at the depth the plaster guard calls for, connect supplies with push-fit fittings (SharkBite or similar run $8 to $15 per fitting), PEX crimp or solder, connect the riser and tub drop, pressure test with the plaster guard still on, then close the wall and install trim.
Two things trip people up. First, the valve depth. Every rough-in valve has a plaster guard marking the minimum and maximum distance from the center of the valve to the finished wall surface. Get that wrong by a half inch and the trim either will not reach the valve or sits proud with screws showing. Second, codes in most US jurisdictions now require a pressure-balance or thermostatic anti-scald valve on every tub and shower, so you cannot replace an old two-handle valve with another plain two-handle valve.
Many cities require a plumbing permit for a valve swap because it alters the supply piping. Call your building department before you cut. If you are not confident soldering inside a stud bay, this is the step to hand off; a plumber charges $400 to $900 for the valve swap, access included, and the trim goes on top afterward.
Remodel plates make a conversion easier. Moen, Delta and Pfister all sell oversized escutcheons sized to cover the footprint of a three-handle valve so you do not retile. Measure the width across the outer handle holes before you shop; most remodel plates cover a span of 10 to 13 inches.
Replacing a deck-mount (Roman tub) faucet
Deck-mount bathtub faucets sit on the tub rim or a tiled deck and come in two pieces: a rough-in valve under the deck and the visible trim on top. Replacing the trim alone is easy if the rough-in brand still matches what you buy. Replacing the whole thing is a half-day job and needs access from below or from an access panel.
Measure the spread first. The spread is the distance from the center of the hot handle to the center of the cold handle. Standard Roman tub faucets are adjustable between 8″ and 16″ centers, and the holes are usually 1-1/4″ to 1-3/8″ in diameter. Fixed-spread faucets exist, so note the distance between all three hole centers.
How to replace the trim only
- Shut off the water and open the faucet to drain.
- Remove the handle caps and screws and pull the handles off the valve stems.
- Unscrew the handle flanges, which are usually threaded onto the valve body.
- Lift off the spout. Most pull up after a set screw at the back is loosened.
- Clean the deck, fit the new gaskets, and install the new spout and handle flanges.
- Fit the handles and test.
Delta uses the R2707 rough-in for most of its Roman tub lines, and the trim kits list which rough they fit. Moen and Kohler follow the same split, so the model number on the old trim will tell you whether the rough underneath is still current.
How to replace the whole faucet
Get under the deck. On a drop-in tub with a tile deck there is normally an access panel in a cabinet or on an adjacent wall. A whirlpool tub always has a panel for the pump, and the faucet rough is usually reachable from the same spot.
- Shut off the water and disconnect the two supply lines from the rough valve with a basin wrench or an adjustable wrench. Have a bucket ready for the water in the lines.
- Disconnect the flexible hoses running from the valve to the spout and the hand shower if there is one.
- From the top, remove the handles, flanges and spout. From below, unscrew the mounting nuts on the valve bodies and lift the pieces out.
- Clean the deck and check that the new faucet’s hole size and spread work. If you need a larger hole in a tile deck, a diamond hole saw with water handles it; in an acrylic rim, a standard hole saw works.
- Set the new valve bodies through the holes with their gaskets, tighten the mounting nuts from below until the bodies cannot rotate, and connect the spout hose.
- Connect supply lines (1/2″ compression flexible connectors, 12″ to 20″ long, around $8 each) and the hand shower hose.
- Install the trim on top, turn the water on and check every connection with a dry paper towel.
A Roman tub spout without an O-ring seal under the base is a leak waiting to happen, because splash water runs down the hole into the deck cavity. Use the gasket supplied and a thin bead of silicone under the base on a tile deck.
Replacing a freestanding floor-mount tub filler
A freestanding tub filler is the most expensive bathtub faucet type and the one with the least margin for error, because the rough-in sits under the finished floor. The good news is that if the old filler’s rough-in box is in good shape and the new filler uses the same brand’s rough, you only remove the column and install the new one. The bad news is that brands are not interchangeable below the floor.
Check the rough-in first. Pull off the floor flange cover at the base of the old filler. You should see a mounting plate bolted to the subfloor and two 1/2″ supply connections, either threaded or sweat. The brand is usually stamped on the plate.
Swapping the filler column on an existing rough
- Shut off the water at the stops under the floor or at the main.
- Lift the decorative floor cover and loosen the set screws holding the column to the rough-in.
- Disconnect the hand shower hose from the column.
- Lift the column straight up and off. It is heavy, often 15 to 25 pounds, so have a helper hold the tub side.
- Check the O-rings or gaskets on the new column’s supply tubes and grease them.
- Lower the new column onto the rough-in, align it so the spout clears the tub rim, and tighten the set screws.
- Connect the hand shower hose, turn on the water and run both hot and cold for a minute.
Replacing the rough-in too
If the brand changed, you need access to the pipes under the floor, which means the floor framing is exposed from below (basement or crawl space) or you open the finished floor. A new rough-in box bolts to blocking between the joists with the supply stub-ups centered where the column will land, which is typically 4 to 6 inches from the tub rim and lined up with the tub’s center, though you should set it to the spec sheet for your filler.
The rough-in needs water supplies of at least 1/2″ and benefits from 3/4″ runs, because fillers deliver far more than a sink faucet and starved supplies make the tub fill slowly. The mounting plate has to be dead level, or the column leans and the spout misses the tub.
This is a job most homeowners hand off. The combination of under-floor access, a finished floor that cannot be patched invisibly and a $700 fixture is a bad place to learn. If you are planning a bathroom remodel for small bathrooms, this is also where you decide whether a freestanding tub actually fits, because the filler needs several inches of floor space behind or beside the tub that a tight room often does not have.
Pro tip
Before you tighten anything on a freestanding filler, fill the tub halfway and sit in it. Then look at where the spout lands. Set the column so the stream lands roughly a third of the way in from the near rim, not at the drain, or splashing on the far wall becomes a daily annoyance.
Step 7: Test, caulk and finish
Turn the water back on slowly. Open the main or the stops a quarter turn, listen for air bleeding at the open faucet, then open the valve fully once water runs steady. Air hammering through a closed faucet can pop a loose connection.
Run cold for 30 seconds, then hot, then both. Check these spots with a dry paper towel, which shows a single drop that a finger would miss:
- Around the spout where it meets the wall, with water running and with it off
- Under the spout at the set screw hole
- Behind the handle escutcheon, which means watching the wall below the valve
- Any access panel or under-deck connections you disturbed
Pull the diverter up. The spout should drop to a dribble within two seconds and the shower head should flow full. A diverter that passes a steady stream from the spout while the shower runs means the spout is not seated, the nipple is too short, or the new spout is a non-diverter model.
Once everything is dry, caulk. Use 100% silicone, not acrylic latex, because silicone stays flexible as the spout warms and cools. Run a thin bead along the top and both sides where the spout meets the wall and around the top and sides of each escutcheon. Leave the bottom edge of every piece open so any water that gets behind the trim can drain out into the tub instead of into the wall. Smooth with a wet fingertip and let it cure for 24 hours before the first shower.
Put the plaster guard, spare screws and the instruction sheet in a bag taped inside the access panel. The next person who works on the valve will thank you.
Bathtub faucet replacement cost
These are realistic numbers for US homes in 2024 and 2025. Plumber labor runs $75 to $150 per hour in most markets and higher in large coastal cities, and many plumbers charge a minimum service call of $100 to $200 regardless of job size.
| Job | Parts (DIY) | Pro labor | DIY time | Total with a pro |
|---|---|---|---|---|
| Wall spout only | $15-60 | $100-200 | 30-60 min | $125-260 |
| Spout plus single-handle trim kit | $80-300 | $150-300 | 1.5-3 hr | $250-600 |
| Spout plus three-handle stems and trim | $60-200 | $150-350 | 2-4 hr | $225-550 |
| Three-handle to single-handle valve conversion | $150-450 valve and trim | $400-900 | Half day to full day | $600-1,400 |
| Valve replacement, same configuration | $100-300 | $350-800 | Half day | $450-1,100 |
| Deck-mount Roman tub trim only | $150-500 | $150-300 | 1-2 hr | $300-800 |
| Deck-mount faucet and rough-in | $250-800 | $300-600 | 3-5 hr | $550-1,400 |
| Freestanding filler column swap | $350-1,800 | $200-400 | 1-2 hr | $550-2,200 |
| Freestanding filler with new rough-in and floor work | $500-2,000 | $600-1,500 | Pro job | $1,100-3,500 |
A few things move these numbers. Brass spouts with a diverter cost about double a plastic-bodied spout with a plated finish, and they last three times as long. Trim kits in chrome are the cheapest finish in every brand; brushed nickel and matte black add 15 to 30 percent and brushed gold or champagne bronze often adds 40 to 60 percent. Lifetime-warranty brands cost more up front, but a cartridge or a diverter that fails in year eight is free, which matters on a part that gets used every day.
Big box stores stock the common spouts and trim kits, but plumbing supply houses carry stems, seats and obsolete trim that the big stores never will. If the counter person can see your old stem, the match is nearly always available the same day or in two days.
Matching the finish across the bathroom
Finish mismatch is the most visible mistake in a tub faucet replacement, and it is hard to undo because every brand’s “brushed nickel” is a slightly different color. Within one brand the finish is consistent across the line, so a Delta Champagne Bronze tub spout matches a Delta Champagne Bronze sink faucet. Across brands, do not count on it.
| Finish | How brands name it | Matching risk | Notes |
|---|---|---|---|
| Polished chrome | Chrome, Polished Chrome | Low | Universal; every brand’s chrome matches every other brand’s chrome |
| Brushed nickel | Brushed Nickel, Spot Resist Brushed Nickel, SpotShield Brushed Nickel | Medium | Moen’s warms slightly, Delta’s reads cooler; mix brands and you will see it |
| Matte black | Matte Black | Medium | Black looks the same across brands but wears differently; cheaper coatings scratch to silver |
| Brushed gold | Champagne Bronze (Delta), Brushed Gold (Moen), Vibrant Brushed Moderne Brass (Kohler), Brushed Gold (Pfister) | High | Tones range from pink-gold to yellow; never mix brands |
| Oil rubbed bronze | Oil Rubbed Bronze, Venetian Bronze, Mediterranean Bronze | High | Each brand’s is a different shade of brown; even the same brand’s two names differ |
| Stainless | Stainless, Arctic Stainless, Vibrant Stainless | Medium | Close to brushed nickel but slightly greyer |
If the shower head, tub spout and handle all come from one trim kit, the finish problem disappears. If you are only replacing the spout, buy it from the same brand and finish name as the existing trim. If you cannot find that, chrome is the only safe cross-brand choice.
Glass and tile shift how a finish reads. Matte black against white subway tile looks sharp; matte black against a dark glass shower enclosure disappears. Hold the sample up in the actual bathroom light before buying all four pieces, because showroom lighting makes gold finishes look two shades warmer than they will at home.
Chrome and physical vapor deposition (PVD) finishes last the longest. PVD is what Moen’s Spot Resist and Delta’s Brilliance finishes use, and a PVD brushed nickel will outlast a painted or powder-coated black finish on a cheap spout by many years. Expect painted finishes to chip at the set screw hole and the spout lip within three to five years in a hard-water house.
Mistakes that cause callbacks
These are the errors plumbers get called to fix after a homeowner’s bathtub faucet replacement. Each is avoidable.
Buying the spout before pulling the old one. You cannot know slip-fit versus threaded from the outside. Pull it, measure, then shop. One trip to the store instead of three.
Sealing the bottom edge of the spout with caulk. Water that gets behind the spout has nowhere to go, pools in the wall and rots the stud. Caulk top and sides only.
Using the spout to fix a stripped nipple. If the nipple threads are damaged, a new $4 brass nipple is the fix. Forcing a spout onto bad threads leaks in a week.
Overtightening a slip-fit set screw. The screw only needs to grip the copper. Crushing it dents the pipe and the O-ring no longer seals, which shows up as water dripping from the set screw hole while the shower runs.
Mixing trim brands with the valve. A Moen trim does not fit a Delta valve. The handle will not seat, the escutcheon screws miss, and the stop limiter will not engage.
Ignoring the pipe length range. A spout installed on a pipe that is a quarter inch too long never seats against the wall, and that gap is where water goes.
Skipping the pressure test on a valve swap. Water the wall before you close it. Turn on the supply with the plaster guard still in place and check every joint for twenty minutes.
Setting the temperature limit stop to full hot. The limit stop exists to keep a child from getting 140°F water. Set it so full hot delivers 120°F at the spout, measured with a kitchen thermometer in a cup.
Caulking before testing. You cannot see a slow leak under a bead of silicone. Run water, dry the joints, wait an hour, then caulk.
Reusing a galvanized nipple. It will rust the new spout from the inside and seize so badly that the next replacement means cutting it out.
Troubleshooting
| Symptom | Likely cause | Fix |
|---|---|---|
| Water drips from the set screw hole while shower runs | O-ring not sealing on the copper stub | Pull spout, clean pipe with emery cloth, grease O-ring, reinstall without overtightening the screw |
| Threaded spout points sideways when tight | Wrong nipple length | Swap to a 1/2″ brass nipple a half inch shorter or longer |
| Spout will not seat flush to the wall | Pipe too long for the spout | Cut copper stub back 1/4″ at a time, or install a shorter nipple |
| Shower runs but spout still pours a stream | Diverter gate worn, non-diverter spout installed, or spout not fully seated | Replace with a diverter spout and push fully onto pipe |
| Shower only trickles with diverter up | Low pressure from clogged head or restricted valve, not the spout | Soak shower head in vinegar; check for debris in the cartridge |
| Water runs down the wall from behind the escutcheon | Stem packing, cartridge O-rings or missing escutcheon gasket | Replace cartridge or packing; reinstall escutcheon with foam gasket |
| Handle turns but water stays on or off | Stripped handle broach or cartridge stem | Replace handle adapter; if the stem is stripped, replace cartridge |
| Hot and cold are reversed after a cartridge swap | Cartridge installed rotated 180 degrees | Pull cartridge, rotate and reinstall (Moen 1222 and 1225 both allow this) |
| New faucet whistles or hammers | Partially open stop valve or air in the lines | Open stops fully; run all faucets in the house for a minute |
| Spout drips for a minute after shutoff | Normal drain-down of the shower riser and spout | No fix needed if it stops within a minute; longer means a weeping cartridge |
| Deck-mount spout leaks under the deck | Missing base gasket or loose mounting nut | Reseat gasket, tighten nut from below, add silicone under the base |
| Freestanding filler leans | Mounting plate not level or set screws loose | Shim the plate; tighten set screws evenly |
| Tub fills slowly after new filler | Supply lines too small or stop valves partly closed | Open stops; upgrade runs to 3/4″ if the filler spec calls for it |
When to call a pro
Call a licensed plumber when the nipple or fitting inside the wall breaks off, when the valve body itself is cracked or weeping, when there is no access and tile has to come off to reach the valve, or when a freestanding filler needs a new rough-in under a finished floor. A valve swap that alters supply piping usually needs a permit, and any wall that shows soft drywall, mold or a stained ceiling below the tub needs the leak traced before new trim goes on.
FAQ
Can I replace just the tub spout and leave the handles?
Yes. The spout connects to its own pipe and has nothing to do with the valve. Match the pipe connection and the finish to the existing handles, and you can swap it in half an hour.
How do I know if my spout is slip-fit or threaded?
Look underneath the spout near the wall with a flashlight. A small hole with a hex set screw means slip-fit. No hole means threaded. A few spouts with a hole are also threaded through an adapter, but the set screw still tells you how it comes off.
Can I replace bathtub taps without turning off the water?
No. Even a spout-only swap is risky because a corroded nipple can snap and leave an open 1/2″ pipe spraying full pressure. Handles and stems absolutely require the water off, because removing a stem opens the supply.
My house has three handles. Can I switch to a single handle without retiling?
Usually. Buy a single-handle rough valve and a remodel trim kit with an oversized escutcheon that covers the span of the old handle holes. You will still need to open the wall from the back or through the tile to install the new valve, and most areas require a permit for that piping change.
How long does a tub faucet replacement take?
A spout swap takes 30 to 60 minutes. Spout plus trim kit takes two to three hours including cleanup and caulking. A valve replacement is a half day for a plumber and a full day for a careful DIYer with good access.
Do I need plumber’s putty or silicone on a tub spout?
Neither on the pipe connection. Use PTFE tape on threads or the supplied O-ring on a slip-fit. Use 100% silicone caulk only on the top and sides where the spout meets the wall, applied after you have tested for leaks.
Why does my new spout drip after the water is off?
Water left in the shower riser and spout drains out for 30 to 60 seconds after shutoff, which is normal. A drip that continues for several minutes means the cartridge or stem washer is leaking and the valve needs service, not the spout.
Will a new bathtub faucet increase water pressure?
A new spout does not change pressure. Low flow at the tub is usually a partly closed stop valve, debris in the cartridge, or a corroded galvanized supply line. A new spout can improve flow slightly if the old one had mineral buildup in the diverter.
What is the difference between a trim kit and a faucet?
The trim kit is the visible metal: handle, escutcheon, spout and often the shower head. The faucet, in plumbing supply terms, includes the valve body inside the wall. Most bathtub faucet replacement jobs are trim kits over an existing valve.
Can I use a universal tub spout?
Yes, and it is a reasonable choice if you are unsure of your pipe. Universal spouts ship with both a threaded adapter and a slip-fit insert. They cost a bit more and sit less tightly to the wall than a dedicated spout, so measure first and buy the exact type when you can.