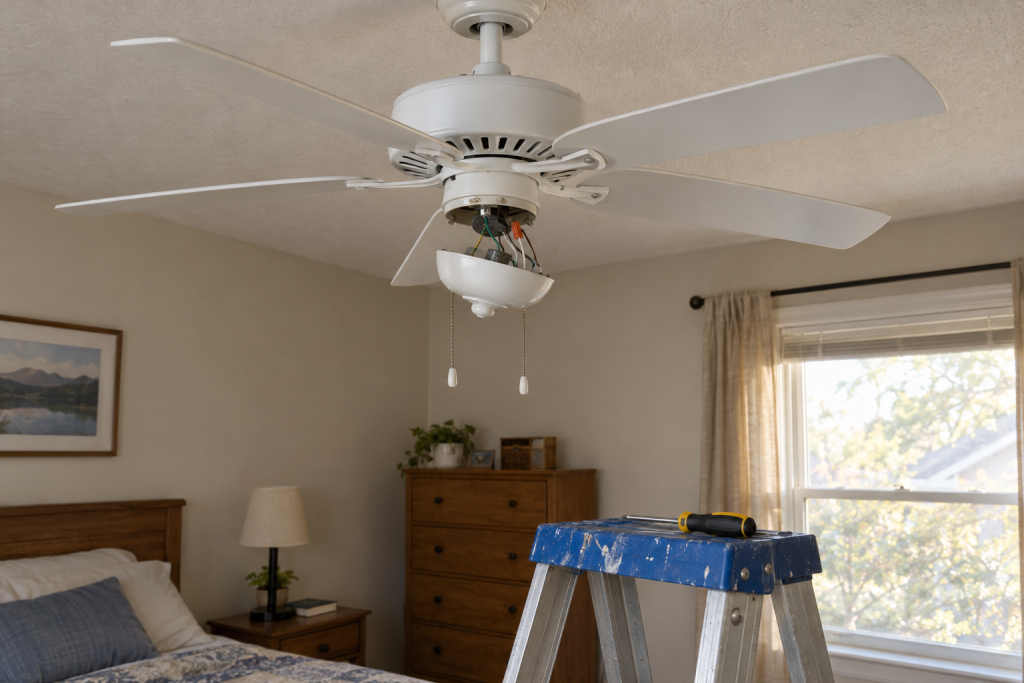
Most ceiling fan repair comes down to five parts: loose screws, a dead capacitor, a worn pull-chain switch, a failed remote receiver, or a cracked flywheel. Every one of those is a 20 to 60 minute fix with a screwdriver, a $5 to $25 part, and the breaker off. Below is how to find which one you have and fix a ceiling fan without calling a fan fixer.
Quick steps: fix a ceiling fan
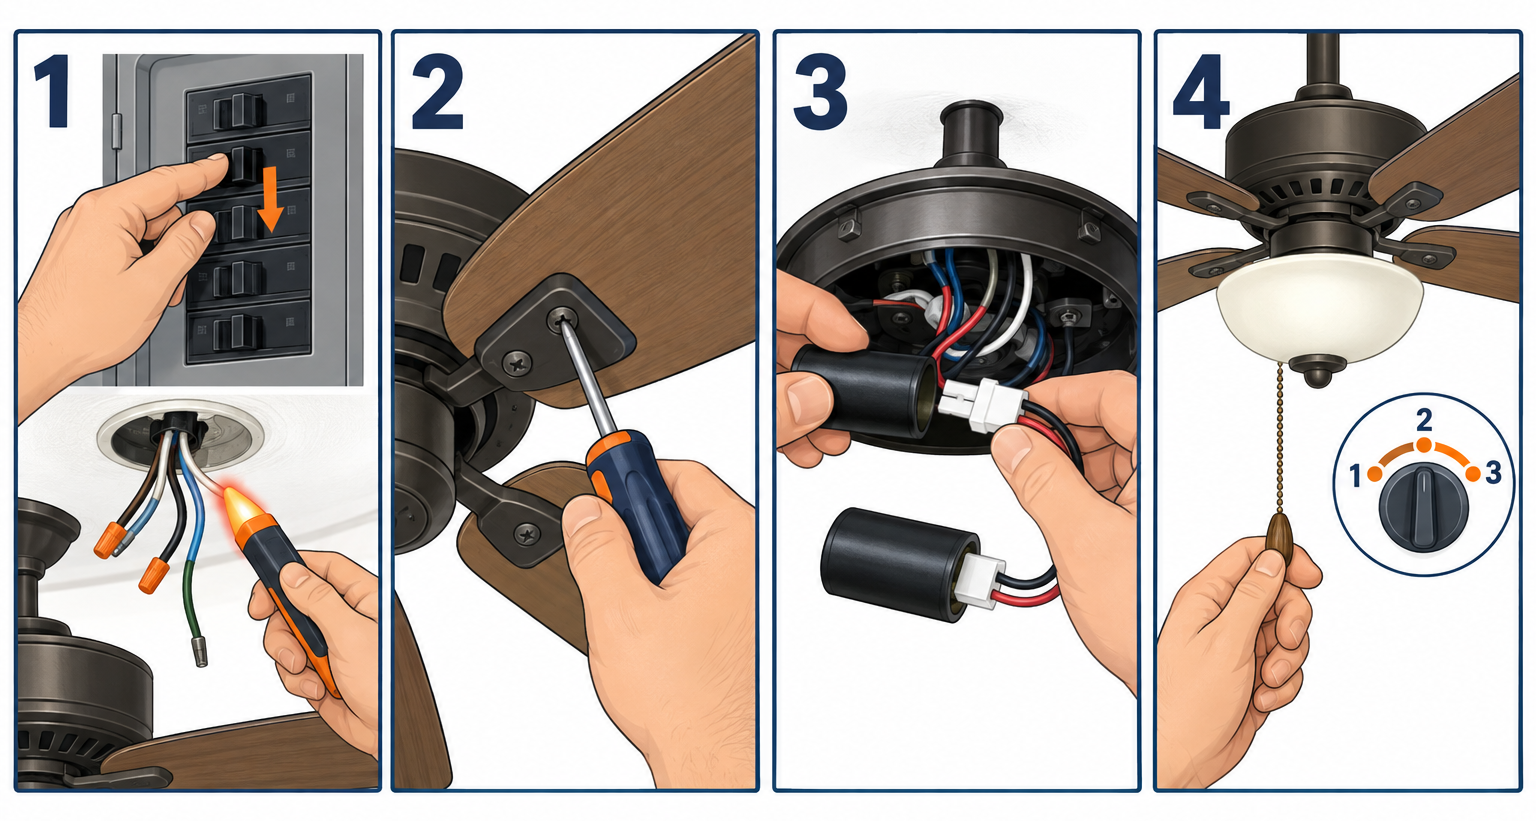
- Flip the breaker off and confirm with a non-contact tester at the canopy.
- Match the symptom to the part using the diagnosis table below.
- Tighten every screw from the ceiling box down to the blade tips.
- Balance the blades if it still wobbles.
- Replace the capacitor if the motor hums, runs slow, or needs a push to start.
- Replace the pull-chain switch or remote receiver if the fan won’t respond.
- Restore power, run all speeds for 10 minutes, and recheck for noise.
Tools and materials
- Non-contact voltage tester
- 6-in-1 screwdriver (Phillips #2 and flat)
- Nut driver set (1/4 in, 5/16 in, 3/8 in)
- Stepladder (6 ft for 8-9 ft ceilings)
- Blade balancing kit (clip plus adhesive weights, about $5)
- Replacement capacitor (CBB61, match the µF and voltage printed on yours, $8-15)
- Pull-chain speed switch (3-speed, 4-wire, $5-10) or light switch ($5)
- Remote receiver matched to your fan brand ($15-40)
- Wire nuts (yellow and red), electrical tape
- Painter’s tape and a tape measure for the wobble test
Safety first
Turn off the breaker, not just the wall switch, before you open the canopy or the switch housing. A fan on a remote receiver has a live hot wire at the canopy even when the fan is “off.” Test the black and blue wires with a non-contact tester before you touch anything.
Diagnose it first: symptom to part in 60 seconds
Nearly every ceiling fan complaint maps to one part. Run the fan on each speed, with and without the lights, and note what it does.
| Symptom | Most likely cause | Part cost |
|---|---|---|
| Wobbles more than 1/8 in at the blade tips | Loose blade or bracket screws, bent blade iron, out-of-balance blades | $0-5 |
| Hums but blades don’t turn | Failed capacitor, seized bearings if it hums hot | $8-15 |
| Starts only if you push a blade | Failed capacitor | $8-15 |
| Only runs on one speed, or high feels like low | Capacitor or 3-speed pull-chain switch | $5-15 |
| Clicking once per rotation | Loose blade screw, blade rubbing the light kit or housing | $0 |
| Rattling or buzzing | Loose light globe, loose canopy, loose motor housing screws | $0 |
| Grinding or scraping | Cracked rubber flywheel, bearing failure, blade iron hitting the motor | $10-25 |
| Fan works, lights don’t | Bulbs, pull-chain light switch, wattage limiter, loose wire nut | $5-15 |
| Nothing works, breaker is fine | Remote receiver, wall switch, loose neutral in the box | $0-40 |
| Remote stopped working | Remote batteries, receiver, pairing lost after a power outage | $0-40 |
| Reverse switch does nothing | Switch set halfway, broken slide switch | $0-10 |
Two quick checks before you start pulling parts. First, does the fan behave the same on all three speeds? If it does, the problem is almost never the speed switch. Second, does the light work when the fan doesn’t, or the reverse? If one works, power is reaching the fan and the fault is inside the housing.
Step 1: Kill the power and open the fan safely
Find the breaker for the room and switch it off. Ceiling fans often share a circuit with bedroom receptacles, so a lamp going dark is a good sign you got the right one.
Set the ladder so your chest is level with the motor housing, not your head. Reaching up over your face is how blades get bent and screws get dropped.
Loosen the two or three canopy screws (don’t remove them, most canopies slot over the screw heads) and slide the canopy down the downrod. Hold the tester against the black, blue, and white wires. No chirp means you can work.
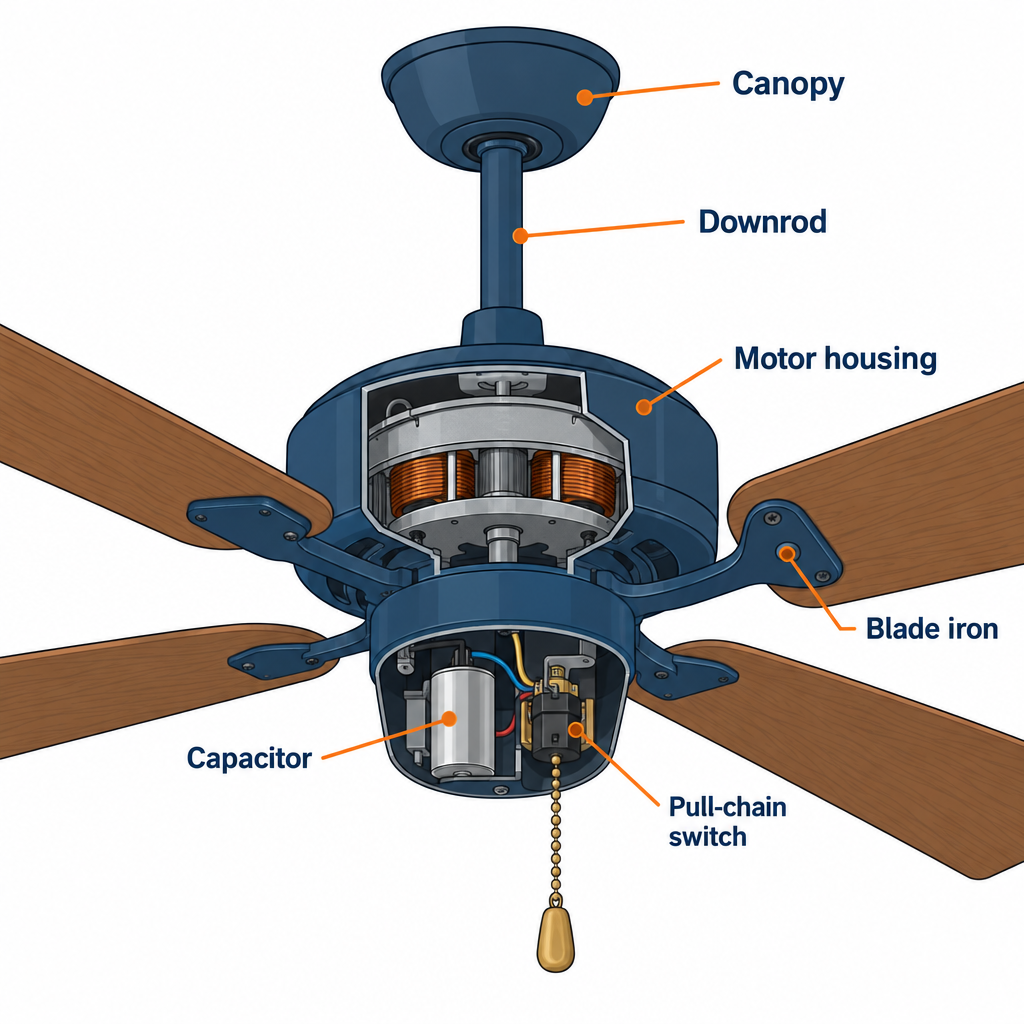
For the switch housing under the motor, remove the three small screws around the rim and lower the cap. The capacitor, pull-chain switches, reverse switch, and the light-kit wiring all live in this cup.
Pro tip
Take a phone photo of every wire connection before you unplug a single one. Fan wiring colors are not standardized between brands, and a 4-wire pull-chain switch wired L-1-2-3 on one fan may be L-1-3-2 on the next. The photo is your wiring diagram.
Step 2: Fix a wobbling fan
Wobble is the most common ceiling fan repair, and 80 percent of the time it’s loose hardware, not balance. Work from the ceiling down, because a loose mounting bracket makes everything below it look unbalanced.
Check the ceiling box and hanger bracket
With the canopy down, grab the downrod and try to rock it. Any movement at the ceiling means the hanger bracket screws or the box itself are loose.
The box must be marked “acceptable for fan support.” A standard plastic light box is not, and a 15 to 25 lb fan will work it loose over a few years. If you see a plastic box with no fan rating, stop here and install a fan-rated box or brace bar (about $20 to $30, sold as an “old work fan brace” that spans the joists through the existing hole).
Tighten the two hanger bracket screws into the box. Snug, then a quarter turn. Overtightening cracks a plastic fan-rated box.
Check the downrod and ball
The downrod has a cross pin at the top and a set screw at the bottom where it enters the motor collar. Confirm the pin is fully through and the cotter clip is on. Tighten the set screw with a 3/8 in nut driver or hex key until it stops, then a quarter turn more.
The hanger ball at the top of the downrod has a groove that must seat in the tab on the bracket. If the fan was rehung after painting, that ball is sometimes sitting on top of the tab instead of in it. That alone causes a visible wobble.
Tighten the blade screws
Every blade attaches to a blade iron (the metal bracket) with two or three screws, and the blade iron attaches to the motor flywheel or hub with two more. On a five-blade fan that’s up to 25 screws. Loose ones back out from vibration, especially on fans run on high in summer.
Tighten all of them. Use a hand screwdriver, not a drill; a drill will strip the threads in composite blades.
Measure the blade heights
Hold a tape measure or a stick of painter’s tape from the ceiling to the tip of one blade. Rotate the fan by hand and check each tip at the same spot. All tips should be within 1/8 in of each other.
A blade sitting 1/4 in or more lower than the rest has a bent blade iron. Remove it from the motor, lay it on a flat surface, and bend it gently back by hand. If two irons are bent, swap their positions so the heavy and light sides cancel out, then recheck.
Balance the blades
If everything is tight and level and the fan still wobbles on high, use the balancing kit. Run the fan on the speed where the wobble is worst.
- Clip the plastic weight to the trailing edge of one blade, halfway out. Run the fan.
- Move the clip to the next blade and compare. Note which blade reduces the wobble most.
- On that blade, slide the clip from the hub toward the tip in 2 in steps until the wobble is smallest.
- Stick the adhesive weight on top of the blade at that spot, centered on the width. Remove the clip.
Typical result: a fan that moved 1/2 in at the tips settles to under 1/8 in. If you can’t get it below 1/4 in with weights, one blade is warped. Hold each blade flat against a table; a gap over 1/8 in at the tip means it’s done. Replacement blade sets run $20 to $40, and you should replace all of them so the weights match.
Step 3: Stop the noises
Each type of noise points to a different part, so listen before you tighten.
Clicking once per revolution is a blade touching something. Spin the fan by hand and watch the gap between each blade iron and the motor housing, and between the blade and the light kit. Loosen the blade iron screws, reposition, retighten.
Rattling at all speeds is usually the glass globe. Remove it, check the rubber gasket (often missing), and reinstall with the thumbscrews snug, not cranked. A missing gasket can be replaced with a 1/8 in rubber O-ring or a wrap of electrical tape around the globe lip.
Buzzing or humming on low speed only is normal on some fans with a capacitor-driven motor, but a buzz that appears after a dimmer was installed on the wall is not. Ceiling fans need a fan speed control or a plain toggle switch, never a light dimmer. A standard dimmer makes the motor hum and will eventually cook the windings.
Grinding or scraping on older Hunter and Casablanca fans is a cracked rubber flywheel. The flywheel sits between the motor shaft and the blade irons. If the blades turn slightly while the motor stays still, or you see rubber dust on top of the motor, that’s it. Replacement flywheels typically run $30 to $75 or more and take about 30 minutes: remove blades, unscrew the blade arms from the flywheel, loosen the set screw that holds the flywheel on the motor shaft, swap, reassemble.
Scraping on any other fan with a hot motor housing is bearing failure. Most modern fan motors use sealed bearings that cannot be re-greased. On a $60 fan, replace the fan. On a $300 fan, the manufacturer may sell the motor as a part, but at that price a repair team’s labor often exceeds the value.
The exception is the oil-bath Hunter Original (the heavy cast-iron one). Those have an oil port on top of the motor and need about 1 oz of non-detergent SAE 10 motor oil every year or two. A dry one squeals, and a fill fixes it in five minutes.
Step 4: Replace the capacitor (hums, slow, or needs a push)
A ceiling fan motor cannot start on its own without a capacitor. When it fails, you get three classic symptoms: the fan hums but doesn’t turn, it starts only after you push a blade, or it runs noticeably slower than it used to on every speed.
Open the switch housing. The capacitor is a black rectangular block, about the size of a matchbox, with two, three, or five wires. Look for the markings. Common values are 4 µF to 6 µF for a 2-wire unit, or combinations like “4.5+5+6 µF 250VAC” on a 5-wire unit. A failed one is often swollen, cracked, or leaking a brown waxy residue.
Order a replacement with the same µF values and the same or higher voltage rating. The physical size doesn’t matter. A 250 V rating is standard; 300 V or 350 V is fine as a substitute, 200 V is not.
To swap it:
- Photograph the connections.
- Cut or unscrew each capacitor lead at the wire nut and note which fan wire it joined.
- Connect the new capacitor wire for wire using fresh wire nuts. On a 5-wire unit the two wires that share a color usually go to the same point; the printed diagram on the capacitor shows which lead is which value.
- Tuck it back so it doesn’t press against the switch or the housing cap.
Expected result: the fan starts instantly on low with no push, and high speed is clearly faster than medium. If it still hums with a new capacitor and the motor feels hot after two minutes, the windings or bearings are gone.
Step 5: Fix a fan stuck on one speed or dead on the chain
The pull-chain speed switch is a small plastic block with a rotating cam. Every pull steps through off, high, medium, low. Over a decade of yanks the contacts wear and the chain eventually pulls out of the switch entirely.
Signs it’s the switch: the fan only works on one position, two pulls do nothing, or the chain came out in your hand.
To replace it:
- Note the number of wires (three for a 2-speed, four for a 3-speed) and the letters on the old switch body (L, 1, 2, 3).
- Photograph which fan wire goes to each terminal.
- Unscrew the knurled nut that holds the switch to the housing from outside, then pull the switch inside.
- Wire the new switch to match the old one by terminal letter, not by position on the body.
- Reinstall and test all four pulls.
Buy the switch by terminal layout. A 4-wire switch wired L-1-2-3 and one wired L-1-3-2 look identical, but mismatching them gives you high-low-medium instead of high-medium-low. It still works, it’s just annoying, and it’s a sign you grabbed the wrong one.
The light pull chain uses a simpler 2-wire on-off switch. Same replacement procedure, under 15 minutes.
Pro tip
If the chain broke off at the switch but the switch still clicks, don’t replace it. Buy a $3 chain connector, feed the chain stub through, and crimp it. Pull-chain switches rarely fail; chains fail constantly.
Step 6: Fix the lights
Lighting faults on a ceiling fan are cheaper than motor faults and usually quicker.
No lights, fan works. Check the bulbs first, then the pull-chain light switch (Step 5). If both check out, open the housing and look for a small black box wired between the switch and the sockets. That’s a wattage limiter, installed on fans made since 2007 to cap the light kit at 190 W. They fail. You can replace it like for like ($10 to $15), or, since LED bulbs draw a fraction of the limit, many owners bypass it by joining the two wires with a wire nut. If you bypass it, stay with LED bulbs.
Lights flicker. LED bulbs on a fan with a built-in dimmer or an older remote often flicker because the remote chops the waveform. Use bulbs marked dimmable, or replace the receiver with one listed for LED. Flicker on incandescent bulbs is a loose socket connection; tighten the socket screws and check the wire nuts.
One socket dead. The socket’s center tab is flattened. Power off, pry the brass tab up about 1/8 in with a small flat screwdriver.
Lights work, bulbs burn out fast. Vibration from a wobble (Step 2) kills incandescent filaments. Fix the wobble, then switch to LED.
Most fans take E12 candelabra or E26 medium base bulbs. Check the sticker inside the socket for the max wattage and stay under it even with LED, since the sticker limit is about heat in the fixture.
Step 7: Fix a remote-controlled fan that won’t respond
Remote fans add a receiver, a small rectangular module tucked inside the canopy or the switch housing. When the fan ignores the remote, the fault is the remote, the receiver, or the pairing between them.
Start with the obvious. Replace the remote batteries, then check the wall switch is on (someone always turns it off).
Next, re-pair. Most modern receivers learn the remote: switch the breaker off for 30 seconds, turn it on, and within 30 seconds hold the fan-off or “pair” button on the remote until the fan beeps or the light blinks. Older receivers use 4-position DIP switches inside both the remote and the receiver; the two must match. Power outages don’t change DIP switches, but battery changes sometimes do, when the battery cover scrapes them.
If pairing fails, the receiver is dead. They fail more than any other fan part because they sit above a warm motor in a closed canopy. Replace it:
- Breaker off, canopy down.
- Note the connections: house hot and neutral in, then fan black, fan blue (light), and white out.
- Buy the matching brand receiver or a universal 3-speed receiver kit ($20 to $40). Universals come with their own remote.
- Wire it in with wire nuts, fold the antenna wire along the canopy rather than coiling it, and reassemble.
Expected result: the fan responds from across the room on every speed and the light toggles. If the fan works from the receiver but range is under 10 ft, the antenna wire is pinched in the canopy.
Step 8: Reverse direction for heating season
A fan that spins the wrong way isn’t broken, but it’s the most common complaint in winter. In summer you want air blowing down on you, which means blades turning counterclockwise when you look up. In winter you want clockwise on low speed, which pulls cool air up and pushes warm air trapped at the ceiling back down the walls.
The reverse switch is a slide switch on the motor housing, or a button on the remote. If it does nothing:
- Make sure the fan is fully stopped. Most fans ignore the reverse switch while spinning.
- Push the slide fully to one end. A switch stuck in the middle leaves the motor dead or humming.
- If the switch is broken (loose, no click), it’s a 6-wire slide switch inside the housing, $5 to $25 depending on brand, replaced the same way as the pull-chain switch.
Running the fan clockwise on low in heating season lets most homeowners drop the thermostat 1 to 2 degrees with no change in comfort. It’s a free efficiency gain once a year.
Troubleshooting: when the fix didn’t work
| What happened | Likely cause | What to do |
|---|---|---|
| New capacitor, still hums and runs hot | Seized bearings or burnt windings | Replace the fan |
| Wobble is gone on low, back on high | Blade warp or mismatched blades | Flat-check each blade, replace the set |
| Fan runs, now the breaker trips | Pinched wire in canopy or housing | Open and inspect, retape nicked insulation, reseat wire nuts |
| New switch, speeds in wrong order | Switch wired by position instead of terminal letter | Rewire to match L-1-2-3 on the photo |
| Remote works, pull chain does nothing | Normal: remote receivers bypass the chains | Leave chains on high and fan off, use the remote |
| Lights dim when fan is on high | Shared neutral loose in the ceiling box | Breaker off, retighten the white wire nut in the box |
| Fan creaks at the ceiling | Hanger ball not seated or bracket loose | Reseat the ball groove in the bracket tab, tighten bracket |
| Fan stops after 20-30 minutes, restarts later | Thermal cutoff tripping from dirty motor or bad capacitor | Vacuum the vents, replace capacitor, then suspect windings |
What a pro charges for ceiling fan repair
If the fault is in the ceiling box, the wiring, or you’d rather not open the housing, an electrician or handyman will do it. Realistic 2025 prices for a straightforward visit:
| Job | Typical cost | Time on site |
|---|---|---|
| Tighten and balance | $75-150 | 30-45 min |
| Replace capacitor or pull-chain switch | $100-200 | 45-60 min |
| Replace remote receiver | $120-220 | 45-60 min |
| Install fan-rated box or brace | $150-300 | 1-1.5 hr |
| Replace the whole fan (you supply it) | $100-250 | 1-2 hr |
| Add a new switch leg or circuit for a fan | $250-600 | 2-4 hr |
Most pros charge a service minimum of $75 to $125 regardless of the job, so bundling two fans into one visit is the cheapest way to hire it out. On a fan that cost under $100 new, the honest answer from a good electrician is usually “replace it,” because an hour of labor plus parts gets close to the price of a new one.
When to call a pro
Call a licensed electrician if the ceiling box is plastic with no fan rating and you can’t reach it from an attic, if the breaker trips when the fan runs, if the wires in the box are aluminum, or if you want a new switch leg or wall control added. Any work inside the panel, or a fan going into a bathroom or over a tub, also needs a licensed trade and often a permit.
FAQ
How do I know if the problem is the capacitor or the motor?
Power off, then spin the blades by hand. If they coast freely for several seconds and the fan hums when powered, it’s the capacitor. If the blades feel stiff, grind, or stop within a turn, the bearings are gone and the motor is the problem.
Is it worth repairing a ceiling fan or should I replace it?
Repair any fan if the fix is under $25 in parts: capacitor, switch, receiver, balancing kit, flywheel. Replace it if the motor is seized, the housing is cracked, or the fan is under $80 new and you’d be paying a pro.
Why does my ceiling fan wobble only on high speed?
Small balance errors don’t show on low because the forces are tiny, but at high speed they multiply. Tighten every blade screw first, measure blade tip heights, then use the balancing kit on high. If one blade is warped it will never balance.
Can I use a wall dimmer to control fan speed?
No. A light dimmer makes the motor hum and will burn out the windings or the dimmer. Use a switch marked as a fan speed control, or a plain toggle and the pull chain or remote.
How tight should the blade screws be?
Hand tight with a screwdriver, firm with no play. Don’t use a drill on composite or MDF blades; the threads strip and the blade will loosen again within a month.
Which direction should my ceiling fan turn in winter?
Clockwise when you look up at it, on the lowest speed. That pulls warm air off the ceiling and down the walls without a draft. Flip the reverse slide switch with the fan fully stopped.
Does a ceiling fan need a special electrical box?
Yes. The box must be marked “acceptable for fan support.” Standard boxes are listed to 35 lb; heavier fans need a box marked with a higher rating, up to 70 lb. A plain light fixture box will work loose and can drop the fan.