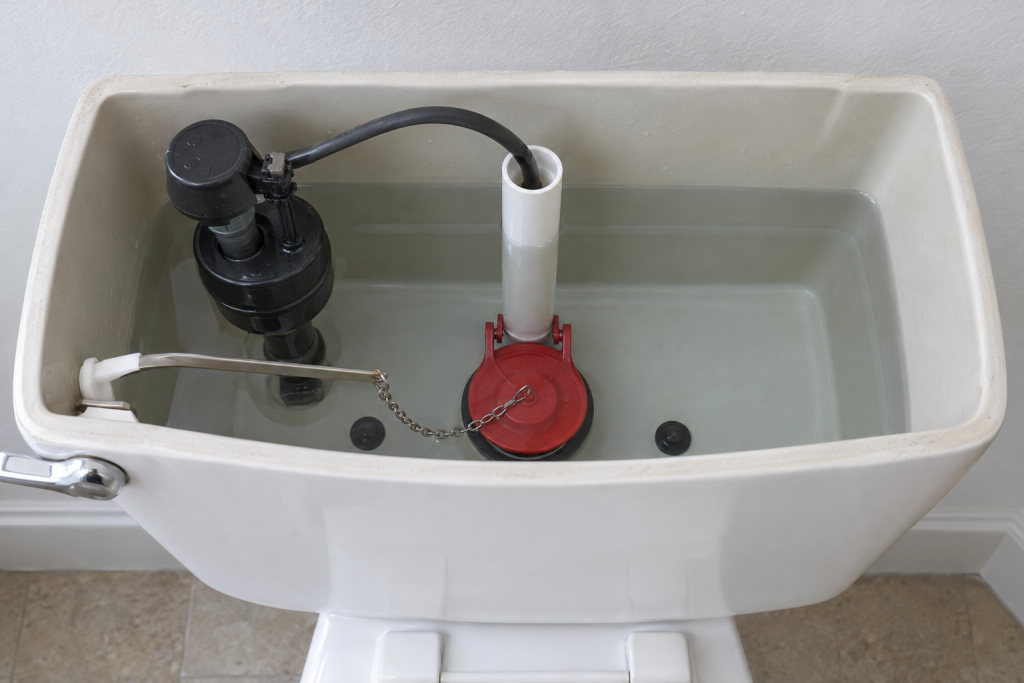
A worn toilet flapper is the number one cause of a toilet that runs, hisses or refills on its own, and swapping it takes about 15 minutes with no tools. Buy a flapper that matches your flush valve size (2 inch or 3 inch), hook it onto the overflow tube, set the chain with about half an inch of slack and you are done. The only part that trips people up is buying the wrong size, so this guide shows you how to measure before you shop.
Quick steps: replace a toilet flapper
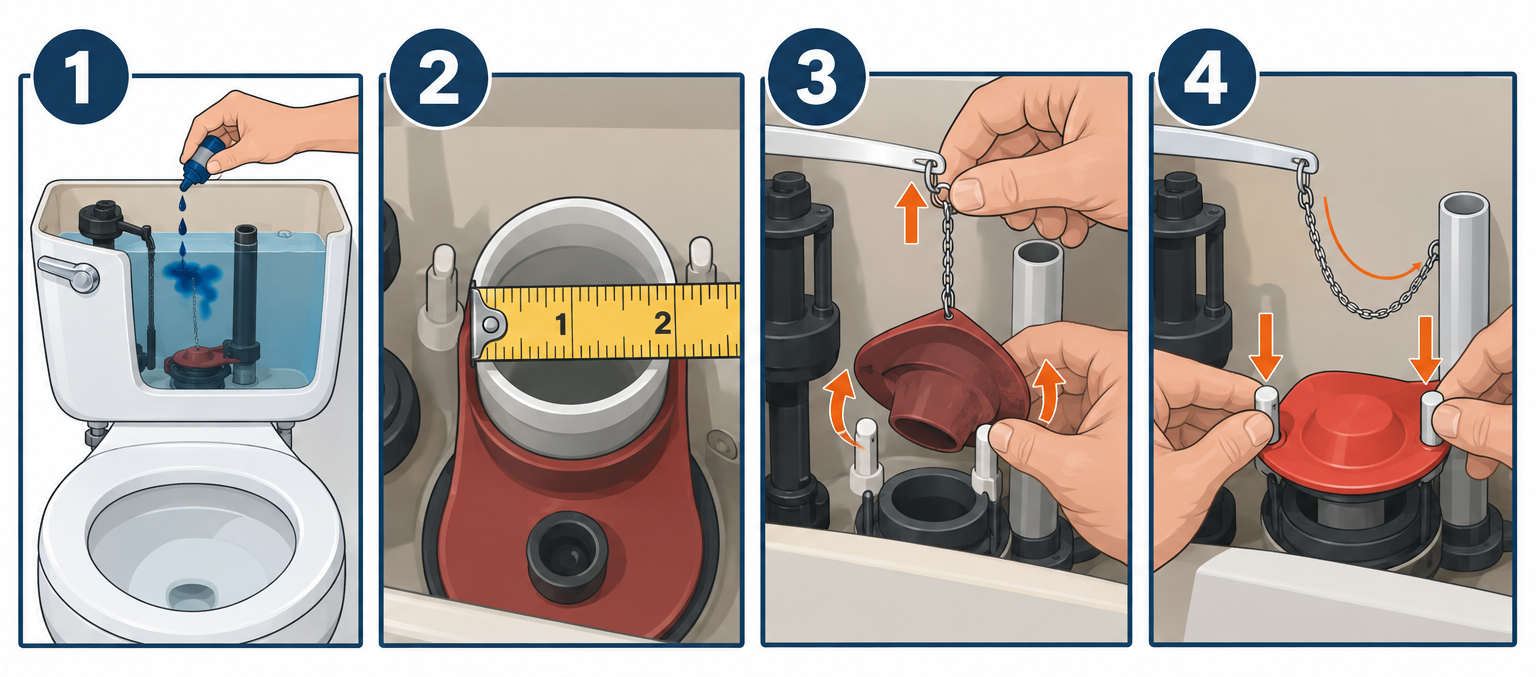
- Drop food coloring in the tank and wait 15 minutes to confirm the flapper is leaking.
- Measure the flush valve opening: about 2 inches is standard, about 3 inches is a large flush valve.
- Turn the shutoff valve behind the toilet clockwise and flush to empty the tank.
- Unclip the chain from the flush lever and pull the old flapper off the overflow tube pegs.
- Wipe the flush valve seat clean with a rag or scrub pad.
- Hook the new flapper onto the pegs (or slide the ring over the tube) and clip on the chain.
- Set chain slack to about 1/2 inch, open the valve, let the tank fill and flush three times.
- Repeat the dye test the next morning to confirm the leak is gone.
Tools and materials
- Replacement toilet flapper (2 inch or 3 inch, matched to your flush valve)
- Food coloring or a dye tablet (free at many water utilities)
- Tape measure or ruler
- Old rag or sponge for the residual tank water
- Scotch-Brite pad or fine scrub sponge for the valve seat
- Small needle-nose pliers (only if the old chain clip is corroded)
- Scissors (only for cutting the ears off a universal ring-style flapper)
- Optional: new chain with S-hook if the old one is rusted
Safety first
Set the porcelain tank lid flat on a towel on the floor, not on the toilet seat. A dropped lid cracks every time, and an exact-match replacement lid can be hard to find for older toilets. Never store chlorine tablets in the tank; they eat rubber flappers and void most toilet warranties.
Step 1: Confirm the toilet flapper is the problem
Do not buy anything until you have proven the flapper is leaking. A running toilet has three usual suspects: the flapper, the fill valve and the flush valve seat. The dye test sorts them out in 15 minutes.
Lift the tank lid and put 8 to 10 drops of food coloring in the tank water. Dark blue or green shows best. Do not flush. Wait 15 minutes, then look in the bowl.
Colored water in the bowl means water is slipping past the flapper or the seat under it. That is the leak you are fixing today. If the bowl stays clear but the toilet still cycles on by itself, look at the fill valve instead. Water trickling down the overflow tube means the fill valve is set too high or has failed, and no flapper will fix that.
| What you see after 15 minutes | What it means | Fix |
|---|---|---|
| Color in the bowl, overflow tube dry | Flapper not sealing | Replace the toilet flapper |
| Color in the bowl, flapper looks new | Flush valve seat is rough or cracked | Clean seat, then replace flush valve if it persists |
| Bowl clear, water running into overflow tube | Fill valve set too high or stuck | Lower the float or replace the fill valve |
| Bowl clear, toilet refills every few hours anyway | Hairline tank crack or cracked overflow tube | Inspect tank with a flashlight, replace flush valve or tank |
Press down on the flapper with one finger while the tank is full. If the running sound stops, the flapper or seat is not sealing on its own and you have your answer.
A flapper leak is not a small thing on the water bill. The EPA’s WaterSense program puts a steadily running toilet at roughly 200 gallons of wasted water a day. On a metered city supply that can add $30 to $70 a month, which is why a $8 commode flapper is one of the best returns in home repair.
Step 2: Figure out which toilet flapper you need
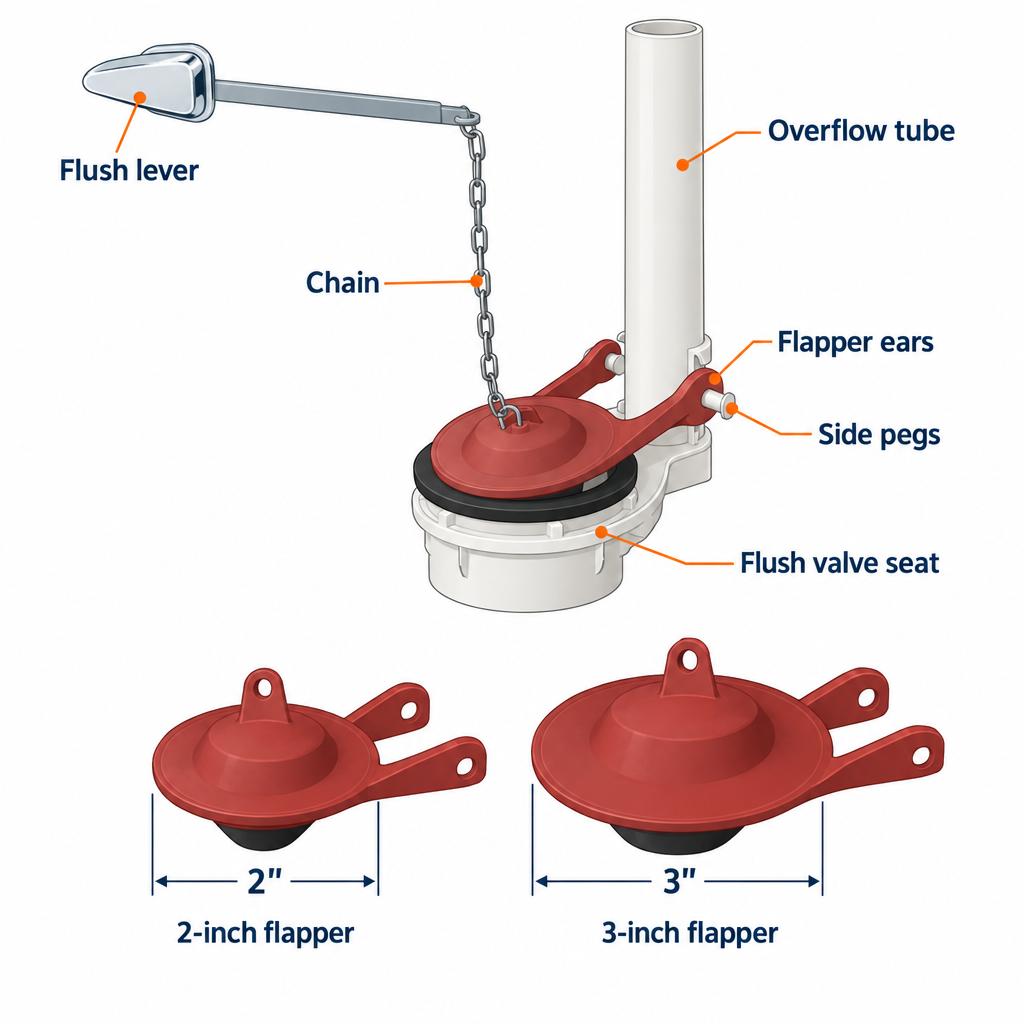
This is the step that matters. There are two common sizes and a handful of mounting styles, and the wrong one will leak worse than the one you removed.
Measure the flush valve opening
Look at the hole the flapper covers at the bottom of the tank. Measure straight across the opening in the plastic or brass seat.
- About 2 inches across (roughly the size of an orange or a baseball): you need a standard 2 inch flapper. This fits most toilets made before about 2005 and many budget toilets made since.
- About 3 inches across (roughly the size of a grapefruit or a softball): you need a 3 inch flapper. Most high-efficiency and “power flush” toilets from Kohler, American Standard and Toto use this.
- Something else entirely (a tall plastic tower or canister that lifts straight up): you do not have a flapper. You need a canister seal, which is a flat rubber ring, and the process is different.
The old flapper itself usually has the size molded into the rubber, which saves measuring. Flip it over and look for “2” or “3” near the hinge.
Match the mounting style
Flappers attach to the overflow tube in one of three ways:
- Two ears over two pegs. The most common. The overflow tube has a peg on each side and the flapper’s ears snap over them.
- Ring over the tube. The flapper has a solid ring that slides down over the overflow tube. Universal flappers ship with both a ring and ears; you cut off whichever part you do not need.
- Hinged bracket. Common on Kohler and some Mansfield models. The flapper clips into a plastic hinge that is molded to the flush valve. These need the brand-specific part.
Flapper size by toilet brand
The table below covers the toilets that account for most sizing mistakes. Measure anyway, because manufacturers have changed flush valves across model years.
| Toilet brand or series | Typical flush valve | Flapper size | Notes |
|---|---|---|---|
| Most pre-2005 toilets (any brand) | Standard 2 inch | 2 inch, ears or ring | Universal 2 inch fits nearly all |
| Kohler Cimarron, Highline, Wellworth (Class Five) | 3 inch with molded hinge | 3 inch, Kohler-specific or Korky 3 inch | Universal ring-style often fails here |
| Kohler Santa Rosa, Memoirs, Devonshire (canister) | Canister flush valve | None, uses canister seal | Not a flapper job |
| American Standard Champion 4 | 3 inch or 4 inch tower | Champion-specific seal kit | Measure, several revisions exist |
| American Standard Cadet 3 | 3 inch | 3 inch | Universal 3 inch usually works |
| Toto Drake, Entrada, Ultramax | 3 inch | 3 inch, Toto or Korky Toto-fit | Toto flappers are slightly thicker |
| Gerber Viper, Avalanche | 3 inch | 3 inch | Universal 3 inch works |
| Mansfield 160, 210 | Tower style | Flush valve seal, not a flapper | Different repair |
| Glacier Bay, Project Source, most big-box toilets | 2 inch or 3 inch | Measure | Varies by year |
Flapper types: what the choices on the shelf actually mean
Every hardware store carries two or three shelves of flappers toilet owners find confusing. The differences are real but simple.
| Flapper type | Best for | Typical price | Life expectancy | Watch out for |
|---|---|---|---|---|
| Standard rubber (2 inch) | Older toilets, 3.5 to 1.6 gpf | $4-8 | 3-5 years | Chlorine tablets destroy it in months |
| Silicone or chlorine-resistant | Any toilet, hard water, tablet users | $8-14 | 5-8 years | Slightly stiffer, check seat contact |
| Adjustable (dial or float cup) | Toilets that flush too weakly or too strongly | $8-15 | 3-5 years | Needs a few flushes to dial in |
| 3 inch universal | High-efficiency toilets, 1.28 gpf | $8-16 | 3-5 years | Does not fit Kohler molded hinge |
| Brand-specific (Kohler, Toto, American Standard) | Exact OEM fit | $10-25 | 4-6 years | Costs more, but no guesswork |
| Flapper with built-in float | Older 3.5 gpf toilets you want to flush less | $8-12 | 3-5 years | Can make a 1.6 gpf toilet flush incompletely |
Korky and Fluidmaster make the universal flappers you will find in nearly every store. Korky’s 2 inch universal (the red rubber one) is the safe default for an older toilet. Fluidmaster’s 2 inch and 3 inch universals come with both ears and a ring, so one package covers either mount. Danco sells a wide lineup, including brand-fit flappers for Kohler and American Standard. If your flush valve has a molded hinge, skip the universal and buy the brand-specific part the first time.
Pro tip
Take the old flapper with you to the store. Lay it on top of the new one in the package and compare the sealing ring diameter and the ear spacing. Thirty seconds in the aisle saves a second trip, which is the real cost of this job.
Step 3: Shut off the water and empty the tank
Find the oval or football-shaped handle on the small valve coming out of the wall or floor behind the toilet. Turn it clockwise until it stops. Most take a quarter turn to a full turn.
If the valve is stiff, do not force it with pliers. Old multi-turn valves with packing nuts seize and start dripping when forced. Wiggle it gently back and forth as you close it. If it will not close, you can still do this job; just hold the fill valve float up with one hand while you work, or tie the float up with a twist tie.
Flush the toilet and hold the lever down until the tank is empty. About half an inch of water will stay in the bottom. That is normal. Mop it up with a sponge or leave it; it will not get in the way.
Check that the fill valve does not start refilling. If it hisses and water trickles in, the shutoff did not close fully. Turn it a bit more.
Step 4: Remove the old toilet flapper
Unhook the chain from the flush lever arm first. The clip is usually a small brass or plastic S-hook or a spring clip. Squeeze it open and lift it off the hole in the arm. Note which hole it was in; most arms have three or four, and the one it came from is a good starting point for the new flapper.
Now pull the flapper off the overflow tube. For an ear-style flapper, flex one ear outward and pop it off its peg, then do the other side. The rubber is usually brittle by now and may tear, which does not matter.
For a ring-style flapper, slide the ring straight up and off the top of the overflow tube. You may need to work it past the refill tube clip.
For a Kohler or other hinged flapper, look for a small plastic pin or bracket. Most pull straight out of the hinge with a firm tug; some require squeezing two tabs.
Look at the old flapper under good light. A failed flapper usually shows one of these:
- Black residue that comes off on your fingers (the rubber is breaking down, often from chlorine tablets)
- A warped or cupped sealing face that no longer sits flat
- Mineral crust on the sealing ring, which holds it a hair off the seat
- A hard, shiny surface instead of soft rubber
- A torn hinge ear
Any of these confirms the diagnosis. If the old flapper looks genuinely soft and flat, pay extra attention to the seat in the next step because that may be where the leak lives.
Step 5: Clean the flush valve seat
This is the step most people skip and the reason a brand-new toilet bowl flapper sometimes leaks on day one. The seat is the smooth lip at the top of the flush valve where the flapper lands. If it has mineral scale, grit or a rough patch, water will find a path.
Run your finger around the whole seat. It should feel smooth and even. If you feel bumps or a gritty texture, scrub it with a Scotch-Brite pad or a damp scrub sponge. Do not use sandpaper on a plastic seat; it leaves scratches that leak. For heavy calcium on a brass seat, a few minutes with a rag soaked in white vinegar softens the crust.
Wipe the seat with a clean rag when you finish. Run your finger around it again. Smooth all the way around means you are ready to install.
If you feel a nick, a crack or a chunk missing from the seat, stop. A new flapper will not seal reliably over a damaged seat. You have two options: a flush valve seat repair kit (a flat ring that glues over the old seat with silicone, $10 to $15) or a full flush valve replacement, which requires removing the tank from the bowl. The repair kit is a reasonable short-term fix. The full replacement is a half-day job covered later in the pro section.
Step 6: Install the new toilet flapper
Ear-style installation
Hold the flapper so the sealing cup faces down and the chain tab faces the flush lever. Flex one ear over the first peg on the overflow tube, then stretch the other ear over the second peg. Both ears should sit fully seated on the pegs with the flapper hanging squarely over the seat.
Ring-style installation
If your overflow tube has no pegs, use the ring. Universal flappers have both; cut the ears off cleanly with scissors so they cannot snag. Slide the ring down over the top of the overflow tube until the flapper rests flat on the seat. The ring should sit snugly. If it rides up when the flapper lifts, it is the wrong diameter for your tube.
If your tube has pegs and you bought a universal, cut off the ring instead and use the ears. Ears are a more precise fit than the ring on a pegged tube.
Hinge-style installation
Kohler Class Five and similar valves have a hinge bracket. Push the flapper’s pin into the bracket until it clicks or the tabs lock. Lift it and let it drop a few times; it should fall straight down and land centered on the seat without catching.
Check the drop
Lift the flapper by its tab and let go. It should fall straight down and land flat with no bounce or tilt. A flapper that lands crooked is usually on the wrong pegs or has an ear not fully seated. Fix that now, before you add water.
Step 7: Attach and adjust the chain
The chain is where a lot of “new flapper still runs” complaints come from. Too tight and the flapper never seals. Too loose and it does not lift far enough to flush, or the slack gets caught under the flapper.
Clip the new chain (or the old one, if it is clean) to the flapper tab. Hook the other end into the flush lever arm hole closest to being directly above the flapper tab. With the flapper sitting closed, there should be about 1/2 inch of slack, which is two or three free links.
A quick way to set it: hold the chain straight up from the flapper tab, count two links above the point where it would be taut, and hook it there.
Cut or remove any extra chain hanging below the hook. A long tail of loose chain dangling in the tank will eventually drape under the flapper and cause the exact leak you just fixed. Some flappers come with a small foam float on the chain; that float keeps the chain from sinking under the flapper and is worth keeping.
Pro tip
If the lever has to travel a long way before the flapper lifts, do not shorten the chain. Move the hook to the lever arm hole nearest the pivot instead. That changes the lift leverage without reducing the slack, and the flush feels crisp again.
Step 8: Turn the water on and test
Open the shutoff valve counterclockwise all the way, then back it off a quarter turn. The tank should fill in 30 to 90 seconds and the fill valve should click off cleanly.
Check the water level. It should sit about 1 inch below the top of the overflow tube, and most tanks have a water line molded or stamped inside. If water is spilling into the overflow tube, lower the fill valve float. On a Fluidmaster-style tower fill valve, pinch the clip on the float rod and slide it down. On an old ballcock with a brass arm, bend the arm slightly downward.
Now flush three times in a row and watch each cycle:
- The flapper should lift fully and stay up until the tank is nearly empty.
- It should drop and seat with a soft thump, with no bouncing.
- The tank should refill and go completely silent. No hiss, no trickle.
Stand there for a full two minutes after the third flush and listen. Silence is the result you want. Any faint hiss or periodic gurgle means something is still passing water.
For a final check, repeat the dye test. Drop in the coloring, wait 15 minutes, and look at the bowl. Clear bowl, job finished. Better still, do it again the following morning after the toilet has sat overnight.
Dialing in an adjustable toilet flapper
If you bought an adjustable flapper, it will have either a dial on the underside or a small float cup on the chain. The dial controls how much air is trapped in the flapper body, which controls how long it floats open before it drops.
Set it to the middle position first. If the bowl does not clear waste in one flush, turn the dial to use more water. If the flush is strong but you want to save water, turn it toward the smaller setting a notch at a time, flushing between each adjustment. Stop at the smallest setting that still clears the bowl reliably. On a 1.6 gallon toilet, you can usually save a tenth or two of a gallon per flush. On an old 3.5 gallon toilet, an adjustable flapper can cut use by a gallon or more.
Do not go below the point where solids clear in one flush. Double flushing wastes more water than the adjustment saves.
What a toilet flapper replacement costs
| Item or service | Typical cost | Notes |
|---|---|---|
| Standard 2 inch rubber flapper | $4-8 | Korky, Fluidmaster, Danco at any hardware store |
| 3 inch universal flapper | $8-16 | Needed for most 1.28 gpf toilets |
| Brand-specific flapper (Kohler, Toto, American Standard) | $10-25 | Order online if the store does not carry it |
| Flapper plus chain kit | $8-15 | Worth it if the old chain is rusted |
| Flush valve seat repair ring | $10-15 | Temporary fix for a nicked seat |
| Full flush valve replacement kit | $15-30 | Requires removing the tank, 2-3 hours |
| Plumber service call for a flapper | $100-250 | Most of that is the trip charge, not the part |
| Plumber flush valve replacement | $200-400 | Includes tank removal and new tank-to-bowl gasket |
The math is plain. A plumber will charge their minimum call fee for a ten-dollar part, and most of them would rather you handled this one yourself.
Common mistakes that make a new toilet flapper leak
Most callbacks on this job trace back to one of these five errors.
Buying by the picture instead of the measurement. A 3 inch flapper will not seal on a 2 inch seat and vice versa. Measure every time, even if the package says “universal.”
Leaving the ears on a ring-style install, or the ring on a pegged tube. The leftover piece props the flapper up a fraction of an inch. Cut off the part you do not use.
Chain too tight. Even a single link too short holds the flapper off the seat. Set half an inch of slack and check that the lever sits fully down at rest.
Not cleaning the seat. Mineral scale left on the seat is the most common cause of a new flapper that leaks within a week.
Chlorine tablets back in the tank. In-tank bleach tablets soften rubber and can kill a new flapper in under six months. If you want a cleaner, use one that hangs in the bowl, not the tank, or switch to a chlorine-resistant silicone flapper and accept a shorter life anyway.
Troubleshooting
| Symptom | Likely cause | Fix |
|---|---|---|
| Toilet still runs after new flapper | Wrong size, chain too tight, or dirty seat | Measure seat, add chain slack, scrub seat |
| Runs for a few seconds every 20-30 minutes (“phantom flush”) | Slow leak past flapper edge | Check seat for scale, confirm flapper sits flat, replace with brand-specific part |
| Flapper won’t stay up, weak flush | Chain too loose or flapper too heavy for valve | Shorten chain by one link, or try an adjustable flapper set higher |
| Have to hold the lever down to flush | Chain too loose or hooked in wrong lever hole | Reduce slack to 1/2 inch, move hook toward the end of the arm |
| Flapper closes too fast, bowl doesn’t clear | Adjustable flapper set too low, or flapper rubber too dense | Turn dial toward more water, or switch flapper brand |
| Water trickles into overflow tube | Fill valve set too high | Lower float so water sits 1 inch below tube top |
| New flapper sits crooked on seat | Ear not fully on peg or ring riding high | Reseat ears, or cut ring and use ears if tube has pegs |
| Flapper hangs up on refill tube | Refill tube clipped too low on overflow tube | Move refill tube clip to the top of the overflow tube |
| Leak returns within weeks | Chlorine tablet in tank, or hard water | Remove tablets, use silicone flapper |
| Flapper lifts but tank does not drain fully | Flush valve partly clogged under seat | Shut off water, remove flapper, clear debris from valve opening |
| Dye still appears but flapper is brand new and seat is smooth | Cracked flush valve body below seat | Replace flush valve (tank removal) |
| Tank sweats or drips on floor after the job | Shutoff valve packing nut loosened when turned | Snug the packing nut a quarter turn clockwise |
Looking after a toilet flapper so it lasts
A rubber flapper in clean, soft water with no additives lasts five years or more. In hard water it lasts three to four. With bleach tablets in the tank it can fail in a year. There is no maintenance beyond keeping chemicals out of the tank and doing a dye test once a year, which is a good habit around the time you change smoke detector batteries.
If your water is very hard, a silicone flapper is worth the extra few dollars. Silicone does not harden or warp the way rubber does, and it shrugs off the mineral scale that builds up on a standard flapper.
When you replace a flapper on one toilet in a house that has several of the same age, go ahead and buy flappers for all of them. They were installed at the same time and will fail within months of each other.
When to call a pro
Call a plumber if the flush valve seat is cracked or chipped, if the overflow tube is split, or if water keeps leaking after a correct flapper and a clean seat. Those mean the flush valve needs replacing, which requires lifting the tank off the bowl and installing a new tank-to-bowl gasket and bolts, and it is easy to crack an old tank doing it. Also call one if the shutoff valve behind the toilet will not close or starts dripping when you turn it; that is a valve replacement, and on an older home it may mean shutting off the main.
FAQ
How do I know what size toilet flapper I need?
Measure the drain opening at the bottom of the tank. Roughly 2 inches across means a standard 2 inch flapper. Roughly 3 inches means a 3 inch flapper, which most high-efficiency toilets use. The old flapper usually has the size molded into the underside near the hinge.
Are toilet flappers universal?
No. “Universal” on the package means it fits most toilets of that size with either a pegged or a plain overflow tube. It does not mean it fits both 2 inch and 3 inch valves, and it rarely fits Kohler, Toto or American Standard valves with molded hinges or tower-style seals.
How long does a toilet flapper last?
Three to five years is typical for a rubber flapper. Silicone flappers last longer. Chlorine tablets in the tank can destroy either one in under a year.
Why does my toilet still run after I changed the flapper?
Nine times out of ten it is one of three things: the chain is too tight, the flapper is the wrong size, or the flush valve seat has mineral scale on it. Add slack, measure, and scrub the seat. If it still runs, do the dye test to confirm the water is actually getting past the flapper and not coming from the fill valve.
Can I replace a toilet flapper without turning off the water?
You can. Hold the float up or tie it with a twist tie so the fill valve stays closed, then flush to empty the tank. Turning off the shutoff valve is easier, but it is not required if the valve is stuck.
Do I need to turn off the water to do a dye test?
No. Just add the coloring to a full tank and wait 15 minutes without flushing.
What is the difference between a flapper and a canister seal?
A flapper is a hinged rubber cup that swings up on a chain. A canister seal is a flat rubber ring that sits under a plastic cylinder that lifts straight up. Many newer Kohler toilets use canisters. If your tank has a tall plastic tower in the center instead of a flapper, you need a canister seal, not a flapper.
Will a new flapper improve a weak flush?
Sometimes. A heavy, waterlogged flapper that drops early cuts the flush short, and a fresh flapper fixes that. An adjustable flapper lets you lengthen the flush further. If the bowl still does not clear, the problem is usually a partly clogged rim or jet, not the flapper.