
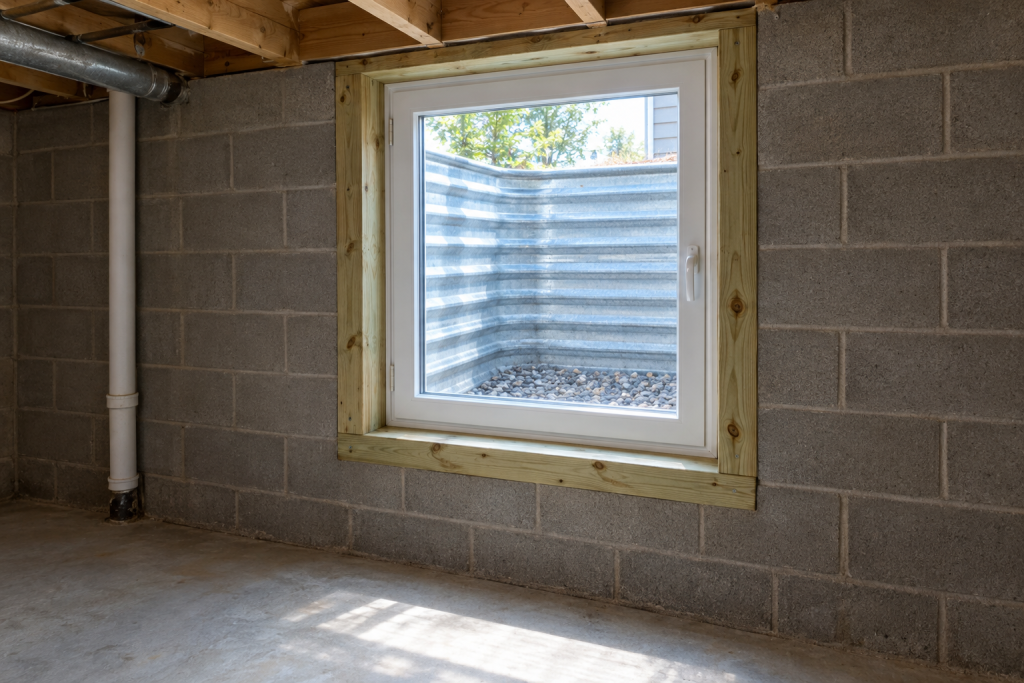
A basement egress window is a window big enough to crawl out of in a fire, and the IRC requires one in every basement bedroom and every finished basement. You cut a hole in the foundation, frame it with a pressure-treated buck, set a window with at least 5.7 square feet of clear opening, and build a drained well outside it. The whole job runs a long weekend if you rent a wall saw and a mini excavator.
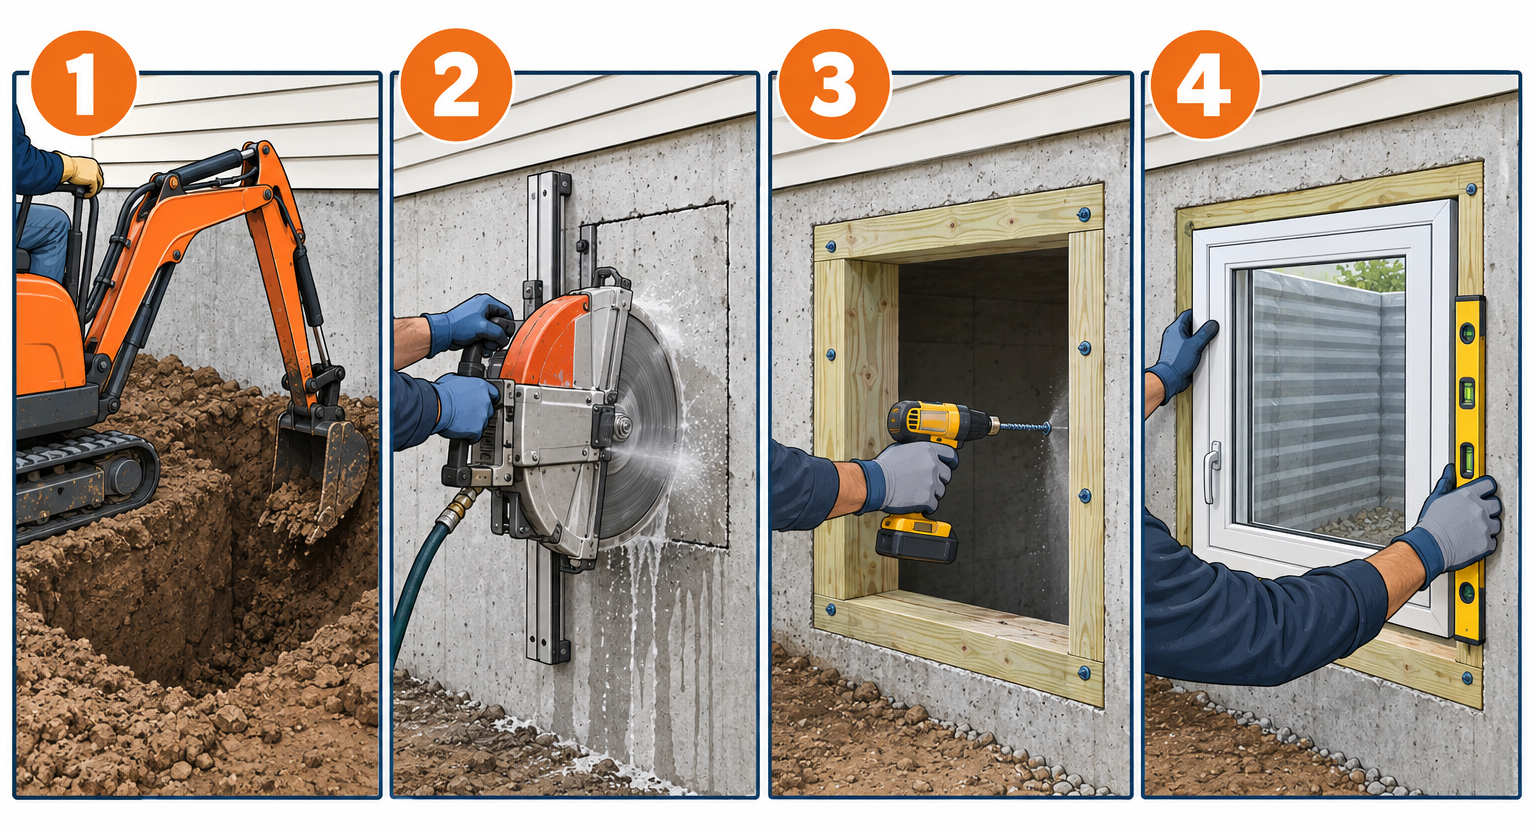
Quick steps: install a basement egress window
- Pull a building permit and call 811 to mark utilities.
- Excavate a hole 6 ft wide, 4 ft out and 8 in below the planned sill.
- Mark the opening on the wall and drill reference holes through to the outside.
- Cut the concrete with a wall saw from both sides, then knock out the slug.
- Install a steel lintel if the wall is block or the inspector requires one.
- Build and fasten the pressure-treated buck frame, then set the window plumb and level.
- Flash and seal the buck, then bolt the window well to the foundation.
- Add a drain, 6 in of washed gravel, and backfill.
- Fit a cover or grate the well, then call for the final inspection.
Tools and materials
- Egress window, slider or casement, 48 in x 48 in or 60 in x 48 in typical
- Window well kit, 48-60 in wide, 36+ in projection, 48-72 in tall (galvanized steel or composite)
- Well cover or grate, clear polycarbonate
- Pressure-treated 2×8 or 2×10 lumber for the buck (match wall thickness)
- Steel angle lintel, 3-1/2 x 3-1/2 x 1/4 in, 16 in longer than the opening (block walls)
- 1/4 x 3-1/4 in concrete screws (Tapcon) or 1/2 in wedge anchors
- Polyurethane concrete sealant, two 10 oz tubes, plus low-expansion window foam
- Self-adhesive flashing tape, 6 in wide
- 4 in perforated drain pipe and 1 yard of 3/4 in washed gravel
- Walk-behind or hand-held wall saw with 14 in diamond blade (rental, $125-175/day)
- Rotary hammer with 3/8 in and 1/2 in masonry bits, 3-lb sledge, cold chisel
- Mini excavator rental ($300-400/day) or two people with shovels
- 4 ft level, tape measure, chalk line, shims, caulk gun
- Safety glasses, P100 respirator, hearing protection, work gloves
Calculators for this job
Safety first
Call 811 at least three business days before digging, shut off the branch circuit for any wiring near the cut, and wear a P100 respirator plus hearing protection while sawing. Wet-cutting keeps silica dust down and the blade cool.
What size the opening has to be
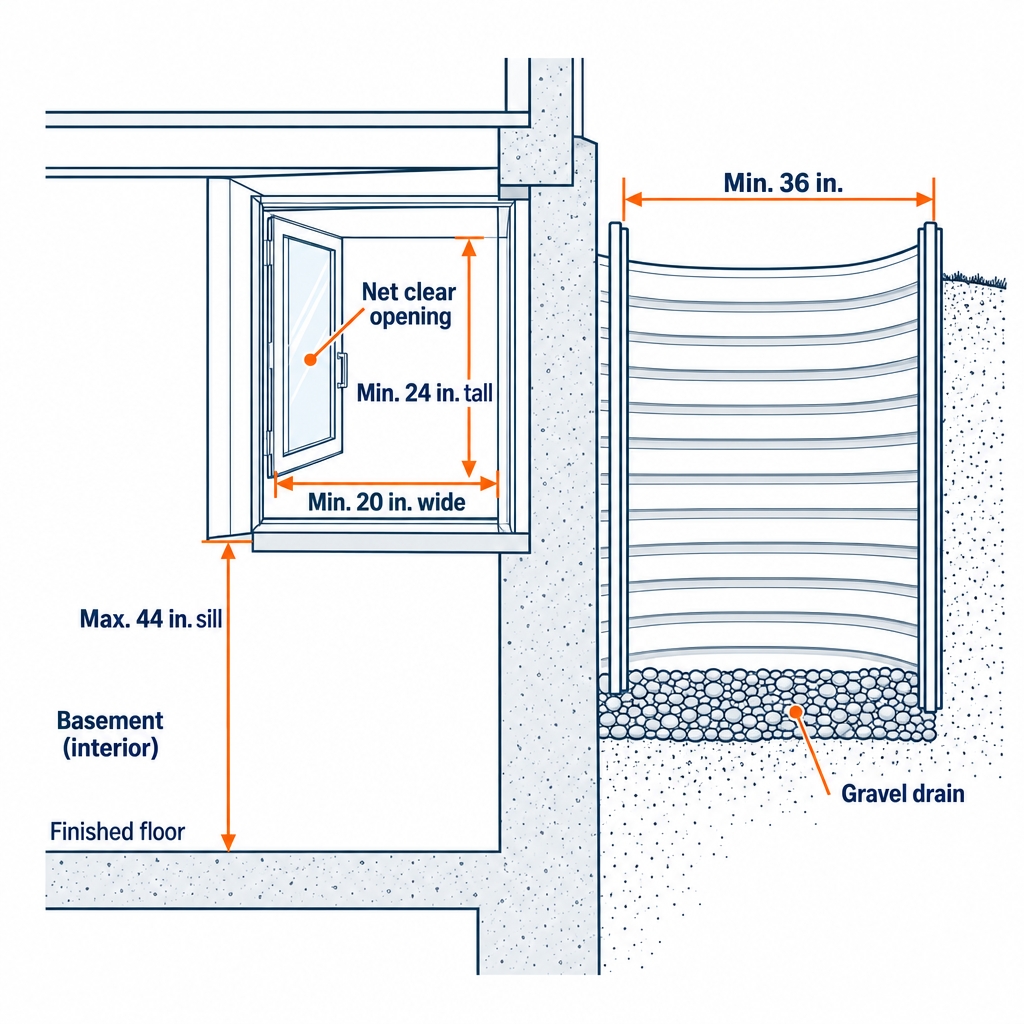
The 2021 International Residential Code, section R310, sets the numbers almost every US jurisdiction uses. Your window has to deliver a net clear opening of 5.7 square feet, at least 24 inches tall and 20 inches wide, with the sill no more than 44 inches above the finished floor. Below-grade openings get an exception down to 5.0 square feet, but plan for 5.7 so you never argue with an inspector.
Net clear means the actual hole when the sash is fully open, not the frame size. A 48 by 48 inch slider only opens about 24 by 44 inches, which is 7.3 square feet. A casement swings fully clear, so a 36 by 48 casement passes while the same size slider fails. Check the manufacturer’s egress chart before buying.
The well needs 9 square feet of floor area, at least 36 inches in both directions. Any well deeper than 44 inches needs a permanent ladder with rungs at least 12 inches wide, projecting 3 inches, spaced no more than 18 inches apart. Grates and covers must lift from inside without tools, keys or special knowledge.
Step 1: Permit, utilities and layout
Egress work is structural, so every jurisdiction wants a permit. Expect $150-500 and a sketch showing the wall, window size, well size and drain. Some cities also ask for an engineer’s letter on poured walls over 8 feet tall, which runs $300-600.
Pick a spot at least 18 inches from an inside corner and clear of the electrical panel, water line, sewer lateral and any bearing point above. Look up: the window head should sit at least 8 inches below the sill plate on a block wall so the lintel has bearing. On a poured wall you can run the cut right up to the bottom of the sill plate if your inspector approves it.
Mark the finished window dimensions on the inside wall, then add 3 inches to width and height for the two-by buck, plus 1/2 inch of shim space. A 48 by 48 window gets a 51-1/2 by 51-1/2 inch rough cut.
Step 2: Dig the well
Rent the mini excavator. Two people with shovels can do it, but 2 cubic yards of clay takes most of a day by hand and the machine costs $300. Dig a hole 2 feet wider than the well on each side, 4 feet out from the wall, and 8 inches below where the window sill will land. That gives room for gravel and drain pipe.
Pile the soil on a tarp. You will need about a third of it back for fill around the well. If you hit the footing before reaching depth, stop; the sill height has to move up, not the footing down.
Pro tip
Drill a 1/2 inch hole through the wall at each corner of your layout before you excavate. The bits poke through outside and show you exactly where the well sits, which saves moving the hole a second time.
Step 3: Cut the concrete
Snap chalk lines on both faces using the corner holes. Rent a wall saw rather than trying this with a circular saw and masonry blade; a 14 inch diamond blade cuts 5 inches deep, so you cut halfway from inside and halfway from outside and the kerfs meet in the middle. Run water on the blade. Dry cutting fills the house with silica dust in minutes.
Cut the top line first, then the sides, then the bottom. Overcut the corners by an inch or so to free the slug. Score the slug into three or four pieces so each chunk weighs under 150 pounds. Knock them out with the sledge from inside, toward the hole, with nobody standing in the well.
On a block wall, cut through the face shells and knock out the cores with the chisel. Fill any open cores along the sides with mortar or expanding foam so the buck has solid bearing.
Step 4: Set the lintel
Block walls always need a lintel because the units above the opening have nothing holding them up. Chip out a block course on each side to seat a 3-1/2 by 3-1/2 by 1/4 inch steel angle with 8 inches of bearing per end. Grout it in and let it set overnight before loading it.
Poured walls are different. The concrete above the opening acts as a beam, and most inspectors accept a 48 inch wide cut under a standard sill plate without steel. Wider than 60 inches, or with a point load above like a post or beam pocket, get the engineer’s letter.
Step 5: Build and anchor the buck
Rip pressure-treated 2x stock to match the wall thickness, usually 8 inches for poured and 7-5/8 for block. Assemble a four-sided box 1/4 inch smaller than the cut in each direction. Set it in the hole, shim it plumb and level, and check diagonals; they should match within 1/8 inch.
Fasten with 1/4 by 3-1/4 inch concrete screws every 12 inches on all four sides, two per corner. Predrill with the rotary hammer and a 3/16 inch bit, 1/2 inch deeper than the screw. Fill the gap between buck and concrete with polyurethane sealant on both faces. Do not use latex caulk; it fails against masonry in two winters.
Step 6: Install the window
Dry-fit the window in the buck. You want 1/4 inch of play on each side. Run a bead of sealant across the sill, set the unit, and tack the top corners. Shim at each side within 4 inches of the corners and every 16 inches between, then screw through the frame with the manufacturer’s fasteners, usually #8 by 2-1/2 inch screws.
Open and close the sash before the last screws go in. A slider that drags or a casement that won’t latch means the frame is racked. Pull a shim and recheck. Fill the gap with low-expansion window foam, never regular foam, which bows vinyl frames inward.
Pro tip
Install the window with the operable sash on the side nearest the well ladder. In a real emergency, a kid climbing out shouldn’t have to cross the well to reach the rungs.
Step 7: Flash, seal and mount the well
Run self-adhesive flashing tape over the outside buck faces, lapping onto the concrete 2 inches and tucking under the window’s nail fin or frame edge. Tape the sill first, then sides, then head, so water always sheds outward.
Position the well so its flanges overlap the window frame by at least 2 inches on each side. Drill 3/8 inch holes through the flanges and anchor with 1/2 inch wedge anchors, 24 inches on center. Run sealant behind the flange first. Composite wells come in stackable sections; galvanized wells are lighter, easier to install and usually cheaper, about $100-400 versus $200-1,600 for composite.
Step 8: Drain and backfill
Every egress well needs a drain unless your soil perc test says otherwise, and clay soil never does. The best option is a 4 inch pipe dropping from the gravel bed to your footing drain or an interior sump. If there’s no footing drain, run a short “french drain” from the well to daylight on a sloped lot, or to a dry well at least 10 feet from the foundation.
Lay 6 inches of washed 3/4 inch gravel in the well bottom. Backfill around the outside in 12 inch lifts, tamping each one. Slope the finished grade away from the well at 1/2 inch per foot so surface water goes around it, not in.
Step 9: Cover, ladder and inspection
Bolt the ladder to the well wall if the depth exceeds 44 inches. Set the polycarbonate cover and confirm it lifts from inside with one hand. Grates need the same 5.7 square foot opening when open.
Inside, finish the buck with trim or drywall returns. Call for the final. Inspectors check sill height, clear opening, well dimensions, ladder spacing, cover operation and drainage, in that order.
Troubleshooting
| Symptom | Likely cause | Fix |
|---|---|---|
| Water in the well after rain | No drain, or drain pipe clogged with backfill | Dig out gravel, add filter fabric, connect 4 in pipe to footing drain |
| Sash binds or won’t lock | Racked frame from over-shimming or expanding foam | Pull foam, reshim, check diagonals, refoam with low-expansion |
| Crack running from the cut corner | Stress riser from a sharp corner on block wall | Chase the crack, epoxy inject, add lintel bearing if missing |
| Daylight or draft around buck | Sealant skipped between buck and concrete | Cut back and refill both faces with polyurethane |
| Inspector fails clear opening | Slider chosen by frame size, not egress chart | Swap to casement or in-swing unit of the same frame size |
| Well pulling away from wall | Flange anchors too short or backfill not tamped | Re-anchor with 1/2 in wedge anchors, backfill in lifts |
When to call a pro
Call a foundation contractor or structural engineer if the wall shows horizontal cracks, bows inward, carries a beam pocket within 3 feet of your cut, or is over 8 feet tall. Hire a licensed concrete cutter ($250-700 for the cut alone, with some shops charging a $500 minimum) if you have never run a wall saw. An electrician handles any circuit that has to move.
FAQ
How much does a basement egress window cost installed?
Professional installs run $3,000-7,000 depending on wall type, soil and whether a drain tie-in exists. DIY with rentals lands around $1,500-3,500, with the window, well, cover and lintel making up most of it.
Do I need an egress window for a basement bedroom?
Yes. Every sleeping room needs its own egress opening, and a finished basement needs at least one regardless of use. A door to grade counts, a bulkhead counts, a regular small window does not.
Can I replace an existing basement window instead of cutting new?
Only if the existing opening can be enlarged to the code size. Most old basement windows are 32 by 14 inches, far below the 24 inch height minimum, so you’ll be cutting down anyway. Cutting down is cheaper than a fresh opening because the top edge already exists.
Slider or casement for egress?
Casement if the budget allows. The sash swings clear, so a 36 by 48 casement passes code and leaves more wall intact. Sliders are not reliably cheaper installed, need a wider opening for the same clear area and are easier to jam with a window well cover.