
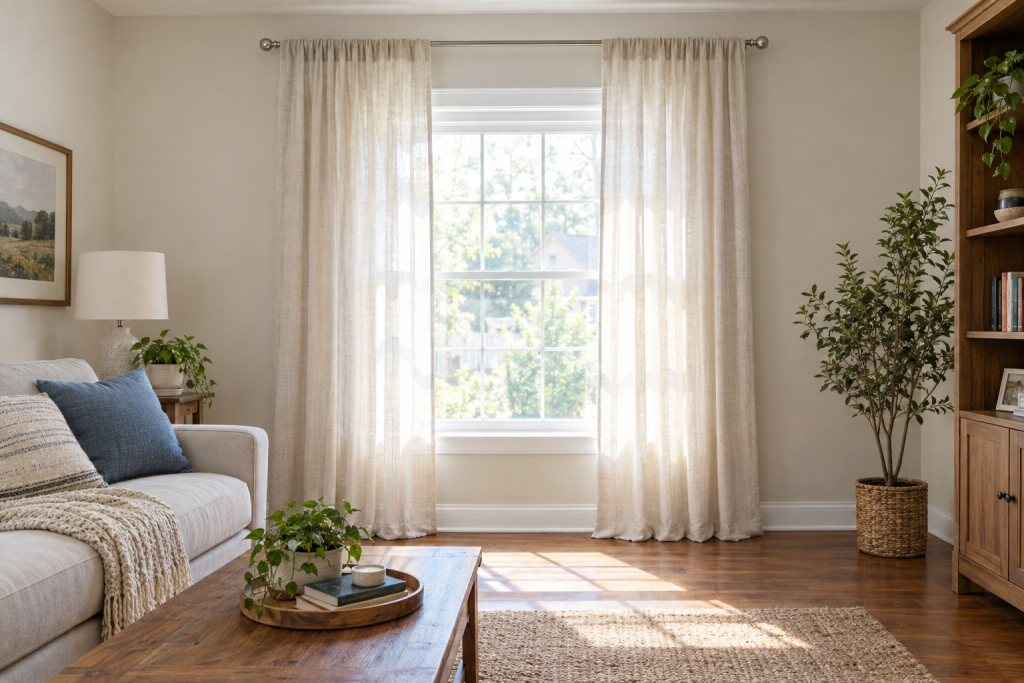
Hang the rod 4 to 6 inches above the window frame and 3 to 6 inches past each side, use anchors rated for the weight, then thread the curtains on before you set the rod in the brackets. The whole job takes under 90 minutes per window, and getting the measurements right beforehand is what separates a tailored look from a droopy one.
Quick steps: hang curtains on a curtain rod
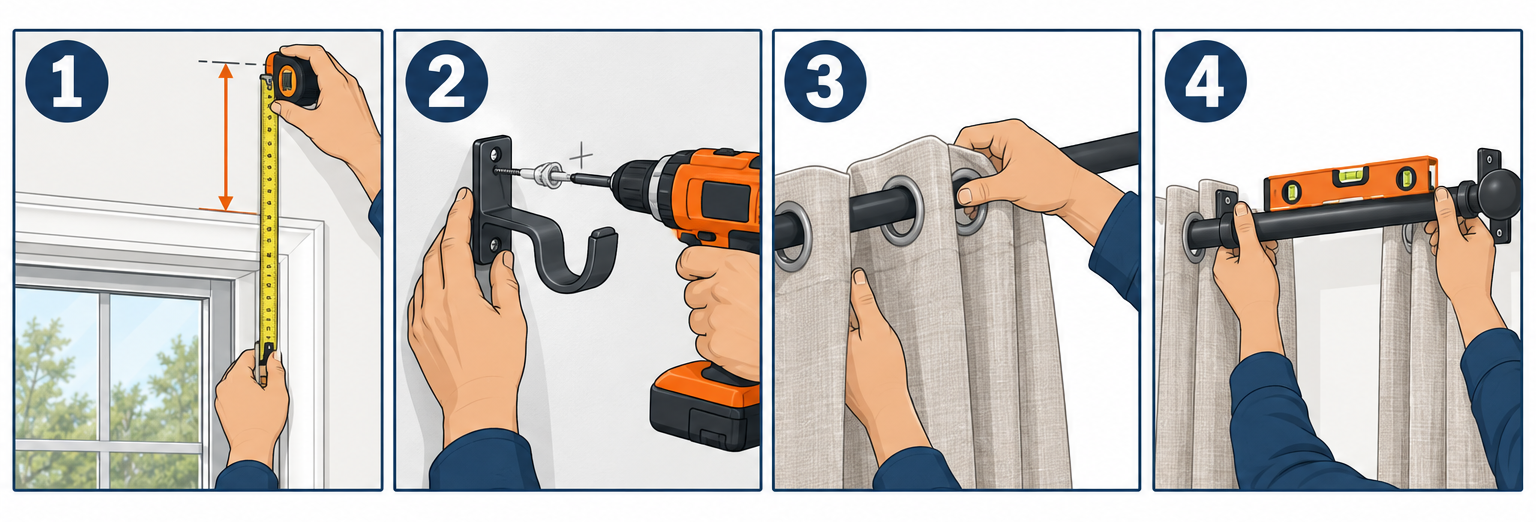
- Measure window width and the drop from your planned rod height to the floor.
- Mark bracket positions 4-6 in. above the frame and 3-6 in. past each side.
- Check marks with a level and find studs with a stud finder.
- Drill pilot holes, set anchors where there is no stud, screw brackets in.
- Thread curtains onto the rod (grommets, pocket, tabs or rings).
- Set the rod in the brackets, tighten set screws, add finials.
- Level the rod, space the panels evenly, and steam or train the folds.
Tools and materials
- Tape measure (25 ft)
- Pencil and painter’s tape
- Torpedo level or 24 in. level
- Stud finder
- Cordless drill with 1/8 in., 3/16 in. and 1/4 in. bits
-
2 Phillips screwdriver bit
- Drywall anchors: self-drilling (50 lb) or toggle bolts (100 lb+)
- Curtain rod kit with brackets, finials and center support if over 60 in.
- Curtain rings or clips if the panels are not grommet or rod-pocket
- Step ladder (4 ft or 6 ft)
- Clothes steamer or iron
Calculators for this job
Safety first
Use a stud finder with AC detection before drilling beside a window; wiring for switches and outlets often runs vertically next to the frame. Work from a step ladder, never a chair, and keep three points of contact when you lift a loaded rod overhead.
Step 1: Measure the window and decide where the rod goes
Everything downstream depends on four numbers: window width including the trim, the height you want the rod, the distance from that rod height to the floor, and the wall space available on each side. Write them on a strip of painter’s tape stuck to the wall so you are not hunting for a scrap of paper later.
Measure the outside edge of the trim, left to right. If the window has no trim, measure the drywall opening. Then measure from the top of the trim to the ceiling. That second number tells you how much room you have to go high.
Rod height is the choice most people get wrong. Mounting the brackets right on top of the trim makes the window look short and the ceiling look low. Going higher stretches the window visually, and because most fabric hangs in a straight line, the extra 6 inches of curtain costs almost nothing.
| Mounting position | Where the rod sits | Best for |
|---|---|---|
| Standard | 4-6 in. above the top of the trim | Most rooms with 8 ft ceilings |
| High | Halfway between trim and ceiling | Rooms with 9-10 ft ceilings, short windows |
| Ceiling height | 2-3 in. below the ceiling or ceiling-mounted | Modern rooms, floor-to-ceiling drapes, cathedral ceilings |
| Inside mount | Inside the window reveal | Tension rods, cafe curtains, sheers on small windows |
For width, extend the rod 3 to 6 inches past the trim on each side on a standard window. On a wider window or where you want maximum daylight, go 8 to 12 inches so the open panels stack almost entirely on the wall. The window reads as wider, and you are not blocking glass with bunched fabric.
Measure from the rod height to the floor last. Subtract 1/2 inch if you want the hem to clear the floor, add 1 to 3 inches if you want the fabric to break on the floor like a trouser hem, and add 4 to 6 inches for a deliberate puddle. For curtains on rings, measure from the bottom of the ring instead of the rod itself, since the ring adds roughly an inch.
Pro tip
Before you drill anything, tape a scrap of ribbon or string at your planned rod height and let it hang to the floor. Stand back in the doorway. You will know in five seconds whether the height feels right, and moving tape is free.
Check the ceiling clearance at the top too. You need about 2 inches between the top of the rod and the ceiling to get the rod in and out of the brackets. Tighter than that and you are mounting from the ceiling instead.
Step 2: Pick curtains that actually fit the rod
Buying the panels and the rod together saves a second trip. A rod needs to match the curtain header, the curtain width needs to cover the rod with slack, and the length needs to land where you decided in Step 1.
Curtain width
A single panel stretched flat across a window looks like a bedsheet. Fabric needs fullness to fall in folds, and the rule is to buy curtains that total 2 to 2.5 times the rod width. Sheers need more, heavy blackout fabric can get away with less.
| Rod width (bracket to bracket) | Fabric width needed at 2x | Panels to buy (50 in. wide each) | Panels to buy (54 in. wide each) |
|---|---|---|---|
| 36-48 in. | 72-96 in. | 2 | 2 |
| 49-72 in. | 98-144 in. | 2-3 | 2-3 |
| 73-96 in. | 146-192 in. | 3-4 | 3-4 |
| 97-120 in. | 194-240 in. | 4-5 | 4 |
| 121-144 in. | 242-288 in. | 5-6 | 5 |
Panels usually sell as singles, so read the listing closely. A “pair” at 100 inches might be two 50-inch panels. Pinch-pleat and tailored pleat panels are already gathered at the factory, so their listed width is the finished width and you buy to the rod width directly, not to the multiplied width.
Curtain length
Off-the-shelf panels come in a handful of lengths. Match them to the rod-to-floor measurement you took.
| Standard panel length | Rod height it suits (8 ft ceiling) | Finished look |
|---|---|---|
| 63 in. | Just above the trim on a short window | Sill or apron length |
| 84 in. | 1-2 in. above the trim | Floor length on a tight 8 ft room, often too short |
| 95-96 in. | 4-6 in. above the trim | Clean floor skim, the most common choice |
| 108 in. | Near the ceiling on 8 ft, standard height on 9 ft | Slight break or puddle on 8 ft ceilings |
| 120 in. | High or ceiling mount on 10 ft ceilings | Floor length in tall rooms |
If your measurement falls between sizes, buy long and hem. A 1 inch double-fold hem on a 95 inch panel takes about 20 minutes with iron-on hem tape and a hot iron, and it is far easier than living with curtains that stop 2 inches short of the floor.
Header type and rod diameter
The top of the curtain decides how it goes on the rod and how it looks when open.
- Grommet: metal rings punched through the header. They slide easily, stack in deep even waves, and need a rod that is at least 1/2 inch narrower than the grommet opening. Most grommets are 1 5/8 inches, so a 1 inch to 1 1/4 inch rod works.
- Rod pocket: a sewn channel the rod threads through. Cheap and simple, but the fabric does not slide well. Use a rod no bigger than about 3/4 of the pocket depth, so a 3 inch pocket takes a rod up to about 2 to 2 1/2 inches.
- Back tab: loops sewn on the back so the rod is hidden. Gives a pleated look without the price, but like rod pocket, it drags when you open them.
- Pinch pleat or tailored pleat: sewn pleats with drapery pins that hook into rings. Hangs the best, slides the best, costs the most.
- Tab top: visible loops over the rod. Casual and easy, shows the rod.
A 5/8 inch rod is fine for sheers up to about 60 inches wide. Go to 1 inch for anything heavier or wider, and 1 1/4 to 1 1/2 inches for lined panels over 8 feet of width. Thin rods bow in the middle and that sag shows from across the room.
Sheers behind heavier drapes need a double rod, which puts two rods on one set of brackets, the sheer rod 2 to 3 inches behind the front rod. Buy the double rod kit rather than trying to stack two single rods, since the bracket geometry is already worked out.
Step 3: Mark the bracket positions
Start with the first bracket. Measure up from the top of the trim to your chosen rod height and make a light pencil tick. Then measure out from the edge of the trim your chosen overhang and make a cross. That cross is where the top screw hole of the bracket lands, more or less. Hold the bracket against the wall with the top hole on the cross and trace all the screw holes.
Now get the second bracket on the same horizontal line. Measure up from the trim the same distance on the other side, then confirm with a level laid across both marks. On older houses the window trim itself might be out of level, so trust the level, not the trim. A rod that follows a crooked window looks crooked; a rod that is level looks right even if the window is not.
If the rod is longer than 60 inches or the curtains are heavy, mark a center support bracket at the midpoint. Most kits include one. Over 96 inches, use two supports spaced evenly so no unsupported span exceeds about 48 inches.
Pro tip
Cut a strip of cardboard or stiff paper to the exact rod height you want, measured from the top of the trim, and use it as a template at every corner of every window in the room. All the rods end up at identical heights without remeasuring, and matching rods across a wall is what makes a room look finished.
Run the stud finder across each mark. You are hoping to hit the trimmer studs that frame the window. They sit directly beside the window opening, usually 1 1/2 inches past the drywall edge of the trim, which is why a 3 to 4 inch overhang often lands you right on solid wood. If you find a stud, mark it and shift the bracket to land on it if you can.
Step 4: Install anchors and brackets
What holds the bracket decides whether the rod stays up. Screws alone in drywall will pull out the first time someone yanks a stuck curtain. Pick a fastener based on what is behind the drywall and how heavy the loaded rod will be.
| Fastener | Holding capacity in 1/2 in. drywall | Drill bit | Use it for |
|---|---|---|---|
| Wood screw into stud (#8 x 1 1/2 in.) | 80-100 lb | 1/8 in. pilot | Any bracket that lands on a stud |
| Self-drilling drywall anchor, nylon | 25-50 lb | None, screw it in | Sheers, lightweight single panels |
| Self-drilling drywall anchor, metal | 50-75 lb | None | Standard lined panels |
| Snap toggle or toggle bolt (1/4 in.) | 100-200 lb | 1/2 in. | Heavy drapes, double rods, blackout, anything over 72 in. wide |
| Tapcon masonry screw (3/16 x 1 3/4 in.) | 100+ lb | 5/32 in. masonry bit | Brick, block, concrete |
| Plastic expansion anchor | 10-20 lb | 3/16 in. | Not recommended for curtain rods |
Lined panels on a 72 inch rod weigh about 8 to 12 pounds, but the leverage of someone pulling the fabric sideways multiplies that. Buy anchors rated for at least three times the static weight. Toggle bolts cost about $1 each and remove any doubt.
For a stud: drill a 1/8 inch pilot hole 1 1/2 inches deep and drive the screw with a driver bit. Stop when the bracket is snug. Over-tightening strips the hole.
For a self-drilling anchor: hold the anchor on the mark and drive it with a Phillips bit until the flange sits flush with the drywall. Do not spin it after it seats or it will chew out the hole. Then put the bracket over it and drive the supplied screw.
For a toggle: drill the 1/2 inch hole, fold the toggle wings, push them through until they spring open, and tighten while pulling the bolt toward you. Snap toggles with the plastic strap are easier because you can set them without the bracket attached and then remove the bolt.
Mount the outer brackets first, then set the bare rod in them and check it with a level. If it is off by more than 1/8 inch over 6 feet, pull one bracket and move it now, before you have anchors and screws in every hole. Install the center support last, with the rod in place so you can see exactly where the rod wants to rest.
Brick and masonry take longer. Use a hammer drill with a 5/32 inch masonry bit, drill 1/4 inch deeper than the screw length, blow the dust out, and drive the Tapcon with a 1/4 inch hex driver. Mortar joints are softer and easier to drill than the brick face, so aim brackets at joints when the layout allows.
Step 5: Thread the curtains onto the rod
Load the curtains before the rod goes up. Threading fabric onto a rod that is already in the brackets means working overhead with your arms up, and that is how finials end up on the floor.
Pull off one finial. Lay the rod on a clean floor or a bed so the panels do not drag.
Grommets go on in a specific pattern. Each panel has an even number of grommets, and the first and last grommet need the fabric facing the same way so the leading edge turns in toward the window. Thread the first grommet from the back of the fabric to the front, the second from front to back, and keep alternating. When you finish, the outer edge of the panel should wrap behind the rod and return toward the wall, which hides the rod end and gives the edge a clean finish.
Rod-pocket panels just thread straight through the channel. Bunch the fabric onto the rod as you go rather than pulling the rod through from the far end, which stresses the stitching. If there is a header above the pocket, it will stand up above the rod as a small ruffle once hung.
Back-tab and tab-top panels thread through each loop in order. Keep them untwisted by holding the panel face toward you as you work.
Ring clips are the quickest. Slide all the rings onto the rod first, then clip the panel to them at even intervals, about every 4 to 6 inches, with one clip at each outer edge. Check the clips are all at the same depth on the fabric or the top edge will wave.
Pleated panels use drapery pins. Push the sharp end into the back of each pleat near the top, hook end up, and hang the hook into the small eye at the bottom of each ring. One pin per pleat plus one at each end.
For a double rod, load the sheer onto the back rod and the drape onto the front rod separately, then set them in the brackets one at a time starting with the back.
Pro tip
Count the rings. Two panels with 7 rings each need 14 rings plus one ring on the outside of each end bracket so the outer edge of the fabric stays pinned against the wall and does not swing in when you open the curtains. Skipping those two outside rings is the most common reason a light gap appears at the edges.
Replace the finial once the panels are on. Finials screw or push onto the rod end and act as the stop that keeps rings from sliding off. If your rod is a telescoping two-piece, make sure the thinner section is inserted at least 6 inches into the thicker one, and avoid landing a grommet right at the step between them.
Step 6: Hang, level, and dress the curtains
Lift the loaded rod with the panels bunched to the center. On rods over 6 feet, have a second person take the other end. Set it in the outer brackets, then let the center support catch the middle.
Most brackets have a small set screw that bites into the rod. Tighten it with the supplied hex key or a screwdriver until the rod cannot rotate. On rods with rings, the center support sits between panels so the rings can slide without hitting it, which means one panel stacks on each side of the support. On grommet panels, place the support where the fabric gap falls when the curtains are closed.
Put the level on the rod one last time. If it reads off and the brackets are level, the rod is seated wrong in one bracket, usually not pushed fully back.
Now spread the panels. Slide the rings or grommets so the folds are evenly spaced across the rod width. With grommets, the deep even S-curves come naturally. With rod pocket, you have to shuffle the gathers by hand until they are consistent.
Check the hem. The fabric should sit exactly where you planned: 1/2 inch off the floor, kissing it, or puddled. If it is slightly long and you used rings, move the clips up or down on the fabric to adjust by up to an inch. If it is slightly short, lower the clips to the very top edge or accept the hem floating.
Creases from packaging will not fall out on their own. Steam the hanging panels top to bottom with a garment steamer held an inch from the fabric, moving at about 6 inches per second. For heavy polyester, a warm iron on the reverse side before hanging is faster. Linen and cotton relax a lot with steam and will sometimes grow a half inch in length as the fibers loosen, so hem after steaming, not before.
Training the folds is the finishing trick that makes store-bought curtains look custom. Open the panels fully so they stack, then arrange each fold by hand so they alternate neatly in and out. Tie the stack loosely with three strips of fabric or elastic bands at the top, middle and bottom. Leave it 2 to 3 days. When you untie them, the fabric remembers the folds and falls in uniform columns every time you open them.
Finished result
A properly hung rod sits level 4 to 6 inches above the trim with the finials extending 3 to 6 inches past each side, the panels stacking on the wall when open so the glass is fully exposed, and the hem landing within 1/2 inch of the floor along its full width. Opening and closing takes one hand with no catching, and the brackets do not flex when you tug a panel.
Ceiling mounts, bay windows and other awkward cases
A ceiling-mount bracket takes the rod up to the ceiling for floor-to-ceiling drapes or where there is no wall space above the window. The bracket screws into a ceiling joist or into toggle bolts through the drywall. Joists run perpendicular to the ridge of the roof in most houses, so a stud finder across the ceiling at 16 inch intervals will find them. Scan for live wires first, the same as you would before putting up a ceiling fan, because light circuits often run across the ceiling right above a window.
Bay windows need either a bendable rod, a set of short rods joined with corner connectors, or a ceiling track. The simplest reliable option is three straight rods with an elbow connector at each angle. Mount a bracket on each side of every connector, since connectors do not carry load, and run one long panel per section or let the panels overlap at the corners.
Windows that meet in a corner use two rods with an inside corner connector, mounted so the rod ends meet at the corner with one bracket each within 4 inches of the joint.
Very wide windows and sliding doors over 10 feet usually exceed what a telescoping rod can do without sagging. A traverse rod with a cord or wand, or a ceiling track with carriers, holds the weight and opens from the center without you touching the fabric. A basic 10 foot traverse rod costs about $110 to $150, with decorative or heavy-duty versions running $150 to $900 or more, and installs on the same bracket principles.
Rental apartments with a no-holes rule can use tension rods inside the frame for lightweight sheers, or Command-style hooks rated for 5 pounds each holding a lightweight rod. Both are fine for sheers on a window under 48 inches. Neither will hold lined drapes.
Metal window frames in older apartments sometimes have no stud beside the window at all. Mount brackets to the ceiling instead, or use toggle bolts rated at 100 pounds and accept that you cannot go heavier than standard lined panels.
Common mistakes and what they look like
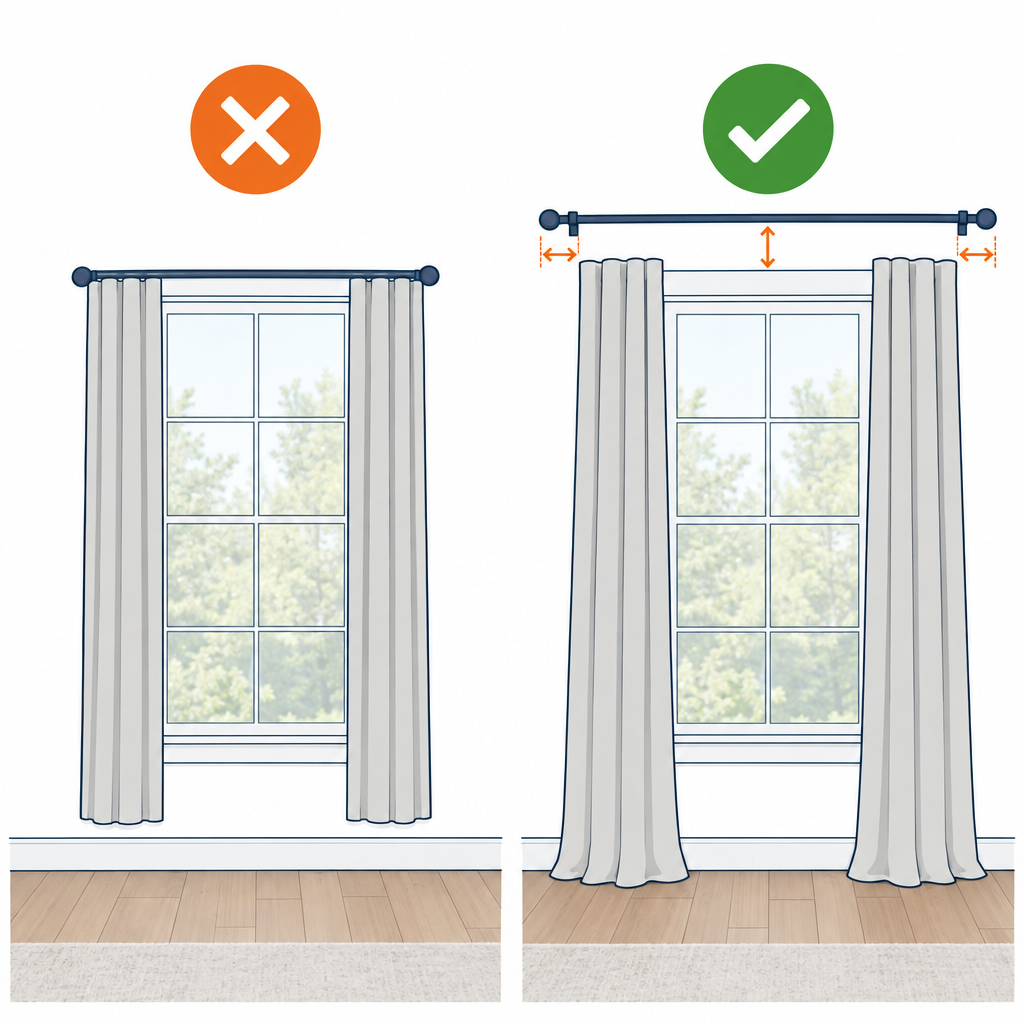
Most curtain problems come from skipping a measurement or saving money on anchors. The fix is usually quick if you catch it early.
| Symptom | Likely cause | Fix |
|---|---|---|
| Rod sags in the middle | No center support, or rod diameter too thin for the span | Add a center support bracket at the midpoint; over 72 in., switch to a 1 1/4 in. rod |
| Bracket pulls out of the wall | Plastic anchors or screws in drywall only | Remove, fill hole with wood filler, re-drill 1/2 in. and use a toggle bolt |
| Curtains stop 1-2 in. above the floor | Rod mounted too high for the panel length | Lower brackets, buy the next length up, or move ring clips to the top edge |
| Curtains puddle unevenly | Floor out of level, or hem not steamed flat | Adjust each clip height individually; steam and let hang 48 hours |
| Light gap at the outer edges | Panels not wrapped behind the end bracket | Add one ring outside each bracket, or wrap the last grommet behind the rod |
| Panels look flat and stretched | Not enough fabric width | Add a third panel; aim for 2x rod width minimum |
| Rod rattles or rotates | Set screws loose | Tighten set screws on every bracket until the rod cannot turn |
| Fabric catches when sliding | Rod pocket too tight, or telescoping joint snagging | Spray the rod with dry silicone lubricant; wrap the joint with clear tape to smooth the step |
| Rod reads crooked but brackets are level | Rod not seated fully in one bracket | Pull the rod forward and push it fully back into both cradles |
| Grommets face the wrong way at the edge | Started threading from the wrong side | Unthread and restart, first grommet from back to front |
| Heavy drapes bow the bracket outward | Bracket projection too long for its gauge, or wrong anchors | Swap to a heavy-duty bracket with a second screw hole, mount into a stud |
A rod that pulls out once will keep pulling out of the same hole no matter what anchor you push in, because the drywall paper is already torn. Fill it with a dab of lightweight spackle or wood filler, let it dry an hour, and drill a fresh hole an inch to the side if the layout allows. Or step up to a toggle, which bears on the back of the drywall rather than inside the damaged hole.
Drapes that look wrong even with everything level usually come down to proportion. A 5/8 inch rod on a 9 foot window looks spindly. A 2 inch wooden pole in a small bathroom overwhelms it. Match rod scale to window scale: 5/8 to 3/4 inch under 48 inches wide, 1 inch for 48 to 84 inches, 1 1/4 inches and up beyond that.
When to call a pro
Call a handyman or drapery installer if the wall is plaster and lath that crumbles when drilled, if the window is wider than 12 feet and needs a traverse or motorized track, if the rod must mount into a cathedral ceiling over a stairwell that needs scaffolding or a 12 ft ladder, or if a stud finder shows wiring or a pipe exactly where the brackets must go. Expect $75 to $150 per window in labor for standard installs, and $300 to $1,000 or more per opening for motorized tracks.
FAQ
How high should curtains on a curtain rod hang?
Mount the rod 4 to 6 inches above the top of the window trim as a baseline. In rooms with 9 foot or taller ceilings, go halfway between the trim and the ceiling, or within 2 to 3 inches of the ceiling for a modern look. The only time the rod belongs directly on the trim is an inside mount for cafe curtains or sheers.
How far past the window should the rod extend?
Three to 6 inches past the trim on each side is standard. Push it to 8 to 12 inches on each side if you want the open panels to clear the glass entirely, which makes the window look larger and lets in the most light. Just confirm you have wall space and the finials will not hit a corner or a cabinet.
Should curtains touch the floor?
Floor-length panels should either float 1/2 inch above the floor, just skim it, or break 1 to 2 inches onto it. All three look intentional. A hem that stops 2 to 3 inches above the floor is the one length that always reads as a mistake. The exception is a window over a radiator, counter or sofa back, where sill or apron length is the right call.
How many curtain panels do I need?
Divide the rod width by the panel width, then double it. A 72 inch rod with 50 inch panels needs 144 inches of fabric, which is three panels. Two panels on a 72 inch rod gives 100 inches, only 1.4 times the width, and the curtains will look flat when closed.
Can I hang curtains without drilling?
Yes, for lightweight panels only. A tension rod inside the window frame holds sheers up to about 10 pounds. Adhesive hooks rated at 5 pounds each can carry a 5/8 inch rod with unlined panels on windows under 48 inches. Neither will hold lined or blackout drapes, and both are likely to drop eventually, so plan on them as a temporary solution.
What size screws do curtain rod brackets use?
Most kits include #6 or #8 screws about 1 1/4 to 1 1/2 inches long, sized for the supplied plastic anchors. Replace them with #8 x 1 1/2 inch wood screws when you hit a stud, and with 1/4 inch toggle bolts for heavy drapes in drywall. The kit anchors are usually the weakest link.
Do I need a center support bracket?
Any rod over 60 inches needs one, and any rod over 96 inches needs two. Even a 1 inch steel rod will show a visible dip over 6 feet with lined panels on it. Place the support between panels so the rings or grommets never have to pass it.
How do I make cheap curtains look expensive?
Hang them high and wide, buy enough width for 2.5 times fullness, hem to a clean floor skim, steam every crease out, and train the folds for 48 hours tied in position. A $40 pair of panels installed this way looks better than $300 drapes hung on the trim with a sagging rod.