
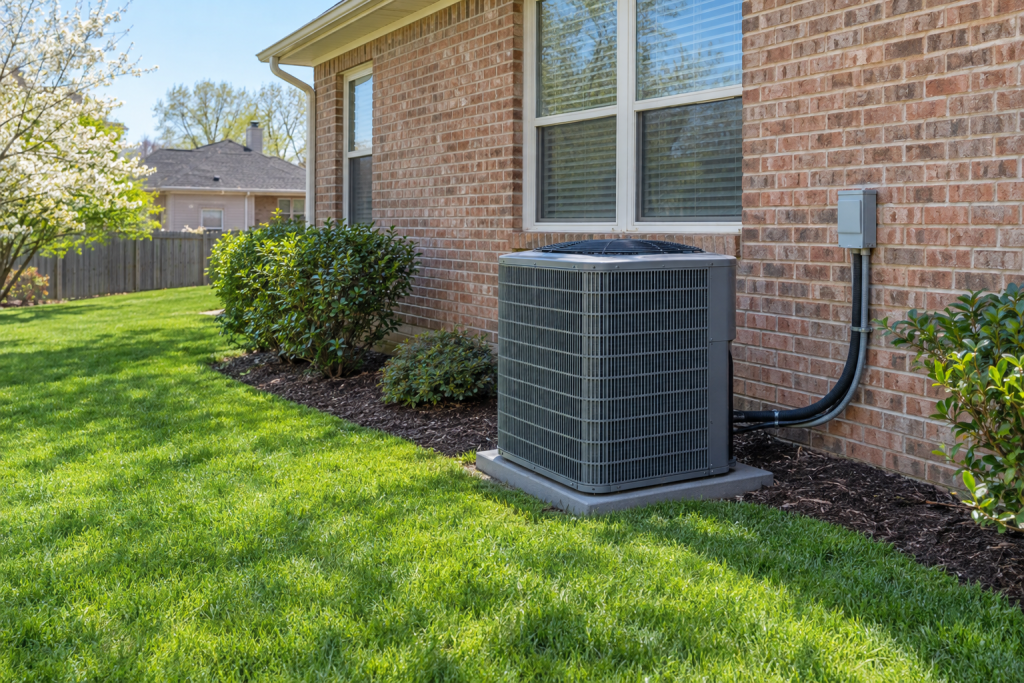
A full year of ac maintenance comes down to twelve jobs: swap the filter on schedule, wash the outdoor coil each spring, flush the condensate drain, test the capacitor, and run a temperature-split check before the first heat wave. Most of it takes one Saturday morning in spring plus ten minutes a month after that, and it keeps a central air conditioner running 15 to 20 years instead of 10.
Quick steps: spring AC maintenance
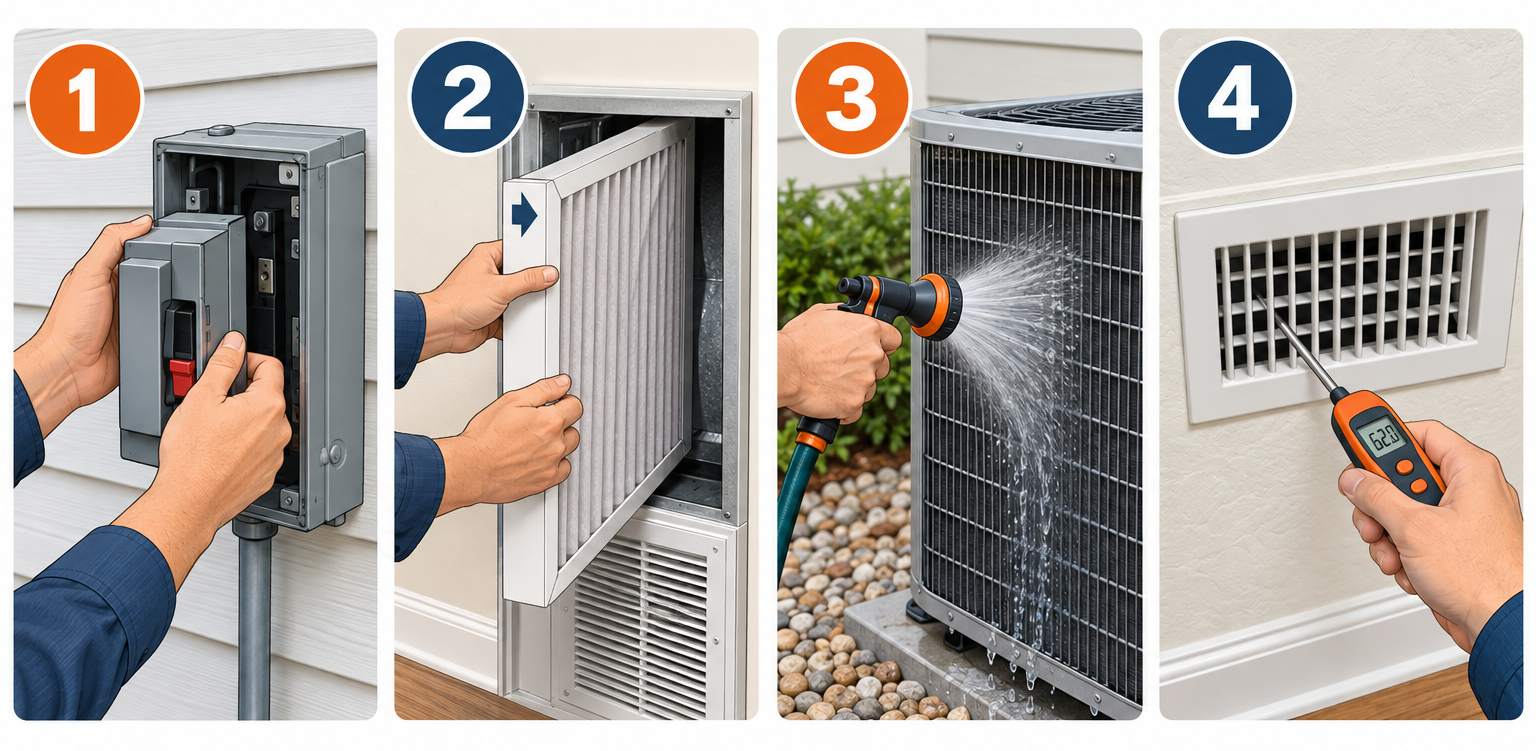
- Kill power at the outdoor disconnect and the furnace or air handler breaker.
- Replace the air filter and note the date on the frame.
- Clear 2 feet around the condenser and rinse the coil from the inside out.
- Straighten bent fins with a fin comb and shim the pad level.
- Spray no-rinse foaming cleaner on the evaporator coil and wipe the blower wheel.
- Pour a cup of distilled vinegar down the condensate line and clear the trap.
- Discharge and meter the run capacitor; inspect the contactor and wiring.
- Restore power, run the system 15 minutes, and confirm a 15-20°F temperature drop.
Tools and materials
- Nut driver set (1/4″ and 5/16″) and a Phillips screwdriver
- Garden hose with spray nozzle (never a pressure washer)
- Fin comb (match it to your fins per inch, usually 14-20)
- Foaming no-rinse evaporator coil cleaner (19 oz can)
- Outdoor condenser coil cleaner, non-acid formula
- Replacement filter in your exact size (check the frame edge, e.g., 16x25x1)
- Distilled white vinegar, 1 cup, plus a wet/dry shop vac
- Multimeter with a capacitance (µF) setting, $25-60
- Insulated screwdriver and a 20,000-ohm resistor for discharging the capacitor
- Torpedo level and composite shims or pea gravel for the pad
- Foam pipe insulation, 3/4″ or 7/8″ ID, UV-rated
- Work gloves, safety glasses, and a flashlight
Calculators for this job
Safety first
Pull the disconnect at the condenser and flip the breaker for the air handler before opening either cabinet. Capacitors hold a charge after power is off, so discharge them with an insulated tool before you touch the terminals. Keep water away from the electrical compartment on the outdoor unit.
The year at a glance
Our checklist spreads the work across the calendar so no single visit is a marathon. Spring carries the load because that service prevents nearly every summer breakdown we see. The other seasons are light.
| Season | Tasks | Time |
|---|---|---|
| Spring (March-May) | Full service: filter, condenser wash, fin repair, evaporator and blower cleaning, drain flush, capacitor test, temperature split | 2-3 hours |
| Summer (June-August) | Filter check monthly, hose off condenser if dusty, listen for new noises, watch the drain pan | 10 minutes a month |
| Fall (September-November) | Final filter change, clear leaves and seed pods from the coil, trim plants back, cover the top only if you cover at all | 30 minutes |
| Winter (December-February) | Keep snow and ice off the unit, check the disconnect box seal, test the thermostat heating side, order spring parts | 15 minutes |
Heat pumps are the exception. They run year-round, so treat fall as a second spring and do the full condenser cleaning before heating season as well.
Step 1: Shut off power at both disconnects
Every ac unit maintenance job starts here, and skipping it is how people lose a finger to a fan blade or take 240 volts through a screwdriver. There are two power sources to deal with.
The outdoor disconnect is the gray metal box on the wall within sight of the condenser. Open the lid and either pull the plastic block straight out (flip it over and reinsert it to park it in the off position) or throw the toggle. Some older homes have a fused pull-out; same idea.
Inside, find the breaker labeled “furnace” or “air handler” in the main panel. If you have a gas furnace, there is usually also a light-switch-style disconnect on or beside the cabinet. Turn both off. Then set the thermostat to off so nothing calls for cooling while you work.
Confirm power is dead before reaching into the condenser. Set your multimeter to AC volts and probe the two line terminals on the contactor. You want 0 volts. If you still read 240, you have the wrong breaker.
Step 2: Replace the air filter
The filter is the single highest-return item on any air conditioner maintenance list. A clogged one starves the evaporator coil of airflow, which drops coil temperature below freezing, which ices the coil, which eventually floods the drain pan. The Department of Energy puts the energy penalty of a dirty filter at 5 to 15 percent, and in our experience it is also the root cause of about half the “AC not cooling” calls in July.
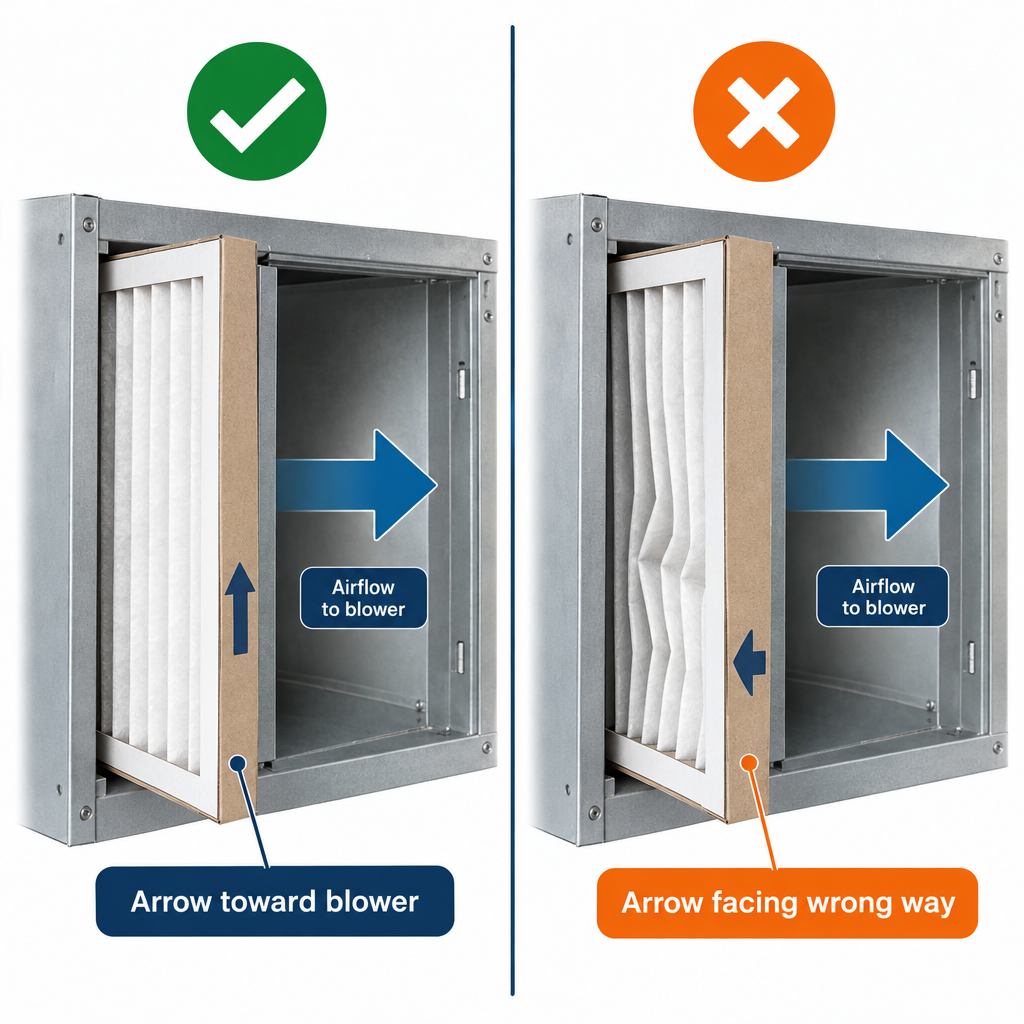
Pull the old filter from the return slot at the air handler or from the return grille in the wall or ceiling. Note the arrow on the frame. It points in the direction of airflow, toward the blower, and installing it backwards collapses the pleats within weeks.
| Filter type | Thickness | Replace every | Typical cost |
|---|---|---|---|
| Fiberglass panel | 1″ | 30 days | $2-5 |
| Pleated, MERV 8 | 1″ | 60-90 days | $5-12 |
| Pleated, MERV 11-13 | 1″ | 45-60 days (more restrictive) | $8-18 |
| Media cabinet filter | 4-5″ | 6-12 months | $30-60 |
| Washable electrostatic | 1″ | Wash monthly, replace every 3-5 years | $20-50 |
Homes with pets, smokers, or a dusty gravel driveway should cut those intervals by a third. Hold the old filter up to a light; if you cannot see the bulb through it, it was overdue.
Write the install date on the cardboard edge with a marker. That single habit beats every app reminder we have tried.
Pro tip
If your system has only a 1-inch filter slot and you want better filtration, do not just jump to a MERV 13 in that slot. The pressure drop can push a marginal blower over the edge. Have a 4-inch media cabinet installed on the return ($300-600) instead, which gives you higher MERV at lower resistance and a once-a-year change.
Step 3: Clear and clean the outdoor condenser
The condenser rejects every BTU of heat your house gives up, and it can only do that if air moves freely through the coil. We want 2 feet of open space on all sides and 5 feet of clearance above the fan. Cut back shrubs, move the trash cans, and pull out the cottonwood fluff and grass clippings packed against the base.
Check where your clothes dryer vent terminates while you are out there. A vent blowing lint onto the condenser coil will plug the fins faster than any amount of yard debris, and the fix is a simple elbow or extension to redirect the exhaust.
Remove the top grille. It is held by four to eight hex-head screws, usually 5/16″. Lift the fan assembly out carefully; the motor wires run to the electrical compartment and are often long enough to let you set the fan upside down on the ground beside the unit. If they are short, rest it on a bucket.
Vacuum or hand-pick the leaves and twigs off the bottom pan. Then spray the condenser coil cleaner on the outside of the coil, let it foam for 5 to 10 minutes, and rinse with the hose from the inside out. Spraying from inside pushes dirt back the way it came in rather than driving it deeper. Work top to bottom, keep the nozzle on a fan or shower pattern, and stay a foot away from the fins. A pressure washer will fold every fin flat and that is a $200 service call to fix.
Rinse until the water runs clear. On a coil that has never been cleaned, this can take 15 minutes and the amount of black sludge coming out will surprise you.
While the top is off, spin the fan blade by hand. It should turn silently and coast. Grinding or wobble means the motor bearings are going, and that motor ($300-600 installed) is cheaper to replace in April than in a July emergency.
Step 4: Straighten the fins and level the unit
Bent aluminum fins block airflow just like dirt does. Hail, weed trimmers, and a dog that likes to lean on the unit all leave their mark. A fin comb is a cheap plastic tool with teeth spaced to match the fin density. Count fins across one inch of coil and buy the matching head, or get a multi-head set for $10-20.
Set the teeth into an undamaged section above the bent area and draw the comb down through the damage with light pressure. Go slow. The fins are soft and will tear if you force a comb through debris, so clean first, then comb. You will not get a perfect factory look. The goal is open channels, not beauty.
Now set a torpedo level on the top of the cabinet in both directions. Pads settle over the years, especially on the downhill side, and a condenser more than a few degrees out of level strains the compressor’s oil distribution and the fan bearings. Lift the unit edge with a pry bar (have a helper hold the unit) and slip composite shims or a pressure-treated wedge under the pad. If the pad itself has sunk deep, that is a job for a cool day: slide the unit off, re-bed the pad on compacted pea gravel, and set it back. Refrigerant lines have some flex but do not move the unit more than an inch or two without a tech present.
Reassemble the fan and top grille, and leave the disconnect pulled for now.
Step 5: Clean the evaporator coil and blower
The evaporator is the indoor coil, an A-frame of aluminum fins sitting above the furnace or inside the air handler cabinet. Over years it collects everything the filter misses, and a coil 20 percent plugged with dust can cut cooling capacity by a similar amount.
Access varies. On a furnace, the coil lives in a sheet-metal box above the burner section with a removable panel on the front, sometimes held by foil tape. Cut the tape with a utility knife and remove the screws. On an air handler, the coil panel is usually the middle section. If you find a panel that is riveted or sealed into the supply plenum with no obvious access, stop here and leave the coil to a pro; cutting into plenum is beyond a spring checklist.
With the panel off, shine a flashlight across the fins. Light dust comes off with a soft brush, working with the fins, not across them. For a gray felt layer, spray the foaming no-rinse cleaner evenly over both faces of the A-frame, let it expand and drip for 10 to 15 minutes, and leave it. The foam condenses and washes down into the drain pan on the next run cycle.
While the cabinet is open, look at the blower wheel below the coil. Dirt builds on the inside of the squirrel-cage blades and unbalances the wheel. If each blade carries a visible crust, scrape it with a plastic putty knife and vacuum the chips. A badly caked wheel has to come out to be cleaned properly, which means pulling the motor assembly, and that is a 90-minute job most homeowners should hand off.
Check the drain pan under the coil for rust, standing water, and cracks. A rusted-through pan on a furnace coil costs $300-700 to replace because the coil has to come out with it, so catching corrosion early matters.
Step 6: Flush the condensate drain line
A central air conditioner pulls roughly 1 to 2 gallons of water out of the air for every hour of summer cooling, and all of it leaves through a 3/4″ PVC pipe. Algae loves that pipe. A clogged drain backs water into the pan, trips the float switch if you have one, and if you do not, it comes through the ceiling.
Find the PVC line where it leaves the coil cabinet. Most installs have a tee with a removable cap near the top, sometimes a short vertical stub. Pull the cap and pour in 1 cup of distilled white vinegar. Vinegar kills the algae and will not eat the metal drain pan the way bleach does over time. Let it sit 30 minutes.
Go outside to where the line terminates (usually a pipe stub at the foundation near the condenser) and press the shop vac hose over the end with a rag to seal it. Run the vac for 2 to 3 minutes. You will often hear a slug of sludge let go. Pour a quart of water into the tee and confirm it runs freely out the end.
If the line has a P-trap (a U-shaped dip near the cabinet, required on most negative-pressure air handlers), make sure the trap is wet. A dry trap lets the blower suck air up the drain and stall the flow of water.
Repeat the vinegar pour monthly through summer. It takes 60 seconds and is the cheapest insurance in the whole a/c maintenance routine.
Pro tip
Add a float switch to the drain line if you do not have one. It is a $15-30 part that screws into a tee, and it shuts the system down the moment water backs up. We have seen $4,000 ceiling repairs that a $20 switch would have prevented.
Step 7: Inspect the capacitor, contactor, and wiring
This is where ac system maintenance crosses from cleaning into diagnostics, and it catches the number one summer failure. The run capacitor is a metal can, usually cylindrical, in the condenser’s electrical compartment. Most residential units use a dual capacitor with three terminal clusters marked C, FAN, and HERM. The label lists the rating, such as 45/5 µF at 370 or 440 VAC.
Power is already off at the disconnect. Confirm it at the contactor again. Then discharge the capacitor: bridge HERM and C, then FAN and C, with a 20,000-ohm resistor on insulated leads. Do not short the terminals with a screwdriver; a direct short causes arcing and sparks, pits the terminals, and can weld the tool to the capacitor. Hold for 5 seconds.
Look first. A bulged top, a split seam, or oily residue means it is done. Replace it without testing. A healthy capacitor is flat on top.
To test, photograph the wiring, pull the spade connectors with needle-nose pliers, and set the meter to capacitance. Probe C to HERM and read the µF. Then C to FAN. Each reading should fall within 6 percent of the label value. A 45 µF side reading 40 is failing and will likely quit during the first heat wave. The part costs $20-80 online or at an HVAC supply house, and swapping it is a five-minute job as long as you match the µF rating exactly and meet or exceed the voltage rating.
Next, the contactor, the block with the big spring-loaded button that pulls in when the thermostat calls. Press the plunger by hand (power off) and look at the contact points. Pitted, blackened, or welded points mean a $15-30 part that is about to strand the compressor. Ants and spiders get crushed in the contacts every summer and cause intermittent failures too. Blow it out with compressed air.
Finally, wiggle each wire at its terminal. Loose spade connectors heat up and melt. Any wire with brown or brittle insulation at the terminal end gets a new crimp connector. Tighten the lugs on the contactor to snug plus a quarter turn.
Step 8: Check the refrigerant lines and insulation
Two copper lines run from the condenser to the indoor coil. The larger one, typically 3/4″ or 7/8″, is the suction line and should be wrapped in black foam insulation its entire length. Sun, dogs, and weed trimmers destroy that foam, and bare suction line sweats, drips, and loses capacity. Foam pipe insulation costs $5-10 for 6 feet; slit it, slip it on, and tape the seams with UV tape.
Look at the line set where it enters the house. The hole should be sealed with foam or putty, not open to mice. Check the service valve caps on the condenser; both should be on and finger-tight, and the valve bodies should be dry. An oily film around a valve or a fitting is a refrigerant leak. Oil travels with refrigerant, and where oil shows up, gas is escaping.
Do not touch the service ports. Adding or checking refrigerant requires gauges, an EPA Section 608 certification, and a vacuum pump if anything is opened. Systems do not consume refrigerant, so a unit that “needs a charge” every year has a leak, and topping it off without fixing it is throwing $150-400 into the yard each spring.
Step 9: Thermostat, ductwork, and registers
Replace the thermostat batteries, usually two AAs, once a year in spring even if the low-battery icon has not appeared. A dead thermostat on a 95°F day is a surprisingly common emergency call.
Pull the thermostat off its base and check that the wires are seated and the base is level and not sitting in a draft from a supply register or a sunny window. A thermostat reading 3°F high because a lamp sits beneath it will overcool the house all summer.
Walk the accessible ductwork in the basement or attic. Press on each joint; if you feel air, seal it with foil tape or duct mastic, never cloth “duct tape,” which dries out in a season. Energy Star estimates typical homes lose 20 to 30 percent of conditioned air through leaky ducts, and in our experience the attic plenum connections are the worst offenders.
Open every supply register, including rooms you do not use. Closing more than a couple raises static pressure, strains the blower, and can freeze the coil. Vacuum the return grilles while you are at it.
Step 10: Power up and test the temperature split
Push the disconnect block back in, flip the breakers, and set the thermostat 5°F below room temperature. The condenser fan should start within a few seconds and the compressor within 30 seconds (some systems have a 5-minute anti-short-cycle delay on first start).
Let the system run 15 minutes. Then measure with a probe thermometer or an infrared gun at the return grille and at a supply register close to the air handler. Subtract. A healthy system in average humidity drops the air 15 to 20°F. Below 12°F points to low refrigerant, a dirty coil you missed, or a weak blower. Above 22°F usually means restricted airflow (new filter installed backwards, a closed register run) and the coil is on its way to icing.
Go outside. The air blowing out the top of the condenser should feel hot, noticeably warmer than ambient. Put your hand on the big insulated suction line; it should be cold and sweating. The small liquid line should be warm but not hot enough to be uncomfortable. If the suction line is frosted, shut the system off, let it thaw for two hours, and re-check airflow before running again.
Listen. A healthy condenser hums. Rattling is loose panel screws or a fan hitting debris. A loud buzz with no fan movement is a dead capacitor. Clicking on and off every minute is short cycling, often an overheating compressor or a thermostat problem.
If the system runs but the house still is not cooling after this service, the problem is deeper than maintenance and our air conditioner troubleshooting steps for diagnosing no-cool calls pick up from here.
Summer, fall, and winter tasks
Summer
Check the filter on the first of each month. Hose the condenser coil if you see dust or cottonwood on the fins, no cleaner needed. Pour the vinegar down the drain. Glance at the drain pan for standing water. Run a ceiling fan in occupied rooms and you can raise the thermostat 3 to 4°F without feeling it, which trims compressor run time.
Keep the thermostat steady. Dropping it to 65°F to cool faster does nothing except overcool; the compressor runs at one speed regardless of setpoint on a single-stage system.
Fall
Make a final filter change. Once the leaves drop, clear the condenser again, because maple seeds and oak leaves pack the coil bottom over winter. Cut back any perennials that grew into the clearance zone. If you want to protect the unit, put a piece of plywood or a mesh top cover over the fan grille only. Full-wrap covers trap moisture, rust the cabinet, and give mice a warm place to chew wires.
Heat pump owners: do the full condenser wash now, test the reversing valve by calling for heat and confirming warm air, and watch the first defrost cycle for excessive steam or ice buildup.
Winter
Do not run a conventional AC below about 60°F outdoors. The compressor oil thickens and the refrigerant pressures drop outside the design range. Knock snow and ice off the top of the condenser after storms so meltwater does not freeze the fan blades to the grille. Check that the disconnect box lid closes tight. January is also the cheapest time to order a spare capacitor and contactor so they are on the shelf for spring.
What maintenance costs: DIY versus professional
| Item | DIY cost | Professional cost |
|---|---|---|
| Annual tune-up (clean, test, inspect) | $30-80 in supplies | $75-200 |
| Maintenance plan (2 visits per year, priority service) | n/a | $150-300 per year |
| Run capacitor replacement | $20-80 | $150-400 |
| Contactor replacement | $15-30 | $150-300 |
| Condensate drain clearing | $3 (vinegar) | $75-250 |
| Condenser fan motor | $80-200 part | $300-600 |
| Refrigerant leak search and repair | Not DIY | $200-1,500 |
| Evaporator coil replacement | Not DIY | $1,200-2,500 |
| Compressor replacement | Not DIY | $1,500-3,000+ |
A pro tune-up is worth it every two to three years even if you do the cleaning yourself, because a tech brings gauges and can check superheat and subcooling, which tell you the true refrigerant charge without guessing. Book it in March or April. Tune-up prices climb and wait times stretch to two weeks once the first 90°F day hits.
Troubleshooting after maintenance
| Symptom | Likely cause | Fix |
|---|---|---|
| Nothing runs after power restored | Breaker not reset, disconnect block inserted upside down, thermostat still off | Check all three; confirm 240V at contactor |
| Condenser hums but fan does not spin | Failed capacitor FAN side, or fan motor seized | Test capacitor; spin blade by hand with power off |
| Fan runs, compressor silent | Capacitor HERM side, contactor not pulling in, compressor overload tripped | Meter capacitor; check 24V at contactor coil |
| Air cool but weak at registers | Filter backwards or wrong size, blower crusted, closed registers | Flip filter, open registers, clean blower wheel |
| Water in pan or on floor | Drain still clogged, dry P-trap, coil cleaner residue blocking trap | Vacuum line again, prime trap with water |
| Ice on suction line or coil | Low airflow or low refrigerant | Thaw 2 hours, verify filter and registers; if it refreezes, call for a charge check |
| Temperature split under 12°F | Low charge, dirty evaporator, blower running slow | Recheck coil cleaning; call a pro for gauges |
| Loud rattle from condenser | Loose top grille screws, fan blade hitting debris, panel off center | Reseat grille, check blade clearance |
| Burning smell at startup | Dust on blower or heat strips, or a melted wire terminal | Normal for 10 minutes if dust; otherwise power off and inspect terminals |
When to call a pro
Call an HVAC contractor for anything involving refrigerant (oily valves, a suction line that keeps icing after airflow is fixed, a split under 12°F with clean coils), for a compressor that hums and trips the breaker, for a blower wheel that needs the motor pulled, for duct sealing inside plenums, and for any unit more than 12 years old that has never had a gauge check. If the condenser pad needs re-setting, have the tech there to pump down the system before you move the unit more than a couple of inches.
FAQ
How often does an air conditioner need maintenance?
Do the full cleaning and inspection once a year in spring, before the first week of cooling. Change the filter every 30 to 90 days depending on type, and flush the drain line monthly in summer. Heat pumps get a second full service in fall because they run through winter too.
Can I do AC maintenance myself or do I need a professional?
Everything on this checklist except refrigerant work is a reasonable DIY job with a nut driver, a hose, and a multimeter. We still recommend a pro gauge check every two to three years, or every year on units past 12 years old, because a slow refrigerant leak is invisible without gauges until the day the compressor fails.
Does regular AC maintenance actually improve efficiency?
Yes, and it is measurable. A clean filter alone saves 5 to 15 percent on cooling energy according to the Department of Energy, and a dirty condenser coil can raise compressor power draw by a similar amount. Over a 15-year lifespan the energy savings and avoided emergency calls dwarf the $30-80 a year in supplies.
Should I cover my AC unit in winter?
Cover the top only, with a board or a fitted mesh cap, to keep ice and leaves out of the fan. Never wrap the whole cabinet. Trapped moisture rusts the base pan and coil end plates, and rodents nest inside and chew the low-voltage wiring.
Is it safe to use bleach in the condensate drain?
Skip it. Bleach corrodes the metal drain pan, the copper coil ends, and any galvanized fittings over time. Distilled white vinegar clears algae just as well, costs $3 a gallon, and does not damage anything it touches.
What temperature should I set the thermostat for the lowest bills?
The Department of Energy suggests 78°F when you are home and higher when you are away. Every degree lower adds roughly 3 to 5 percent to cooling costs during the hours the system runs. A programmable or smart thermostat that raises the setpoint 7 to 10°F while you are at work pays for itself in the first summer.
How long should a well-maintained central AC last?
Fifteen to 20 years is realistic for a system that gets annual service, timely filter changes, and a clean condenser. Neglected systems, especially those that run with chronically dirty coils or low charge, commonly fail at 10 to 12 years with a compressor that costs almost as much to replace as a new condenser.