
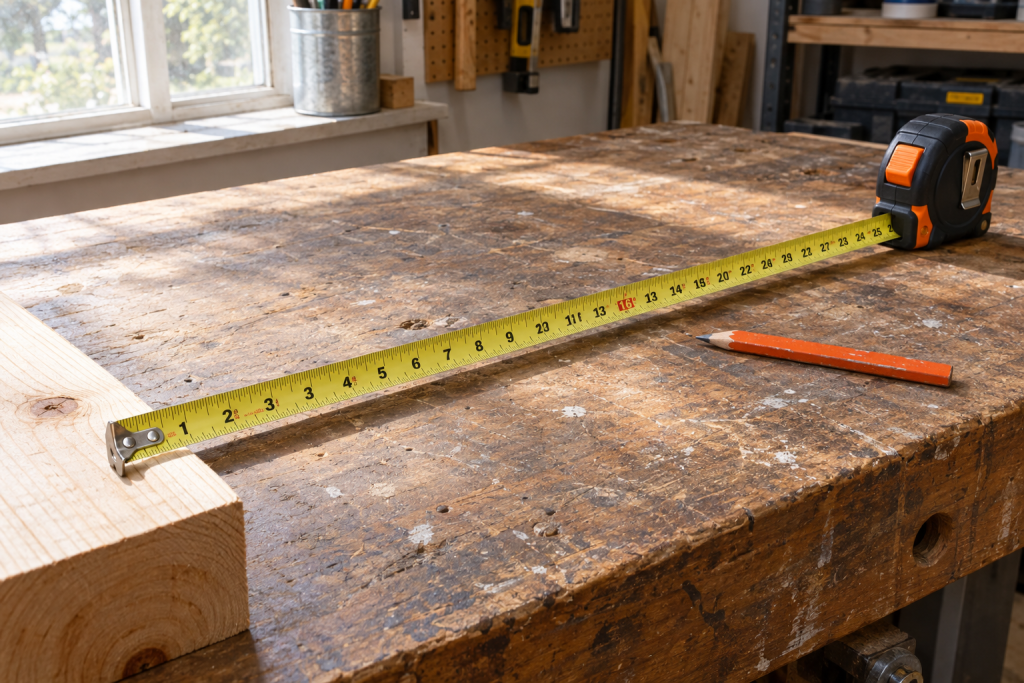
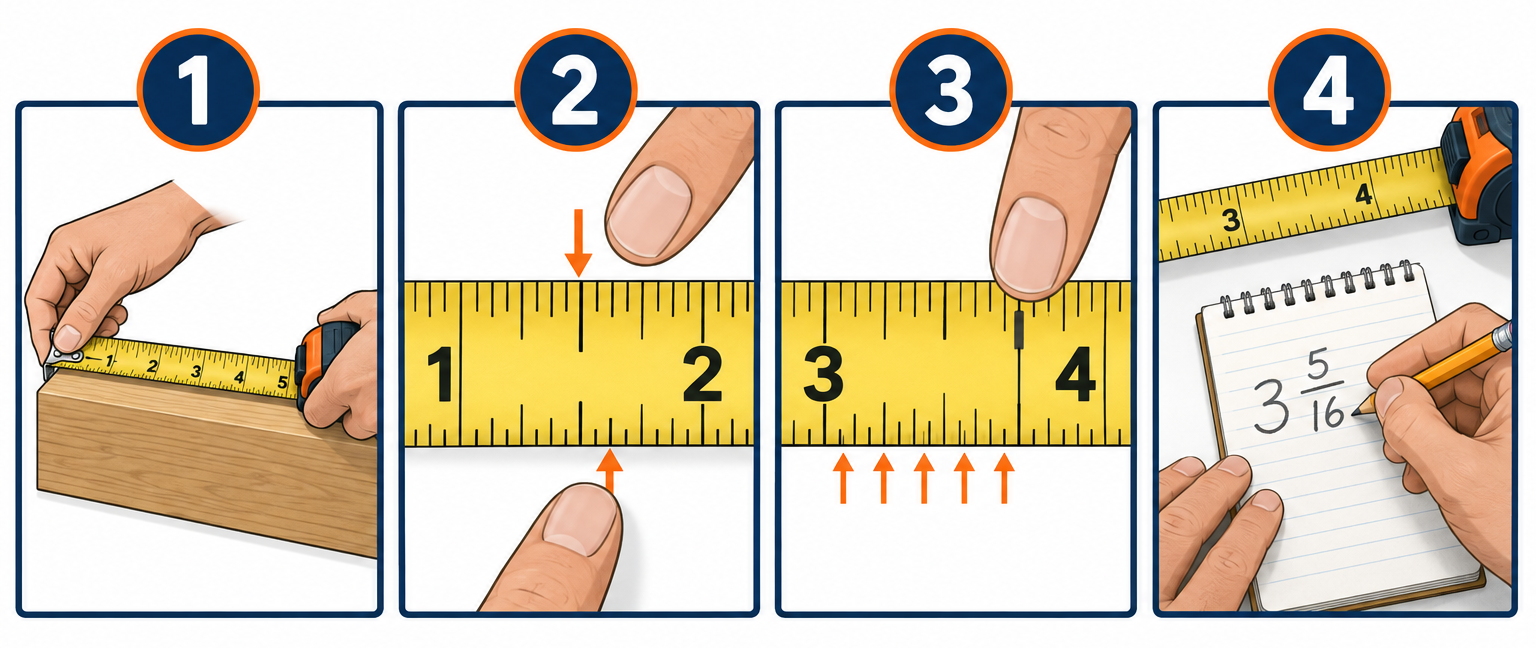
You read a tape measure by finding the nearest whole inch to the left of your mark, then counting the small lines past it: each line on a standard tape is 1/16 inch, so seven lines past the 5 means 5 7/16 inches. Once you know which line is which, every measurement on a job, from a curtain rod to a stud wall, follows the same three-second routine.
Quick steps: read a tape measure
- Hook the end on the edge of what you are measuring and pull the blade straight.
- Find the last big number before your mark. That is your whole inches.
- Look at the line heights: tallest is 1/2, then 1/4, then 1/8, shortest is 1/16.
- Count the small lines past the whole inch to get sixteenths.
- Reduce the fraction (8/16 becomes 1/2, 4/16 becomes 1/4).
- Say it out loud or write it down before you let go of the tape.
Tools and materials
- Tape measure (25 ft, 1 or 1 1/4 inch wide blade, 1/16 inch graduations)
- Carpenter’s pencil or 0.9 mm mechanical pencil
- Notepad or painter’s tape for writing dimensions
- Speed square or combination square (optional, for square marks)
- Calculator or phone for adding fractions
Calculators for this job
Safety first
A steel blade snapping back into the case can slice a fingertip. Let the blade retract slowly with your thumb on the lock, and never use a metal tape near live wiring or an open panel.
Step 1: Learn the big numbers (inches and feet)
The large numbers printed along the blade are whole inches. Most American tapes count them straight through, so the number after 12 is 13, not 1. A small arrow or box near the 12 reads “1F” for one foot, then “2F” at 24, and so on.
Some tapes switch styles at the foot mark and print “1F 1, 1F 2” through the next foot. If your blade shows a small inch number next to a foot number, read it as feet plus inches: “2F 7” is 2 feet 7 inches, or 31 inches.
Check which style you own before you cut anything. Mixing the two is the fastest way to end up 12 inches short on a run of baseboard.
Step 2: Read the fractional lines by height
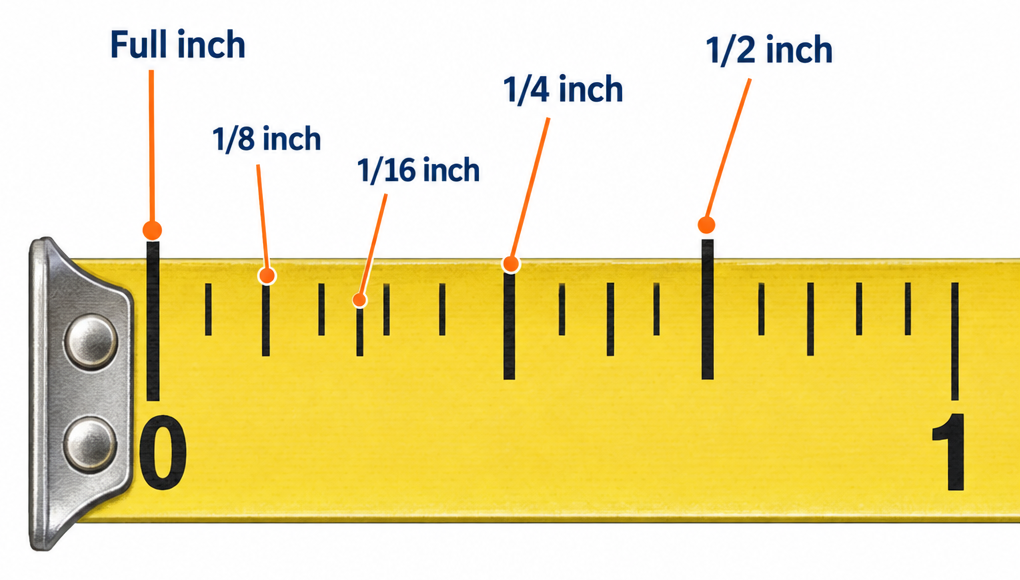
Between every inch number there are 15 lines, and their length tells you what they mean. Here is the pattern that repeats across the whole blade:
| Line height | Value | Where it sits |
|---|---|---|
| Longest (often numbered) | 1 inch | Full inch mark |
| Second longest | 1/2 inch | Dead center between inch numbers |
| Third longest | 1/4 and 3/4 inch | Quarter points |
| Fourth longest | 1/8, 3/8, 5/8, 7/8 | Between each quarter |
| Shortest | Every odd sixteenth (1/16, 3/16, and so on) | Between each eighth |
That is the whole system. If you can tell a tall line from a short one, you can read any standard tape. A few tapes print the fractions right on the blade, which helps while you are learning, though those blades get crowded and harder to read at a glance.
The first foot on many quality tapes is divided into 32nds, with even shorter lines squeezed between the sixteenths. Ignore them for rough carpentry. They matter for cabinet work, trim scribes and anything with a visible seam.
Step 3: Count from the nearest whole inch
Put your pencil on the mark you want to read. Slide left to the last full inch number. Now count the small lines from that number to your mark. Each is one sixteenth.
Say your mark lands two lines past the 8. That is 8 2/16, which reduces to 8 1/8. Land one line before the 9 and you are at 8 15/16. With a little practice you stop counting from the inch and start counting from the nearest half or quarter instead, which is faster: “a quarter past 8, plus one line” is 8 5/16.
Reducing matters because cut lists and lumber dimensions are written in lowest terms. Nobody writes 12/16, they write 3/4. The quick rule: if the top number is even, halve both numbers until it is odd.
Pro tip
Train your eye to recognize the four long lines in each inch (1/4, 1/2, 3/4 and the inch itself) instantly. Then you only ever count one or two short lines in either direction, which cuts reading errors on a long day.
Step 4: Use the hook the right way
The metal hook on the end slides back and forth a little, and that is not a defect. It moves by exactly the thickness of the hook itself, roughly 1/16 inch. When you hook the tape over the end of a board and pull, the hook slides out and the blade reads from the outside face. When you push the tip against a wall for an inside measurement, the hook slides in and the reading starts from the inside face.
Either way you get a true zero. If someone “fixes” a loose hook by crimping or gluing it, every outside measurement on that tape is now 1/16 inch short. Toss it or mark it as a rough tape.
The hook also has a small lip or slot for grabbing a nail or screw head, useful when you are measuring alone across a deck or a long wall.
Step 5: Add the case for inside measurements
To measure the inside of a window frame, closet or cabinet opening, push the hook against one side and butt the case against the other. Then read the blade where it leaves the case and add the length of the case. That length is printed on the back or bottom of most cases, for example “3 3/8 in” on a typical 25-foot tape.
Bending the blade into the corner and guessing where it would hit is good for maybe 1/4 inch of accuracy. That is fine for ordering blinds with a mounting bracket. It is not fine for a filler strip when you are finishing a run of custom cabinets ikea style, where a 1/8 inch gap shows.
Pro tip
When inside measurements need to be dead on, measure from each side to a pencil mark in the middle and add the two numbers. No case length, no bent blade, no guessing.
Step 6: Read the stud marks and black diamonds
Every 16 inches, most tapes print the inch number in red or inside a red box. Studs, floor joists and rafters in US houses are normally spaced 16 inches on center, so once you find one stud you can hook the tape on its edge and every red number lands on the next one. The same marks lay out drywall screws and plywood edges, since a 48-inch sheet breaks on 16, 32 and 48.
The small black diamonds (or triangles) show up every 19.2 inches: at 19.2, 38.4, 57.6, 76.8 and 96. That spacing fits exactly five framing members under one 8-foot sheet of subfloor or roof sheathing, which is a common layout for engineered trusses and I-joists. If you are framing a shed with 16-inch centers, you can ignore the diamonds entirely.
Step 7: Read the metric side
Many tapes carry inches along the top edge and metric along the bottom. The numbered marks are centimeters, each small line is one millimeter, and a slightly longer line marks 5 mm. There are no fractions to reduce, which is why so many trades people like metric for layout.
One inch equals 25.4 mm, so 1/16 inch is just under 1.6 mm. If a European faucet or an IKEA drawer slide gives you a spec of 160 mm, read 16 on the centimeter scale and you are there. Do not mix systems on the same cut list. Pick one and convert once at the start.
Step 8: Burn an inch, and call it “light” or “heavy”
When the hook is damaged, or you need to measure from a point where the hook cannot grab, start the tape at the 1-inch mark instead of zero. Carpenters call this burning an inch. Read as normal, then subtract 1 inch from the result. Forgetting that subtraction is the classic one-inch-too-long cut, so say “burned an inch” out loud when you do it.
On a job site you will also hear measurements called out as “light” or “heavy,” sometimes “shy” or “strong.” Heavy means the mark falls just past the fraction named, light means just before it. “Forty-two and three-eighths heavy” tells the person at the saw to cut a hair over 42 3/8, maybe 1/32. It is faster than reading 32nds, and most cuts get trimmed or planed to fit anyway.
Measuring real jobs with the tape
Reading the blade is half the task. Taking the number in the right place is the other half.
Curtains: Measure the rod, not the window. Rods normally extend 4 to 6 inches past the frame on each side, and panel width should be 1.5 to 2 times the rod length for fullness. Measure length from the top of the rod (or the bottom of a ring) to where you want the hem, usually 1/2 inch above the floor or sill.
Blinds for an inside mount: Measure the width at the top, middle and bottom of the opening and order the smallest. Measure the height at left, center and right and use the longest. Write every number to the nearest 1/8 inch, since blind makers take that fraction literally.
Flooring in a hall, stairs and landing: Break the space into rectangles, measure length and width of each in feet and inches, convert to decimal feet (6 inches is 0.5 ft, 3 inches is 0.25 ft), multiply for square feet, then add 10 percent for waste. Stairs get measured tread by tread: depth plus riser height, times the number of steps.
Wall tile: Measure the wall height and width in inches, then divide by the tile size plus one grout joint (a 12-inch tile with a 1/8-inch joint takes up 12 1/8 inches). That tells you how many full tiles fit and how wide the cut tile at the end will be. If the end cut comes out under 2 inches, shift the layout so you get a wider cut on both sides.
Paving: Length times width in feet gives square feet. Divide by the coverage per paver from the bag or pallet label and add 5 to 10 percent for cuts.
A 25-foot tape covers almost every one of these. For a 40-foot driveway or a long fence line, a 100-foot open reel tape ($20 to $35) saves you from adding up overlapping readings and introducing errors at each joint.
Troubleshooting
| Symptom | Likely cause | Fix |
|---|---|---|
| Cuts come out 1/16 inch short every time | Hook crimped, bent or glued | Replace the tape or burn an inch and subtract |
| Cut is exactly 1 inch too long | Burned an inch and forgot to subtract | Say “burned” out loud and write “minus 1” on the board |
| Measurement off by a foot | Read “1F 3” as 3 inches | Check the foot-mark style on your tape before layout |
| Inside measurement does not match the opening | Guessed the bend in the corner | Add the printed case length, or measure to a center mark from both sides |
| Two tapes disagree by 1/16 inch | Worn hook rivets on one tape | Use one tape for the whole job so every part is off by the same amount |
| Blade sags or twists on long pulls | Pulling 12 feet or more unsupported | Have a helper hold the hook, or clip it on a nail |
| Marks are fuzzy and off by a hair | Dull carpenter’s pencil | Sharpen to a chisel point or switch to a 0.9 mm mechanical pencil |
When to call a pro
Reading the tape is never the problem; what you do with the number can be. Call a licensed contractor or structural engineer if your measurements are for cutting joists, headers, rafters or load-bearing walls, and a licensed electrician or plumber for any layout that involves panel clearances, gas lines or drain slopes. Those jobs need permits in most US jurisdictions, and a 1/4 inch of drain fall per foot is not a number to eyeball.
FAQ
How do I read inches?
Find the last big number to the left of your mark; that is the whole inch count. Then count the short lines past it. On a standard tape each short line is 1/16 inch, the mid-height lines are eighths and quarters, and the tallest line between numbers is the half inch.
How to read a ruler for dummies?
A ruler works the same as the first foot of a tape: numbers are inches, the longest unnumbered line in each inch is 1/2, the next two are 1/4 and 3/4, and the shortest lines are sixteenths. Count up from the nearest number and reduce the fraction. If the ruler also has a metric edge, every numbered line is a centimeter and each small line is a millimeter.
Does a tape measure read in inches?
Tapes sold in the US read in inches and feet, usually down to 1/16 inch. Many also print centimeters and millimeters along the opposite edge. Tapes made for Canada, the UK, Europe and Australia are often metric only, so check the blade before you buy if you work in fractions.
What do the numbers mean on a measuring tape?
The large numbers are inches, counted straight through past 12 on most US tapes. Red or boxed numbers every 16 inches mark standard stud and joist spacing. Small foot markers (“1F,” “2F”) appear every 12 inches, and black diamonds every 19.2 inches mark truss layout for five members per 8-foot sheet. On the metric edge, the numbers are centimeters.