
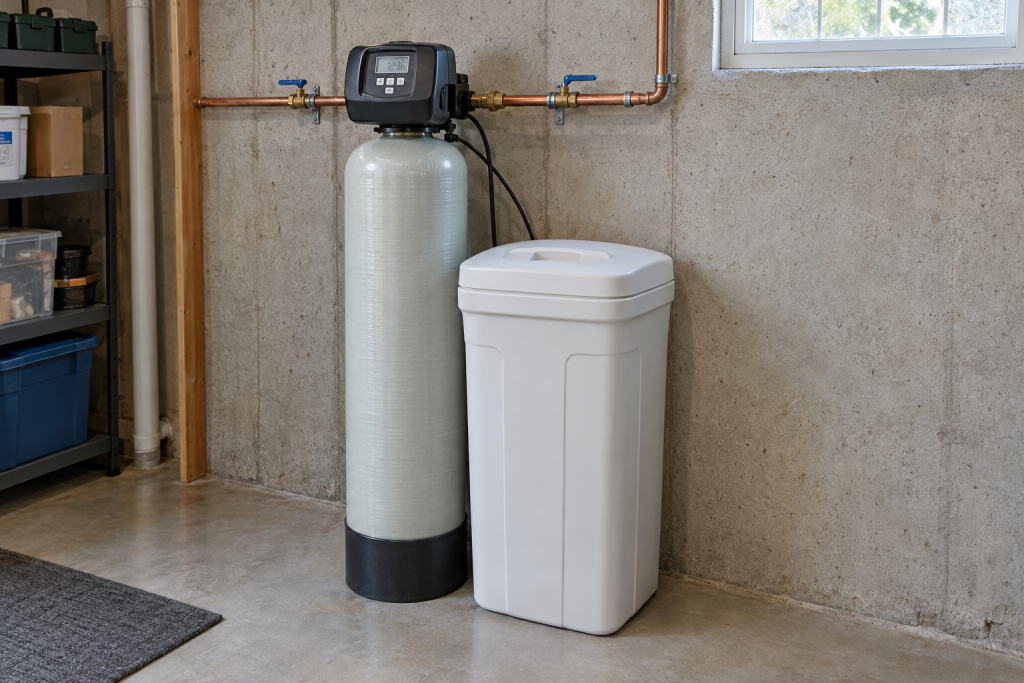
Most water softener failures come down to five things you can fix in an afternoon: a salt bridge, salt mush, a clogged injector, a fouled resin bed, or wrong settings on the control head. Work through those in order, run a manual regeneration, and test the water. If it still reads hard or tastes salty after that, the fault is in the control valve or the resin tank itself, and this guide covers those too.
Quick steps: repair a water softener
- Test water hardness at a tap to confirm the softener is actually failing.
- Check power, time of day, hardness setting and regeneration schedule on the control head.
- Open the brine tank and break up any salt bridge or scoop out salt mush.
- Empty and wash the brine tank, brine well, float and brine valve.
- Pull the injector (venturi) and screen from the valve body and clean them.
- Check the drain line and brine line for kinks, crushed tubing and blockages.
- Dose the resin bed with resin cleaner and run a manual regeneration.
- Retest hardness the next day; if still hard or salty, service the control valve.
Tools and materials
- Water hardness test strips or a Hach 5-B titration kit
- Broom handle or 3/4-inch dowel
- Phillips and flat screwdrivers
- Adjustable wrench and slip-joint pliers
- Shop vacuum (wet) or a bucket and scoop
- Soft toothbrush and warm soapy water
- Resin cleaner (Res-Care, Iron Out or Pro Rust Out, about $10-20)
- 40 lb bag of evaporated salt pellets ($7-12)
- Replacement injector, o-ring kit or piston/seal kit matched to your valve ($15-80)
- Flashlight and towels
Safety first
Unplug the control head’s transformer from the wall before opening the valve body, and put the softener in bypass before loosening any fittings. The resin tank holds house pressure (40-80 psi), so relieve it by opening a nearby tap after bypassing.
Step 1: Prove the softener is the problem
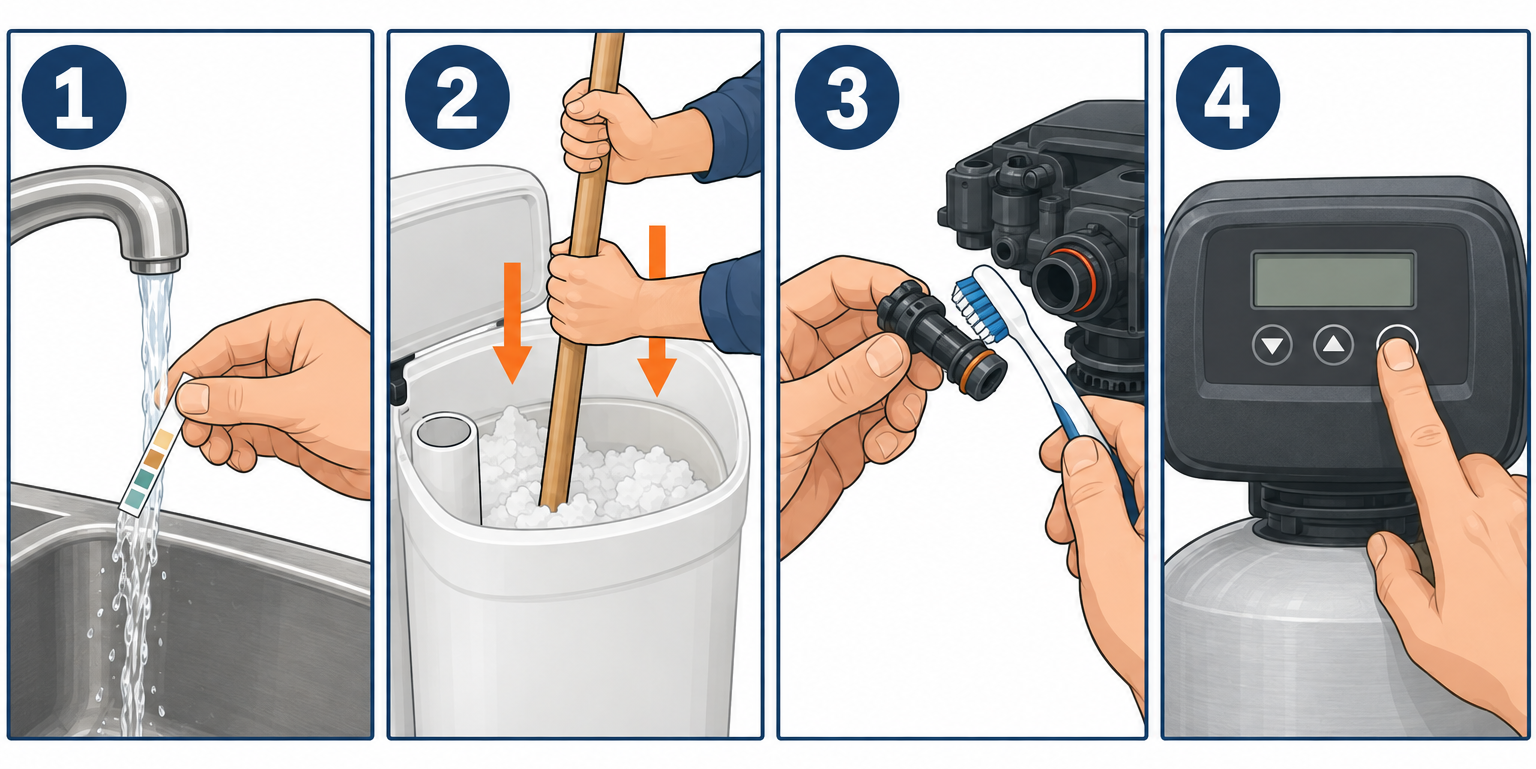
Before you take anything apart, confirm the water is actually hard. Spots on glassware and dry skin can come from a dozen things, including a shower cartridge that’s simply caked with old scale from before the softener was installed. Run cold water at a tap downstream of the softener for 30 seconds, then dip a hardness test strip.
Soft water reads 0 to 1 grain per gallon (gpg). Anything over 3 gpg means the softener isn’t doing its job. If you only have a strip that reads in ppm, divide by 17.1 to get grains. Test the raw water too, either at an outside hose bib or with the softener in bypass, so you know what the unit is up against. A well producing 25 gpg with 2 ppm of iron is a very different repair from city water at 8 gpg.
Note the taste while you’re at it. Salty water is a different fault from hard water, and it points you straight to the drain side of the system, which Step 6 covers.
Also look in the brine tank right now. Three readings tell most of the story:
- Salt level. Should be at least a quarter full, and the salt should sit above the water line. If you can see water over the salt or the tank is empty, that’s your problem.
- Water level. Several inches of water in the bottom is normal on most residential units because they refill after regenerating. Water halfway up the tank or more means the brine isn’t being drawn out.
- Salt condition. Loose pellets are good. A hard crust you can’t push a finger through, or a grey sludge at the bottom, is covered in Step 3.
Step 2: Check power, clock and settings on the control head
A surprising number of “broken” softeners simply stopped regenerating. The control head is a small computer or mechanical timer, and if it has no power, loses its clock, or has the wrong numbers programmed, the resin never gets recharged.
Check that the transformer is plugged into a live outlet. Softeners often share a GFCI outlet in a basement or garage with a sump pump or freezer, and one trip takes everything out. Press the reset button on the receptacle and see if the display lights up. If the display is blinking 12:00, the unit lost power and reset. Set the correct time, because regeneration is normally scheduled for 2 a.m., and a clock that’s six hours off will regenerate while the family is showering.
Now check the programming. On a digital head like a Fleck 5600SXT or Clack WS1, hold the button combination in your manual to enter the settings and confirm:
- Hardness. Should match your raw water test. If you have iron, add roughly 5 grains for every 1 ppm of iron.
- Capacity. Matches the resin volume. A one-cubic-foot system is typically rated at 32,000 grains.
- Day override. Forces a regeneration every X days regardless of gallons used. Set it to 7 or less if you have iron, 14 is fine on clean city water.
- Regeneration time. Keep it in the small hours.
On an older mechanical timer like the Fleck 5600, the hardness is set with a small dial inside the cover and the days are set by pulling out pins on the skipper wheel. Pins pulled out are the days it regenerates.
Finally, confirm the bypass valve is in the service position. On Fleck heads that’s a single lever or knob pointed toward the valve. Clack bypasses have two knobs that both point inward for service. Someone may have bypassed it to fix a leak elsewhere and never put it back.
Then force a manual regeneration. On a 5600SXT, hold the regen button for five seconds; on a Clack WS1, hold REGEN for three seconds. On a mechanical 5600, turn the manual knob clockwise until it clicks into backwash. The full cycle takes 90 to 120 minutes and you should hear water running to the drain. Note what happens. No water at the drain, or a cycle that never advances, means the motor or piston is stuck and you’ll end up at Step 7.
Pro tip
Write the raw hardness, iron, capacity and date on a strip of tape stuck to the head. Every technician who ever touches the unit will thank you, and you’ll spot a setting that’s been changed by accident in two seconds.
Step 3: Break up salt bridges and remove salt mush
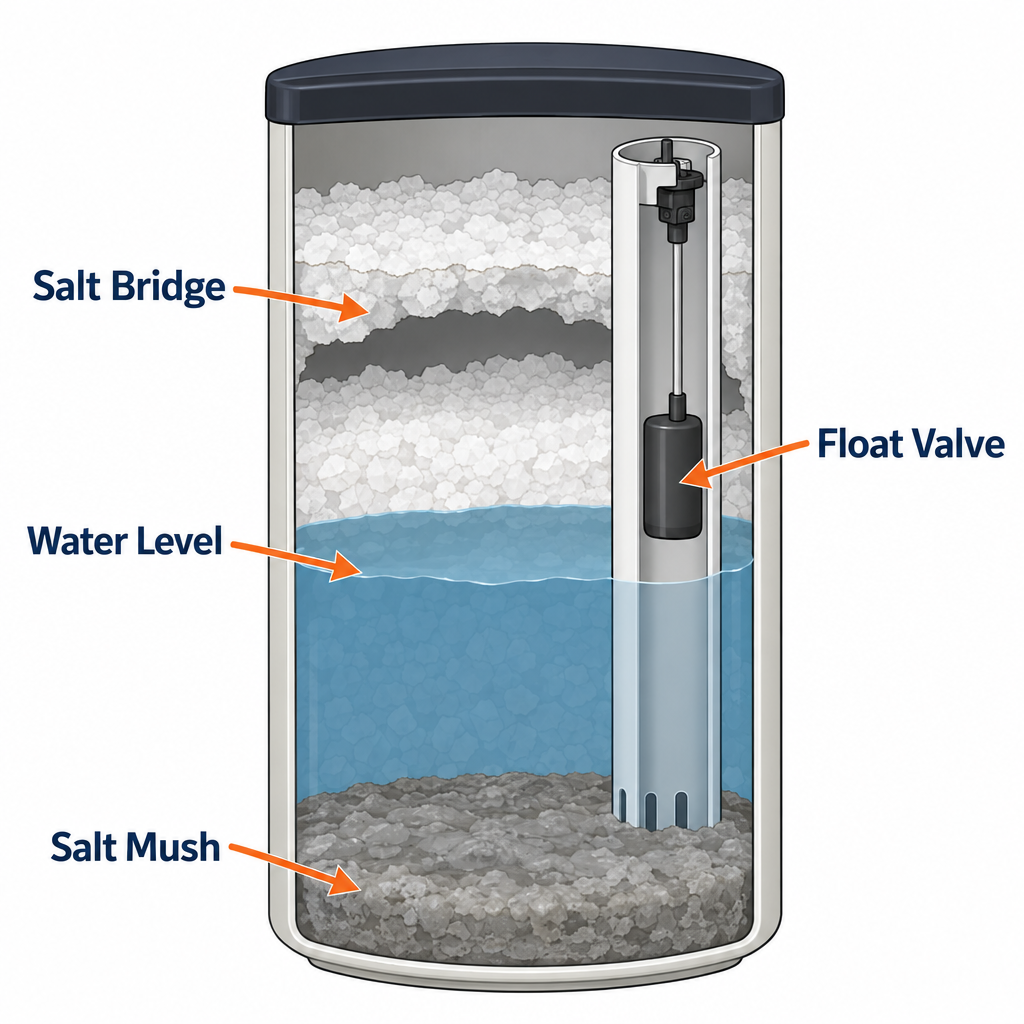
A salt bridge is a crust of salt that hardens across the tank, usually a few inches above the water. The salt looks fine from the top, but underneath it there’s an air pocket and the water never touches the salt. No brine, no softening. Bridges form in humid basements, with low-quality salt, and when the tank is kept topped all the way up.
Push a broom handle or dowel straight down into the salt in several spots. If it stops dead a few inches down with a hollow thump, you’ve found the bridge. Work the handle around the edges of the tank and tap gently to crack the crust. Don’t hammer at it, because the brine well (the plastic tube standing in the corner) and the float inside it are fragile. Scoop out the broken chunks you can reach, and pour a gallon of warm water over what’s left to help it dissolve.
Salt mush is the opposite problem. Fine salt grains and impurities settle into a sludge at the bottom that clogs the brine valve and keeps the water from reaching the salt. You’ll see it as a grey or brown paste when you dig to the bottom. It’s most common with rock salt and solar crystals.
Mush can’t be fixed in place. Scoop out all the loose salt, wet-vac or bail the tank down to the sludge, then shovel the mush into a bucket. That takes you straight into Step 4 anyway, so plan on doing both at once.
Going forward, switch to evaporated salt pellets. They’re 99.6 percent pure or better, dissolve clean and cost only a couple of dollars more per 40 lb bag. Keep the tank between a quarter and two-thirds full instead of jamming it to the lid, and always keep the salt a few inches above the water line. A typical family of four goes through roughly one bag a month.
Step 4: Clean the brine tank, brine well and float
With the tank empty you can finally see the parts that make brine. Lift the lid off the brine well. Inside is the brine valve assembly: a float on a rod, an air check valve at the bottom, and a 3/8-inch brine tube running up to the control head. Pull the assembly straight up and out; it usually just lifts free, though some have a nut at the top.
Hose out the tank. Scrub the bottom and the brine well with warm soapy water and a stiff brush, then rinse until no salt residue remains. Check the overflow elbow on the side of the tank, which should be connected to a drain with its own tube. If it isn’t, run one, because this fitting is the only thing standing between a stuck float and a flooded floor.
Clean the float assembly in a sink. The float should slide freely on its rod. Rinse grit out of the air check ball at the bottom; it’s a small ball in a cage that drops to close the valve when the brine runs out, so the softener draws brine instead of air. A grain of salt lodged in that ball is enough to let the tank overfill or keep brine from drawing at all.
Reinstall the assembly with the float at the same height it was. On most tanks the safety float is set so the tank won’t fill above roughly a third of its height. If you aren’t sure where it was, your valve manual lists the correct brine refill level in inches for your tank size. Reconnect the brine tube finger-tight plus a quarter turn with pliers, then refill the tank with two gallons of clean water and about 60 to 80 pounds of fresh pellets.
Pro tip
Before you put salt back in, run a manual regeneration and stand there during the brine draw cycle. If the water level in the clean, empty tank drops, the injector is pulling properly and you’ve likely solved the problem. If it doesn’t move, go straight to Step 5 without wasting a bag of salt.
Step 5: Clean the injector, nozzle and screen
The injector, also called the venturi, is what creates suction to pull brine out of the tank. It’s a tiny nozzle and throat inside the valve body, usually with a mesh screen on the inlet side. A few grains of sand, a bit of rust or a sliver of resin will block it, and from then on the softener regenerates with plain water. Hard water and a brine tank that slowly fills up are the classic signs.
Put the softener in bypass, unplug it and open a tap to drop the pressure. On a Fleck 5600 the injector sits under a small cover on the side of the valve, held by two screws. Clack WS1 valves have it under a cap on top marked with the injector letter. Remove the cover and lay out the parts in order on a towel: cap, gasket, screen, injector nozzle, throat and o-rings. Take a photo before you touch anything.
Wash each part in warm soapy water and scrub gently with a soft toothbrush. Hold the nozzle and throat up to the light and look through them; both must be fully open. Soak stubborn scale in white vinegar for 20 minutes. Never clear the orifice with a wire, pin or drill bit. The hole is sized to the gallon, and enlarging it even slightly changes the brine draw and rinse rates permanently. If you can’t clear it without poking, buy a new injector for your valve size. They run $15 to $30.
Reassemble in the same order with the o-rings lightly coated in silicone grease (never petroleum jelly, which swells rubber). Snug the cover screws evenly; they only need to compress the gasket. Return the bypass to service, plug in the head and run another manual regeneration. During brine draw you should hear a soft sucking sound at the brine line and see the tank level drop.
Step 6: Check the drain line and brine line (the usual cause of salty water)
If your tap water tastes salty, the softener is making brine but not rinsing it out. During the regeneration cycle the valve runs brine through the resin, then flushes the salty water to the drain during slow rinse and rapid rinse. Anything that slows that drain flow leaves brine sitting in the tank, and the next person to run a tap drinks it.
Start with the drain line itself. It’s usually 1/2-inch flexible tubing or rigid PVC running to a floor drain, utility sink or standpipe, and it should have an air gap at the end rather than being pushed down into the drain. Look for kinks, crushed spots where it passes behind the tank, and a long uphill run. Most manufacturers limit the drain line to about 20 feet and no more than 8 feet of rise. Disconnect it at the valve and blow through it or run water through it with a hose.
Next is the drain line flow control (DLFC), a small washer with a calibrated hole inside the drain elbow on the valve. Pull the elbow and check the washer for resin beads or scale. Resin beads in the DLFC, or showing up in your faucet aerators, mean the bottom screen or distributor tube inside the resin tank has broken. That’s a bigger job and belongs in the pro section below.
Then check the brine refill side. A float set too high lets too much water into the salt tank, which makes more brine than the rinse cycle can clear. Compare the float position to the manual. On digital heads, check the brine fill time in the settings; it’s typically between 8 and 12 minutes on a one-cubic-foot system.
Other causes of salty water, in the order to check them:
- Low water pressure during regeneration. The injector needs at least 20 psi to draw and rinse properly. A well pump cycling low at 2 a.m. or a partly closed main shutoff can leave brine behind. Check pressure with a $10 hose bib gauge.
- Partly clogged injector. Draws brine slowly over a long cycle so rinse is incomplete. Clean it per Step 5.
- Brine valve not sealing. If the air check doesn’t close, the valve keeps drawing brine into the rinse cycles.
- Piston or seals worn in the control valve. Lets brine bleed across chambers. Covered in Step 7.
- Using water during regeneration. Most residential valves pass hard water, not brine, during the cycle, but on older units a tap opened during brine draw can pull salt water into the house. Keep regeneration at 2 a.m. and set the time correctly.
After each fix, run a full manual regeneration, wait for it to finish completely, then flush a cold tap for two minutes and taste.
Pro tip
Pour a cup of water into the drain-line end bucket during the rapid rinse cycle and taste it. Rapid rinse water should be nearly fresh by the end of the cycle. If it’s still strongly salty when the valve clicks back to service, the rinse time is too short or the flow is restricted, and you’ve narrowed the fault without opening the valve.
Step 7: Clean or restore the resin bed
The resin tank is full of tiny plastic beads that trade sodium for calcium and magnesium. Over time iron, manganese, chlorine and organic matter coat those beads, and no amount of regenerating brings capacity back. The signs are a softener that works for a day or two after regeneration and then quits, orange staining in toilets and tubs, or salt use that keeps climbing while the water keeps getting harder.
Start with a resin cleaner. Iron Out or Pro Rust Out works for iron and manganese; Res-Care is a general-purpose cleaner for scale and organics. Pour the labeled dose, usually a half to a full cup of powder dissolved in water, directly into the brine well so it draws into the tank with the brine. Run a manual regeneration right away. For heavily fouled resin, do this once a day for three days. For iron water, make it a monthly habit or install a drip feeder on the brine well, which doses the cleaner automatically for about $30.
If cleaning doesn’t bring hardness back to 0 to 1 gpg, test the resin directly. Shut off the water, bypass the softener, unscrew the control head from the tank (it threads on by hand after you disconnect the plumbing) and look inside with a flashlight. Healthy resin is tan to dark amber and the beads look round and separate. Resin that’s black and mushy, has a jelly-like layer on top, or crumbles when you rub it between your fingers is finished. Cracked, broken beads also pass through the screen and show up in your aerators.
Replacing resin is a messy but genuinely DIY job. A cubic foot of standard cation resin costs around $100 to $200, and a one-cubic-foot tank takes exactly one bag. You’ll tip the tank into the yard to dump the old resin, rinse it, cap the distributor tube with tape so beads don’t fall down it, and funnel the new resin in with the tank about a third full of water to cushion it. Budget two to three hours and a shower afterward. Resin typically lasts 10 to 15 years on city water and 5 to 10 on iron-heavy well water, so if the unit is that old, replacement rather than cleaning is the right call.
Step 8: Service the control valve
If settings, salt, injector, drain and resin all check out and the water is still hard or salty, the fault is mechanical inside the control head. There are only three moving parts worth knowing about.
The timer or circuit board. A mechanical timer that never advances through a cycle, or a digital display that’s dead with a known-good transformer, needs a new timer motor ($30-60) or board ($100-180). Timer motors on Fleck 5600 heads are two screws and a plug and take ten minutes to swap.
The drive motor and gears. You’ll hear the motor hum but the valve won’t move through cycles, or it stalls partway through. Pull the cover and watch the cam. Stripped gears are visible and cheap; a seized piston is not, which brings you to the last item.
The piston, seals and spacers. The piston slides through a stack of rubber seals and plastic spacers to route water through each cycle. When the seals wear, water leaks between chambers. The symptoms are continuous water running to the drain even in service, salty water, or a unit that regenerates but never softens. A seal and spacer kit runs $30 to $60. On a Fleck 5600 you remove the back cover, take out the drive yoke screw and the timer mounting screws, then pull the piston straight up by the yoke; the seals and spacers can usually be worked out of the valve body by hand. They go back in a strict alternating order, seal first, and the stack has to be fully seated or the valve will leak. The job takes about an hour the first time.
The decision point here is simple. If a seal kit and an injector get the valve working, do it. If the valve body itself is cracked (look for white mineral weeping around the base where it meets the tank) or you’re on your third repair in two years, a new control head runs $150 to $600 and a complete new softener installed is $1,000 to $3,000 depending on size. Spending $400 in parts on a 15-year-old valve attached to spent resin isn’t a repair, it’s a down payment on a replacement.
Troubleshooting chart
| Symptom | Likely cause | Fix |
|---|---|---|
| Water tests hard, salt not going down | Salt bridge, clogged injector, or unit not regenerating | Break bridge, clean injector, check power and clock, force manual regen |
| Water tests hard, salt disappears normally | Fouled or exhausted resin, hardness set too low, valve bypassed | Resin cleaner for 3 days, raise hardness setting, check bypass position |
| Water tastes salty | Clogged drain line or DLFC, float set high, low pressure, worn piston seals | Clear drain line, reset float, check psi, replace seal kit |
| Brine tank full of water | Clogged injector or brine line, stuck brine valve, float set wrong | Clean injector and air check, verify float height, check brine tube for kinks |
| Brine tank bone dry with water never refilling | Brine refill cycle not running, refill flow control clogged | Check settings and clean the brine refill flow control button |
| Water runs to drain constantly | Piston stuck in a cycle, seals worn, timer stuck | Manually advance to service; if it continues, replace piston and seals |
| Softener regenerates every day | Hardness set far too high, meter reading wrong | Correct hardness setting, clean or replace the meter turbine |
| Resin beads in faucet aerators | Broken distributor tube or bottom screen | Replace distributor and resin, flush lines, clean all aerators |
| Orange or black staining despite soft water | Iron or manganese overwhelming the resin | Monthly resin cleaner, raise hardness setting for iron, consider an iron filter ahead of the softener |
| Low water pressure through the house | Resin compacted or broken down, clogged inlet screen | Backwash manually; if no change, replace resin |
| Motor hums but valve doesn’t move | Stripped gear or seized piston | Replace gear; if piston won’t move by hand, full seal and piston kit |
How to tell if you need a new water softener
Repair makes sense for most softeners under ten years old. Past that, weigh the fault against the age of the resin and the valve. Replace the whole unit when you see any of these:
- Resin is more than 12 to 15 years old and the water is still hard after a full cleaning cycle.
- The resin tank or valve body is cracked or weeping minerals at the threads.
- Resin beads are getting into the house plumbing (a broken distributor on a tank that age isn’t worth rebuilding).
- The control head needs a board or piston kit and the unit is also undersized for the household, which shows up as regenerating every day or two.
- Parts for the valve are discontinued. Many big-box store brands use proprietary heads with no aftermarket support, while Fleck and Clack parts will be available for decades.
Upgrading from a timer-based unit to a metered one typically cuts salt use by a third because it regenerates on gallons used rather than a calendar.
When to call a pro
Call a water treatment company (not a general plumber) if resin beads are coming through fixtures, if the valve body is cracked or leaking, if you’ve replaced the injector and seals and the water is still hard, or if raw water has more than 3 ppm of iron or any sulfur smell, which usually needs an iron or air-injection filter in front of the softener. Expect $40 to $100 for a diagnostic visit and $150 to $400 for most repairs with parts.
FAQ
Why does my water softener make the water salty?
Brine isn’t being fully rinsed out of the resin tank after regeneration. Check the drain line for kinks and clogs first, then the drain flow control washer, the brine float height and water pressure. Clean the injector and run a manual regeneration. If the taste persists after all that, the piston seals in the control valve are worn and letting brine bleed through.
How often should a water softener regenerate?
A correctly sized metered softener regenerates every three to seven days for a typical family. Daily regeneration means the hardness setting is too high or the unit is too small. Going more than two weeks without regenerating on well water lets iron set into the resin, so use the day override setting to force at least one cycle a week.
Can I use water while the softener is regenerating?
You can, but it will be hard water on nearly every residential valve, because the unit sends raw water to the house during the cycle. On older or budget valves, running a tap during brine draw can pull salty water into the lines. Keep the regeneration time set to 2 a.m. so it doesn’t matter.
Why is my brine tank full of water?
The softener is refilling the tank each cycle but not drawing brine back out. A clogged injector is the usual cause, followed by a stuck brine valve or a pinched brine line. Clean the injector and the air check, then run a manual regeneration and watch the tank level drop during the brine draw cycle.
How much salt should be in the brine tank?
Keep it between a quarter and two-thirds full, and always above the water line. Filling it to the lid encourages salt bridges. Use evaporated pellets, add salt when it drops to a quarter, and run a manual regeneration after refilling if the tank was empty.
Does a salt bridge damage the softener?
No, but it stops the softener from working until it’s broken up. Weeks of hard water can leave scale in your water heater and fixtures, so test the water whenever a bag of salt seems to last unusually long.