
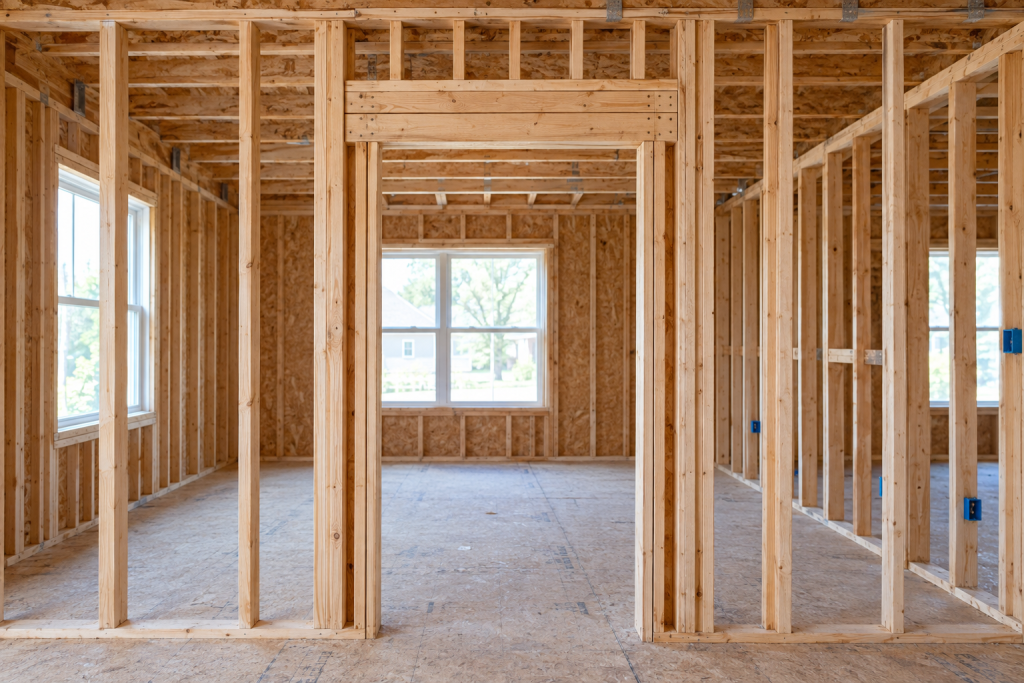
Frame a doorway by adding 2 inches to the door width and 2-1/2 inches to its height, then building that opening with king studs, jack studs, a header and cripples. A standard 36-inch by 80-inch prehung door needs a 38-inch by 82-1/2-inch rough opening in a non-bearing wall. Bearing walls need a sized header and usually a permit, but the layout and nailing are otherwise identical.
Quick steps: frame a doorway rough opening
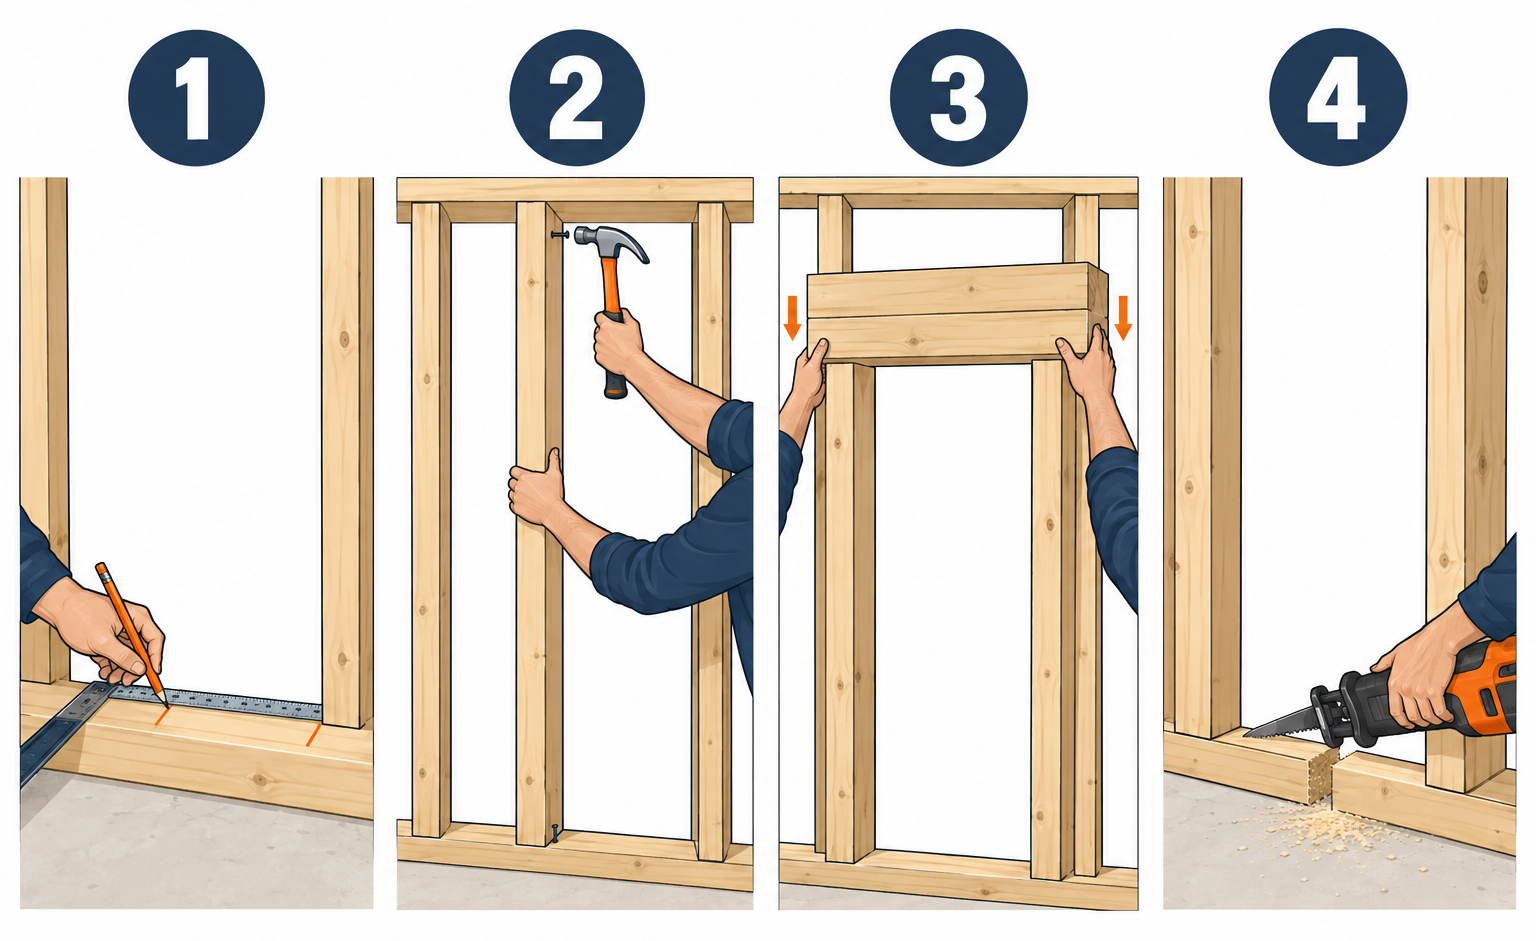
- Confirm the door size and calculate the rough opening: width plus 2 inches, height plus 2 to 2-1/2 inches.
- Determine whether the wall is bearing and size the header accordingly.
- Mark king stud and jack stud locations on the top and bottom plates.
- Nail the king studs full height between the plates.
- Build the header and set it on top of the jack studs, tight to the kings.
- Nail jacks to kings, then fill between the header and top plate with cripple studs.
- Cut out the bottom plate inside the opening, then check width, height, plumb and square.
Tools and materials
- Tape measure (25 ft) and speed square
- 4 ft level and a 6 ft level or straightedge
- Circular saw (7-1/4 in) or miter saw
- Framing hammer or framing nailer with 16d (3-1/2 in) and 10d (3 in) nails
- Reciprocating saw or handsaw for cutting the bottom plate
- Chalk line and carpenter’s pencil
- 2×4 or 2×6 studs, 8 ft or precut 92-5/8 in (count: 2 kings, 2 jacks, header stock, 2-4 cripples)
- 1/2 in plywood scrap for header spacer (2×4 walls only)
- Construction screws (3 in) if assembling a header before lifting it
- Safety glasses and hearing protection
Calculators for this job
Safety first
Shut off the circuit for any wall you are cutting into and test with a non-contact voltage tester before opening drywall. In a bearing wall, build temporary shoring on both sides before removing any stud. Wear eye protection whenever you nail or saw framing.
Doorway framing terms you need before you start
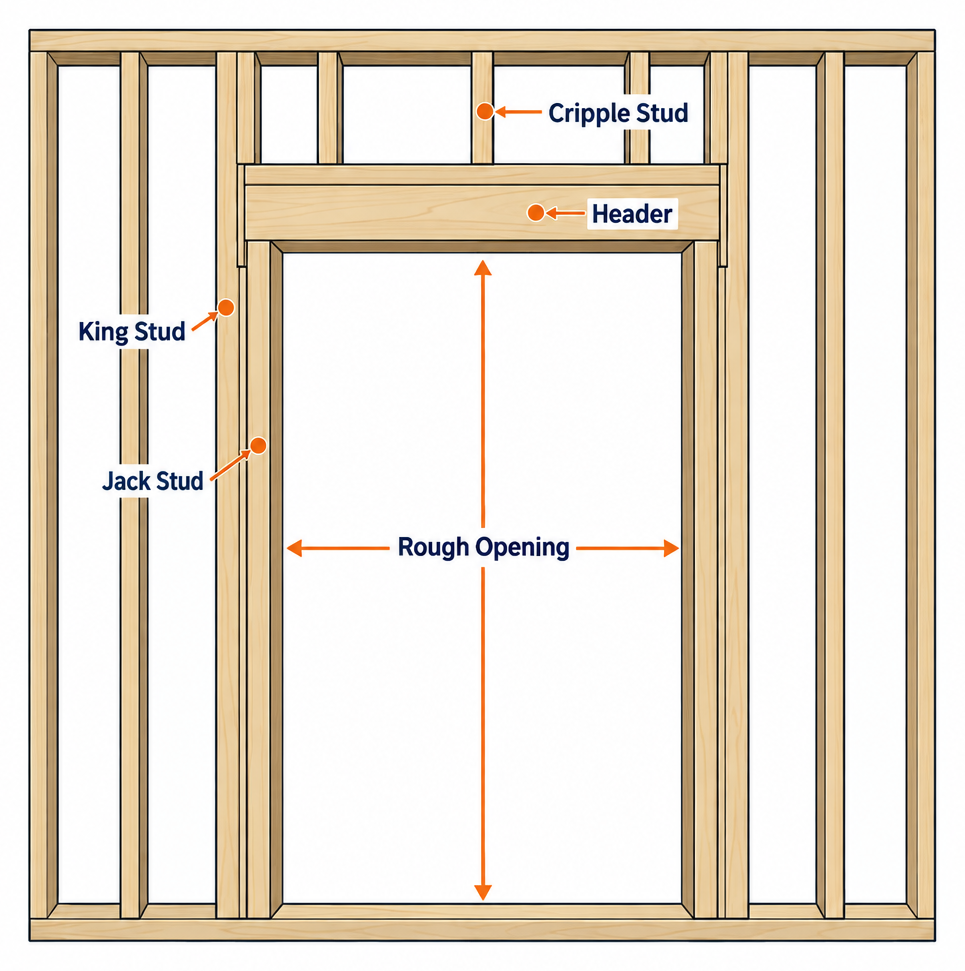
Every doorway uses the same five parts, and getting the names right makes the rest of the job easy to follow. The king stud runs full height from the bottom plate to the top plate on each side of the opening. The jack stud, also called a trimmer, is shorter and nails to the inside face of the king, and the header rests on top of the jacks.
Cripple studs fill the gap between the top of the header and the underside of the top plate. The rough opening is the clear space between the two jack studs and from the subfloor to the bottom of the header, and that is the number every door manufacturer specifies.
A 2×4 stud measures 1-1/2 inches by 3-1/2 inches, and a 2×6 measures 1-1/2 inches by 5-1/2 inches. Those actual dimensions drive every layout number below, so write them on the wall if you have not framed before.
Step 1: Pick the door and calculate the rough opening
Decide on the door before you cut any lumber, because the rough opening depends on the exact unit you install. Prehung interior doors ship as a slab already hung in a jamb, and the rough opening gives the jamb room to be shimmed plumb inside the framing.
The standard formula is simple. Add 2 inches to the slab width and 2 to 2-1/2 inches to the slab height, measured from the subfloor to the underside of the header. The extra width comes from two 3/4-inch jamb legs plus roughly 1/2 inch of shim space, and the extra height covers the head jamb, shim space and clearance under the slab.
| Door slab width | Slab height | Rough opening (width x height) | Header length in a 2x framed wall |
|---|---|---|---|
| 24 in | 80 in | 26 in x 82-1/2 in | 29 in |
| 28 in | 80 in | 30 in x 82-1/2 in | 33 in |
| 30 in | 80 in | 32 in x 82-1/2 in | 35 in |
| 32 in | 80 in | 34 in x 82-1/2 in | 37 in |
| 36 in | 80 in | 38 in x 82-1/2 in | 41 in |
| 36 in | 96 in | 38 in x 98-1/2 in | 41 in |
The 36 inch door rough opening of 38 by 82-1/2 inches is the most common question, and it is also the width that meets most accessibility guidelines for a clear passage. If you have room for it, a 36-inch door makes moving furniture and appliances far easier than a 30-inch door.
Check the manufacturer’s spec sheet anyway. Some prehung units call for 82 inches of height, and exterior doors with a sill often want 82-1/2 to 83 inches. Treat the formula as the default and the spec sheet as the final word.
Account for the finished floor as well. The rough opening height is measured from the subfloor, so if 3/4-inch hardwood or 1/2-inch tile goes in later, the installer trims the jamb legs or raises the door on blocks. Framing the opening 82-1/2 inches tall leaves room for either approach.
Pro tip
Frame the rough opening 1/2 inch oversize in width, never 1 inch oversize. A 39-inch opening for a 36-inch door forces you to stack shims 3/4 inch thick behind each hinge, and stacked shims compress and let the door sag within a year. Hold it to 38 inches so a single pair of tapered shims fills each gap.
Jamb width matters when you order the door, not when you frame. A 2×4 wall with 1/2-inch drywall on both sides is 4-1/2 inches thick, and the matching jamb is 4-9/16 inches wide. A 2×6 wall takes a 6-9/16-inch jamb. If you plan 5/8-inch drywall, order a wider jamb or plan to add jamb extensions.
For a cased opening with no door, the same framing applies, but you can size the opening to whatever finished width you want. Add 1-1/2 inches for two 3/4-inch jamb boards plus 1/2 inch of shim space, so a 40-inch finished passage needs a 42-inch rough opening.
Step 2: Determine whether the wall is bearing and size the header
The header carries any load that lands above the doorway, and in a non-bearing partition that load is nothing more than the drywall and the cripple studs. In a bearing wall the header carries roof, ceiling or floor loads, and its size is dictated by code.
Start with the ceiling joists or floor joists above. A wall running perpendicular to the joists is bearing when the joists lap, splice or end on it. A wall parallel to the joists is almost never bearing unless a beam, post or point load sits on it.
Then check these signs in order.
- Exterior walls are bearing on all sides of the house, regardless of roof type.
- Interior walls directly under a ridge, under lapped joists, or over a basement beam or steel column are bearing.
- Walls with a double top plate are often bearing, though many framers double every plate out of habit.
- On a gable-roofed house, the gable end walls carry little roof load, but the eave walls carry all of it.
- Walls supporting a stair opening or a second-floor partition that lines up above them are bearing.
- Walls with existing doorways that have only a flat 2×4 header are non-bearing, or were framed wrong.
For a non-bearing partition, the header can be a single 2×4 laid flat, a doubled 2×4 on edge, or a 2×6 on edge. Most framers use a doubled 2×4 on edge because it keeps the jack stud length consistent and resists twisting when the door slams.
For a bearing wall, the 2021 International Residential Code lists header spans in Tables R602.7(1) for exterior walls and R602.7(2) for interior walls, and the span depends on the header lumber size, species, snow load, building width and how many floors sit above. Look up your exact case in those tables or have your building department confirm it, because the correct answer changes with every variable.
| Wall condition | Typical header build | Header depth | Notes |
|---|---|---|---|
| Non-bearing 2×4 partition | Single 2×4 flat or doubled 2×4 on edge | 1-1/2 in or 3-1/2 in | No permit for a new partition in most jurisdictions |
| Non-bearing 2×6 partition | Doubled 2×6 on edge or 2×4 flat | 5-1/2 in or 1-1/2 in | Match wall thickness with a third ply or furring |
| Bearing 2×4, one-story roof load | Two 2×6 to two 2×10 with 1/2 in plywood spacer | 5-1/2 to 9-1/4 in | Size from IRC Table R602.7(1) or R602.7(2) |
| Bearing 2×6 wall | Three plies of 2×8 to 2×12 or 5-1/2 in LVL | 7-1/4 to 11-1/4 in | Engineered lumber avoids spacers entirely |
| Bearing with floor above | Often 2×10 to 2×12 or LVL | 9-1/4 in and up | Engineer or inspector sign-off is common |
Oversizing the header in a bearing wall costs a few dollars and almost never causes a problem in an 8-foot wall. Undersizing it causes drywall cracks, a door that binds in the top corner, and in bad cases a sagging ceiling. When in doubt, go one lumber size deeper than the table minimum.
Step 3: Lay out the plates
Layout happens on the top and bottom plates before any studs go up, whether you are building the wall flat on the floor or framing in place. Cut both plates to the full wall length and lay them side by side on edge with the ends flush.
Mark the centerline of the doorway first, then measure half the rough opening to each side. For a 38-inch rough opening, mark 19 inches left and right of center. Those marks are the inside faces of the jack studs.
Now mark the jack stud and king stud positions outward from each rough opening line. The jack sits directly on the line, occupying 1-1/2 inches, and the king sits outside the jack, occupying another 1-1/2 inches. Draw an X for each stud location and write J and K so you do not nail a king in the wrong spot.
Lay out the regular studs at 16 inches on center from the end of the wall, continuing straight through the doorway area. Any common stud that lands inside the opening becomes a cripple above the header, and that keeps drywall seams landing on framing later.
Use the speed square to carry each mark across both plates at the same time. Marking both plates together is the single best way to guarantee the kings land plumb when the wall stands up.
Measure the rough opening at the plate marks once more before cutting. The most common framing mistake is sizing the opening from king to king, which comes out 3 inches too wide and leaves you shimming a 41-inch hole for a 36-inch door.
Step 4: Cut and set the king studs
King studs run the full wall height, so they are the same length as every other stud in the wall. For an 8-foot ceiling, precut 92-5/8-inch studs with a single bottom plate and a doubled top plate give a wall height of 97-1/8 inches, which allows for 1/2-inch drywall on the ceiling and a little float.
Set each king on its layout mark and end-nail through the plates with two 16d nails at each end. Keep the stud edge flush with the plate edge, because a king that sits proud by 1/8 inch will show as a bump in the drywall next to the casing.
If you are framing in place against an existing ceiling, toenail the kings instead. Drive two 16d nails at an angle from each face of the stud into the plate, starting the nail about 3/4 inch up from the plate and angling it at roughly 60 degrees.
Check each king for plumb with a 4-foot level before the header goes in. A crowned or bowed king stud should be turned so the crown faces away from the opening, and a stud bowed more than 1/4 inch over its length belongs in the scrap pile, not next to a door.
Sight down each stud before nailing it. Pick the straightest two studs in the bundle for the kings and the next straightest two for the jacks, since those four pieces determine whether the door hangs plumb.
Step 5: Build and set the header
Cut the header to the rough opening width plus 3 inches, which accounts for the two 1-1/2-inch jack studs it rests on. A 38-inch rough opening gets a 41-inch header, and the header ends butt tight to the inside faces of the king studs.
For a non-bearing doubled 2×4 header, lay two 2x4s face to face with the crowns pointing the same way, flush the edges and ends, and nail them together with 10d nails every 12 inches in a staggered pattern. Cut the pieces from the same board when possible so the widths match.
For a bearing 2×4 wall header, sandwich a strip of 1/2-inch plywood between the two 2×6, 2×8 or 2×10 plies to bring the total thickness to 3-1/2 inches, matching the wall. Nail through both faces with 10d nails at 16 inches on center along each edge, staggered top and bottom. Keep the plywood 1/4 inch short of the header ends so it never bears on the jacks.
A 2×6 wall needs a 5-1/2-inch-thick header, which means three plies of dimensional lumber with two 1/2-inch spacers, or a single 5-1/2-inch LVL. A header narrower than the wall leaves a recess that drywall will bridge but casing will not sit flat against, so match the thickness.
Set the header into the opening with the crown up, resting on the jack studs you will cut in the next step, or hold it temporarily on a couple of toenails if you prefer to nail the kings first. Drive four 16d nails through each king stud into the header end, two high and two low.
Pro tip
Cut the jack studs and stand them under the header before nailing anything, then pull the header down tight against the jacks with a bar clamp across the kings. Nailing the kings to a floating header leaves a gap above the jacks, and that gap is exactly where the door binds once the roof load settles.
Measure from the subfloor to the underside of the header on both sides before the final nails go in. It should read 82-1/2 inches for a standard door, and the two measurements should match within 1/8 inch.
In a bearing wall, a header must also be supported at its ends by jack studs that run continuously to the bottom plate, never by nails alone through the king. Headers over 6 feet typically need doubled jacks on each side, and the IRC tables note that requirement in the span listings.
Step 6: Install the jack studs and cripples
Jack stud length equals the rough opening height minus the bottom plate thickness. For an 82-1/2-inch opening on a single 2×4 bottom plate, cut the jacks at 81 inches. If your subfloor is wavy, cut them from the high side and plan to shim the low side jamb leg.
Stand each jack on the bottom plate, tight to the inside face of its king, with the header resting fully on its top end. Nail the jack to the king with 16d nails every 12 to 16 inches, staggered front to back, and toenail the bottom end into the plate with two nails.
The jack must sit flat on the plate and flat under the header with zero daylight at either end. A jack cut 1/8 inch short lets the header drop under load, and a jack cut long cocks the header out of level. Trim with the miter saw rather than forcing it.
Cripple studs fill the space from the top of the header to the bottom of the top plate. With 81-inch jacks and a 3-1/2-inch doubled 2×4 header, the cripples on a 92-5/8-inch wall measure 8-1/8 inches. A deeper bearing header leaves shorter cripples or none at all when the header fills to the plate.
Place a cripple directly above each jack stud and on any 16-inch layout mark that falls over the opening. End-nail through the top plate into each cripple with two 16d nails, then toenail the bottom of the cripple into the header with two 8d or 10d nails from each side.
Cripples shorter than about 4 inches are difficult to nail without splitting. Below that height, fill the gap with a solid block cut to width and face-nailed, or increase the header depth so it meets the top plate and eliminate the cripples entirely.
Step 7: Cut out the bottom plate and check the opening
The bottom plate runs continuous under the doorway until the wall is nailed off, which keeps the opening square while you move the wall around. Once the wall is secured to the floor and ceiling, cut the plate flush with the inside face of each jack stud.
Use a reciprocating saw with a wood blade for most of the cut, holding the blade tight against the jack so you do not score the stud, then finish the last 1/8 inch with a handsaw or oscillating tool to avoid gouging the subfloor. Pry the cut section up with a flat bar and pull any nails that remain.
Over a concrete slab you must cut the plate before fastening it, because the anchors will be inside the opening otherwise. Mark the cuts, make them, and anchor the two remaining plate sections on each side of the door.
Now verify the opening against five checks before you call it done.
- Width: measure between the jacks at the top, middle and bottom. All three should read within 1/8 inch of your target, 38 inches for a 36-inch door.
- Height: measure from subfloor to header on both sides and at the center. Target 82-1/2 inches or the manufacturer’s spec.
- Plumb: hold a 6-foot level against each jack on both the face and the edge. Anything beyond 1/8 inch over the height means shims later, and beyond 1/4 inch means re-cut.
- Square: measure both diagonals corner to corner. Matching diagonals mean a square opening. A difference over 1/4 inch needs correcting.
- Flush faces: run a straightedge across both faces of the jacks, kings and header. Proud or recessed pieces show through casing and drywall.
A doorway that passes all five checks takes under 30 minutes to hang a prehung door in. One that fails will eat an afternoon of shimming and still swing on its own.
Doorways in basement walls
Basement partition walls sit on a concrete slab and tie to joists above, and the doorway framing has three differences from an upstairs wall. The bottom plate must be pressure-treated or separated from the concrete, the plate anchors fall inside the opening unless you plan around them, and the slab is rarely level.
Use a pressure-treated 2×4 for the bottom plate, or a standard plate over a sill gasket or foam sill seal if your local code allows it. Fasten it with 1/4-inch by 2-3/4-inch concrete screws every 32 to 48 inches, or with powder-actuated pins, keeping fasteners at least 12 inches from the doorway cut lines.
Because the slab slopes toward the floor drain in most basements, measure the rough opening height from the high side of the doorway and let the low side run a little tall. The door installer then shims the low jamb leg off the floor rather than trimming the high leg, and the door swings clear of the slab.
Basement partitions are non-bearing in nearly every house, so a doubled 2×4 header is plenty. If the wall runs parallel to the joists above, add 2×4 blocking between the joists at 24 inches on center so the top plate has something to nail to.
Leave a 1/2-inch gap between the top of the wall and the joists in houses with poured foundations in cold climates, where the slab or the framing can shift seasonally. Many framers set the top plate with a slip connection rather than nailing it tight, and your inspector will tell you whether that applies locally.
Steel studs are common in basements because they resist moisture and insects. A steel-framed doorway uses the same layout, but the jacks and kings are boxed together with screws, and the header is a track section bent and screwed into the kings. Wood door jambs need wood blocking inside the steel jacks so the casing nails hold.
Cutting a doorway into an existing wall
Framing a new opening in a finished wall adds demolition, utility checks and, in bearing walls, temporary support. Budget an extra two to four hours and expect to replace a sheet of drywall on each side.
Locate the existing studs with a stud finder and mark the rough opening so at least one existing stud can serve as a king. Snap lines on the drywall from the floor to the ceiling, extending one stud bay beyond each king so you have framing to screw new drywall to.
Cut the drywall on both sides with an oscillating tool or drywall saw and remove it, then look for wiring, plumbing, ducts and vents. Electrical cables can be rerouted around the opening by an electrician or, in most jurisdictions, by a homeowner on a permit. Supply pipes and a clothes dryer vent running through the bay almost always mean choosing a different spot for the door.
In a non-bearing wall, cut the studs inside the opening at the header height plus the header thickness, pull them, and frame the kings, jacks, header and cripples as described in the steps above. Cut the bottom plate last.
In a bearing wall, build a temporary stud wall on each side of the existing wall, 2 to 3 feet back, with a top plate wedged against the ceiling and studs every 16 inches. Only then cut the existing studs and install a code-sized header on jack studs that sit on the bottom plate and support the header from below, nailed to full-height king studs. Remove the shoring after the header is fully nailed and the cripples are in.
Existing walls are rarely plumb, so check the kings with a long level and sister a new straight stud to any bowed one before using it as a king. A 1/4-inch bow in an old stud turns into a door that swings closed on its own.
Costs for doorway framing
Lumber for a non-bearing opening in a 2×4 wall is cheap because you need only six to eight studs and a few feet of header stock. Bearing openings add header lumber, possibly engineered, plus permit fees and sometimes an engineer’s letter.
| Item | Typical cost | Notes |
|---|---|---|
| 2×4 x 8 ft stud, kiln-dried | $3-5 each | Six to eight needed for kings, jacks, cripples |
| 2×6 x 8 ft | $6-10 each | Header plies in 2×6 walls or light bearing headers |
| 2×10 x 8 ft | $12-20 each | Common bearing header for one-story roof loads |
| 1-3/4 x 9-1/4 in LVL, 8 ft | $35-60 | Engineered header, no spacer needed |
| 1/2 in plywood scrap | $0-10 | Header spacer, one strip per opening |
| 16d and 10d framing nails | $8-15 | One box covers several doorways |
| Prehung 36 in hollow-core interior door | $150-300 | Solid-core and paneled styles run higher |
| Building permit for a structural opening | $75-400 | Varies widely by city and county |
| Carpenter labor, non-bearing opening | $200-500 | Framing only, before drywall and door |
| Carpenter labor, bearing opening | $600-1,500 | Includes shoring, header and cleanup |
Regional lumber prices move month to month, so price your materials at the yard the week you build. Buying straight studs at a lumberyard usually costs a little more than at a big-box store, but the kings and jacks will be straighter.
Troubleshooting doorway framing
| Symptom | Likely cause | Fix |
|---|---|---|
| Rough opening is 41 in instead of 38 in | Measured king to king instead of jack to jack | Add a second jack on each side, or a 1-1/2 in rip of 2x stock to each jack face |
| Opening is 1/2 in too narrow | Forgot the 2 in allowance or used thick studs | Plane the jack faces or re-cut one jack and move it over |
| Header has daylight above the jacks | Jacks cut short or header nailed before jacks set | Pull header nails, clamp header down to jacks, re-nail |
| Door binds at the top hinge corner | Header sagging or opening out of square | Check diagonals, add a jack or deeper header in bearing walls |
| Jamb legs sit proud of the drywall | Wall thicker than the jamb width | Use 5/8 in drywall only with a wider jamb, or add jamb extensions |
| Casing rocks and will not sit flat | King or header not flush with wall plane | Plane the proud piece or shim the recessed one before drywall |
| Door swings closed by itself | Hinge jack out of plumb in the wall plane | Shim the jamb plumb; if more than 1/4 in, sister a straight jack |
| Drywall cracks above the corners | Undersized header in a bearing wall or no cripples | Upsize the header to the IRC table value, add cripples on layout |
| Bottom plate cut leaves a ridge | Cut not flush with the jack | Trim with an oscillating tool, chisel the remainder flat |
| Rough opening height is 81 in | Jack cut to opening height minus plate twice | Shim under the header is not acceptable; re-cut jacks at 81 in for an 82-1/2 in opening |
Most of these show up during the five-point check in Step 7, which is the whole reason to run it before the drywall goes on. A framing fix takes 15 minutes with the studs exposed and two hours once the wall is finished.
Finishing after the framing
Once the opening passes its checks, the rest of the sequence runs drywall first, then the prehung door, then casing and baseboard. Hang drywall tight to the jacks and header, since the jamb covers the raw edge and the casing covers the first 2-1/4 inches of wall on each side.
Set the prehung door with the jamb centered in the wall thickness and shim behind each hinge and at the strike, using tapered shims in pairs so the pressure is flat against the jamb. Nail through the shims with 2-1/2-inch finish nails and snap the shim ends off flush before casing.
For an exterior door framed with the same method, the opening also gets a sill pan, flashing tape and a bead of sealant under the threshold, and after installation the door needs weather stripping for doors fitted to the stop to close the air gap the shims leave. Interior doors skip all of that.
Cased openings get 3/4-inch jamb stock ripped to the wall thickness, shimmed plumb the same way as a door jamb, then cased on both sides. Keep the top jamb level with the header and the legs plumb, and the casing miters close without fuss.
When to call a pro
Call a licensed general contractor or framing carpenter if the wall is bearing and the span exceeds what you can read directly from the IRC header tables, if the wall is an exterior wall with sheathing and siding to patch, or if there is any sign of a beam, post or point load above the opening. Call an electrician when cables cross the opening and the circuit cannot be moved on your own permit, and a plumber when supply or drain lines run through the bay. Any opening wider than 6 feet or any header in a wall under a second floor is worth an engineer’s letter, and most building departments will require one.
FAQ
What is the rough opening for a 36 inch door?
A 36-inch by 80-inch prehung door needs a rough opening 38 inches wide and 82-1/2 inches tall, measured between the jack studs and from the subfloor to the underside of the header. Some manufacturers specify 82 inches tall, so confirm the spec sheet before cutting jacks.
Can I use a single flat 2×4 as a doorway header?
Yes, in a non-bearing partition wall a single 2×4 laid flat is allowed by the IRC and works fine. Most framers prefer a doubled 2×4 on edge because it stiffens the top of the opening and resists twisting when the door slams.
How do I know if the wall is bearing?
Check the joists above. A wall that runs perpendicular to the joists, especially where they lap or end on it, is bearing. Exterior walls, walls under a ridge, and walls over a basement beam or column are bearing. Parallel walls with no post or beam above are usually not.
How long should the header be for a doorway?
Cut the header to the rough opening width plus 3 inches so it rests fully on both 1-1/2-inch jack studs. A 38-inch opening takes a 41-inch header, and a 32-inch opening takes a 35-inch header.
What size jamb do I need for a 2×4 wall?
A 2×4 wall with 1/2-inch drywall on both sides is 4-1/2 inches thick, and the standard interior jamb is 4-9/16 inches wide. A 2×6 wall takes a 6-9/16-inch jamb. With 5/8-inch drywall, order a 4-11/16-inch jamb or add extensions.
How much bigger should the rough opening be than the door?
Add 2 inches to the slab width and 2 to 2-1/2 inches to the slab height. Oversizing beyond that forces stacked shims that compress over time and let the door sag, so hold the width to the formula.
Do I need a permit to frame a doorway?
A new doorway in a non-bearing partition usually does not require a permit, though a few cities inspect all framing. A doorway cut into a bearing wall or exterior wall requires a permit nearly everywhere, and the inspector will want to see the header size and jack studs before drywall covers them.
Can I frame the opening without cripple studs?
Yes, if the header is deep enough to fill the space between the jacks and the top plate. In an 8-foot wall with 81-inch jacks, a header 11-1/8 inches deep meets the top plate and needs no cripples, which is why some framers use a doubled 2×12 on every doorway in bearing walls.