
A clean, streak-free paint job comes down to three things: a wall that’s actually ready for paint, the right roller nap and brush for the surface, and keeping a wet edge so every section blends into the next. Do those three right and a 12×12 bedroom takes one weekend, two coats included. This walks you through the whole job from furniture to final tape pull, with the exact tools, dry times and traps that separate a pro finish from a patchy one.
Quick steps: paint an interior room
- Empty the room or pull furniture to the center and cover everything.
- Wash walls, fill holes, sand patches smooth and spot-prime repairs.
- Tape trim and outlets, kill power to the room, remove cover plates.
- Cut in ceiling, corners and trim with a 2.5-inch angled brush.
- Roll the wall in 3×3-foot sections in a W pattern while the cut-in is still wet.
- Let the first coat dry 2-4 hours, then cut in and roll a second coat.
- Pull tape when the paint is dry to the touch, scoring it first if it sat overnight.
- Reinstall plates, move furniture back after 24 hours, avoid scrubbing for 2 weeks.
Tools and materials
- Interior latex wall paint (1 gallon per 350-400 sq ft per coat)
- Primer if needed (PVA for new drywall, stain-blocking for stains, bonding primer for glossy walls)
- 2.5-inch angled sash brush (nylon/polyester for latex)
- 9-inch roller frame and roller covers (3/8-inch nap for smooth walls, 1/2-inch for light texture, 3/4-inch for heavy texture)
- Roller tray with disposable liners, or a 5-gallon bucket with a bucket grid
- 4-foot extension pole (threaded to fit roller frame)
- Painter’s tape, 1.41-inch (3M ScotchBlue or FrogTape Multi-Surface)
- Canvas drop cloths, 9×12 feet (one per wall area, plus one for the work zone)
- Lightweight spackle and 1.5-inch and 6-inch putty knives
- 120-grit and 220-grit sanding sponges or paper
- TSP substitute or dish soap, bucket, two sponges
- 5-in-1 painter’s tool
- Caulk gun and paintable acrylic latex caulk
- Screwdriver for outlet and switch covers
- Non-contact voltage tester
- 4-6 foot stepladder
- Rags, paint can opener, stir sticks
Calculators for this job
Safety first
Turn off the breaker for the room before taping outlets and switches, and confirm with a non-contact voltage tester. Open windows and run a fan for ventilation. Wear safety glasses while sanding ceilings and a dust mask for any sanding; use an N95 if the house was built before 1978 and you are disturbing old paint, and get the paint tested for lead before sanding it at all.
Step 1: Clear the room and protect what stays
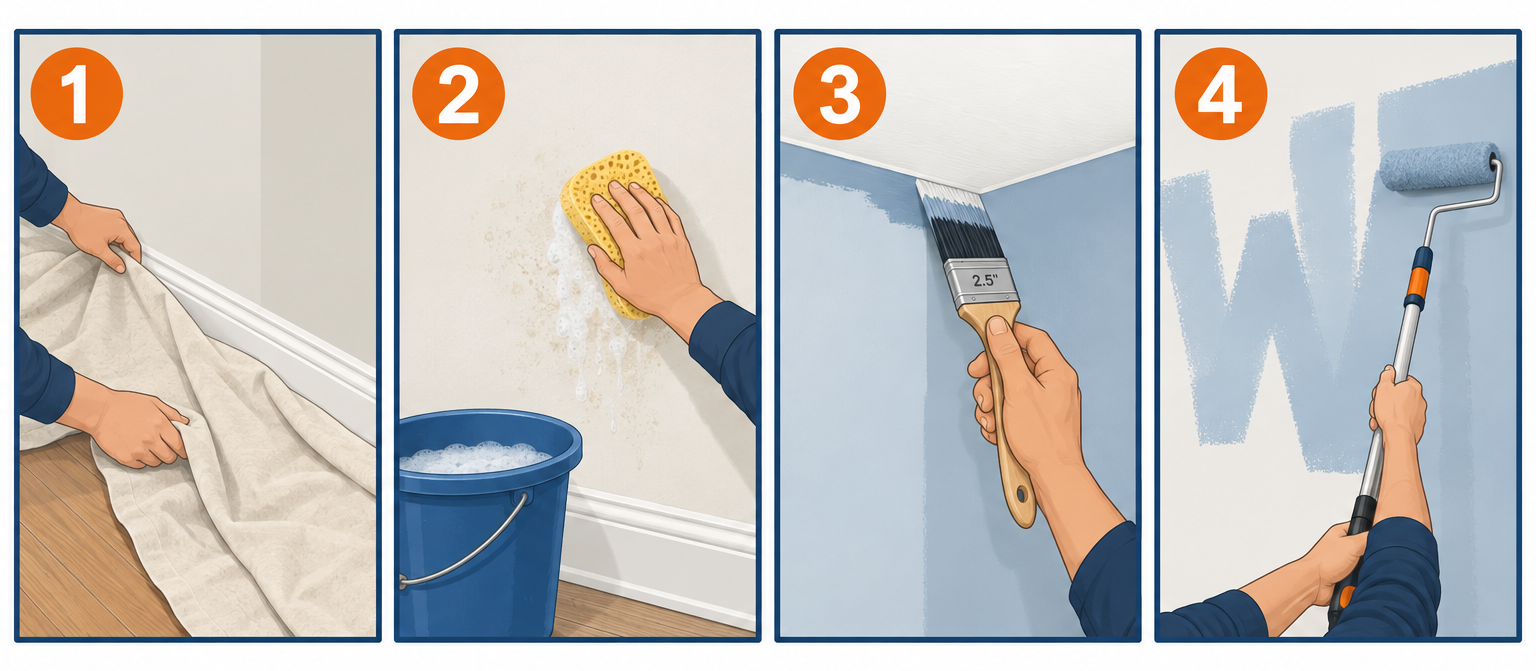
Take out everything you can carry: lamps, pictures, rugs, small tables. Anything too heavy goes to the center of the room, at least 3 feet from every wall so you have room to work the roller pole and ladder. Cover the pile with a plastic sheet, then a canvas drop cloth on top of the plastic so splatter doesn’t bead and roll off onto the floor.
Pull every nail, picture hook and anchor from the walls. If you have floating shelves on a wall, take them down completely rather than painting around them; the cut-in around a shelf bracket never looks right, and the shelf itself will get splatter. Same for curtain rods, brackets and thermostat covers. Keep all the hardware in a labeled zip bag taped to the inside of the closet door so it doesn’t walk off.
Remove outlet and switch cover plates after the breaker is off. Painting around a cover plate leaves a hard ridge that shows the moment someone swaps the plate for a different size. Put a strip of painter’s tape over the exposed receptacle face so you don’t roll paint into the slots.
If the room has a ceiling fan and you’re painting the ceiling, take the blades off (usually 2-3 screws per blade) and bag the motor housing with a plastic grocery bag and tape. Fan blades collect dust that will fall into your wet ceiling paint if you leave them up. It’s also a good moment to tighten any blade screws that have loosened, since a wobbling ceiling fan is almost always a loose blade bracket.
Why canvas beats plastic on the floor
Use cotton canvas drop cloths on the floor, not plastic. Plastic is slick underfoot, especially on a ladder, and paint drips sit on top of it wet for hours, waiting for your shoe to track them across the hallway. Canvas absorbs drips and stays put. A 9×12 canvas cloth runs $20-30 at a big-box store and lasts for decades. Butt the cloths tight against the baseboard; a 1-inch gap at the wall is exactly where every drip lands.
On hardwood or tile, add a strip of 2-inch painter’s tape along the baseboard edge of the floor so the cloth can’t creep. On carpet, run the tape half on the baseboard and half on the carpet, pressing the carpet edge down with a putty knife so the tape tucks under the baseboard lip.
Step 2: Wash the walls so paint can bond
Dirty surfaces are the number one cause of paint that peels or flakes months later. Kitchen walls carry cooking grease, bathroom walls have soap film and hairspray, and every wall in the house has a layer of skin oils around light switches and door frames. Paint will stick to the grime instead of the wall, and the grime lets go.
Mix a TSP substitute (sold as “TSP-PF” or “heavy-duty cleaner”) per the label, usually 1/4 cup per gallon of warm water. For most bedrooms and living rooms, a few drops of dish soap in a gallon of warm water does the job. Wash from the bottom up with one sponge, rinse with a second sponge and clean water from the top down. Bottom-up washing prevents the dirty streaks that form when cleaner runs down a dry wall and dries before you get to it.
Pay extra attention to:
- A 2-foot band around every switch and doorknob
- The wall above the stove and the backsplash zone in a kitchen
- The upper third of bathroom walls where steam deposits
- Any wall near a wood stove or fireplace, which picks up soot
Let walls dry at least an hour before you patch. If you find mildew (black or green spotting, common in a bathroom), kill it with a 1:3 bleach-to-water solution, rinse, and plan on a primer with mildewcide before the finish coat.
Step 3: Patch, sand and prime the repairs
Run your hand across the wall at a low angle with a work light held against the surface. Raking light shows every nail pop, dent and old patch that daylight hides. Circle each spot lightly with a pencil so you don’t lose them.
Nail holes and small dents
Push lightweight spackle into the hole with a 1.5-inch putty knife, then scrape it flush in a second pass at a 45-degree angle. Leave the patch barely proud of the wall; spackle shrinks a little as it dries. Nail holes dry in 15-30 minutes. Sand with 220-grit until you can’t feel the edge with your eyes closed.
Holes bigger than a quarter
Use a self-adhesive mesh patch for holes up to about 4 inches. Press the patch on, skim joint compound over it with a 6-inch knife, let it dry overnight, then skim a second wider coat to feather the edges out 3-4 inches past the patch. Sand with 120-grit, then 220. For holes larger than 4 inches you want a drywall cut-out patch backed with a scrap of 1×3, which is a different article’s worth of work.
Nail pops
Drive a drywall screw 1.5 inches above and below the popped nail, then tap the nail back in with a hammer and cover all three with two coats of compound. Just filling over a nail pop guarantees it returns within a year.
Cracks at corners and above doors
Hairline cracks that keep returning over a door are usually seasonal framing movement. Rake the crack open with a 5-in-1 tool, fill with compound, embed a strip of paper tape, and skim two coats. For the joint between trim and wall, run a bead of paintable acrylic latex caulk and smooth it with a damp finger. Caulk before painting, never after, because fresh caulk on a finished wall looks like what it is.
Prime every patch
Bare spackle and joint compound soak up paint differently than the surrounding painted wall. Skip primer and you get “flashing”: dull spots in the exact shape of each patch, visible from across the room in any sheen above flat. Spot-prime every repair with a brush and let it dry 1 hour. If the wall has more than a dozen patches, or you skimmed a whole area, roll primer on the full wall.
If your wall has an orange-peel or knockdown texture, a smooth patch stands out even under primer. Spray texture in an aerosol can (sold as “orange peel” or “knockdown” wall texture, $15-20) lets you match it. Spray in short bursts from 12-18 inches, let it set 5 minutes for knockdown and lightly flatten with a wide knife, then prime once it’s dry.
Pro tip
Tint your primer. Any paint counter will add colorant to primer for free, and a gray-tinted primer under a deep red, navy or forest green saves a full coat of expensive finish paint. Ask for the tint shade the manufacturer recommends for your color; Sherwin-Williams and Benjamin Moore both print it on the color chip.
When you need a full-wall primer
| Wall condition | Primer to use | Why |
|---|---|---|
| New or unpainted drywall | PVA drywall primer | Seals paper and compound so finish coat doesn’t soak in unevenly |
| Glossy or semi-gloss existing paint | Bonding primer (Zinsser 123, Kilz Adhesion) | New paint slides off slick surfaces without it |
| Water stains, smoke, marker, tannin bleed | Stain-blocking primer (Zinsser BIN shellac or Kilz Original oil) | Latex primer lets stains bleed through within days |
| Dark color going to light | High-hide latex primer, or 2 coats of finish | Cuts a three-coat job to two |
| Bathroom with past mildew | Primer with mildewcide (Zinsser Mold Killing Primer) | Stops regrowth under the new film |
| Sound, same-sheen, similar-color repaint | Spot-prime patches only | Full primer is wasted money here |
A gallon of general-purpose latex primer runs $20-35 and covers roughly 300-400 square feet. Shellac-based BIN runs $55-70 a gallon, so buy a quart for spot work unless you’re sealing a whole smoke-damaged room.
Step 4: Tape and set up the room
Tape the top of the baseboard, both sides of window and door casing, and the edge of any built-in you aren’t painting. Use 1.41-inch tape (the standard “1.5 inch” roll) and press the wall-side edge down firmly with a putty knife or your thumbnail. The tape only works where it’s sealed; a loose edge lets paint wick underneath and leaves a ragged line.
Whether you tape the ceiling line is a judgment call. Textured ceilings don’t take tape well; it won’t seal to the bumps. On smooth ceilings, a decent cut-in brush line is faster than taping 50 linear feet and often cleaner. If you’ve never cut in before, tape the ceiling for your first room and practice freehand on the closet.
Don’t leave tape on for more than a few days. Standard blue tape is rated for 14 days of clean removal, but paint cures over the tape and bonds to it, which matters at pull time.
Set up a rolling station
Pour the paint. If the room needs more than one gallon, open all the cans and pour them together into a clean 5-gallon bucket, stir with a drill-mounted paddle for 2 minutes, then pour back into cans or work straight from the bucket. This is called boxing. Two cans of the “same” color mixed on different days can differ just enough that the seam between can one and can two shows as a faint line on the biggest wall. Boxing eliminates it.
Work from a 5-gallon bucket with a bucket grid hooked over the rim rather than a tray. A tray holds a quart and tips over; a bucket holds enough for the whole room and lets you load the roller by dunking it and rolling off the excess against the grid. If you prefer a tray, use disposable liners so cleanup is 10 seconds.
Thread your roller frame onto the extension pole. Even in an 8-foot room, the pole lets you roll floor to ceiling in one stroke without a ladder and takes the strain off your shoulder. Keep the ladder for cutting in only.
Step 5: Cut in the edges with a brush
Cutting in means painting a 2-3 inch band with a brush everywhere the roller can’t reach: the ceiling line, inside corners, around trim, and around outlets. Rollers leave a different texture than brushes, so you want to keep that brushed band narrow and then roll right up to it, which we’ll cover in Step 6.
Load a 2.5-inch angled sash brush by dipping the bristles about 1 inch into the paint, then tap both flat sides against the inside of the cut bucket. Don’t wipe the brush on the rim; that strips too much paint out and you’ll be dry after 12 inches. A 1-quart cut bucket with a magnetic brush holder ($5-10) keeps the brush out of the dust and is far easier on a ladder than the gallon can.
The cut-in stroke
Start about 1/2 inch away from the ceiling and brush a short stroke to lay paint on the wall. Then, with the brush edge-on so the tip forms a knife edge, pull a second stroke that slides up into the corner and along it. The paint already on the wall feeds the bristles, so you get a long controlled line instead of a blob. You’ll get 18-24 inches per load. Reload, start your next stroke 2 inches back into the wet section, and pull forward.
Keep the brush moving. Hesitate and the brush unloads a drip. If the line wobbles, don’t try to fix it with the same brush; let it dry and touch the ceiling with a small artist brush and ceiling paint later.
Cut in one wall at a time, not the whole room. Latex paint starts to skin over in 10-15 minutes in a warm room. If you cut in all four walls before rolling, the cut-in on wall one is dry by the time you roll it, and you’ll see a visible band along the ceiling where brushed paint meets rolled paint. This is the single most common mistake in DIY interior painting and it’s entirely avoidable: cut one wall, roll that wall, move on.
Pro tip
Buy one good brush instead of three cheap ones. A Purdy XL Glide or Wooster Ultra Pro 2.5-inch angled brush costs $15-22 and will hold a crisp line for years if you wash it in warm water right after use and store it in its cardboard keeper. A $4 brush sheds bristles into the paint and fans out after the first wall.
Step 6: Roll the walls in sections
Load the roller by rolling it into the bucket paint and back up the grid 5-6 times until the cover is saturated but not dripping. A properly loaded 9-inch roller with 3/8-inch nap holds enough paint for roughly a 3×3-foot section.
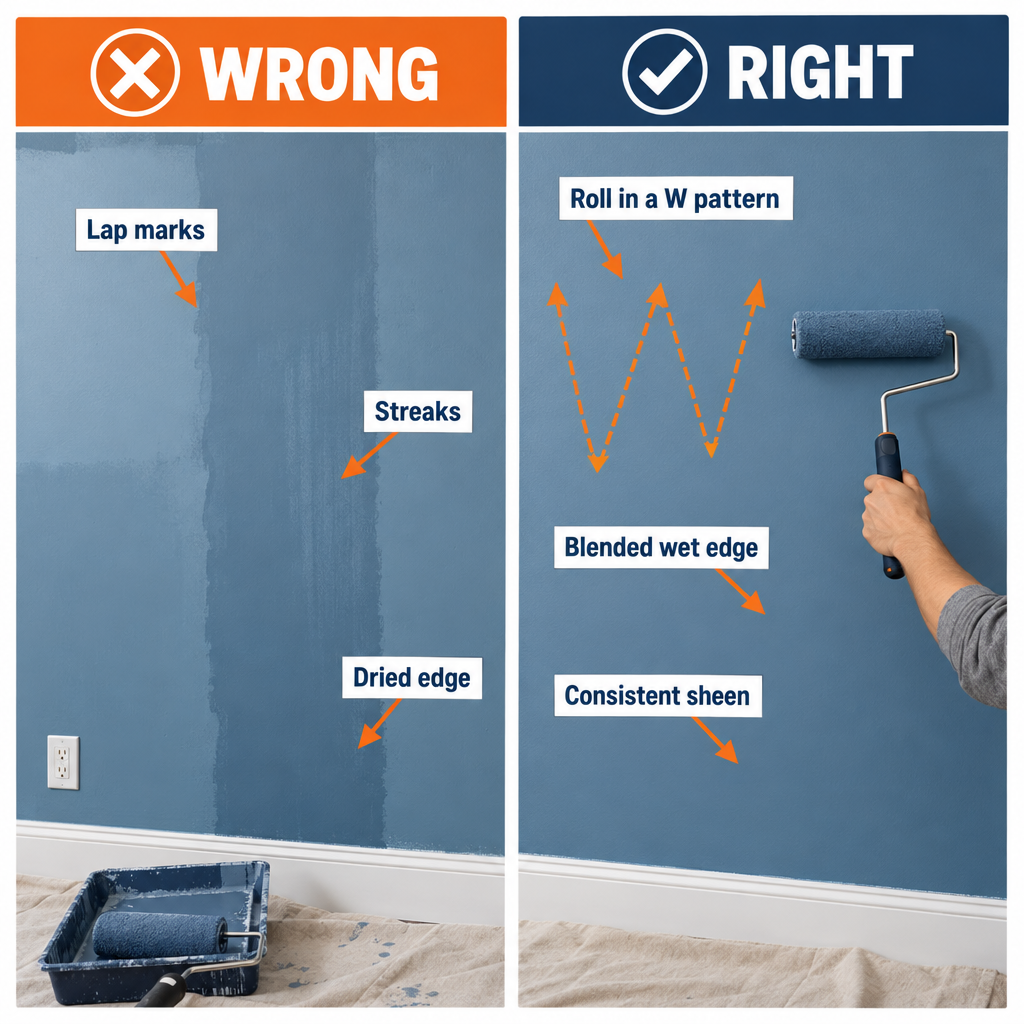
Start about 6 inches from the corner and 1 foot down from the ceiling. Roll a loose W or N shape about 3 feet wide and 3 feet tall to unload the paint, then fill in the W with light overlapping vertical strokes until the section is evenly covered. Finish the section with one light top-to-bottom pass to lay the texture in the same direction.
Roll the next section overlapping the previous one by 3-4 inches, working across the wall and then down. The goal is to keep a wet edge the full height of the wall: every section is rolled while the one beside it is still wet, so they merge. If a section dries before you overlap it, the overlap shows as a darker stripe called lapping. In a warm, dry room you have about 10 minutes. Work fast, don’t take a phone call mid-wall, and if you must stop, stop at a corner.
Roll into the cut-in
After cutting in a wall, bring the roller as close to the ceiling, corners and trim as it will physically go without hitting them, usually within 1/2 inch. The roller’s sheen and texture need to cover as much of the brushed band as possible. A 4-inch mini roller with the same nap ($6-8 for a frame and two covers) reaches into corners and under window stools where the 9-inch can’t. The texture difference between brushed and rolled paint is what you see as a “halo” around the edges of a wall, and rolling the edges fixes it.
Pressure and speed
Let the paint do the work. Pressing hard squeezes paint out of the ends of the cover and leaves raised lines (roller tracks) along each stroke. Moderate pressure, steady speed, and reload when the roller starts to sound dry. You’ll hear it: a loaded roller is nearly silent, a dry one makes a tacky, sticky sound.
Keep a wet rag in your back pocket for drips on the trim tape and the occasional roller fleck. Wipe immediately; dried latex on semi-gloss trim needs a razor blade.
Feather where you can’t keep a wet edge
Sometimes you can’t finish a wall in one pass: a stairwell wall 16 feet tall, or a wall interrupted by a built-in. When you have to stop mid-wall, feather the edge. Roll the last section, then with an unloaded roller, pull long light strokes outward from the wet paint into the bare wall so the edge thins to nothing over 6-8 inches. When you come back, start inside the feathered zone and the overlap disappears. On the second coat, shift your stopping point by a couple of feet so the two feathered edges don’t stack.
Step 7: Dry, then recoat
Most interior latex paints are dry to the touch in 1 hour and ready to recoat in 2-4 hours at 70°F and 50 percent humidity. Behr, Sherwin-Williams and Benjamin Moore all print the recoat window on the can; follow it. Rolling a second coat too early drags the first coat, lifts it in patches, and produces a leathery texture you can’t fix without sanding.
Cold and humid rooms stretch dry times dramatically. Below 50°F most latex paints won’t form a proper film at all. Above 85 percent humidity, overnight is safer than the label time. Run a box fan in a window to move air, but don’t point it directly at a wet wall, which can dry the surface before the paint underneath and cause cracking.
Nearly every wall needs two coats. One coat of even premium paint-and-primer product leaves thin spots over patches and a slightly uneven sheen in raking light. The second coat goes on faster because you’re not fighting coverage, usually 60-70 percent of the time of the first coat. Cut in and roll the second coat exactly as you did the first, wall by wall.
Between coats, check the wall with your work light held low and sideways. Mark holidays (missed spots), drips and roller tracks with a small piece of tape beside each one. Sand drips flat with 220-grit before the second coat. Holidays just need paint.
How much paint you need
Paint coverage is remarkably consistent across brands at 350-400 square feet per gallon per coat on a smooth, previously painted wall. Textured walls, bare drywall and rough plaster drink more; figure 250-300 square feet.
To size a room: add up the perimeter, multiply by wall height, subtract roughly 20 square feet per door and 15 per window.
| Room | Perimeter x 8-ft walls | Wall area (after openings) | Gallons, 2 coats |
|---|---|---|---|
| 10×10 bedroom, 1 door, 1 window | 320 sq ft | 285 sq ft | 2 |
| 12×14 bedroom, 1 door, 2 windows | 416 sq ft | 366 sq ft | 2 |
| 15×20 living room, 2 openings, 3 windows | 560 sq ft | 475 sq ft | 3 |
| 5×8 bathroom, 1 door, 1 window | 208 sq ft | 173 sq ft | 1 |
| 12×12 ceiling (ceiling paint) | n/a | 144 sq ft | 1 |
Round up. A leftover quart for touch-ups is worth far more than a 6 p.m. run to the store for a half gallon of a custom tint that then doesn’t quite match.
Step 8: Pull the tape and handle touch-ups
Pull tape when the final coat is dry to the touch but not cured, usually 1-2 hours after the last coat. Pull slowly at a 45-degree angle away from the painted surface, folding the tape back on itself. Going straight up or too fast tears chips out of the fresh paint.
If the tape has sat overnight or longer, the paint film has bridged over the tape edge. Score the edge first with a sharp utility blade held at a shallow angle, running the blade along the tape line without digging into the wall. Then pull. Skip the scoring and you’ll peel a jagged strip of your new paint off along with the tape.
Expect a few spots where paint bled under the tape, even with good tape and firm pressing. On white trim, a damp rag inside an hour takes it off. After that, a fresh razor blade at a low angle shaves it off semi-gloss trim without scratching. A small artist brush with trim paint cleans up the rest.
Touch-ups that actually disappear
Touch up with the same can, the same tool and the same technique. A patch of rolled paint touched up with a brush shows as a different texture; use a mini roller for rolled areas and a brush only on brushed areas. Feather the edges of the touch-up by rolling outward with a nearly dry roller. In flat and matte sheens, touch-ups vanish. In eggshell and above, a touch-up on a wall that’s been up for more than a few months often shows regardless, which is the argument for keeping a sealed, labeled quart of every color in the basement.
Step 9: Reinstall, cure and clean up
Put the cover plates back, rehang the curtain rod, and remount anything you removed. Hold off on pushing furniture against the wall or hanging pictures for 24 hours. Latex paint feels dry in an hour but takes 2-4 weeks to cure fully. During that window, a chair back leaned against the wall can leave a permanent dent in the film, and tape or adhesive hooks will pull the paint off. Don’t scrub the wall for at least 2 weeks either; wipe only with a damp cloth.
Wash brushes and roller covers in warm water until it runs clear, spin the roller cover on the pole handle or in a spinner, and hang brushes to dry. A good roller cover washed promptly is good for 3-4 rooms. Store leftover paint in the sealed can upside down for a few seconds to seal the lid gasket with paint, then right-side up in a spot that doesn’t freeze. Write the room, date and sheen on the lid with a marker.
Choosing the right paint for each room
Sheen matters more than brand in most rooms. Flatter sheens hide wall flaws and touch up invisibly but scuff easily and don’t wipe clean. Glossier sheens are scrubbable but telegraph every bump, patch and roller mark.
| Sheen | Best rooms | Hides flaws | Washability | Notes |
|---|---|---|---|---|
| Flat / matte | Ceilings, adult bedrooms, formal living rooms | Excellent | Poor to fair | Modern “scrubbable matte” lines (Benjamin Moore Aura, SW Emerald) are much tougher than old flat |
| Eggshell | Living rooms, dining rooms, hallways, kids’ bedrooms | Good | Good | The default for most walls in the house |
| Satin | Kitchens, bathrooms, laundry, mudrooms | Fair | Very good | Shows roller lap marks more; keep the wet edge |
| Semi-gloss | Trim, doors, cabinets, bathroom walls in heavy-steam homes | Poor | Excellent | Rarely right for a full wall |
| High gloss | Front doors, furniture, accent trim | Very poor | Excellent | Needs a flawless, sanded surface |
Bathroom and kitchen walls benefit from satin or a dedicated kitchen-and-bath paint, which adds mildew resistance and a tighter film against steam. Everywhere else, eggshell is the safe answer.
On price, interior wall paint falls into three tiers. Budget and contractor-grade paint (Behr Pro i100, Behr Premium Plus, Glidden Essentials) runs $20-36 a gallon, covers adequately, and is fine for rentals and ceilings; SW ProMar 200 is a contractor line too, but it retails at roughly $79-86 a gallon and only drops to $20-40 with a contractor account. Mid-grade (Valspar Signature at $39-49, and comparable lines from other brands) runs roughly $39-55 and is the best value for most homeowners. Premium (Benjamin Moore Aura or Regal, SW Emerald, SW SuperPaint, Behr Dynasty) runs $60-90 and earns its price mainly in deep colors, one-coat coverage claims, and scrub resistance. Retail paint goes on sale constantly; Sherwin-Williams runs 30-40 percent off several times a year, which brings premium paint down to mid-grade pricing.
Painting order: trim, ceiling, walls
If you’re repainting the whole room, the order is trim first, then ceiling, then walls. Trim first because trim paint (usually semi-gloss) is the hardest to cut cleanly against and the easiest to tape over once it’s dry. Ceiling second because ceiling paint splatter lands on walls, and walls are last. Reverse the order and you’ll be taping fresh wall paint to protect it from ceiling drips.
Trim gets its own technique. Sand it with 220-grit between coats, wipe the dust with a tack cloth, and brush with a 2-inch angled brush along the length of each piece. The sanding knocks down dust nibs and brush marks so the second coat lays glass-smooth. Semi-gloss trim paint needs a full overnight before you tape it.
If you’re replacing damaged trim as part of the project, pull the old pieces before you paint the walls. Prying baseboards or casing after the wall is finished is how you crack a corner of fresh paint; take the molding without damage to the wall by scoring the caulk line first and prying against a wide putty knife.
Ceilings use a dedicated flat ceiling paint ($18-30 a gallon). It’s thicker so it splatters less and goes on with a 1/2-inch nap. Cut in the ceiling perimeter, then roll in rows across the shortest dimension of the room so each pass is as short as possible and you keep the wet edge. Roll toward the main window so any lap marks run with the light instead of across it.
Kitchen cabinets are a different job entirely: degreasing, deglossing, bonding primer and a cabinet-grade enamel sprayed or applied with a foam roller. If your kitchen has flat-pack boxes and you’re weighing paint versus replacement, the custom cabinets IKEA route of new doors and trim on existing boxes often costs about the same as a proper paint job and outlasts it.
DIY vs hiring it out
| Item | DIY, 12×12 bedroom | Pro, 12×12 bedroom |
|---|---|---|
| Paint, 2 gallons mid-grade | $80-110 | Included |
| Primer, patching, caulk | $20-40 | Included |
| Brush, roller, covers, tape, drops (first room) | $60-90 | n/a |
| Labor | 6-10 hours of your weekend | 4-6 hours, one painter |
| Typical total | $120-250 first room; $100-150 each room after | $350-900 walls only; $500-1,200 with ceiling and trim |
Pros price interior painting at roughly $2-4 per square foot of wall area for walls alone, or $4-6 per square foot including ceilings and trim, with labor making up about 70-80 percent of the quote. A full 2,000-square-foot house interior typically lands between $4,000 and $10,000 depending on condition, trim detail and your region. Those figures are market ranges; get three written quotes and ask each painter what prep is included, how many coats, and which product line they’ll use. “Two coats of Sherwin-Williams Duration” and “two coats of paint” are very different bids.
Troubleshooting
| Symptom | Likely cause | Fix |
|---|---|---|
| Visible stripes or darker bands on the wall (lapping) | Rolled over a dry edge; sections dried before overlap | Let dry fully, lightly sand the ridges, apply another coat working faster in smaller sections |
| Dull patches in the shape of repairs (flashing) | Patches not primed | Spot-prime the patches, then recoat the whole wall |
| Halo of different texture along ceiling and corners | Cut-in band too wide, or roller didn’t reach it | Roll closer with a mini roller on the next coat; cut in narrower |
| Raised lines along each roller stroke (roller tracks) | Too much pressure, or roller cover ends overloaded | Sand lines with 220-grit, recoat with lighter pressure and a fresh cover |
| Small bubbles in the finish | Rolled too fast, shook the can, or painted over a damp wall | Let dry, sand bubbles flat, recoat slower with fresh paint |
| Paint peeling in sheets from trim or glossy walls | No bonding primer over a slick surface | Scrape loose paint, sand, bonding primer, repaint |
| Paint peeling from the wall near a shower or window | Moisture behind the film, or dirty surface | Fix the leak or ventilation first, scrape, prime with stain-blocker, repaint with bath paint |
| Yellow or brown stain reappears through new paint | Water stain, nicotine or wood tannin not sealed | Shellac primer (BIN) over the stain, then two finish coats |
| Jagged line where tape was pulled | Tape left on too long, pulled too fast | Score with a blade next time; touch up with an artist brush |
| Ragged bleed under tape | Tape edge not sealed, or taped over textured surface | Press tape with a putty knife; seal edge with a thin coat of the base color before the new color |
| Fine lines or hairs in the finish | Cheap roller cover shedding, or dust | Wrap new covers in painter’s tape and pull to remove loose fibers; sand and recoat |
| Color looks different on wall than on chip | Lighting, sheen, or chip viewed under store fluorescents | Paint a 2×2-foot sample on the actual wall and view morning and evening before buying gallons |
| Strong odor lingers for days | Poor ventilation, high humidity, or oil-based product | Open windows, run fans, give it 48 hours; choose a zero-VOC line next time |
Common mistakes that give away a DIY job
Skipping the wash. Paint on a greasy kitchen wall peels within the year, and the fix is to strip it and start over.
Cutting in the whole room before rolling any of it. The dried cut-in band shows as a halo on every wall.
Using one gallon at a time without boxing. The color shift between cans lands in the middle of the biggest wall.
Painting over nail pops and cracks without proper repair. They come back in six months.
Wrong roller nap. A 3/8-inch nap on a heavily textured wall leaves the valleys bare; 3/4-inch on a smooth wall leaves an orange-peel stipple.
Pulling tape the next day without scoring. You tear a strip of new paint off with it.
Leaning furniture on the wall the same evening. Uncured paint takes a permanent impression.
What a finished wall should look like
Stand at the doorway with the overhead light on. The wall should read as one even color and sheen, with no visible bands, no patch outlines, and no stripes. Walk up with a flashlight held flat against the wall at a low angle; you’ll see the roller stipple, which is normal and uniform, but no ridges or drips. The ceiling line should be a straight, tight edge of wall color meeting ceiling white with no scallops. Trim lines should be crisp with no bleed. Outlet covers sit flat over paint that extends cleanly under their edges. That’s the standard, and with two careful coats and a wet edge it’s entirely reachable on your first room.
When to call a pro
Call a painter if you have a stairwell or great-room wall over 12 feet tall, since the ladder setup and wet-edge timing get genuinely dangerous and difficult; if the house predates 1978 and the old paint is chipping or will need sanding, which triggers lead-safe work practices; if the walls need a full skim coat to fix widespread damage; or if you’re painting more than four rooms on a deadline. Call a drywall contractor for holes larger than a dinner plate or sagging ceilings, and a plumber or roofer before painting over any water stain that’s still damp or growing, because the paint job is pointless until the leak stops.
FAQ
Do I really need to prime before painting a wall?
Not the whole wall, in most cases. A previously painted wall in decent shape with a similar color and sheen only needs its patches spot-primed. Full priming is for bare drywall, glossy surfaces, stains, big color changes and past mildew. “Paint and primer in one” products are just thicker paint with better hiding; they don’t replace a real primer on bare drywall or slick trim.
How long between the first and second coat?
Check the can, but 2-4 hours is typical for interior latex at normal room conditions. In a cold or humid room, wait overnight. Recoating too soon is worse than waiting too long; a tacky first coat lifts under the roller.
Can I paint over a dark wall with a light color in two coats?
Usually yes, if you use a tinted primer or a high-hide premium paint for the first coat. Going from navy or deep red to off-white with standard mid-grade paint and no primer typically takes three coats.
What roller nap should I use?
3/8-inch for smooth drywall and plaster, 1/2-inch for light orange-peel texture or ceilings, 3/4-inch for heavy knockdown or stucco-style texture. The nap number is printed on the roller cover package.
Should I paint the ceiling or the walls first?
Ceiling first, walls second, after any trim. Ceiling splatter lands on walls, so you want the walls still unpainted when it does. If the ceiling isn’t getting painted, protect it with tape along the wall line or a careful cut-in.
How do I avoid roller marks and streaks?
Load the roller fully, use moderate pressure, roll in 3×3-foot sections, and overlap each section into the previous one while it’s still wet. Finish each section with one light downward pass. Most streaking comes from a half-loaded roller or from letting a section dry before the next one meets it.
How long until the room is usable again?
You can sleep in the room the same night if it’s ventilated, since modern low-VOC paints have little odor. Wait 24 hours before moving furniture back against the walls, and 2 weeks before washing the walls or hanging anything with adhesive.
Is it cheaper to paint myself or hire someone?
For a single room, DIY costs about $120-250 in materials against $350-900 for a pro, so you save several hundred dollars per room. For a whole house, the gap widens into thousands, but the time commitment is a full week or more of evenings and weekends. The break-even is usually about your hourly value and how much the tall or detailed spaces intimidate you.