
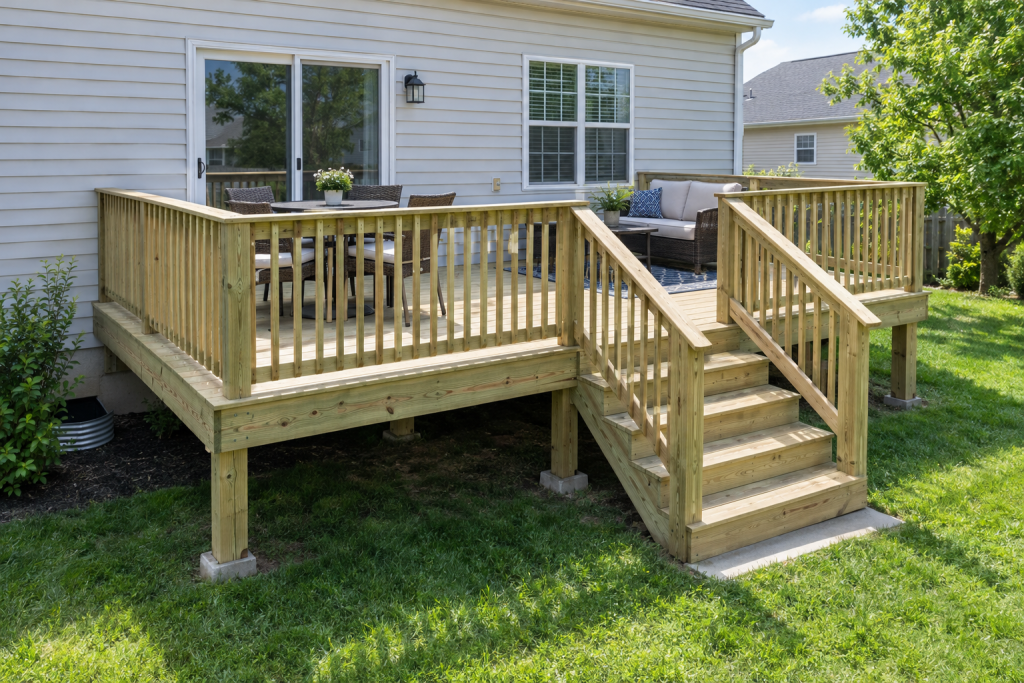
Building a deck comes down to four jobs done in order: set footings below the frost line, bolt and flash a ledger to the house, frame beams and joists on hangers, then lay decking and railing to code. A 12×16 pressure-treated deck is a solid first-timer project if you get a permit, follow a span table, and don’t skip the flashing.
Quick steps: build a ground-level or low deck
- Get a permit, call 811, and pick joist and beam sizes from a span table.
- Lay out the deck with batter boards and string, squared with a 3-4-5 triangle.
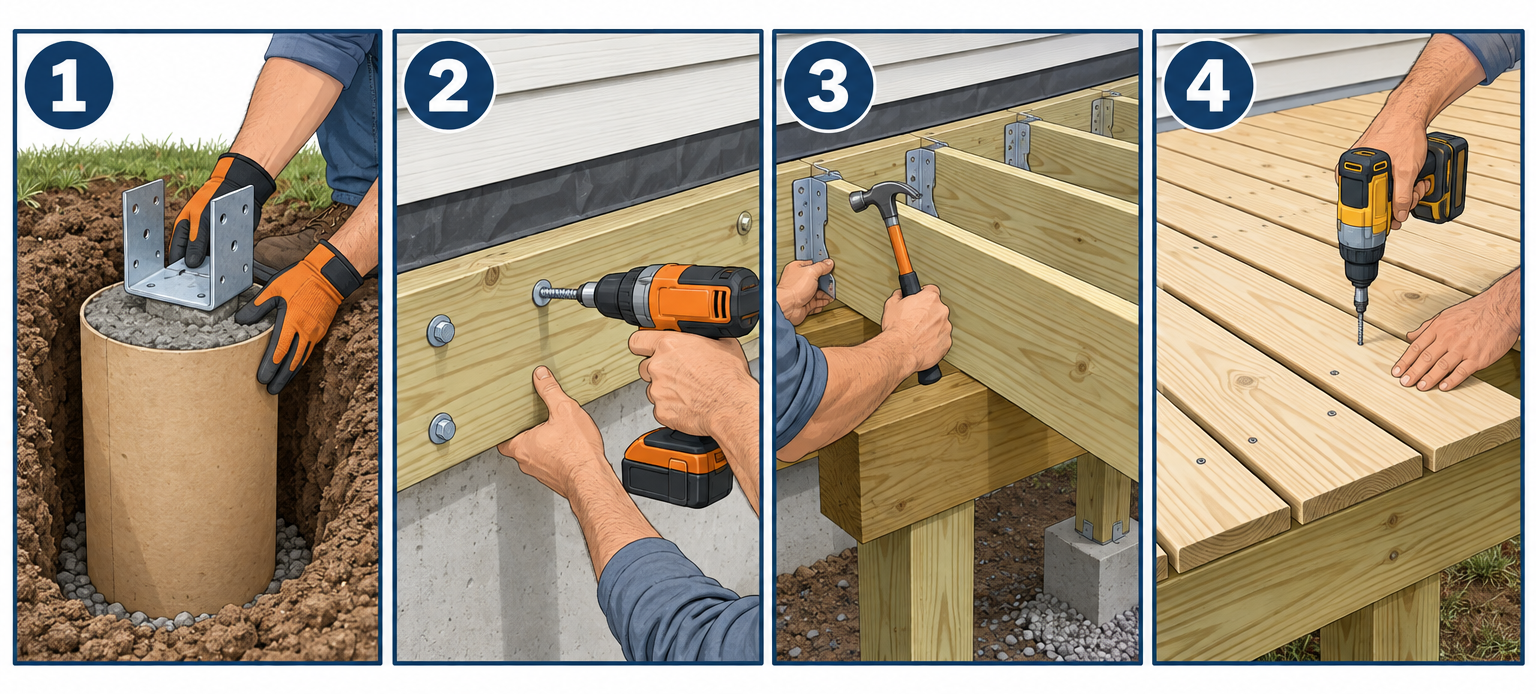
- Dig footings below frost depth and pour concrete in tubes with post bases set in wet mix.
- Cut and flash the siding, then bolt the ledger to the house rim with 1/2-inch lags or structural screws.
- Set 6×6 posts, cut to height, and cap them with a double 2×10 beam.
- Hang 2×8 or 2×10 joists at 16 inches on center, crown up, with blocking at mid-span.
- Lay decking with a 1/8 to 1/4 inch gap, then trim the ends in one pass.
- Build stairs, set railing posts, and install guards and balusters to code.
Tools and materials
- Circular saw with a 24-tooth framing blade, plus a miter saw for repeat cuts
- Impact driver and 1/2-inch drill with a 3/8-inch auger bit (for ledger pilot holes)
- 4-foot level, 2-foot torpedo level, and a line level or laser level
- Speed square, framing square, chalk line, 25-foot tape, pencils
- String, batter board stakes (2×4 scraps), mason’s twine
- Post-hole digger or rented one-person auger ($60-90 a day)
- Wheelbarrow, hoe, 5-gallon buckets, hose
- Concrete footing tubes, 10 or 12 inch diameter
- 80-pound bags of concrete mix (about 5 per 12-inch tube at 42 inches deep)
- Pressure-treated lumber rated UC4A ground contact for posts; UC3B above ground is fine for joists
- 6×6 posts, double 2×10 beams, 2×8 or 2×10 joists, 2×10 ledger and rim joists
- 5/4×6 decking (pressure-treated, cedar, or composite)
- Simpson ABU66Z post bases, BC6Z or equivalent post caps, LUS28 or LUS210 joist hangers, H2.5A hurricane ties, two DTT2Z lateral load connectors
- 1-1/2 inch 10d hot-dip galvanized joist hanger nails, or #9 x 1-1/2 inch SD structural screws
- 1/2 x 5 inch hot-dip galvanized lag screws with washers, or 1/4 x 5 inch LedgerLOK structural screws
- 3-inch coated deck screws or hidden fastener clips for composite
- Self-adhering flashing tape (window and door grade), plus Z flashing or copper drip cap
- 16d galvanized framing nails or 3-1/8 inch structural screws for rim-to-joist connections
- 4×4 or 6×6 railing posts, 2×4 top and bottom rails, 2×2 balusters or aluminum balusters, 2×6 cap rail
- Stair stringers (2×12), stair treads, 1/2 inch carriage bolts for stringer attachment
Calculators for this job
Safety first
Call 811 at least three business days before digging; underground gas and electric lines are usually 18 to 24 inches down, right where footings go. Wear safety glasses and gloves when cutting pressure-treated lumber, cut it outdoors, and never burn the scraps.
Step 1: Plan the deck and pull the permit
Decide on size by taping the footprint on the lawn and setting your patio furniture inside it. A 12×16 deck holds a six-person table and a grill with room to walk. Anything under 10 feet deep feels like a hallway once chairs are pushed back.
Then decide how the deck connects to the house. A ledger-attached deck is cheaper because it needs one fewer beam. A freestanding deck needs a second beam and posts near the house, but it’s the only right answer when the house has brick veneer, stone, cantilevered floor joists, or a rim you can’t inspect. I build freestanding whenever I’m not sure what’s behind the siding.
Almost every jurisdiction in the US requires a building permit for a deck over 30 inches above grade, and most require one for anything attached to the house. Expect to pay $100-500 and to submit a simple plan showing footing locations, beam and joist sizes, ledger attachment, railing height, and stair dimensions. The inspector usually wants to see the holes before concrete, the framing before decking, and the finished rails.
Size the lumber from a span table before you buy anything. The American Wood Council’s DCA 6 guide is what most inspectors reference, and it’s free. A few benchmarks for Southern Yellow Pine #2 at 16 inches on center and a 40 psf live load:
| Joist size | Max span (16″ o.c.) | Typical use |
|---|---|---|
| 2×6 | about 9 feet | Small ground-level platforms |
| 2×8 | about 11 feet 10 inches | Most 10 to 12 foot deep decks |
| 2×10 | about 14 feet | 12 to 14 foot deep decks |
| 2×12 | about 16 feet 6 inches | Deep decks, fewer beams |
Hem-fir and SPF span 6 to 12 inches less than those figures, so check the species stamped on the lumber at the yard. Beam spans work the same way: a double 2×10 carrying 12-foot joists can run roughly 8 feet between posts, and a triple 2×10 or double 2×12 buys you another foot or two. Pick the joist size first, then the beam, then count posts.
Budget realistically. For a 12×16 pressure-treated deck I plan on $1,600-2,900 in materials at current pricing, with lumber the bulk of that and hardware, concrete, and fasteners a surprising share of the rest. Swap to a composite surface like Trex or TimberTech and composite materials alone run $28-45 per square foot, so the same 192-square-foot deck lands at roughly $5,400-8,600 in materials and $13,000-18,000 installed, even though the boards themselves are only $4-8 per linear foot. A contractor will charge $30-60 per square foot for pressure-treated and $50-100 or more for composite, so DIY typically saves half.
Pro tip
Draw the decking layout before you order joists. If the deck is 12 feet deep and boards come in 12, 16, and 20 foot lengths, running boards parallel to the house with the deck exactly 11 feet 10 inches deep lets you use 12-footers with no butt joints and almost no waste.
Step 2: Lay out the footprint
Mark the ledger location on the house first. The finished deck surface should sit 1 to 2 inches below the door threshold so water and snow don’t blow inside. Measure down from that line by the decking thickness (1 inch for 5/4 boards) to find the top of the ledger, then down by the ledger width to get the bottom.
Drive batter boards (two stakes with a 2×4 crosspiece) about 2 feet beyond each outside corner. Run mason’s twine from the house to the batter boards at the outside edges of the deck, and a third string across the front. Square each corner with a 3-4-5 triangle: measure 6 feet along the house string, 8 feet along the side string, and adjust until the diagonal between those marks is exactly 10 feet. On a 12×16 rectangle, both diagonals should match within 1/4 inch when you’re done.
Now mark the footings. The beam usually sits 1 to 2 feet inside the front edge of the deck so the joists cantilever past it, which hides the posts and lets you fudge the footing locations a bit. Code allows a cantilever up to one-quarter of the joist span, so 12-foot joists can overhang a beam by 3 feet. I set the beam 18 inches back on most decks. Drop a plumb bob or a line level from the string at each post location and mark the ground with marking paint.
The ground under the deck should slope away from the house. If it doesn’t, this is the time to cut a shallow swale or install a “french drain” along the foundation, because you will never get a shovel under there once the joists are on. Lay landscape fabric and 2 inches of gravel under low decks to keep weeds and mud down.
Step 3: Dig and pour the footings
Footings go below the frost line, which is 12 inches in the Carolinas, 36 inches in Ohio, 42 inches in Minnesota, and 48 inches or more in northern Maine. Your permit office tells you the local depth. Footing diameter depends on the load each post carries; 12-inch tubes handle most residential decks, and a 10-inch tube is often fine for corner posts. The 2021 IRC also allows a wider pad at the bottom (bell footing) in soft soils, and the inspector will tell you if your soil needs it.
Dig with a post-hole digger or rent a gas auger for anything over 30 inches deep. Clay and rock will turn a 2-hour job into a full day, so start digging on the first morning. Cut the footing tube so it sticks 2 to 4 inches above grade, set it plumb in the hole, and backfill around the outside. Keep the bottom on undisturbed soil; loose fill under a footing settles.
Mix concrete to a stiff, workable consistency, not soup. A 12-inch tube 42 inches deep takes about 2.75 cubic feet, which is roughly five 80-pound bags. Fill the tube in thirds and rod each lift with a scrap 2×4 to knock out air pockets. Screed the top flat with a board, then press a galvanized post base into the wet concrete. I use Simpson ABU66Z bases for 6×6 posts because the standoff plate keeps the post end grain 1 inch off the concrete. Set the base with the string line so the center of the post lands on your mark, and check that the base is level in both directions.
Let the footings cure for 48 hours before you load them, longer if it’s below 50°F. If you’re in a hurry, you can set the posts after 24 hours but don’t put the beam on until day three.
Step 4: Attach and flash the ledger
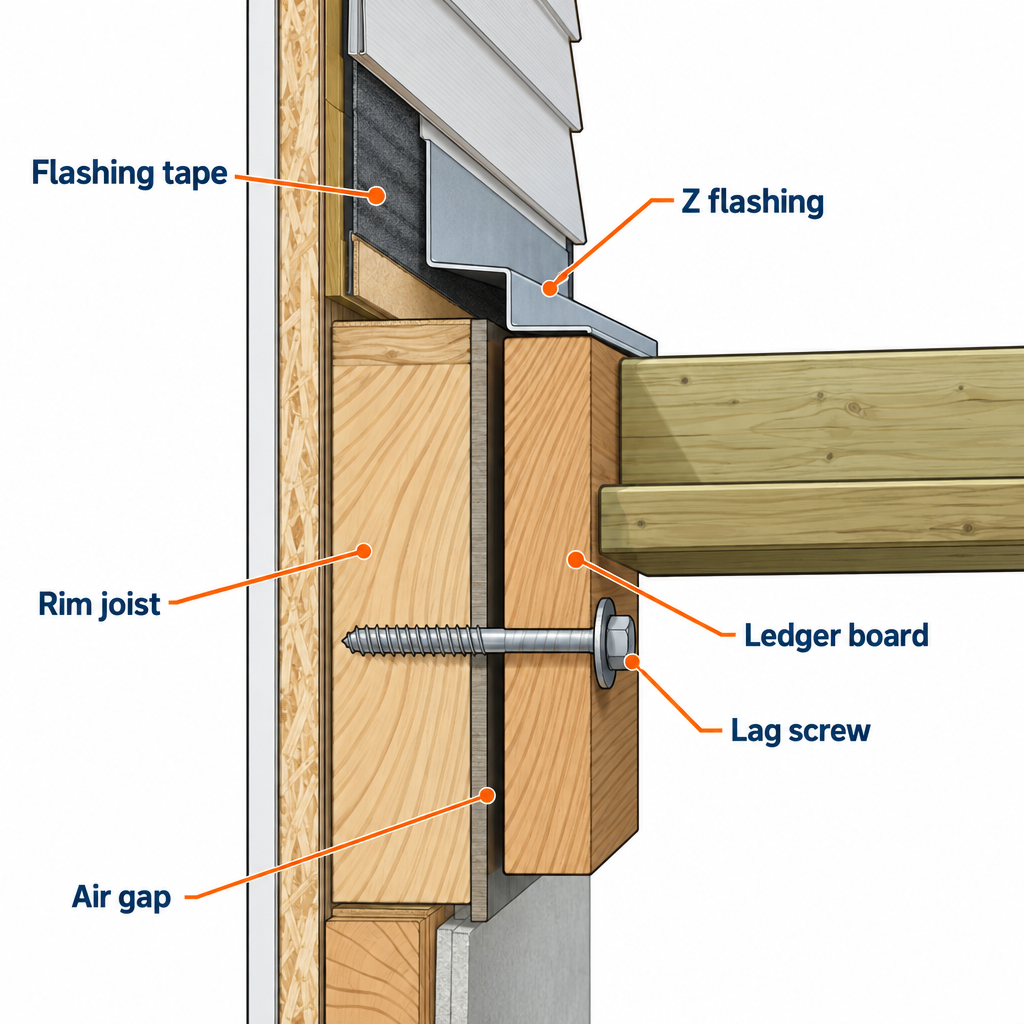
This is the step that fails more decks than any other. Of the deck collapses reported in the US each year, most trace to a ledger that was nailed instead of bolted or that rotted behind unflashed siding. Take an hour longer here.
Remove the siding where the ledger goes, plus about 2 inches above and below. Vinyl unzips with a siding tool. Wood lap siding comes off with a flat bar and a sawzall. Cut the housewrap, fold it up, and look at the rim joist. You want solid 2x lumber or an engineered rim. If you find rot, a cantilevered floor, or a concrete block foundation at ledger height, stop and build freestanding.
Run self-adhering flashing tape over the sheathing where the ledger will sit, lapping it under the housewrap above. Then set the ledger, a 2×10 or whatever matches your joists, level on temporary blocks screwed to the wall. Fasten it with 1/2-inch hot-dip galvanized lag screws or through-bolts in a staggered pattern: one near the top edge, the next near the bottom, alternating. DCA 6 gives spacing by joist span; for 12-foot joists that’s 1/2-inch lags about every 18 inches, and for 10-foot joists about every 23 inches. Keep lags 2 inches from the ends and from the top and bottom edges. Predrill 5/16-inch pilot holes through the ledger and into the rim, and add a washer under every head.
Structural screws like the 1/4-inch LedgerLOK or Simpson SDWS are easier to drive and are listed as a lag replacement, but check the manufacturer’s spacing chart since it differs from lags. Never use deck screws or nails; they shear.
Finish with a metal Z flashing or drip cap over the top of the ledger, tucked up under the housewrap and siding, then another strip of flashing tape over the top leg of the metal. Reinstall the siding, leaving a 1/4-inch gap above the flashing so water can drain. Finally, install the two lateral load connectors the IRC now requires (R507.9.2). The Simpson DTT2Z is the usual choice: one on each of two joists, through-bolted to the house floor joist inside the basement or crawlspace. Each one is rated for 1,500 pounds and the inspector will look for them.
Pro tip
Hang the ledger 1/8 inch out from the wall using stacked washers on every lag. That gap lets water drain between the ledger and the flashing instead of sitting there. Some inspectors require it; mine is happy either way but the ledger lasts longer.
Step 5: Set the posts and beam
Stand a 6×6 post in each base, plumb it with the 4-foot level in both directions, and brace it with two diagonal 2x4s staked to the ground. Drive the hanger nails or SD screws into the base holes. I use 6×6 even on low decks because 4×4 posts are only allowed to 8 feet tall and they twist as they dry.
Now find the post height. Run a string from the bottom of the ledger out to the posts and level it with a line level or laser. The top of the beam equals the bottom of the joists, which is the bottom of the ledger. Mark that line on each post, subtract the beam depth if you’re notching posts to carry the beam on a shoulder, or cut at the line if you’re using post caps. I prefer post caps (Simpson BC6Z or similar) with a beam resting on top; notching a 6×6 by hand takes longer and a bad notch weakens the post.
Build the beam from two 2x10s with the crowns both up, fastened with two rows of 16d galvanized nails or 3-1/8 inch structural screws every 12 inches, staggered. If the beam needs a splice because the deck is longer than your lumber, the splice must land over a post, and the two plies should splice at different posts. Lift the beam onto the caps (two people, or a third for a 20-footer), check it for level, and nail off the caps. The beam should run past the end posts by no more than its depth unless the span table says otherwise.
If this is a freestanding deck, repeat this near the house with a second beam, posts, and footings, keeping that beam within 2 feet of the wall.
Step 6: Frame the joists
Mark the joist layout on the ledger and the beam at the same time so they line up. Hook the tape on the end of the ledger and mark 15-1/4 inches, then every 16 inches after that, and draw an X on the far side of each line. The 15-1/4 start puts the center of the second joist at 16 inches so a 4×8 sheet or a 16-foot deck board breaks on center. Composite decking laid diagonally usually needs 12 inches on center, and some brands require 12 inches for all layouts; read the install guide before you mark anything.
Sight down each joist and put the crown (the slight hump) up. Mark the crown with an arrow on the end so you don’t flip it. Set the rim joist first: the outside joists on each end, then the front rim across the cantilevered joist ends. Nail the rim to each joist with three 16d nails or three structural screws through the face. A rim-to-joist connection with only end nails has about 100 pounds of capacity, which is why newer code adds the screws.
Hang the joists at the ledger in galvanized hangers. The Simpson LUS28 fits 2x8s and the LUS210 fits 2x10s; fill every hole with 1-1/2 inch hanger nails or #9 SD screws, including the angled holes into the joist. Hold each joist tight to the bottom of the hanger so the top sits flush with the ledger. At the beam, toenail each joist with two 16d nails and add an H2.5A hurricane tie on every joist so wind uplift can’t lift the frame.
Add a row of solid blocking at mid-span for joists over 8 feet, cut from the same stock and staggered on alternate sides of the layout line so you can nail through. Blocking keeps the joists from rolling and stiffens the floor. Also block under any railing post location now; it’s miserable to do later.
Before you lay a board, string a line across the tops of the joists. Any joist more than 1/8 inch high gets planed; any low joist gets a shim strip of 15-pound felt or a thin rip of cedar. Walk the frame and jump on it. A properly built frame barely moves. Call the inspector for the framing inspection and don’t cover anything until it’s signed off.
Pro tip
Run a 2×4 “ribbon” of blocking flat along the top of the joists where the decking will later butt, so every board end lands on 3 inches of wood instead of 3/4 inch. On a picture-frame layout, double the rim joist for the same reason.
Step 7: Install the decking
Start at the house and work out, or start at the outside edge and work toward the house if the deck length isn’t a multiple of board widths and you want the rip against the wall where it’s hidden. Lay the first board perfectly straight with the string line, because every board after it follows that line.
Wet pressure-treated 5/4×6 boards shrink about 1/8 to 3/16 inch across their width as they dry, so butt them tight or leave a 1/16-inch gap and they’ll end up at the right spacing in a few months. Kiln-dried (KDAT) treated lumber, cedar, and composite go down with a 1/8 to 1/4 inch gap; a 16d nail makes a decent spacer for 1/8 inch and a stack of two works for 1/4. Composite manufacturers publish exact gap tables by temperature because the boards expand lengthwise in heat. TimberTech and Trex both want about 1/8 to 3/16 inch at the ends when installed above 40°F, more when it’s cold.
Fasten wood decking with two 3-inch coated or stainless deck screws per joist, driven 3/4 inch from each edge and angled slightly inward. Drill pilot holes at board ends so they don’t split. Composite goes down on hidden clips (Trex Hideaway, TimberTech Concealoc) that slide into the grooved edges, with face screws only on the first and last boards and at picture frames. Use the manufacturer’s color-matched plugs if you face-screw composite.
Cupped wood boards go bark side up or down depending on who you ask. I put the better face up and screw it down well, because a board held by two screws every 16 inches can’t cup much either way. Cull any board with a wane edge or a loose knot in the middle of the deck; use those for the first and last rows where you’ll trim them.
Let the boards run long past the rim joist, snap a chalk line 1 to 1-1/2 inches past the rim, and cut them all in one pass with the circular saw. That overhang looks far better than flush ends and covers the rim’s rough edges. If you’re adding a fascia board, set the overhang to clear it by 1/2 to 3/4 inch.
Stagger butt joints on long decks so no two land on the same joist, and always center a joint over a joist or over the blocking ribbon from Step 6. An alternating pattern of 16-foot and 12-foot boards on a 28-foot deck gives a clean brick pattern with no joints lining up.
Step 8: Build the stairs
Stairs are the part of deck building most likely to fail inspection. The code limits on a residential deck stair are a maximum rise of 7-3/4 inches, a minimum tread depth of 10 inches, a 36-inch minimum width, and no more than 3/8 inch variation between any two risers. A rise of 7 inches with an 11-inch tread feels right underfoot.
Measure the total rise from the deck surface to the landing. For a deck 42 inches off the ground, divide 42 by 7 and you get 6 risers at 7 inches each. Six risers means five treads, so the total run is 55 inches at 11 inches per tread. Lay out the stringers on a 2×12 with a framing square and stair gauges, with the 7-inch rise on the tongue and the 11-inch run on the blade. Drop the bottom of the stringer by the tread thickness (1 inch for 5/4 decking) so the first step isn’t taller than the rest. Cut the first stringer, test fit it against the deck, and use it as a template for the others.
Stringers need support every 18 inches of width, so a 36-inch stair gets three stringers and a 48-inch stair gets four. Attach the top with a Simpson LSC adjustable stringer connector or a 2×10 header hung from the rim with hangers. The bottom lands on a concrete pad or a pair of 12-inch footings, with a pressure-treated 2×4 kicker bolted down to keep the stringers from sliding. Treads are two 5/4×6 boards with a 1/4-inch gap and a 1-inch nosing overhang.
Stairs with four or more risers need a graspable handrail 34 to 38 inches above the tread nosings. A 2×4 on edge does not count as graspable; use a 2×2 round-top rail, a metal handrail, or a milled profile with a cross section between 1-1/4 and 2 inches.
Step 9: Install the railing
Any deck surface more than 30 inches above grade needs a guard. The IRC minimum is 36 inches above the decking, and a few cities and most of Canada require 42 inches. Balusters or infill must stop a 4-inch sphere, which means a maximum gap of 3-7/8 inches. The space under the bottom rail follows the same rule. Stair guards need a 34-inch minimum height measured from the nosing, and the triangle under the stair rail must block a 6-inch sphere.
The guard must hold a 200-pound load at the top rail in any direction, which is the part most DIY rails get wrong. A 4×4 post notched over the rim and held with two lags will fail that test. Instead, set a full 4×4 or 6×6 post inside the rim, tight to a joist or to the blocking you added in Step 6, and through-bolt it with two 1/2-inch carriage bolts. Add a Simpson DTT1Z or DTT2Z tension tie from the post to the joist and the post won’t move. Space posts no more than 6 feet apart for wood rails, or 8 feet for aluminum rail kits like Trex Signature or Fortress.
Build the rail sections between posts with a 2×4 bottom rail on edge, 3 inches above the deck, and a 2×4 top rail, then drop in 2×2 balusters at 3-1/2 inches on center with one screw top and bottom. Aluminum balusters snap into pre-drilled rails and look sharper for about $2 each. Cap the whole thing with a 2×6 laid flat, mitered at corners, and screwed down from the top with trim screws.
Measure the baluster spacing with a template block rather than a tape. If you calculate the spacing to divide evenly between posts, the end gaps come out equal and the inspector will never pull out a 4-inch ball.
Step 10: Finish and maintain
Pressure-treated lumber arrives soaked with preservative and has to dry before it accepts stain. Sprinkle water on a board; if it beads, wait; if it soaks in within 30 seconds, it’s ready. That usually takes 2 to 3 months in summer and 6 months through a winter. Kiln-dried treated lumber and cedar can be finished within a few weeks.
Clean the deck with a wood brightener (oxalic acid) to pull out mill glaze and gray, rinse, let it dry two days, then apply a penetrating oil stain with a pad applicator. Semi-transparent stains last 2 to 3 years on a sunny deck. Solid stains last longer but peel instead of fading. Composite needs nothing beyond a wash with a deck cleaner and a soft brush once a year.
Trim the posts flush with the beam, add a fascia board over the rim if the plans call for it, and install lattice or horizontal skirting with a removable panel so you can get underneath. Rake out the construction debris and “seed the lawn” where the footings and traffic tore it up; late summer or early fall seeding fills in before the first season of deck parties.
Check the deck every spring. Tighten any loose ledger bolts, probe the ledger and post bases with a screwdriver for soft spots, and look for rust streaks on the hangers. Decks fail slowly and then all at once, and a 10-minute inspection catches the slow part.
Troubleshooting
| Symptom | Likely cause | Fix |
|---|---|---|
| Deck bounces when you walk | Joists undersized or spans over the table maximum | Add a mid-span beam on footings, or sister every joist with a second 2x |
| Decking gaps are uneven | Wet boards shrank at different rates, or no spacer used | Pull and re-space after drying, or live with it on PT; always gap composite |
| Water pooling against the house | Ledger set too high or deck doesn’t pitch away | Flashing matters more than pitch; verify Z flashing and tape, add a drip edge under the threshold |
| Railing post wobbles | Notched post or lag-only attachment | Replace with full post through-bolted to the joist and add a tension tie |
| Stair feels wrong on one step | Riser heights vary more than 3/8 inch, usually the bottom one | Recut stringers with the drop for tread thickness, or add a thicker landing pad |
| Screw heads popping or boards cracking | Screws too close to the ends with no pilot hole | Predrill ends; use #10 screws with a type-17 cutting tip |
| Hangers rusting after one season | Electroplated hardware on ACQ-treated lumber | Replace with hot-dip galvanized (G185) or stainless; ACQ eats zinc plating |
| Posts leaning after winter | Footings above frost line heaved | Dig new footings to code depth; this cannot be shimmed |
| Composite boards buckling at the ends | No expansion gap, or installed cold without allowing for growth | Trim ends to give 1/8 to 3/16 inch per joint |
| Inspector failed the ledger | Nails, undersized lags, no flashing, or no lateral connectors | Pull the siding, bolt and flash properly, add two DTT2Z ties |
When to call a pro
Call a licensed deck contractor or structural engineer if the deck will sit more than 8 feet off the ground, needs a hot tub (that’s 100 psf, triple a normal deck load and it needs engineered framing), attaches to a house with brick veneer or a cantilevered floor, or sits on a slope steeper than 1:3 where footings need engineering. Hire an electrician for any outdoor outlets or lighting, and a plumber if you’re running a gas line to a built-in grill.
FAQ
How much does it cost to build a deck yourself?
A 12×16 pressure-treated deck runs $1,600-2,900 in materials when you do all the labor, including concrete, hardware, and permit. The same footprint in composite runs $28-45 per square foot in materials, roughly $5,400-8,600, because the boards and matching rail cost two to three times what wood does. Tool rental for an auger and a compound miter saw adds $150-250 if you don’t own them.
How long does deck building take for a first-timer?
Plan on three to five weekends for a 12×16 deck with two people. Footings and the ledger eat the first weekend, framing the second, decking the third, and stairs and railing the fourth. Inspections add waiting days between phases, so schedule them as soon as you finish each stage.
Do I need a permit to build a deck?
Yes in almost every US city and county if the deck attaches to the house or sits more than 30 inches above grade. Some areas exempt small freestanding platforms under 200 square feet and under 30 inches. Building without a permit can mean removing the deck, and it causes problems at sale when the buyer’s inspector notices it’s not on the property record.
Should I use 2×8 or 2×10 joists?
Use 2x8s at 16 inches on center for joist spans up to about 11 feet 10 inches in Southern Yellow Pine, and 2x10s for anything longer up to 14 feet. If you’re near the limit, step up a size. The cost difference on a 12×16 deck is about $100 and the deck feels noticeably stiffer.
How far apart should deck posts be?
For a double 2×10 beam carrying 12-foot joists, keep posts about 8 feet apart. A triple 2×10 or double 2×12 can stretch to 9 or 10 feet. Check the beam span table in DCA 6 for your lumber species and joist span, because hem-fir and SPF carry less than Southern Pine.
Can I build a deck directly on the ground?
Yes, as a floating deck on concrete deck blocks or on short footings, as long as the frame uses ground-contact rated (UC4A) lumber and the joists sit at least a few inches above soil on gravel. Freestanding ground-level decks under 30 inches skip the guardrail requirement, but a deck that touches the ground anywhere will rot early, so keep the joists off the dirt.
What is the best wood for building a deck?
Pressure-treated Southern Yellow Pine is the cheapest and strongest framing material and the right choice for posts, beams, and joists regardless of the surface. For decking, pressure-treated 5/4×6 is cheapest at about $0.90-1.30 per linear foot at big-box stores, cedar runs $3-5 and looks better, and composite at $4-8 costs the most upfront but needs no staining for 25 years.