
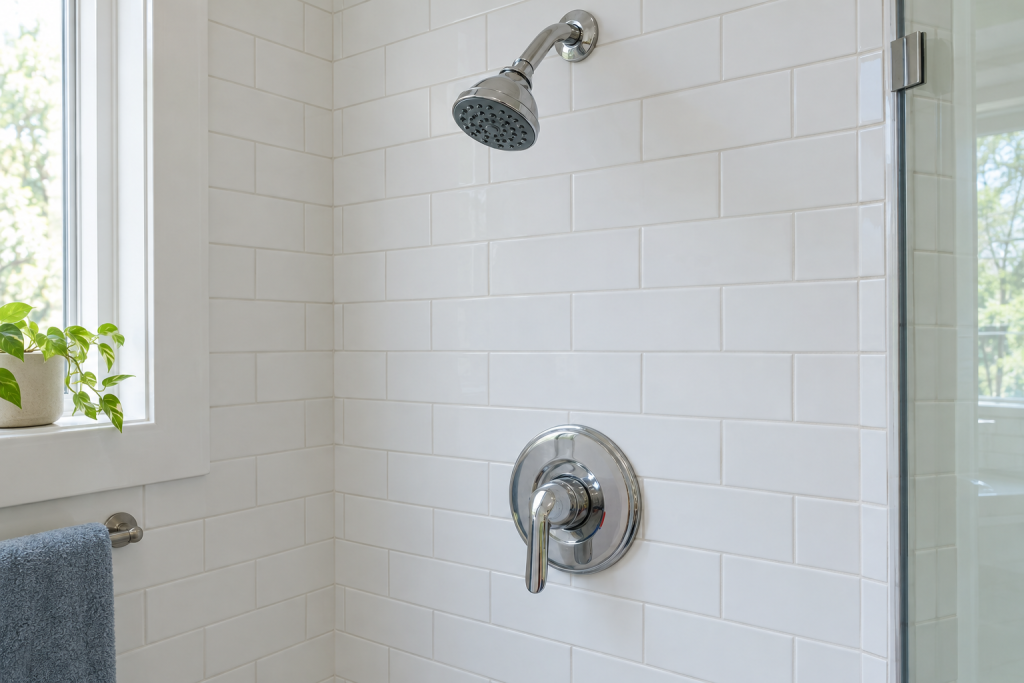
A dripping shower head or a handle that won’t hold temperature almost always means the cartridge inside the valve is worn out. Shower cartridge replacement takes most homeowners under an hour with a hex key, pliers and the right part, and the fix lasts 10 to 20 years. The only hard parts are matching the cartridge to your valve brand and getting a mineral-stuck cartridge out of the body without breaking it.
Quick steps: shower cartridge replacement
- Shut off water at the main or the valve’s integral stops, then open the shower to drain pressure.
- Pry off the handle cap, remove the set screw and pull the handle and escutcheon.
- Photograph the valve, then remove the retaining clip or bonnet nut.
- Pull the old cartridge straight out with pliers or a brand puller.
- Clean the valve body and coat the new O-rings with silicone grease.
- Insert the new cartridge in the same orientation and reinstall the clip or nut.
- Turn the water back on, flush, set the temperature limit stop and reassemble the trim.
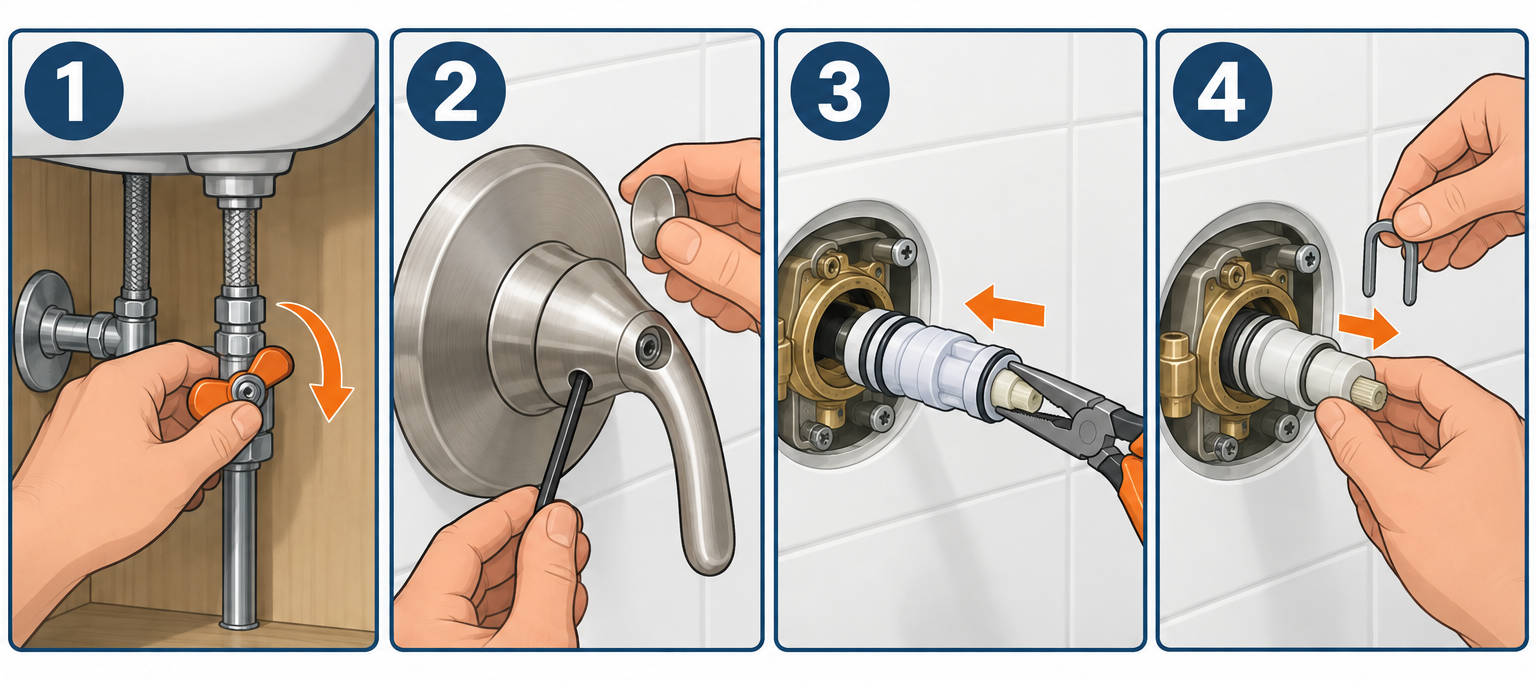
Tools and materials
- Replacement cartridge matched to your valve brand (Moen 1222, Delta RP19804, Kohler GP500520, etc.)
- Hex key set (3/32 in. and 7/64 in. cover most Moen handles, 1/8 in. covers most Delta)
- Phillips and flat screwdrivers
- Needle-nose pliers and slip-joint (Channellock) pliers
- Brand cartridge puller if available (Moen 104421 for 1200/1222/1225 series)
- Silicone plumber’s grease (not petroleum jelly)
- White vinegar and an old toothbrush
- Rag or drain stopper to cover the tub drain
- Flashlight or headlamp
- Optional: utility knife, penetrating oil, kitchen-type spray bottle
Calculators for this job
Safety first
Shut off water at the main or at the valve’s integral stops before removing any clip or nut, then open a lower faucet to bleed pressure. Scalding is the real hazard: after the swap you must reset the temperature limit stop so the hot side can’t exceed about 120°F at the shower head.
Signs you need a new cartridge, not just a new washer
Modern single-handle shower valves don’t use washers. One cartridge controls both flow and the hot-to-cold mix, so when it wears, several things go wrong at once. You’ll usually notice one of these first:
- The shower head or tub spout drips after the handle is fully off.
- The handle is stiff, gritty or needs two hands to turn.
- You can’t get the water hot enough, or it swings between scalding and cold when a toilet flushes.
- Water comes out of the shower head only lukewarm no matter how far you turn the handle.
- The handle feels loose and spins past its normal stop.
- Water seeps out from behind the escutcheon plate onto the tile.
A drip from the spout is the clearest signal. Set a cup under it overnight. Anything more than a few ounces means the cartridge seals have failed, and that drip wastes several hundred gallons a month while quietly staining the tub.
If you have two or three separate handles (hot, cold and sometimes a diverter), you have stems rather than a single cartridge. Those are replaced one at a time with a stem socket set, and the shutoff and trim steps below still apply, but the parts and the stuck-removal tricks are different.
How to identify the correct replacement cartridge
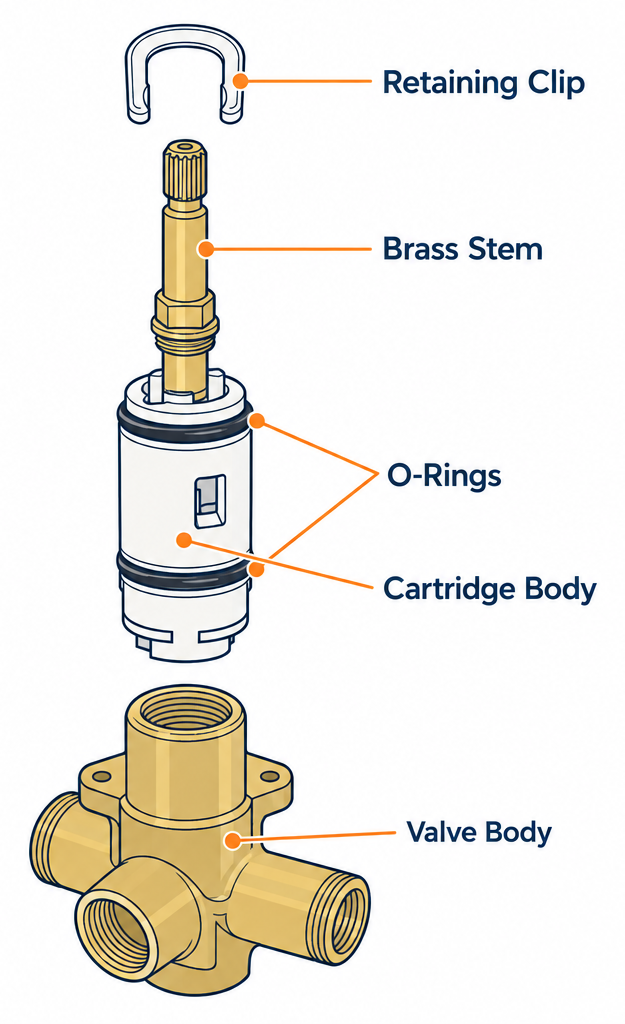
This is the step that sends people back to the store twice. Cartridges are not interchangeable between brands, and most brands have three or four designs in circulation. Start with the brand name, which is usually stamped or printed somewhere on the trim: the handle cap, the face of the escutcheon, the tub spout or the shower head arm. If the trim is unmarked, pull the handle (Step 2 below) and look at the cartridge itself. The shape tells the story.
| Brand and valve family | Cartridge part number | How to recognize it | Typical price (2024-2025) |
|---|---|---|---|
| Moen Posi-Temp (most single-handle Moen since the 1990s) | Moen 1222 | White plastic body with a flat brass stem, held by a brass retaining clip | $40-60 |
| Moen Standard/Chateau single-handle (older) | Moen 1225 (plastic) or 1200 (brass) | Round brass or plastic sleeve, held by a retaining clip, comes with a white twist tool | $35-55 |
| Delta Monitor 1300/1400 series | Delta RP19804 | Gray or black plastic body about 2 in. wide, held by a chrome bonnet nut, includes the rotational limit stop | $40-60 |
| Delta Monitor 17 series (dual-function) | Delta RP46074 | Larger housing with a separate temperature knob behind the volume handle | $50-80 |
| Kohler Rite-Temp | Kohler GP500520 | Tall cartridge with a brass cap, held by a large plastic or brass retaining nut | $60-100 |
| Pfister 0X8 single-handle | Pfister 974-042 | Short cartridge with a protruding stem and a separate retainer plate | $30-50 |
| Symmons Temptrol | Symmons TA-10 spindle (plus TA-4 seats) | Not a cartridge at all; a brass spindle behind a large bonnet | $35-60 |
| Generic/aftermarket “fits Moen 1222” | Various | Same shape, often slightly looser tolerances | $12-25 |
Prices move with retailers and seasons, so treat the right column as a range to expect at a home center or plumbing supply, not a quote.
Two shortcuts save a lot of guessing. First, Moen and Delta both back their cartridges with a limited lifetime warranty to the original owner of the faucet. Call customer service with the model number (or even a photo of the trim) and they will often ship a replacement free, though you’ll wait a week or more for it to arrive. Second, if you’re already at the store with the old cartridge in a bag, hold it up against the packaging. The plastic blister packs are shaped to the part and a mismatch is obvious.
Resist the urge to buy a universal cartridge. There is no such thing. The cheap aftermarket copies of the Moen 1222 do work, but the tolerances on the stem and O-rings are looser, and the common complaint is a handle that goes stiff again within two or three years. For a part you want to leave alone for a decade, the brand original is worth the extra $25.
Pro tip
Before you buy anything, pull the handle and escutcheon and take a clear photo of the exposed valve with a tape measure in frame. Every plumbing counter in the country can match a cartridge from that picture in about ten seconds, and you avoid the embarrassing second trip.
Step 1: Shut off the water
Most shower valves have no local shutoff, so you’ll close the main. In a basement or crawlspace home it’s the valve where the water line enters, usually a quarter-turn ball valve with a lever or an older gate valve with a round wheel. In slab homes look near the water heater, in the garage or at the meter box in the yard. Turn the ball valve 90 degrees so the lever runs across the pipe. Gate valves turn clockwise until they stop; don’t force them past that point or the stem packing will start weeping.
Some valves do have integral stops. Delta MultiChoice and many newer Moen and Kohler rough-in bodies have two small screw heads, one on each side of the cartridge, visible once the escutcheon is off. A flat screwdriver turned clockwise closes each one. If you have these, you can skip the main and leave the rest of the house running.
After the water is off, open the shower handle all the way and let it run dry. Then open a sink faucet on a lower floor to bleed pressure out of the lines. If you skip this, you’ll get a face full of water the moment the retaining clip comes out. Finally, stuff a rag in the tub drain or close the stopper. Set screws and retaining clips are small, and the drain is exactly where they want to go.
Step 2: Remove the handle and trim
Put on your headlamp and look at the handle. There’s almost always a decorative cap, a small plastic or metal disc with a brand logo or a red/blue indicator. Pry it off with a thin flat screwdriver or your fingernail. Underneath is the set screw. Moen handles use a 3/32 in. or 7/64 in. hex set screw on the underside or front of the handle. Delta usually uses 1/8 in. hex, sometimes a Phillips screw hidden under the cap. Kohler varies, but a hex set screw on the underside of the lever is typical.
Back the set screw out three or four turns; it doesn’t need to come all the way out. Pull the handle straight off the stem. If it won’t budge after 15 or 20 years of mineral buildup, wiggle it side to side while pulling, or wrap a rag around it and tap outward with the heel of your hand. Don’t pry against the tile. A handle puller (the same tool used for Moen kitchen faucets) costs about $15 and saves cracked trim if yours is really stuck.
Next comes the escutcheon, the large plate against the wall. Older plates have two screws at the 3 and 9 or 12 and 6 o’clock positions. Newer screwless plates pull straight off, sometimes after unthreading a decorative sleeve or a plastic adapter ring that sits over the valve. Run a utility knife around the perimeter first to cut the caulk bead so you don’t tear the paint or grout.
Behind the escutcheon on Moen Posi-Temp valves there’s a plastic stop tube and a cone-shaped temperature limit ring. On Delta 1300/1400 valves you’ll find a chrome bonnet nut (a sleeve about 1.5 in. in diameter) with the rotational limit stop just behind the handle. Note the position of every one of these parts. Then take the photograph. You will not remember how the limit stop was oriented an hour from now, and this photo is the only record.
Step 3: Remove the retaining clip or bonnet nut
Now you’re looking at the cartridge seated in the brass valve body. How it’s held in depends on the brand.
Moen (1222, 1225, 1200): A U-shaped brass or stainless retaining clip straddles the cartridge at the top of the valve body, about the size of a staple with legs 3/4 in. long. Grab the exposed loop with needle-nose pliers and pull straight up and out. It slides in a slot; it does not need to be pried. If it’s crusted in place, a drop of vinegar and a few minutes of patience usually loosens it. Set the clip somewhere safe, because the new cartridge usually comes with a new one but not always.
Delta 1300/1400 and 17 series: The chrome bonnet nut threads onto the brass body. Turn it counterclockwise by hand first; if it’s tight, use slip-joint pliers with a rag wrapped around it to protect the finish. Behind it on the 1300/1400 you’ll see the cartridge itself with the limit stop still attached.
Kohler Rite-Temp: Remove the handle adapter and cap, then unscrew the large retaining nut (brass or white plastic, roughly 1.75 in. across) counterclockwise. Some models have a metal screw through the cap first.
Pfister 0X8: Two small screws hold a retainer plate over the cartridge. Remove them and the plate lifts off.
Whichever you have, stop here and compare the exposed cartridge to the one you bought. If the shapes don’t match, now is the time to find out, before anything gets pulled.
Step 4: Pull the old cartridge
Grip the stem with slip-joint pliers and pull straight out while twisting gently back and forth. A cartridge that’s only a few years old will slide free in one pull. One that’s been in a hard-water house for 20 years will fight you. This is the step where jobs go sideways, so work through the options in order.
Start by twisting. Moen 1225 cartridges ship with a white plastic twist tool that slides over the stem and keys into the cartridge body; turning it a quarter turn each way breaks the O-rings’ grip on the brass. For the 1222, grip the stem with pliers and rotate the whole cartridge 90 degrees each way before pulling. Delta and Kohler cartridges are shorter and seldom seize as badly, but the same twist-then-pull motion applies.
If twisting and pulling doesn’t move it, spray penetrating oil or white vinegar around the cartridge where it enters the body and wait 15 minutes. Mineral scale is what’s holding it, and vinegar dissolves scale.
The next escalation for Moen is the brand single-handle cartridge puller, Moen part 104421. It threads onto the cartridge stem, braces against the valve body and lets you drive the cartridge out with a wrench rather than yanking on pliers. Cheaper copies exist and work. For Delta and Kohler, a pair of pliers and a steady pull is nearly always enough.
Pro tip
If a Moen 1225 stem pulls out but the brass shell stays behind in the valve, don’t panic and don’t start digging at it with a screwdriver. Buy a cartridge puller that includes a shell-extraction bit (the Moen 104421 does), thread it into the shell and turn. Prying at the shell is how people gouge the valve body and turn a $45 job into a $600 valve replacement.
Once the cartridge is out, note which way it was facing. Moen 1222 cartridges have ears at the top with a notch that should sit at 12 o’clock. Delta 1300/1400 cartridges have a hot-side mark and can only go in one way if you line up the key, but the limit stop can be clocked wrong. Set the old cartridge on a paper towel exactly as it came out so you have a reference.
Step 5: Clean and inspect the valve body
Shine your light inside the brass body. You’ll see smooth machined walls, two or three ports where water enters and exits, and a ring of green or white mineral crust where the old O-rings sat. Those walls need to be clean for the new O-rings to seal.
Dip an old toothbrush in vinegar and scrub the inside. For heavy scale, soak a rag in vinegar, push it into the body and leave it for 20 minutes, then scrub again. Don’t use sandpaper, steel wool or a wire brush. Scratches in the brass become leak paths. A plastic scouring pad is as abrasive as you should get.
Check the ports for debris. When a cartridge fails, bits of worn rubber and plastic end up in the body, and anything left behind will be in your new cartridge within a week. Flush the body by cracking the main or stops open for two seconds with a bucket held under the valve, then close it again. This also clears any solder beads or sand that have been sitting in the lines since the house was built.
Delta valves have an extra component here: two small rubber seats with springs behind them, sitting in the inlet ports at the bottom of the body. These wear with the cartridge and cause the same drip. The Delta RP4993 seat-and-spring kit costs about $8-12. Pull the old ones out with needle-nose pliers, note that the spring goes in first with the narrow end down and the rubber seat on top, and install the new ones with a dab of silicone grease. Replace them every time you replace a Delta cartridge; skipping them is the number one reason Delta showers keep dripping after a new cartridge.
Now prep the new cartridge. Open the package and coat every O-ring with a thin film of silicone plumber’s grease. Use silicone specifically. Petroleum-based lubricants (Vaseline, WD-40, motor oil) swell and soften rubber over time and will shorten the life of the seals. A small tub of silicone grease is $5-8 and lasts years.
Step 6: Install the new cartridge
Line the cartridge up exactly as the old one sat. For a Moen 1222, the notch in the ears points straight up and the flat side of the stem is on top. Push it straight in until the ears seat flush against the body and the slot for the retaining clip is fully exposed. It should slide in with firm hand pressure. If it stops short, don’t hammer it; pull it out and check that an O-ring hasn’t rolled.
Slide the retaining clip back down into its slot until it’s fully seated. You’ll feel it drop in. Make sure both legs went into the slot and not alongside the cartridge body, which is a mistake that lets the cartridge blow out under pressure.
On Delta 1300/1400, orient the cartridge so the “hot” mark aligns with the hot supply (left side when facing the valve in a standard installation), press in until it seats, then thread the bonnet nut on by hand until snug. Tighten a further quarter turn with pliers through a rag. Over-tightening cracks the plastic cartridge housing, so stop when it’s firm.
Kohler Rite-Temp cartridges have a locating tab that drops into a notch in the body. Press in, then thread on the retaining nut hand-tight plus a quarter turn.
Reinstall the handle temporarily (no set screw needed) so you can operate the valve for testing, but leave the escutcheon off. You need to see the valve body while the water comes back on.
Step 7: Turn on the water, flush and set the temperature limit
Open the main valve slowly, about a quarter of the way, and watch the valve body for 30 seconds. A drip around the cartridge means an O-ring rolled or the clip isn’t fully seated; shut off and reseat. No drips, open the main the rest of the way.
Turn the shower on cold and let it run for a full minute. This pushes any debris you loosened out through the shower head instead of leaving it in the cartridge. Then run through the full handle range. Cold should be at the position it was before, hot at the other end.
If hot and cold are reversed (common with Moen 1222 installs), you don’t need to pull the cartridge. Remove the handle, grip the stem with pliers and rotate it 180 degrees. On Delta you do have to pull the cartridge and reinsert it the other way, which is why checking the orientation before the bonnet nut goes on saves time.
Now set the temperature limit stop. This is the piece that stops the handle before the water gets dangerously hot, and your new cartridge or its limit ring is almost certainly not set to match the old one. Turn the handle to the hottest position and hold a cooking thermometer under the shower head for a minute. The Consumer Product Safety Commission recommends 120°F as the maximum at the tap. If it reads higher, adjust the stop.
On Moen Posi-Temp, the limit is a white or gray toothed ring behind the handle. Pull it off and rotate it one tooth clockwise to reduce maximum heat, then push it back on and recheck. Each tooth changes the max by roughly 4-6°F. On Delta 1300/1400, the rotational limit stop is a black plastic collar on the cartridge; lift it, rotate counterclockwise (toward cooler) one notch at a time and press back down. Kohler Rite-Temp has a similar toothed limit ring on the cartridge face.
Once the max temperature is where you want it, shut the water off, dry the wall and reassemble: escutcheon with a fresh bead of silicone caulk along the top and sides (leave the bottom edge uncaulked so any water behind it can drain), handle, set screw snug but not cranked, and cap. Run the shower one final time and check the spout for drips after you turn it off. A properly replaced cartridge leaves the spout bone-dry within a minute.
Common mistakes to avoid
Most callbacks on this job trace back to one of six errors. Each is avoidable with about 30 seconds of attention.
Guessing at the cartridge. The Moen 1222 and 1225 look similar in photos but fit entirely different valve bodies. Match the actual old part or a photo of the exposed valve, not the look of the handle.
Skipping the vinegar. A new cartridge pushed into a scaled body will seal for a month and then weep. Ten minutes of cleaning is the difference between a 15-year fix and a repeat job next spring.
Using the wrong lubricant. Petroleum jelly is in every bathroom and it’s the wrong product. It softens EPDM and silicone O-rings. Silicone grease only.
Not replacing Delta seats and springs. The cartridge is only half the sealing system on a Delta. Change both or expect the drip to continue.
Forgetting the limit stop. New cartridges often allow a hotter maximum than the old one did. A household with kids or elderly members can go from a safe 115°F max to 135°F without anyone adjusting a thing.
Overtightening. Bonnet nuts and retaining nuts are snug plus a quarter turn. Set screws are snug. Cracked plastic housings and stripped brass threads are expensive and entirely self-inflicted.
Why the shower still leaks after cartridge replacement
Finishing the job and still hearing the drip is maddening, but the cause is almost always one of a short list. Work through the table in order.
| Symptom | Likely cause | Fix |
|---|---|---|
| Steady drip from spout or head, same as before | Wrong cartridge, or an aftermarket copy with loose tolerances | Compare part numbers; swap for the brand original |
| Drip from spout, Delta valve | Old seats and springs left in place | Install RP4993 seat/spring kit |
| Drip started after replacement, wasn’t there before | Debris lodged under new seals during install | Pull cartridge, flush body for 10 seconds, reinstall |
| Water weeping behind escutcheon | O-ring rolled on install, or retaining clip not fully seated | Shut off, pull and reseat with fresh grease; confirm clip legs are in the slot |
| Handle very stiff on new cartridge | O-rings installed dry, or body not cleaned | Pull and grease; scrub scale from body walls |
| Hot and cold reversed | Cartridge or stem installed 180 degrees out | Moen: rotate stem 180°; Delta/Kohler: pull and reinsert |
| Water never gets fully hot | Temperature limit stop set too cool, or hot supply valve partially closed | Adjust limit ring one tooth toward hot; check hot stop is fully open |
| Low pressure after replacement | Debris in shower head or cartridge ports; integral stop not fully opened | Unscrew head and rinse; open stops fully |
| Drip from spout only when shower is running | Worn tub spout diverter, not the cartridge | Replace the spout ($15-40) |
| Water from both head and spout at once | Diverter failure in the spout | Replace the spout |
One symptom not on the list is a wet ceiling below the bathroom or a stain behind the shower wall. That is never the cartridge. It means a supply connection or the valve body itself is leaking inside the wall, and the fix involves opening drywall.
When the cartridge is not the problem
A few shower symptoms imitate a bad cartridge and will survive a replacement untouched. Rule these out before you buy a part.
Dripping tub spout while the shower runs. That’s the diverter inside the spout, a small gate that lifts to send water up to the head. When its seal wears, water bypasses and dribbles out the spout at the same time the head is running. The fix is a new spout, which threads or slips onto the pipe stub and costs $15-40. The cartridge is fine.
Hot water that runs out quickly or never gets hot anywhere in the house. Check the kitchen sink. If it’s lukewarm there too, the problem is the water heater (a failed lower element, a tripped high-limit or a thermostat set low), not the shower valve.
Low pressure at the head only. Unscrew the shower head and run the arm bare. Full flow from the arm means the head is clogged with scale. Soak it in vinegar overnight or replace it.
Temperature that swings when another fixture runs, on a valve less than 15 years old. Pressure-balance cartridges are designed to stop exactly this. If the swing is new and the cartridge is fairly recent, debris in the balancing spool is the likely cause, and sometimes pulling the cartridge and flushing it is enough. If the swing has always existed, the valve may be an older non-balancing type and only a full valve replacement fixes it.
Leaks that appear in the wall or ceiling. A corroded valve body, a cracked solder joint or a pinhole in a copper stub. All of these require opening the wall, and none of them will respond to a cartridge.
What shower cartridge replacement costs
Doing it yourself, the cartridge is the only real expense. Hiring it out adds a service call that varies a lot by region.
| Scenario | Parts | Labor | Total |
|---|---|---|---|
| DIY, Moen 1222 or Delta RP19804, brand original | $40-60 | $0 | $40-60 |
| DIY, warranty replacement from Moen or Delta | $0 | $0 | $0 (plus a week’s wait) |
| DIY with new puller tool and silicone grease | $65-100 | $0 | $65-100 |
| DIY, Kohler Rite-Temp | $60-100 | $0 | $60-100 |
| Plumber, straightforward swap | $40-80 | $100-250 | $150-350 |
| Plumber, stuck cartridge requiring extraction | $40-80 | $200-400 | $250-500 |
| Plumber, valve body replaced (wall opened) | $150-400 | $400-900 | $600-1,500 |
Plumbers typically charge a flat trip fee of $75-150 that covers the first half hour, then an hourly rate of $85-150 in most US metros, higher in coastal cities. A cartridge swap fits inside the first hour when it goes well. If you’re already paying for the visit, ask the plumber to check the water heater’s temperature setting and the tub spout diverter while they’re there.
When to call a pro
Call a licensed plumber if the cartridge stem snaps off or a Moen shell separates and the puller won’t extract it, if the retaining clip slot or bonnet threads on the brass body are damaged, if you find water staining inside the wall or on the ceiling below, or if the valve is an old two- or three-handle unit with stems that won’t budge. Those jobs end with cutting into the wall and soldering or crimping in a new valve body, which is a plumber’s work and in most jurisdictions needs a permit. A plumber is also the right call if your home has no working main shutoff; that’s a problem worth fixing before you touch anything downstream.
FAQ
How do I know which shower cartridge I need?
Find the brand on the trim first, then pull the handle and escutcheon to expose the cartridge and photograph it. Moen single-handle valves almost always take a 1222 (Posi-Temp) or a 1225/1200; Delta Monitor 1300/1400 takes the RP19804; Kohler Rite-Temp takes the GP500520. Any plumbing counter can confirm from the photo. If the faucet is original to your home, call the manufacturer with the model and ask about a warranty replacement.
Can I replace a shower cartridge without turning off the main water?
Only if the valve has integral stops, the two screw-type shutoffs visible beside the cartridge once the escutcheon is off. Without them, the main has to be closed. Pulling a cartridge from a pressurized valve releases the full supply line into your bathroom.
Why is my new shower cartridge so hard to turn?
The O-rings were installed dry or the valve body still has mineral scale on its walls. Pull the cartridge, scrub the body with vinegar and a toothbrush, coat every O-ring with silicone grease and reinstall. Aftermarket cartridges also tend to run stiffer than brand originals.
How long should a shower cartridge last?
Ten to twenty years is normal with municipal water. Very hard well water or a sediment problem can shorten that to five. If you’re replacing one every couple of years, install a whole-house sediment filter and check whether the water heater is shedding scale into the lines.
Do I need to replace the whole valve or just the cartridge?
Just the cartridge, nearly every time. The brass valve body in the wall typically outlasts the house. The valve only needs replacing when the body itself is cracked or corroded, when the cartridge slot or threads are damaged, or when you’re upgrading from an old non-pressure-balanced valve to a modern anti-scald one.
What temperature should the limit stop be set to?
Set it so the hottest the handle can deliver is about 120°F at the shower head, measured with a thermometer after a full minute of running. Households with young children or elderly residents often go to 110-115°F. Recheck it any time the water heater setting changes, since the limit stop only restricts the mix ratio, not the incoming hot water temperature.