
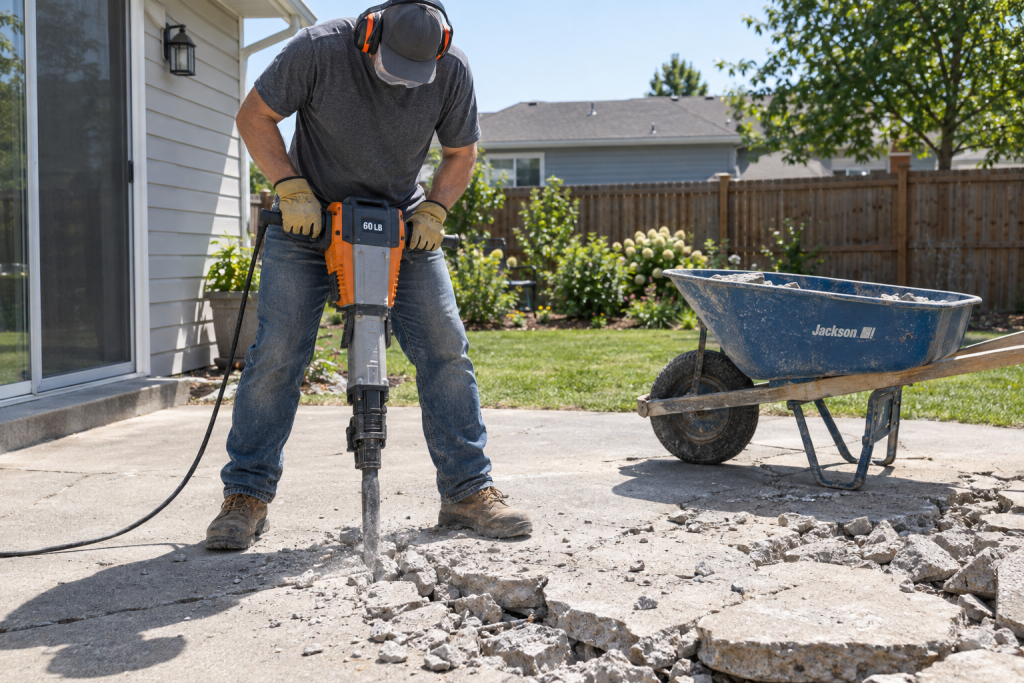
To break up a slab, patio or walkway with a jack hammer, we rent a 60 to 70 lb electric breaker, fit a moil point bit, start at a free edge and take 3 to 4 inch bites back toward that edge so every chunk has somewhere to fall. A 4 inch residential slab comes up at roughly 25 to 40 square feet per hour once the first edge is open, so a 10 by 12 patio is a morning’s work and an afternoon of hauling.
Quick steps: break concrete with a jack hammer
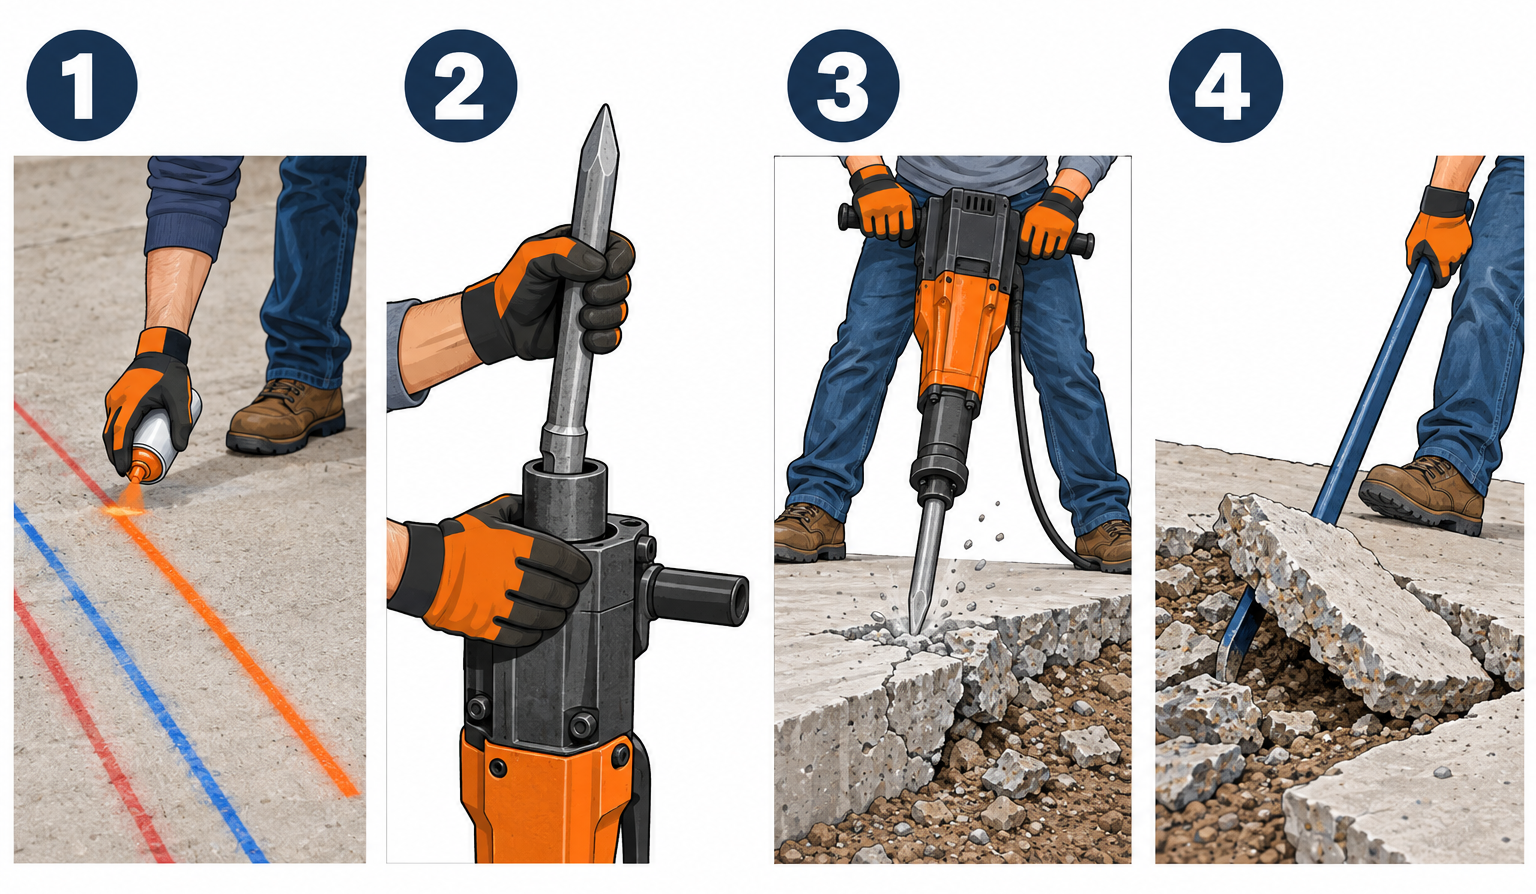
- Call 811, mark utilities, and probe for anything buried in or under the slab.
- Rent a 60-70 lb breaker with a moil point and a wide chisel; add a 12 gauge cord.
- Put on hearing protection, safety glasses, steel toes, gloves and a P100 respirator.
- Expose a free edge, then set the bit 4-6 in. in from that edge at a slight lean toward it.
- Let the tool’s weight do the work; shift 3-4 in. back after each piece cracks loose.
- Lever stubborn slabs with a 60 in. digging bar and cut rebar or mesh with bolt cutters or a grinder.
- Stack debris in a wheelbarrow and haul to a dumpster or concrete recycler.
Tools and materials
- Electric breaker hammer, 60-70 lb class, 1-1/8 in. hex shank (rental)
- Moil point bit, 1-1/8 in. hex, 16 in.
- Wide flat chisel, 3 in., 1-1/8 in. hex
- Asphalt cutter bit, 5 in., if breaking blacktop
- Extension cord, 12 gauge up to 50 ft or 10 gauge up to 100 ft
- Digging bar, 60 in. by 1 in., with chisel end
- Wrecking bar, 36 in.
- Sledgehammer, 8 or 10 lb
- Bolt cutters, 24 in., or angle grinder with metal cutoff wheel
- Wheelbarrow, 6 cu ft, and a hand truck or breaker cart
- Garden hose with spray nozzle for dust control
- Hearing protection (NRR 30), safety glasses, P100 respirator, leather gloves, steel toe boots
- Shin guards or heavy work pants
- Tarp or plywood sheets to protect adjacent surfaces
- Marking paint and a 25 ft tape measure
Calculators for this job
Safety first
Call 811 before any slab work and wait for the utility marks. Water, gas, electrical conduit and sewer lines run under and through residential concrete all the time. Wear hearing protection every minute the tool is running (breakers run 100 to 110 dB), plus a P100 respirator and wet the surface to keep silica dust down. Never run a breaker on a ladder, a scaffold or a wood-framed floor.
Which jack hammer to rent or buy for the job
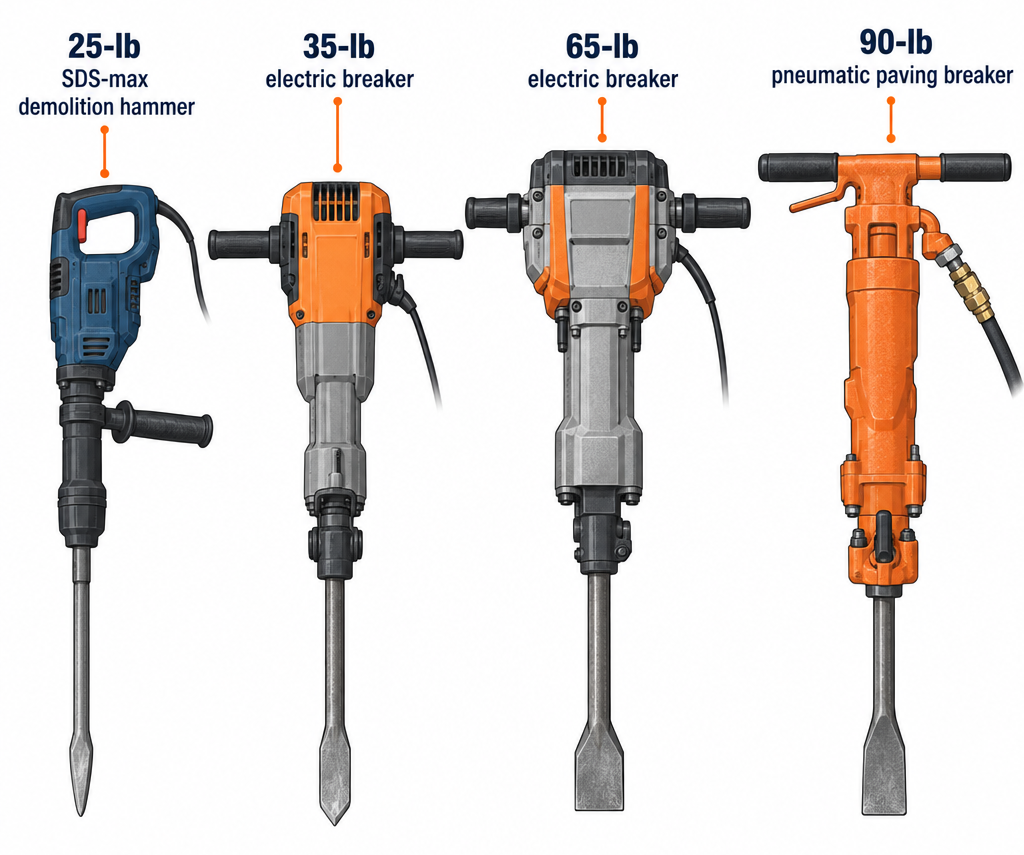
We treat “jack hammer” as a family of tools, not one product, and matching weight class to the material is the single decision that determines whether the day goes well. A 25 lb SDS-max demolition hammer will chip tile and knock out a block wall but will bounce off a 6 inch driveway for an hour and leave you exhausted with nothing to show for it. A 90 lb pneumatic paving breaker will demolish a driveway in record time but needs a towable compressor, a truck to move it and a second person to set it up.
The electric 60 to 70 lb breaker is the go-to for homeowners because it plugs into a standard 15 or 20 amp outlet, rides on a cart, and breaks anything up to about 8 inches of reinforced concrete. The table below compares the classes we see in rental yards and in the tool aisle, with the shank sizes and current approximate rental and purchase prices.
| Class | Weight | Shank | Power | Best for | Rental (day) | Buy |
|---|---|---|---|---|---|---|
| Light demolition hammer | 20-30 lb | SDS-max or 3/4 in. hex | 120 V, 13-15 A | Tile, thinset, block walls, plaster, 2-3 in. toppings | $55-80 | $400-1,200 |
| Medium breaker | 35-40 lb | 1-1/8 in. hex | 120 V, 15 A | Sidewalks, 4 in. patios, steps, small footings | $65-95 | $900-1,500 |
| Heavy electric breaker | 60-70 lb | 1-1/8 in. hex | 120 V, 15 A | Driveways, 4-8 in. slabs with rebar, pool decks | $75-110 | $1,500-3,200 |
| Pneumatic paving breaker | 60-90 lb | 1-1/8 in. hex, 6 in. | 90 psi, 70-90 cfm | Roads, thick footings, all-day commercial demolition | $50-80 plus $150-250 compressor | $1,200-2,500 plus compressor |
| Gas-powered breaker | 50-60 lb | 1-1/8 in. hex | 2-stroke engine | Remote sites with no power, asphalt and post removal | $90-140 | $2,000-3,500 |
A few things stand out when we compare the columns. Price per day barely changes between the 35 lb and 70 lb electric models at most yards, so there is little reason to rent the lighter tool unless the job is upstairs, inside, or made of block rather than slab. Impact energy, not weight, is what actually breaks concrete, and the heavy electric class sits around 45 to 70 foot-pounds per blow depending on the maker, which is why a 65 lb Hilti or Makita feels like a different machine than a 60 lb budget import rated at 35 foot-pounds. Blow rate is the other spec worth reading, and the 1,000 to 1,900 blows per minute range covers nearly everything; faster blow rates with lower energy suit asphalt, slower and harder suits reinforced concrete.
Pneumatic breakers remain the standard on commercial sites because air tools have almost no electronics to fail and the 90 lb class delivers more energy per blow than any electric model. For a homeowner they rarely make sense, because the compressor rental costs more than the breaker, the hose adds another trip hazard, and the extra power only matters on slabs thicker than 8 inches.
Pro tip
Ask the rental counter for a tool with anti-vibration handles (Bosch calls it Vibration Control, Hilti calls it AVR, Makita calls it AVT). The difference over four hours is enormous, and the yards almost never charge extra for the better model if you ask for it by name.
Step 1: Call 811 and plan the break
Call 811 or submit the request online at least two full business days before the job, and more in states that require three. The service is free everywhere in the United States, and the utility companies send locators to paint the ground for gas, electric, water, sewer, cable and fiber. Private lines are not marked by 811, so we also look for irrigation valves, landscape lighting, the run from the house to a detached garage, and any sewer cleanout, then assume a line connects each of those to something.
With the marks down, we measure the slab and sketch the grid we intend to break. Slab thickness sets everything else, and the easiest way to find it is to dig a small hole at one edge with a spade and read a measuring tape down the exposed face. Residential sidewalks and patios are almost always 4 inches, driveways run 4 to 6 inches, garage aprons and porch slabs can be 6 inches with a thickened edge, and anything you suspect is a footing or a pier pad can be 8 to 12 inches and heavily reinforced.
Thickness also tells us the weight we will be lifting. Concrete weighs roughly 150 pounds per cubic foot, so a 4 inch slab is 50 pounds per square foot and a 6 inch slab is 75. A 10 by 12 patio at 4 inches is 6,000 pounds, or 3 tons, which matters when we book the dumpster and when we decide how big to break the pieces. We aim for chunks a single person can lift into a wheelbarrow, which in practice means 12 to 18 inches across for a 4 inch slab and no more than 12 inches for a 6 inch slab.
Look at what the slab touches. A patio poured against a house foundation needs a cut line along that edge so the breaker never drives sideways into the foundation wall, and a slab poured against a block wall or a brick step needs the same treatment. If you are breaking out a strip to install a french drain or a trench drain across a driveway, snap chalk lines for both edges of the trench and plan to make saw cuts there, because a breaker alone leaves a ragged edge that is hard to form against when the new concrete goes in.
Find a free edge. Concrete breaks far more easily when there is somewhere for the chunk to go, so we start at a slab edge where the soil can be dug away to expose the full face, or at an existing crack or expansion joint. On an interior slab with no edge, we drill a 1 inch hole with a rotary hammer or cut a 12 inch square with a concrete saw to create one.
Step 2: Set up power, air or fuel
An electric breaker draws 13 to 15 amps continuously and spikes higher at startup, so we run it on its own 20 amp circuit when possible and never share the circuit with a shop vac, a saw or a refrigerator. Garage and exterior outlets on a 15 amp circuit will usually hold, but a tired breaker in the panel will trip under the load, and resetting it ten times a day gets old.
Cord gauge is where most homeowners go wrong. A 16 gauge cord will run the tool, but the voltage drop over 50 feet starves the motor, the tool runs hot and hits weak, and the cord itself warms up. We use 12 gauge for runs up to 50 feet and 10 gauge for anything up to 100 feet, and we never daisy-chain two cords when one longer one is available. Plug the tool into a GFCI outlet or a GFCI adapter, because we will be running water on the slab for dust control.
Several rental models have a soft-start trigger and a lockout, and the heavier Makita and Hilti units have a thermal overload light. Read the sticker on the tool before you start, because the one time the light comes on you want to know whether to stop or just let it idle.
Pneumatic breakers need a compressor that delivers 70 to 90 cfm at 90 psi for a 60 to 90 lb tool, which means a towable 185 cfm diesel unit from the rental yard, not a garage compressor. The hose is 3/4 inch minimum for runs under 50 feet, the claw couplings need safety whip clips, and the tool needs air tool oil in the inlet every hour or so. The yard will show you the oiler; use it.
Gas breakers run on a 50:1 two-stroke mix like a chainsaw, start with a pull cord and have no power cord to manage, which makes them the tool of choice for fence post removal and remote work. They are also the loudest option and the exhaust sits right in front of your face, so we only use them outdoors with a breeze.
Step 3: Fit the right bit
Bits for a jack hammer come in a handful of shapes and the shape determines what the tool does. A moil point concentrates the blow on a single point and starts cracks, a flat chisel follows a crack and splits, a wide chisel or spade shears thin material and pries, and an asphalt cutter slices blacktop in a straight line. We start every concrete job with a moil point and swap to a 3 inch chisel when we are chasing cracks or cleaning up an edge.
| Bit | Width | Shank | Use it for | Avoid it for |
|---|---|---|---|---|
| Moil point | Point | 1-1/8 in. hex, SDS-max | Starting breaks in slabs, footings, thick concrete | Tile, thin toppings (punches through and bogs) |
| Narrow flat chisel | 1 to 1-1/2 in. | 1-1/8 in. hex, SDS-max | Following cracks, trimming edges, cutting along saw kerfs | Opening up fresh concrete (skids) |
| Wide chisel | 3 in. | 1-1/8 in. hex, SDS-max | Splitting 4 in. slabs, lifting pieces, removing thinset | Reinforced slabs over 6 in. |
| Asphalt cutter | 5 in. | 1-1/8 in. hex | Cutting straight lines in asphalt, trenching blacktop | Concrete of any thickness |
| Clay spade | 5-1/2 in. | 1-1/8 in. hex | Digging hardpan, frozen soil, clay trenches | Anything with rock or concrete |
| Scaling chisel | 3 to 4 in. | SDS-max | Tile, thinset, mortar beds, plaster | Slabs |
| Bushing tool | 2 by 2 in. grid | SDS-max, 1-1/8 in. hex | Roughening or leveling concrete surfaces | Demolition |
| Tamper plate | 6 in. | 1-1/8 in. hex | Compacting backfill in trenches after the break | Everything else |
Shank fit is non-negotiable. A 1-1/8 inch hex bit has a collar or a notch that locks under the tool’s retaining latch, and some tools take a 1-1/8 inch hex with a round collar while older or import tools take the notched style, so we match the bit to the tool at the counter rather than assuming. Pull the latch, slide the bit in until it seats, release the latch and tug hard; a bit that can slide out will fly out mid-swing.
Grease the shank with the tube the rental yard gives you, or any high-temp lithium grease, every time you change bits. The shank runs dry inside the anvil and dry steel galls in an hour, which pits the bit and eventually scars the tool. Yards will charge you for a scored bushing.
Check the tip. Rental moil points are usually dull, and a dull point skids across the surface instead of biting. If the tip is rounded over more than about 1/4 inch, ask for a different one or grind it back to a point on a bench grinder, dipping it in water every few seconds so the steel does not lose its temper.
Pro tip
Rent two moil points, not one. When a bit sticks hard in a slab (and one will), pull the tool off the stuck bit, fit the spare and keep going. You can work the stuck one free with a sledge and the slab piece it is wedged in later, instead of losing 20 minutes fighting it.
Step 4: Start at the edge and work the grid
Dig the soil away from the starting edge so at least 6 inches of the slab’s face is exposed and there is open air under the edge. Concrete fails in tension, and a slab with soil packed under it is supported everywhere, so the hammer just powders the surface. Once the edge is undermined, the slab becomes a cantilever and cracks under its own weight with far less effort.
Set the moil point 4 to 6 inches in from the free edge, with the tool leaning 10 to 15 degrees toward the edge rather than straight down. This angle drives the crack outward to the face instead of straight down into the subgrade. Stand with feet shoulder-width apart, one foot slightly behind the other, knees soft, and hold the handles with a firm grip but relaxed arms. The tool should rest on the slab under its own weight; our job is to steer it, not push it.
Squeeze the trigger and hold it. Within two to ten seconds a 4 inch slab will crack in a rough semicircle around the bit, and the chunk at the edge will drop or shift. Release the trigger, lift the tool, and move 3 to 4 inches back from the new crack line. Repeat. Every bite should have a free face on at least one side, so we work in a line parallel to the edge first, break the whole strip loose, then move the line back and go again.
The rhythm most beginners miss is lifting the tool as soon as the piece cracks. Holding the trigger after the break buries the bit in the subgrade, where it sticks, and it also hammers the broken piece into gravel instead of leaving it in a liftable chunk. Crack, lift, move. If the bit drops through and the tool lurches, let go of the trigger immediately.
On a 6 inch slab, the same pattern works but the bites are 3 inches and the first crack takes longer, often 15 to 30 seconds of continuous hammering. If nothing happens after 30 seconds, the tool is either underpowered for the slab, the bit is dull, or there is no free edge nearby, and more time will not fix any of those.
Keep the surface wet. We run a hose on low and spray the work area every few minutes, enough to darken the concrete without pooling. Wet concrete produces a fraction of the respirable silica dust, and OSHA’s silica standard for jackhammers specifies either a water delivery system or a dust shroud with a vacuum for exactly that reason. The respirator is backup, not the primary control.
Pro tip
Chalk the grid before you start. Snap lines every 12 to 18 inches both ways with a chalk reel, and break along the lines rather than freehand. The chunks come out a uniform size, the wheelbarrow fills evenly, and you can see at a glance how far you have come and how much slab is left.
Step 5: Lever pieces free and manage the subgrade
Not every chunk falls away on its own. Pieces that crack but stay locked in place by friction or by the gravel underneath come out with a 60 inch digging bar. Drive the chisel end into the crack, lean on the bar, and the piece lifts. A 36 inch wrecking bar handles smaller pieces, and an 8 lb sledge finishes anything that cracked but did not separate.
Steps, curbs and thickened slab edges need a different approach. A concrete step is solid, often 8 inches or more front to back, and it will not cantilever the way a slab does. We attack the vertical face with the moil point, 2 inches in from the top edge, and break it down in layers from the top, chasing each crack with the wide chisel. Thickened edges on a patio or driveway hide a 12 by 12 inch beam of concrete around the perimeter; break the field slab first, then undermine the beam from the inside and break it in 12 inch sections.
The subgrade under an old slab will be compacted gravel, sand, or whatever the builder had on hand in that decade, and we leave it alone until the concrete is out. Breaking into the subgrade wastes blows and buries the bit. If the slab was poured on a vapor barrier, the plastic comes up in sheets with the concrete and goes in the dumpster.
Watch for voids. Older patios and porch slabs often span a hollow where the fill settled, and the slab sounds hollow when tapped with the sledge. Those areas break easily, which is good, but the broken pieces drop into the void and the tool can drop with them. Clear the hole as you go so you are never standing on a piece that has nothing under it.
Step 6: Deal with rebar, mesh and embedded hardware
Most residential patios and sidewalks poured since the 1970s have welded wire mesh, a 6 by 6 inch grid of 10 gauge wire laid in the middle of the slab. Driveways and garage slabs often have #3 or #4 rebar on 18 to 24 inch centers, and footings have #4 or #5 bars with ties. The breaker does not care about any of it until the piece is broken, at which point the steel holds the chunk to its neighbors like a hinge.
Wire mesh cuts with 24 inch bolt cutters at the crack line, and we cut it flush with the edge of the piece we are removing. Rebar up to #4 cuts with the same bolt cutters if they are sharp, though it is slow, and anything larger or any bar that is rusted in place goes to an angle grinder with a 4-1/2 inch metal cutoff wheel. Cut the bar on the side of the chunk that is coming out, not the side that stays, so the remaining slab keeps its steel.
Epoxy-coated or heavily rusted bar is a sign the slab was engineered, and we pause when we see it. A garage slab with #5 bars on 12 inch centers is holding something up, and if that slab is part of a foundation system, the break stops here until an engineer or contractor looks at it.
Embedded items are the real surprises. Anchor bolts, conduit, drain pipe, railing posts and dryer vent ducts running through a slab all show up at the worst moment. Conduit means a live wire; stop, trace it, and shut the breaker off before touching it. A 4 inch PVC pipe through a slab is usually a drain, and we chip around it with the narrow chisel by hand rather than drive the moil point into it. A 1/2 inch anchor bolt means the slab is bolted to something, and we trace it before we cut.
Step 7: Haul, dispose and clean up
Concrete pieces go into a wheelbarrow with a steel tray, not a plastic one, and we stack them flat rather than tossing them, which keeps the load low and the handles from bending. A 6 cubic foot wheelbarrow holds about 400 to 600 pounds of concrete comfortably, so the 6,000 pound patio from Step 1 is 10 to 15 trips. A hand truck handles single large pieces, and a 4 by 8 sheet of 3/4 inch plywood across a lawn saves the grass and keeps the wheel from sinking.
Dumpster companies treat concrete as heavy debris and will not let you fill a 20 or 30 yard container with it, because a full 30 yard box of concrete weighs 40 tons and no truck can lift it. The standard offering is a 10 yard heavy debris dumpster, which runs $300 to $550 depending on the market; the base weight allowance is usually 1 to 3 tons with overage billed per ton, and it holds about 60 to 80 square feet of 4 inch slab if the pieces are stacked. Fill it to the line, not above, because the driver will refuse an overloaded box.
Concrete recyclers are the cheaper route if you have a pickup. Most crushing yards take clean concrete for $5 to $25 per ton and some take it free, as long as there is no dirt, wood or trash mixed in, and a modern half-ton truck hauls about 1,500 to 3,000 pounds per trip depending on its payload rating. Call ahead, because yards have different rules on rebar; many accept it, some charge extra, a few refuse it.
Sweep the subgrade, pull any remaining mesh, and rake the gravel level if you are repouring. Return the breaker clean and with every bit accounted for, because the yard charges for missing bits at retail and for a tool that comes back caked in mud.
Concrete, asphalt and tile compared
A jack hammer behaves differently on each material, and the technique that works on concrete will make a mess of asphalt and ruin a wood subfloor under tile. We compare the three below, including which tool class and bit to pull.
| Material | Tool class | Bit | Technique | Production rate |
|---|---|---|---|---|
| Concrete slab, 4 in. | 60-70 lb breaker | Moil point, then 3 in. chisel | Free edge, 3-4 in. bites, 10-15 degree lean | 25-40 sq ft/hr |
| Concrete slab, 6 in. with rebar | 60-70 lb breaker or 90 lb pneumatic | Moil point | Same, 3 in. bites, cut steel as you go | 12-25 sq ft/hr |
| Concrete footing, 8-12 in. | 90 lb pneumatic | Moil point | Break in layers from the top, undermine | 2-5 linear ft/hr |
| Asphalt driveway, 2-3 in. | 35-70 lb breaker | Asphalt cutter | Cut strips 12-18 in. wide, lift with digging bar | 50-100 sq ft/hr |
| Block wall, 8 in. CMU | 20-40 lb demolition hammer | Narrow chisel or moil point | Start at top course, hit mortar joints | 20-40 sq ft/hr |
| Ceramic tile on slab | 20-30 lb SDS-max | Scaling chisel, 3-4 in. | Low angle, 15-20 degrees, pop tiles then thinset | 40-80 sq ft/hr |
| Ceramic tile on wood subfloor | 20 lb SDS-max or hand tools | Scaling chisel | Very low angle, light pressure, never through to plywood | 30-60 sq ft/hr |
Asphalt is the easy one. It is soft, especially above about 60°F, and the 5 inch asphalt cutter bit slices it like a cold butter knife. We cut parallel lines 12 to 18 inches apart across the driveway, then a crosscut every 2 feet, and the strips lift out with a digging bar in slabs that one person can carry. Asphalt is roughly 140 pounds per cubic foot, so a 3 inch driveway runs 35 pounds per square foot, and it recycles at asphalt plants for less than concrete. Work it on a warm afternoon rather than a cold morning, and do not bother with a moil point, which just punches holes.
Block walls break from the top down. The 20 to 40 lb hammer with a narrow chisel or moil point goes into the mortar joint, not the block face, and each course comes loose as the joint below it fails. A 25 lb demolition hammer on a cart is overkill here; we use the SDS-max tool with the D-handle so it can be held sideways. Check for grouted cores and rebar in any wall over 4 feet tall, and never remove a block wall that supports a floor, a roof or a retaining load without a plan for what replaces it.
Tile is where people destroy their houses. A 60 lb breaker on a wood-framed floor will crack joists, punch through subfloor and shake drywall loose in the room below, and even on a slab it chews craters in the concrete that have to be patched before new tile goes down. The right tool is a 20 to 30 lb SDS-max demolition hammer with a 3 or 4 inch scaling chisel, held at 15 to 20 degrees to the floor, with the chisel skating under the tile rather than driving into it. On a wood subfloor we set the chisel just above the plywood and let it ride on the mortar bed; a few tiles will take hand work with a cold chisel.
Operator technique, fatigue and vibration
A jack hammer is a heavy tool that mostly runs itself, and the operator’s job is positioning, not force. The most common beginner mistake is leaning hard on the handles, which does nothing for the break because the piston delivers the same energy whether you push or not, and it transfers every blow straight into your shoulders and lower back. We rest our weight through the tool only enough to keep the bit from skating, which on a 70 lb breaker is almost nothing.
Work in rounds. Twenty to thirty minutes on the tool, then five to ten minutes hauling or cutting steel, is a pace a reasonably fit adult can keep up all day. Running the breaker for an hour straight is a mistake we see on every first-time job, and the result is a shaky grip, lost accuracy and a stuck bit every third bite.
Vibration is the long-term hazard. Hand-arm vibration syndrome, which shows up as numb or white fingers and permanent nerve damage, comes from years of exposure in the trades, and a single weekend will not cause it, but tools with anti-vibration handles cut the exposure by half or more and the fatigue by even more. Padded anti-vibration gloves help a little; keeping the grip relaxed and the arms slightly bent helps more.
Lifting the tool is where backs get hurt. A 70 lb breaker lifted off a slab fifty times an hour is a serious workout, and we use the cart whenever the tool comes with one. Every heavy electric model has a cart accessory, usually a two-wheeled frame that clamps to the tool body and lets you tip it back and roll it to the next bite, and the rental yard will include it if you ask. Without a cart, lift with the legs and keep the tool close to the body, never twist with it in the air, and let it drop the last few inches onto its bit rather than lowering it.
Noise sits at 100 to 110 dB at the operator’s ear, and hearing damage begins at 85 dB over an 8 hour shift. We wear foam plugs under earmuffs on long days, which stacks the protection, and we warn the neighbors in advance because the sound carries for blocks. Most cities limit construction noise to between 7 a.m. and 7 p.m. on weekdays and later starts on weekends, and the fine for ignoring that is more than the rental.
Flying chips are constant. Safety glasses are the minimum, and a face shield over them on footing work where the chips are big. Long pants, shin guards if you have them, and leather gloves. Steel toe boots are not optional, because a 40 pound chunk of slab tipping onto a sneaker breaks bones.
Rent, buy or hire out
For most homeowners the math is simple: a 60 to 70 lb breaker rents for $75 to $110 a day or roughly $250 to $350 a week, and a weekend of demolition on a patio or a driveway section costs less than the fuel to deliver a skid steer. Buying makes sense only for people who will use the tool several weekends a year, which describes landscapers, flippers and people with a lot of old concrete, and in that case a mid-range 60 lb electric with anti-vibration handles is the one to own.
| Option | Cost | Makes sense when |
|---|---|---|
| Rent 60-70 lb electric breaker | $75-110/day, $250-350/week | One job, slab under 8 in., power within 100 ft |
| Rent 25-30 lb SDS-max demolition hammer | $55-80/day | Tile, block, interior work, upstairs |
| Rent 90 lb pneumatic plus 185 cfm compressor | $200-330/day | Footings over 8 in., long driveways, no power on site |
| Buy budget 60 lb electric breaker | $300-600 | Several jobs a year, can tolerate lower impact energy and no AVR |
| Buy pro 60-70 lb electric breaker | $1,500-3,200 | Regular use, want AVR, warranty and parts support |
| Buy pro SDS-max demolition hammer | $600-1,200 | Frequent tile and block work, remodeling |
| Hire demolition contractor | $2-6 per sq ft removed and hauled | No time, no truck, slab over 300 sq ft, reinforced |
| Hire skid steer with breaker attachment | $400-800 per half day with operator | Driveways over 400 sq ft, footings, open access |
Budget breakers in the $300 to $600 range from brands sold on Amazon and at discount tool stores work, and we have used them, but they come with real tradeoffs. Impact energy is usually 25 to 35 foot-pounds against 45 to 70 for the pro models, the handles have no vibration damping, the hex retention is sloppy, and the duty cycle is short, so the tool needs rest breaks or it cooks its brushes. On a 4 inch patio they get the job done in perhaps 50 percent more time; on a 6 inch reinforced driveway they struggle.
Pro models from Bosch, Makita, Hilti, DeWalt and Milwaukee all run the 1-1/8 inch hex shank, so bits interchange, and all have parts support and service centers. The Bosch Brute line has been the rental yard standard for decades, Makita’s 70 lb AVT model is the heaviest electric in common use, and Hilti’s TE 3000 is the one the concrete crews buy when the company is paying.
Hiring out starts to make sense around 300 square feet of slab, or anything reinforced and over 6 inches, or any job where disposal is a problem. A two-person demolition crew with a skid steer breaker can remove a 600 square foot driveway in a day, haul it and leave the gravel graded, and for that size the per-square-foot rate usually beats the rental, dumpster and two weekends of our own labor.
Troubleshooting a jack hammer that will not break concrete
| Symptom | Likely cause | Fix |
|---|---|---|
| Bit skates across the surface, no crack | Dull moil point, or no free edge | Swap or sharpen the bit; dig out the edge so the slab can cantilever |
| Tool hammers but concrete only powders | No free edge, bit too far from edge, slab too thick for tool | Move to within 4-6 in. of an open face; rent a heavier class for 8 in. plus |
| Bit sticks in the slab after every bite | Holding the trigger past the crack | Release as soon as the piece moves; lift, then move 3-4 in. |
| Bit stuck, tool will not pull off | Bit wedged between chunk and subgrade | Release the retaining latch, pull the tool off, swap to spare bit, free the stuck one with a sledge |
| Tool runs hot, hits weak | Undersized or too-long extension cord | Use 12 gauge to 50 ft, 10 gauge to 100 ft, no daisy chains |
| Circuit breaker trips repeatedly | Shared circuit or a 15 A circuit with weak breaker | Move to a dedicated 20 A circuit; unplug everything else on the run |
| Motor runs, no hammering | Bit not seated, or tool needs downforce to engage the piston | Reseat bit under the latch; set the bit on the concrete and let weight engage it |
| Thermal overload light on | Continuous use past the duty cycle | Idle 5-10 minutes; check cord gauge |
| Pneumatic tool loses power over the hour | Low air, no oil, long or narrow hose | Confirm 90 psi at the tool, oil the inlet hourly, use 3/4 in. hose |
| Broken pieces too big to lift | Bites too far apart | Chalk a 12-18 in. grid and break on the lines |
| Cracks run under adjacent slab or foundation | No cut line at the shared edge | Stop and saw cut a 1 in. deep kerf along the joint before continuing |
| Chips hitting house siding or windows | No protection | Hang a tarp or lean plywood sheets against the wall |
| Dust cloud despite water | Spray too light, or dry subgrade kicking up | Soak the surface and subgrade ahead of the work, not behind it |
The single most common complaint we hear is “it just bounces,” and nine times in ten the answer is the free edge. A slab fully supported on compacted gravel resists a breaker better than most people expect, and an undermined edge changes the job completely. The second most common is the cord, and the fix costs $40 at the hardware store.
When to call a pro
Stop and hire a demolition contractor or a structural engineer if the slab is part of a foundation, a basement floor over 6 inches, a porch slab tied into the house with rebar, or a retaining wall footing. Call a licensed electrician if the breaker exposes conduit, and a licensed plumber or your gas utility if you hit a pipe you cannot identify. A slab over 300 square feet, anything 8 inches or thicker, and any job without truck access for disposal usually costs less to hand to a crew with a skid steer than to do yourself.
FAQ
How thick a slab can an electric jack hammer break?
A 60 to 70 lb electric breaker handles up to about 8 inches of concrete, including rebar, when it has a free edge to work toward. Beyond 8 inches, or in footings and piers, a 90 lb pneumatic breaker or a skid steer attachment is the efficient tool, and an electric unit will spend most of the day powdering the surface.
Do I need a permit to break up a patio or driveway?
Most jurisdictions do not require a permit to remove a flatwork slab on private property, but many require one for the replacement pour, for any work in the public right-of-way (sidewalks and driveway aprons), and for anything attached to the house. Call the building department before the rental, because the permit for the new concrete often needs an inspection of the subgrade that happens after demolition.
Can a jack hammer be used on a wood-framed floor?
No. The vibration cracks joists, loosens subfloor fasteners and shakes drywall nails out in the room below. For tile or a mortar bed over wood framing, use a 20 to 30 lb SDS-max demolition hammer held at a low angle with a scaling chisel, and finish with hand tools near walls and fixtures.
How long does it take to break a 10 by 12 patio?
Expect 3 to 5 hours of hammering for a 4 inch slab with a 60 to 70 lb breaker, plus an equal amount of time hauling. The first edge is the slow part; once a strip is open, production climbs to 30 to 40 square feet an hour. Add half a day if the slab is 6 inches or has rebar.
What is the difference between a demolition hammer and a breaker hammer?
Demolition hammers are the 20 to 40 lb tools with SDS-max or 3/4 inch hex shanks and a D-handle, built for chipping and held at any angle. Breaker hammers are the 35 to 90 lb tools with 1-1/8 inch hex shanks and twin T-handles, built to be run vertically on slabs. The term jack hammer in everyday use covers both, but rental yards list them separately.
Does a jack hammer need special power?
Electric breakers run on a standard 120 volt, 15 or 20 amp outlet, ideally a dedicated circuit. The cord matters more than the outlet: 12 gauge to 50 feet, 10 gauge to 100 feet. Pneumatic breakers need a 185 cfm towable compressor, and gas breakers need a 50:1 two-stroke mix.
Can I break concrete without a free edge?
Not efficiently. Create one by cutting a 12 inch square with a concrete saw, drilling a 1 inch hole with a rotary hammer, or digging the soil away from an existing slab edge to expose the face. Every bite after that works back toward the opening.
How do I dispose of broken concrete?
A 10 yard heavy debris dumpster ($300 to $550) typically includes a 1 to 3 ton weight allowance with overage billed per ton, which covers about 60 to 80 square feet of 4 inch slab stacked. Concrete recyclers accept clean rubble for $5 to $25 a ton, often free, and a modern half-ton pickup hauls 1,500 to 3,000 pounds per trip depending on its payload rating. Many municipal transfer stations also take it by the load.