
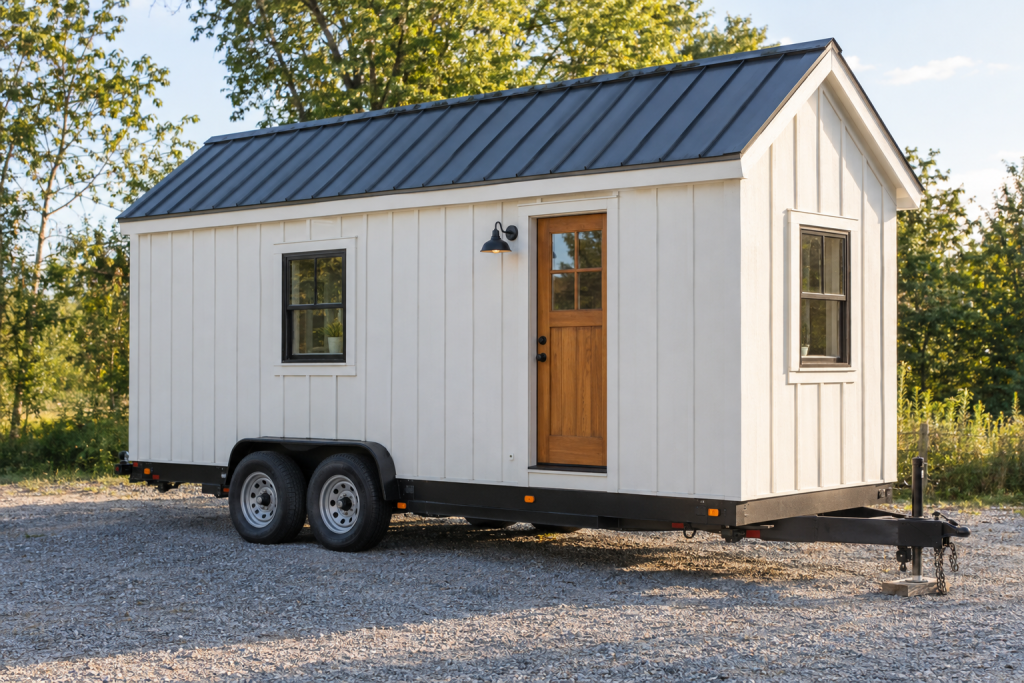
You build a tiny home the same way you build a small stick-framed house, except the foundation is usually a flatbed trailer and every pound and inch counts. Budget 600 to 1,200 hours and $30,000 to $60,000 for a DIY build on wheels, or more if you hire out the trades. Here is the whole job, in the order it actually happens.
Quick steps: build a tiny home on wheels
- Decide wheels vs. foundation and confirm where you can legally park or build it.
- Buy a tiny-house trailer rated for the finished weight (14,000 lb GVWR for most 20-24 ft builds).
- Draw or buy plans sized to 8 ft 6 in wide and 13 ft 6 in tall.
- Build the subfloor on the trailer, flashed, insulated and bolted to the frame.
- Frame walls and roof with 2x4s, sheathe, wrap, then set windows, siding and metal roofing.
- Rough in electrical (30A or 50A inlet) and PEX plumbing before insulation.
- Insulate with closed-cell foam or mineral wool and hang interior walls.
- Install kitchen, bath, mini split, water heater, then load-test and tow.
Tools and materials
- Framing nailer (21° or 30°) and 3 in ring-shank nails
- 18V impact driver, drill, 7-1/4 in circular saw, 10 in miter saw
- 4 ft level, chalk line, framing square, 25 ft tape
- Jigsaw, oscillating multitool, reciprocating saw
- PEX crimp or expansion tool, 1/2 in and 3/4 in PEX
- Wire strippers, non-contact tester, 12 AWG and 14 AWG NM-B
- Metal snips, roofing screws with neoprene washers
- Tiny-house trailer, 20-28 ft deck, dual 7,000 lb axles
- 2×4 and 2×6 framing lumber, 7/16 in OSB or 1/2 in plywood
- House wrap or Zip System sheathing, flashing tape
- Closed-cell spray foam kits or R-15 mineral wool batts
- 29-gauge standing seam or ribbed metal roofing
- Simpson hurricane ties, 1/2 in carriage bolts, sill seal
Calculators for this job
Safety first
Wear a harness clipped to a rated anchor any time you work on the roof, which sits 13 ft off the ground. Kill the generator or shore power and test every circuit dead before touching wire. Spray foam needs a full-face respirator and 24 hours of ventilation.
Step 1: Choose wheels or a foundation, then check the rules
Before buying a board, settle the one decision that changes every other one. A tiny house on wheels (THOW) is treated like an RV by most states, which lets you skip a building permit but limits where you can live in it full time. A tiny home on a slab or piers is a real house, usually permitted under your local building code as a small dwelling or an ADU.
| Factor | On wheels (THOW) | On a foundation |
|---|---|---|
| Max footprint | 8 ft 6 in x 28 ft deck, 13 ft 6 in tall | Whatever zoning allows, often 400-1,200 sq ft |
| Permits | Usually none to build; RV or NOAH/RVIA certification helps | Full building permit and inspections |
| Where you can live | RV parks, tiny house communities, some backyards | Any lot zoned for a dwelling or ADU |
| Utilities | Shore power cord, hose, sewer hose or tanks | Permanent water, sewer or septic, electrical service |
| Resale | Sells like an RV, depreciates | Appraises with the land |
| Typical DIY cost | $30,000-$60,000 | $40,000-$120,000 plus site work |
Call your city or county planning office and ask two questions: can I live in a tiny house on wheels on a residential lot, and does the jurisdiction use Appendix Q of the International Residential Code? Appendix Q covers houses of 400 sq ft or less and relaxes the normal rules, allowing 6 ft 8 in ceilings in living areas, 6 ft 4 in in bathrooms and kitchens, and sleeping lofts reached by steep stairs or ladders. If your area has adopted it, a foundation build becomes much easier to pass.
For a backyard ADU on a foundation, you will also need setbacks, a soils check and sometimes a sprinkler or energy compliance form. That is a separate project from the shell, so budget $5,000 to $20,000 for site work, utility trenches and permit fees on top of the numbers below.
Step 2: Buy the right trailer
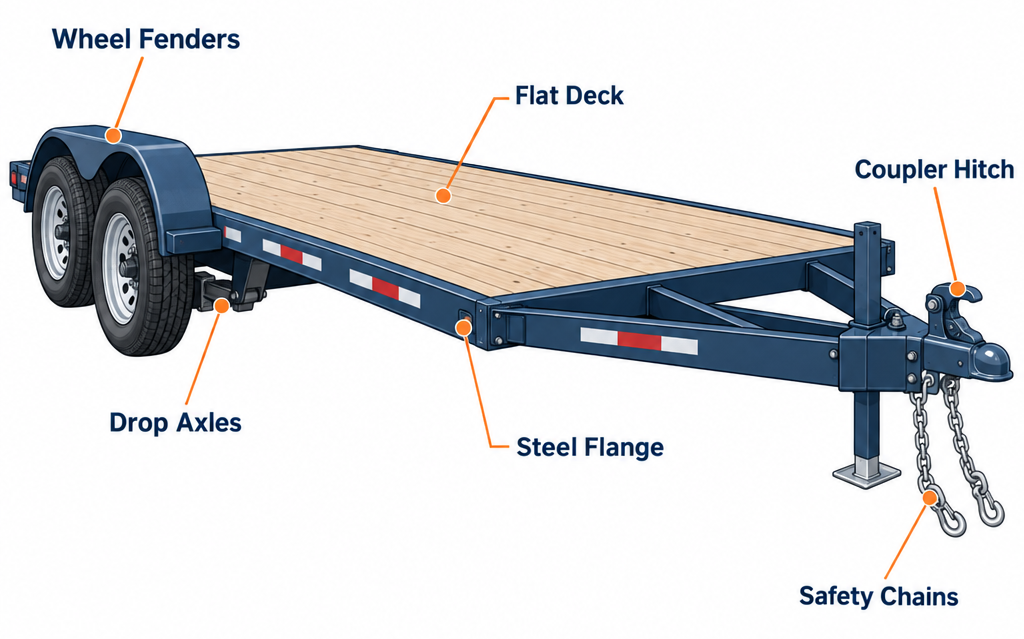
The trailer is your foundation, and it is the one part you cannot fix later. Buy a trailer built for tiny houses, not a used car hauler. Tiny-house trailers come with a flat deck, no wheel wells sticking up, a steel flange or threaded inserts for bolting down sill plates, and drop axles that gain you 4 to 6 inches of ceiling height.
| Deck length | Axles / GVWR | Typical finished house weight | Trailer price |
|---|---|---|---|
| 16-20 ft | Dual 5,200 lb (10,400 lb) | 7,000-9,500 lb | $5,000-$7,500 |
| 20-24 ft | Dual 7,000 lb (14,000 lb) | 9,500-12,500 lb | $6,500-$9,500 |
| 26-28 ft | Triple 7,000 lb (21,000 lb) | 12,500-16,000 lb | $8,500-$12,000 |
A rule of thumb that holds up on real builds is 450 to 550 lb per linear foot of finished house, more if you use a lot of tile and solid wood. Pick a GVWR with at least 20 percent headroom over your estimate. Overloaded axles are the single most common way a tiny house build goes wrong, and you only find out when a tire blows at highway speed.
Measure the deck width before drawing anything. Most decks are 8 ft wide between the fenders, giving you 8 ft 6 in to the outside of your siding, which is the legal towing width in all 50 states without a permit. Legal height is 13 ft 6 in in most states, measured from the pavement to the top of the roofing or vent cap.
Pro tip
Have the trailer delivered and weighed empty at a truck stop CAT scale ($13 or so), then weigh the house again after framing and after finishing. Those three numbers tell you exactly where your weight is going and whether you can afford that cast-iron tub.
Step 3: Get plans that match your trailer
You can buy tiny house plans for $100 to $500, or draw your own in SketchUp. Either way, lock down four dimensions before framing: exterior width (102 in max), wall height, loft height and overall height including the roof and anything on it. A common recipe that works for a 24 ft trailer is 8 ft 6 in walls, a 2:12 single-slope roof, and a loft with 42 to 44 in of headroom at the ridge.
Plan the heavy stuff over the axles. The kitchen, water heater, fresh tank and bathroom should sit between or just ahead of the wheels, with tongue weight landing at 10 to 15 percent of the total. Put the loft stairs and storage at the tongue end rather than the rear, which keeps the trailer from fishtailing.
Decide now whether you want a composting toilet, an RV-style flush toilet with a black tank, or a standard toilet that connects to sewer. It changes the plumbing rough-in, the floor framing and where the vent stack goes.
Step 4: Build the subfloor on the trailer
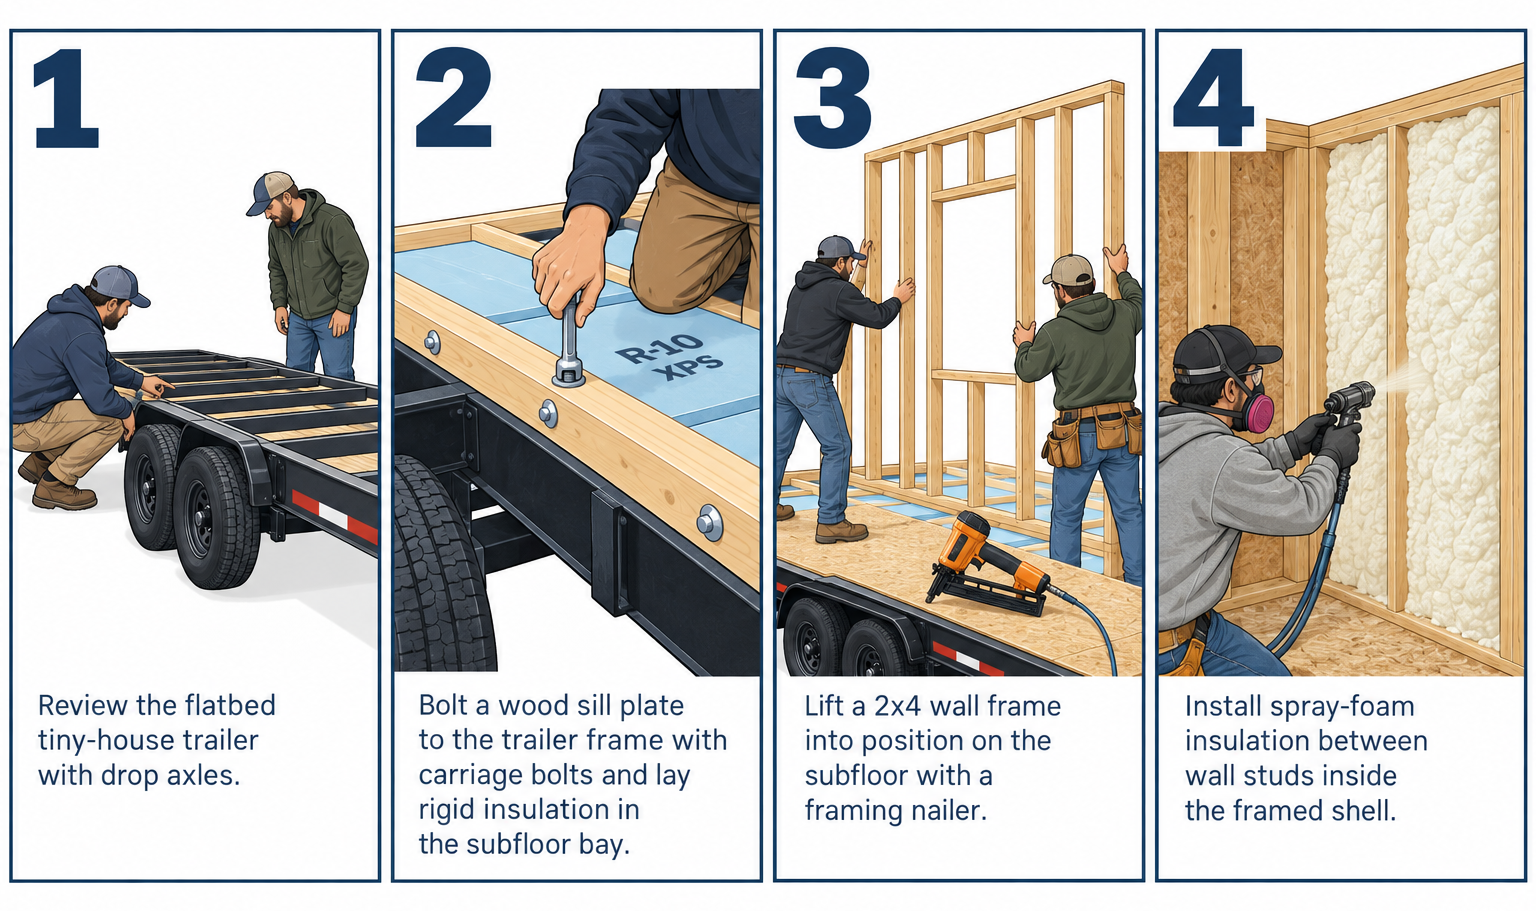
Start by cleaning and painting any bare steel, then lay 6 mil poly or aluminum flashing across the trailer frame to stop road spray from reaching the wood. Frame the floor with 2x4s on edge at 16 in on center, running the joists across the width so they sit on the trailer’s steel crossmembers. Many builders use 2×6 joists on trailers that have a dropped deck between the frame rails for the extra insulation depth.
Fill the bays with 2 in rigid XPS foam (R-10) or closed-cell spray foam, then glue and screw 3/4 in tongue-and-groove subfloor with construction adhesive and 2 in screws every 6 in along the edges. Skip the nails here. A floor that creaks on a house will rattle apart on a trailer.
Bolt the floor frame to the trailer with 1/2 in carriage bolts through the flange or the manufacturer’s threaded inserts, one every 4 ft and within 12 in of every corner. Run a bead of sill seal foam under the rim joists first. Check the whole deck for square by measuring diagonals, which should match within 1/4 in, before any walls go up.
Step 5: Frame, sheathe and dry it in
Frame walls with 2x4s at 16 in on center, or 24 in on center if you want to save about 300 lb and your plans account for it. Use a single top plate and metal straps at joints to shave weight and gain an inch of ceiling height. Every window and door gets a header, even in a tiny house, because the wall takes racking loads at 65 mph that a normal house never sees.
Sheathe the outside with 7/16 in OSB or 1/2 in plywood, glued to the studs and nailed with 8d ring-shank nails every 4 in on the edges and 6 in in the field. Zip System sheathing with taped seams saves a step by skipping house wrap, and it costs $5 to $8 more per sheet. Tie every stud to the sill plate and every rafter to the top plate with Simpson H2.5 hurricane ties.
The roof is the part most first-timers underbuild. Frame it with 2×6 rafters at 16 in on center, sheathe it, add a synthetic underlayment, then install 29-gauge metal. Standing seam is the better choice at low pitches because screws stay hidden under the seams. If you use exposed-fastener ribbed panels, keep the pitch at 3:12 or steeper and seal every screw with butyl tape.
Set windows in a bed of flashing tape, sill first, then jambs, then head, so every layer laps over the one below it. Vinyl double-pane windows weigh about 40 percent less than aluminum-clad wood. Your front door should be an exterior fiberglass or steel door with a storm-rated frame, not an RV door, since RV doors leak air and sound.
For siding, cedar lap at 1/2 in thickness, corrugated metal and fiber cement all work. Fiber cement is the heaviest at about 2.3 lb per square foot. Cedar and metal land near 1 lb per square foot, which matters when you have 600 square feet of wall.
Pro tip
Build and sheathe the walls flat on the trailer deck, then tilt them up with two helpers. Trying to sheathe a standing wall from a ladder on a trailer takes three times as long and the panels never line up square.
Step 6: Rough in electrical and plumbing
With the shell dry, run your utilities before any insulation goes in. For power, most tiny homes use a 30-amp 120V service through a TT-30 inlet, which runs lights, outlets, a mini split and a small water heater but not all at once with an electric range. A 50-amp 120/240V service through a 14-50 inlet gives you 12,000 watts and the freedom to run an induction cooktop and heat together. Install a 12- or 20-space main lug panel sized to match.
Wire 20-amp circuits with 12 AWG NM-B and 15-amp lighting circuits with 14 AWG. Put GFCI protection on the kitchen, bath and exterior outlets, and use arc-fault breakers if you plan to get the house certified. Drill holes through studs at least 1-1/4 in from the face, or add nail plates, exactly like a normal house.
For water, bring supply in through a 3/4 in PEX trunk with a pressure regulator set to 45 to 50 psi, then branch to fixtures with 1/2 in PEX. Every supply line needs to live inside the heated envelope or it will freeze. Run drains in 1-1/2 in PVC for sinks and showers and 3 in for a flush toilet, sloped 1/4 in per foot to a single outlet under the trailer with a 3 in RV sewer connection.
A tankless water heater is the standard choice. A 120V point-of-use electric unit works for a sink and a short shower, while a propane tankless like the small Rinnai or Eccotemp units gives you a real shower on 30-amp service. Vent any propane appliance to the outside and install a CO detector.
Step 7: Insulate and finish the interior
Insulation is where you decide how comfortable the house is in January. Closed-cell spray foam at R-6.5 per inch gives a 2×4 wall about R-22, adds structural rigidity, and seals every air leak that road travel would otherwise open up. Pro installation on a 24 ft house runs $2,500 to $4,500. Mineral wool batts cost about a third as much, deliver R-15 in a 2×4 wall, and need a careful air barrier and vapor retarder on the warm side.
| Insulation | R-value per inch | 2×4 wall total | Weight | Installed cost, 24 ft house |
|---|---|---|---|---|
| Closed-cell spray foam | R-6.5 | R-22 | Light | $2,500-$4,500 |
| Mineral wool batts | R-4.2 | R-15 | Moderate | $900-$1,500 |
| Rigid polyiso, cut and foamed | R-6.0 | R-20 | Light | $1,200-$2,000 |
| Fiberglass batts | R-3.7 | R-13 | Light | $500-$900 |
Skip drywall on the walls. It cracks at every joint the first time you tow, and a full house of 1/2 in board adds 1,000 lb. Use 1/4 in plywood, 5/16 in tongue-and-groove pine, or shiplap screwed to the studs, and keep the ceiling in the same material. A coat of white paint on pine keeps a small interior from feeling like a cabin.
Install flooring next. Luxury vinyl plank at 5 to 6 mm thick weighs about 1.5 lb per square foot, handles temperature swings and takes 30 minutes to lay in a tiny house. Run it the long way to make the room read longer.
Then build out the kitchen and bath. Standard 24 in base cabinets fit a 30 in aisle in an 8 ft house if the opposite wall holds only a 12 in counter or open shelving. A 32 x 32 in shower pan with a solid-surface or FRP surround beats tile by about 300 lb and never cracks. For sleeping lofts, 3/4 in plywood on 2×6 joists at 16 in on center carries a queen mattress and two adults with no bounce.
Step 8: Install heating, cooling and fixtures
A 9,000 BTU mini split heat pump handles any tiny house under 400 sq ft in most of the country, including heating down to about 5°F with a cold-climate model. DIY-rated kits with pre-charged lines run $1,200 to $2,000 and take an afternoon. Mount the outdoor unit on a bracket bolted to the trailer frame, not the siding, so it survives towing.
Ventilation matters more here than in a full-size house because you are cooking, showering and breathing in 250 square feet. Install a 50 to 80 CFM bath fan on a timer, a range hood vented outside, and consider a small ERV like the Lunos or Panasonic WhisperComfort if you spray foamed the walls.
Finish by setting the toilet, hooking up the sink traps, mounting the water heater and testing. Fill the system, pressurize to 60 psi with a gauge on a hose bib, and watch it for an hour. Flip every breaker, plug a space heater into each outlet, and check that GFCIs trip.
Step 9: Weigh it, title it and tow it
Take the finished house back to the CAT scale. You want total weight under 90 percent of GVWR and tongue weight at 10 to 15 percent of that total. If the tongue is light, move the water tank or add storage forward; if it is heavy, you risk overloading the tow vehicle’s rear axle.
Most states title a DIY tiny house as a homemade trailer or RV, which requires a VIN inspection, receipts for major components and a weight slip. If you want to park in an RV park or a tiny house community, many require NOAH or RVIA certification, which costs $1,500 to $3,500 and involves inspections during the build, so decide early.
A 12,000 lb house needs a 3/4-ton or 1-ton truck with a weight-distributing hitch and trailer brake controller. Tow at 55 mph the first trip, stop after 20 miles and retorque the lug nuts and check the bolts into the trailer frame.
What a DIY tiny house build costs
These are realistic 2024-2025 ranges for a 24 ft house on wheels with mid-grade finishes, built by the owner with spray foam and the mini split hired out.
| Item | Low | High |
|---|---|---|
| Trailer, 24 ft dual 7,000 lb | $6,500 | $9,500 |
| Framing lumber and fasteners | $3,000 | $5,000 |
| Sheathing, wrap, tape | $1,500 | $2,500 |
| Windows and exterior door | $2,500 | $6,000 |
| Siding and trim | $2,000 | $4,500 |
| Metal roofing and underlayment | $1,500 | $3,000 |
| Insulation | $1,500 | $4,500 |
| Electrical materials and panel | $1,500 | $3,000 |
| Plumbing, water heater, fixtures | $2,500 | $5,000 |
| Mini split | $1,200 | $2,500 |
| Interior walls, ceiling, flooring | $2,500 | $5,000 |
| Kitchen cabinets, counter, appliances | $3,000 | $7,000 |
| Bathroom, shower, toilet | $1,500 | $4,000 |
| Total | $30,700 | $61,500 |
Buying a finished house from a builder lands between $60,000 and $150,000 for the same size. A used trailer, salvaged windows and a composting toilet can push a bare-bones DIY tiny house build under $20,000, but every salvaged window costs you a weekend making it fit.
Troubleshooting
| Symptom | Likely cause | Fix |
|---|---|---|
| Doors stick after towing | Trailer frame flexing, walls racked | Park on a level pad, add diagonal strapping or more sheathing nails, shim the jamb |
| Water stains at window corners | Flashing tape lapped wrong | Pull siding, re-tape sill, jambs, then head in that order |
| Condensation on walls in winter | Under-insulated or no ventilation | Add bath fan on timer, run an ERV, raise interior temps above dew point |
| Breaker trips when heat and water heater run | 30-amp service overloaded | Stagger loads or upgrade to 50-amp inlet and panel |
| Trailer sways above 50 mph | Tongue weight under 10 percent | Shift tanks and storage forward, add weight-distributing hitch |
| Pipes freeze on the first cold night | Supply lines outside the heated envelope | Reroute inside the wall, add heat tape to the inlet hose |
| Metal roof drips at screws | Exposed fasteners on a low pitch | Replace with longer screws and butyl washers, or switch to standing seam |
When to call a pro
Hire a licensed electrician if you are installing a 50-amp 240V panel and you have never wired a sub panel, and a licensed plumber for any gas line or propane tankless heater. Any foundation build needs a permit and inspections, which means a licensed contractor pulls the permit in most jurisdictions. If the finished house weighs within 10 percent of GVWR, have a trailer shop inspect the axles and brakes before the first tow.
FAQ
How long does it take to build a tiny home?
A first-time builder working weekends finishes in 6 to 12 months, roughly 600 to 1,200 hours. Someone with framing experience and a dry workspace can close in a shell in three weeks and finish in three months. Weather and waiting on parts add more time than the actual work.
Can I build a tiny house without any experience?
Yes, if you treat it as a series of small, learnable jobs. Framing a wall, setting a window and crimping PEX are all skills you can pick up in an afternoon. The expensive mistakes come from skipping the trailer weight math and the flashing details, not from imperfect carpentry.
What size trailer do I need for a tiny house?
A 20 to 24 ft deck with dual 7,000 lb axles (typically 12,000 lb GVWR once tongue weight is deducted, with only specialized heavy-duty 24 ft models reaching 14,000 lb) covers most one- or two-person homes with a sleeping loft. Go to 26 or 28 ft with triple axles only if you need a ground-floor bedroom, and expect to need a 1-ton truck to move it.
Is it cheaper to build a tiny home or buy one?
Building saves about half. A DIY tiny house on wheels runs $30,000 to $60,000 in materials, while builder-built homes of the same size cost $60,000 to $150,000. Your labor is the difference, so the savings only hold if your time is free.
Do I need a permit to build a tiny home?
Not for a house on wheels in most states, since it is treated as an RV. You do need one for any tiny home on a foundation, and you may need zoning approval to live in a THOW full time on a residential lot. Check with your county planning office before buying the trailer.