
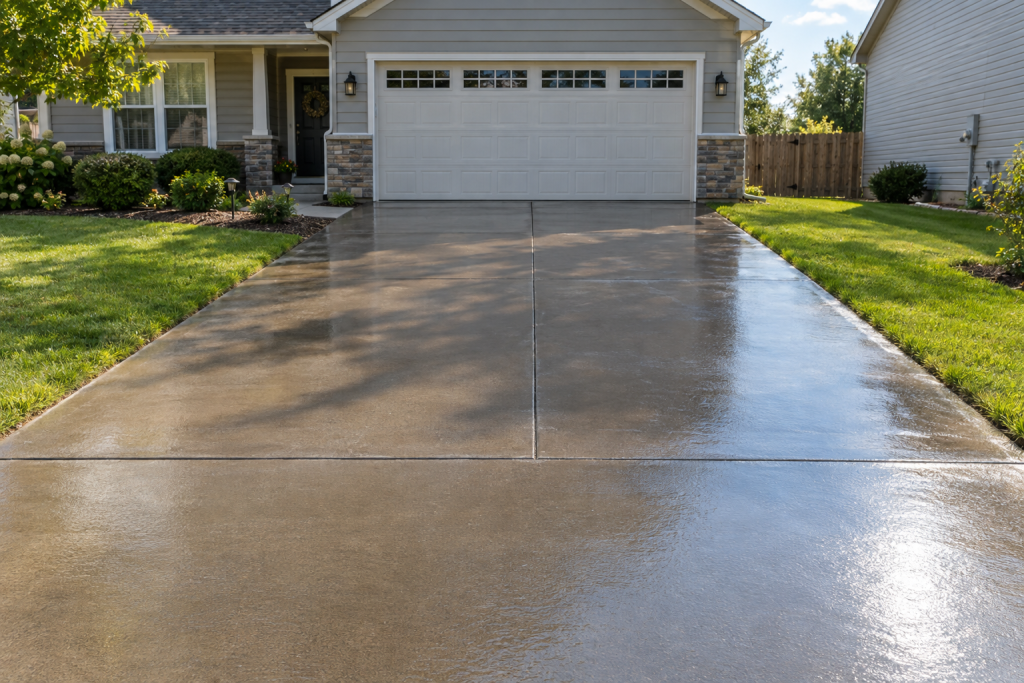
For a driveway, sidewalk, or plain patio, buy a penetrating silane/siloxane concrete sealer, spray it on with a pump sprayer until the slab stops drinking it, and you’re done for 5 to 10 years. Stamped or colored concrete wants a solvent-based acrylic for the wet look, and a garage floor wants a two-part epoxy or polyaspartic coating. Whatever you pick, the job only works on concrete that is at least 28 days old, scrubbed clean, bone dry, and between 50 and 90°F.
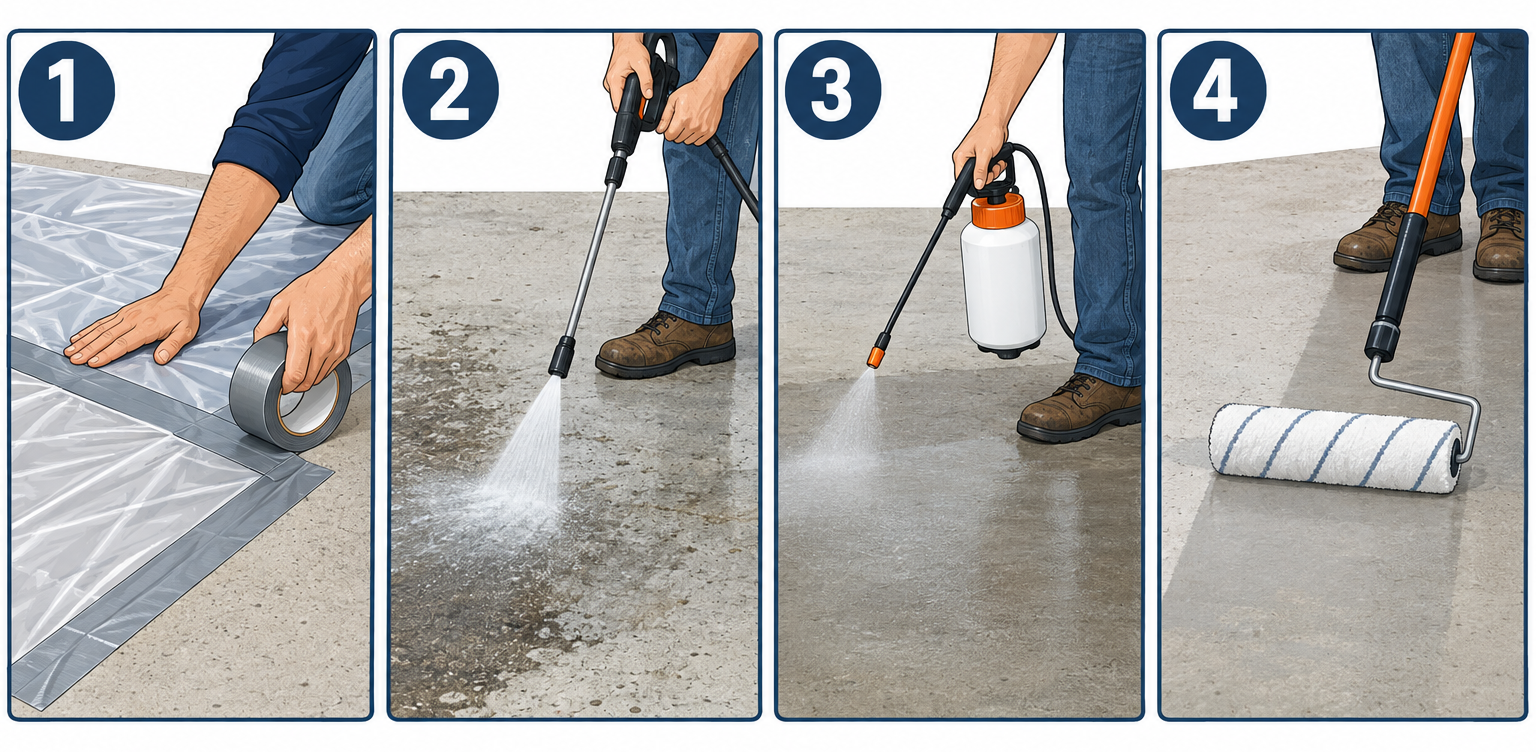
Quick steps: seal a concrete slab
- Match the sealer to the slab: penetrating for driveways, acrylic for stamped, epoxy or polyaspartic for garages.
- Confirm the concrete is 28 days old and dry (tape down plastic overnight and check for condensation).
- Pressure wash at 2,500-3,000 psi, degrease oil spots, let it dry 24-48 hours.
- Strip any old film sealer if you’re changing chemistry; etch or grind for epoxy.
- Mask edges, cover plants, and check the forecast for 24 dry hours.
- Apply a thin coat with a pump sprayer or 3/8-inch nap roller, back-rolling puddles immediately.
- Add a second coat at 90 degrees within the recoat window (acrylics and epoxies).
- Keep feet off for 24 hours and tires off for 72 hours.
Tools and materials
- Pressure washer, 2,500-3,000 psi, with 25-degree and surface-cleaner attachments
- Concrete degreaser or TSP substitute, plus a stiff deck brush
- Plastic sheeting (18 x 18 inch square) and duct tape for the moisture test
- Pump sprayer, 1-2 gallon, with Viton or chemical-resistant seals for solvent products
- 9-inch roller frame, 3/8-inch nap solvent-resistant covers, extension pole
- Paint tray with liners, 2-inch chip brush for edges
- Painter’s tape and 2-mil plastic for siding, doors, and plants
- Citric acid or muriatic acid etcher (epoxy prep only)
- Anti-slip additive (polymer grit such as Shark Grip) for pool decks and steps
- Nitrile gloves, splash goggles, knee pads, half-mask respirator with organic vapor cartridges
- Sealer, bought by coverage rate: 100-250 sq ft per gallon for penetrating, 200-400 for acrylic, roughly 250 for epoxy kits
Calculators for this job
Safety first
Solvent-based acrylics carry xylene or acetone and are flammable: snuff pilot lights on the water heater and furnace if you’re in a garage, open every door, and wear an organic vapor respirator. Muriatic acid goes into water, never the other way around, and needs goggles, rubber gloves, and a hose running.
Step 1: Pick the sealer type for your slab
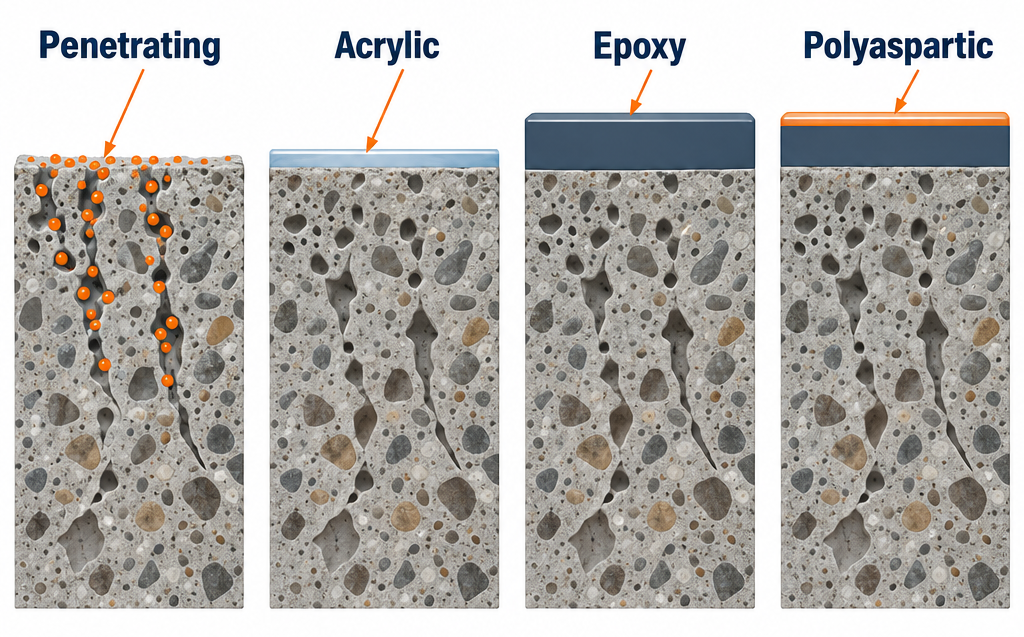
There are four families of concrete sealer, and most bad outcomes I’ve seen came from buying the wrong family, not from sloppy application. The split is simple: penetrating sealers soak in and leave no film, while acrylics, epoxies, and urethanes sit on top as a coating.
If someone at the hardware store calls it cement sealer, they mean the same product. Cement is the powder that binds sand and gravel into concrete, so “cement sealer” is just the everyday name for the same can.
| Type | What it is | Best surfaces | Look | Lifespan | Typical price |
|---|---|---|---|---|---|
| Penetrating silane/siloxane | Reacts inside the pores, repels water and salt | Driveways, sidewalks, steps, plain patios, retaining walls | Invisible, no sheen | 5-10 years | $35-70/gal, $150-300 per 5 gal |
| Penetrating silicate (densifier) | Lithium or sodium silicate that hardens the surface | Dusting basement and shop floors, interior slabs before polishing | None, slight sheen if burnished | Permanent, but no water repellency | $30-60/gal |
| Acrylic, water-based | Thin film, low odor, low VOC | Interior floors, basements, light-use patios, areas with VOC limits | Satin to semi-gloss | 1-3 years | $30-50/gal |
| Acrylic, solvent-based | Thin film in xylene or acetone | Stamped, colored, exposed aggregate, pavers | Gloss “wet look”, deepens color | 2-5 years | $40-70/gal |
| Epoxy (two-part) | Thick chemical-cure coating | Garage floors, basements, workshops | High gloss, takes color flakes | 5-10 years | $100-180 per 2-car DIY kit, $300-600 for 100% solids |
| Polyaspartic / polyurethane | Two-part UV-stable topcoat | Over epoxy, sunny garages, commercial floors | Gloss or satin | 7-15 years | $70-150/gal |
Here’s how I decide in practice.
Driveways, sidewalks, and plain broom-finish patios. Penetrating silane/siloxane every time. It stops water and deicing salt from getting in, which is what causes spalling and freeze-thaw pitting in the first place. It never peels because there’s no film to peel. Foundation Armor SX5000, Ghostshield Siloxa-Tek 8500, and Eagle Natural Seal are the usual DIY picks. Water-based versions are fine outdoors and don’t stink.
Stamped, stained, or colored concrete. A solvent-based acrylic brings the color back and gives the gloss people paid for. Water-based acrylic works too, but the color enhancement is weaker and the film wears faster under sun. If the stamped surface has faded badly, tinted acrylic sealers (sold as semi-transparent color concentrates you stir into clear sealer) will even out blotchy color in the same coat.
Garage floors. Epoxy or polyaspartic, not acrylic. Acrylic softens under hot tires and you’ll pull the coating up in strips the first August afternoon. A water-based DIY epoxy kit such as Rust-Oleum EpoxyShield or Seal-Krete Epoxy-Seal is a weekend job. 100% solids epoxy with a polyaspartic topcoat is a better floor but a much less forgiving install, which I’ll come back to.
Pool decks and steps. Penetrating sealer if you want no change in look and maximum grip. If you want sheen, use acrylic and stir in a polymer grit additive, because a glossy acrylic film around a pool is a slip hazard.
Interior floors. Water-based acrylic or water-based urethane for a finished basement or a stained floor. Silicate densifier if the only problem is a dusting slab in a workshop and you don’t care about looks.
Freeze-thaw climates. This is the one place I’d argue with a salesperson. Film sealers on exterior flatwork in Minnesota or Buffalo tend to flake within two winters as water gets under the film and freezes. Go penetrating outdoors, period.
Water-based vs solvent-based
The question I get most is whether to buy the water-based or solvent-based version of the same acrylic. Solvent-based gives a deeper gloss, bonds better to an old solvent acrylic, and can be re-emulsified with xylene later to fix blushing. Water-based has almost no odor, is legal in low-VOC states like California, cleans up with soap, and gives a more natural satin finish. For a stamped patio outdoors I pick solvent-based. Anywhere indoors or near an open window I pick water-based.
One hard rule: never put a water-based acrylic over an existing solvent-based acrylic. It won’t bond and you’ll get peeling within months. Solvent over old solvent is fine because the new carrier partly melts the old film.
Pro tip
Buy about 15 percent more than the coverage math says. Broom-finish and old weathered concrete drink two to three times more penetrating sealer than smooth troweled concrete, and running out mid-slab leaves a visible line you can’t blend later.
Step 2: Check the concrete before you buy anything
Three things stop a seal job cold: concrete that’s too new, concrete that’s too wet, and concrete that’s already sealed with something you can’t bond to.
Age. New concrete needs 28 days minimum before any sealer. It’s still shedding water during cure, and a film sealer will trap that moisture and turn cloudy white. Some penetrating products allow application after 7 days on fresh pours; follow the label, but I still wait the full month.
Moisture. Tape an 18 x 18 inch square of clear plastic to the slab with duct tape on all four edges and leave it overnight. If there’s condensation under it in the morning, or the concrete looks darker under the plastic, the slab is wet and you wait. Outdoors that usually means more drying days. On a basement or garage floor, moisture coming up through the slab every night means you have a vapor problem that no sealer on this list will survive. A dark line of damp along the edge of a garage slab after rain is often grading pushing water toward the house, and the fix is a swale or a french drain outside, not another coat on the floor.
Existing sealer. Pour a cup of water on a few spots. On bare concrete it soaks in and darkens the surface within a minute or two. On sealed concrete it beads up and sits there. Beading tells you there’s a sealer; it doesn’t tell you which kind. Dab a rag soaked in xylene on a hidden spot and wait 30 seconds. If the surface gets tacky or the rag picks up a film, it’s a solvent acrylic. If nothing happens and the water still beads, it’s either a penetrating sealer or a cured epoxy or urethane.
Efflorescence. White powdery deposits are salts migrating out of the concrete. Scrub them off with a stiff brush and a diluted efflorescence cleaner (or a 10:1 water to muriatic solution) and rinse well. Sealing over efflorescence locks it under the film and it shows forever.
Cracks. Fill hairline and control-joint cracks with a polyurethane concrete crack sealant like Sikaflex Self-Leveling or a flexible caulk, and let it cure 24 hours before sealing. Cracks wider than 1/4 inch, or ones with a height difference between the two sides, are a structural or soil problem and sealer won’t help.
Step 3: Clean the slab properly
Sealer bonds to concrete, not to dirt, oil, mildew, or old curing compound, so this is where the time goes.
Start with a pressure washer at 2,500 to 3,000 psi using a 25-degree tip, or a rotary surface cleaner if you have one for driveways. Hold the wand 8 to 12 inches off the surface and work in overlapping passes along the slab’s length. A 600 sq ft driveway takes me about 45 minutes with a surface cleaner and twice that with a wand.
Hit oil stains first with a concrete degreaser (Simple Green Pro HD, Zep Driveway cleaner, or a TSP substitute). Scrub it in with a deck brush, let it sit 10 minutes, then pressure wash. Old deep oil spots may need a poultice: mix powdered laundry detergent or kitty litter with the degreaser into a paste, spread it 1/4 inch thick, cover with plastic for a day, then scrape and rinse. Sealer applied over oil will fisheye and peel at exactly that spot.
Mildew and algae on shaded patios get a 3:1 water to bleach solution, scrubbed and rinsed. Rust stains from furniture come off with oxalic acid cleaners sold for decks.
If the concrete is new and the contractor used a curing compound (the surface looks slightly waxy and water beads unevenly), that has to come off. Most will pressure wash off after a month or two of weather; stubborn ones need a stripper or light grinding.
Then let the slab dry. In summer sun that’s 24 hours. In spring or fall shade, give it 48 hours and repeat the plastic test if you’re unsure. Concrete that looks dry on top can still hold water an inch down, and that water will cloud a film sealer the next afternoon.
Step 4: Strip old sealer or etch for epoxy
If the old sealer is the same chemistry as the new one and it’s not flaking, skip this step and just clean. Solvent acrylic over solvent acrylic, or penetrating over penetrating, bonds fine.
If you’re switching families, or the old film is peeling in patches, strip it. Soy-based or citrus strippers (Smart Strip, Soy Gel) take 4 to 24 hours, aren’t fumy, and work on acrylics. Scrape with a flat shovel or floor scraper, then pressure wash. Budget a full day; stripping a 300 sq ft stamped patio is more work than sealing it. Peeling epoxy needs a diamond grinder rented for about $80 to $150 a day with a dust shroud and vacuum.
Epoxy and polyaspartic need a profile to bite into, something like 80 to 120 grit sandpaper. On a smooth troweled garage floor that means either acid etching or grinding. Etching is what the DIY kits include: mix the citric or muriatic etcher per the label (muriatic is usually 1 part acid to 4 parts water), wet the floor, pour it on, scrub with a stiff broom while it fizzes for 5 to 10 minutes, then rinse at least three times until the rinse water runs clear and isn’t slippery. Neutralize with a cup of baking soda per gallon of water if you used muriatic.
The slab should feel like fine sandpaper when dry. If it still feels smooth, etch again or rent the grinder. Grinding is better, honestly. Etching leaves a weaker bond and a powdery residue if you under-rinse, and that’s the cause of most DIY epoxy failures I’ve been called to look at.
Step 5: Set up for weather, masking, and mixing
Air and surface temperature both matter. Most sealers want 50 to 90°F for the full application and the first 4 hours of dry time, and the slab itself should be under about 90°F. Concrete in direct sun on a 85°F day can hit 120°F, and solvent acrylics flash off so fast at that temperature you get bubbles and roller marks. I seal in the morning before the slab heats up, or in the evening once it’s shaded.
| Sealer type | Air temp range | Tack-free | Recoat window | Foot traffic | Vehicles |
|---|---|---|---|---|---|
| Silane/siloxane penetrating | 40-90°F | 1-2 hours | Wet-on-wet, within 10-15 minutes | 2-4 hours | 24 hours |
| Water-based acrylic | 50-90°F | 1-2 hours | 2-4 hours | 24 hours | 72 hours |
| Solvent-based acrylic | 50-90°F | 30-60 minutes | 1-4 hours | 24 hours | 48-72 hours |
| Water-based DIY epoxy | 60-85°F | 4-6 hours | 12-24 hours | 24 hours | 72 hours minimum, 7 days ideal |
| Polyaspartic | 35-100°F | 1-2 hours | 2-4 hours | 4-6 hours | 24-48 hours |
Check the dew point too. If the night temperature will drop within 5 degrees of the dew point, water-based products can get dew on them before they cure and turn milky. No rain for 24 hours after application, and preferably none in the 24 hours before so you’re not fighting a damp slab.
Masking is simple: 2-inch painter’s tape along siding, door thresholds, and the garage door track, and plastic over shrubs within 6 feet if you’re spraying. Solvent acrylic overspray kills grass and leaves permanent gloss spots on vinyl siding. Water down nearby plants first.
For penetrating and acrylic sealers, stir, don’t shake, to avoid bubbles. For epoxy, mix Part A and Part B with a drill paddle for 3 full minutes, scraping the sides of the bucket, then respect the pot life printed on the can. Most water-based kits give you about 2 hours; 100% solids epoxy on a warm day can go off in 30 to 40 minutes. Mix only what you can roll out in that time, and pour it onto the floor in a ribbon rather than leaving it in the bucket, where the mass heats up and cures faster.
Pro tip
Use a sprayer with Viton seals (Chapin makes a 1-gallon steel-tank industrial model, the 1949, rated for solvents) for solvent-based sealers. Standard garden sprayer gaskets start swelling within minutes of xylene exposure, and the sprayer starts dribbling onto the slab in blobs you’ll see forever.
Step 6: Apply the first coat thin
The single biggest application mistake is putting it on too heavy. Sealer should be applied thin enough that you worry you’re not using enough.
Penetrating sealers
Fill the pump sprayer and set a fan spray. Flood the surface in overlapping passes so the concrete looks uniformly wet but isn’t puddling. Watch it absorb. On porous broom finish it will soak in within a minute or two; on hard troweled concrete it sits longer. Where it absorbs fast, hit it again while the first pass is still damp. That wet-on-wet second pass is the only “second coat” penetrating sealers usually need.
Back-roll any puddles with a dry roller or push them out with a broom. Dried puddles of silane/siloxane leave slightly darker or whitish patches. Work in sections you can finish in 10 to 15 minutes, and keep a wet edge so sections blend. A water-based product may look slightly milky going on; it dries clear within an hour.
You’ll know it worked the next day when water sprinkled on the slab beads up, though penetrating sealers often bead less dramatically than film sealers after a few months. That’s normal; the protection is inside the pores, not on top.
Acrylics
Pour sealer into a tray and load a 3/8-inch nap solvent-resistant roller cover. Cut in edges, expansion joints, and the stamped grout lines with a chip brush first. Then roll in 3 to 4 foot wide strips, parallel to the long dimension, maintaining a wet edge. Each gallon should cover 200 to 400 sq ft per coat; if you’re getting 150, you’re too heavy.
On stamped concrete the sealer pools in the low spots of the pattern. After each strip, go back with a nearly dry roller and lift those pools, or they dry into white blobs. Spraying acrylic with a pump sprayer and back-rolling is faster for big stamped patios and gives more even coverage.
If the stamped area is slippery when wet, this is the coat to add grit: stir 1 bag (about 3.2 ounces) of polymer anti-slip additive into each gallon, and keep stirring every few minutes since it settles.
Epoxy
Pour a ribbon of mixed epoxy about 2 feet from the back wall and spread it with a notched squeegee or a 3/8-inch nap roller on a pole, working toward the garage door so you don’t trap yourself. Cut in edges with a brush ahead of the roller. Keep the coat thin and even; a water-based kit should spread at roughly the coverage printed on the box, which for the common 2.5-car kits works out to about 250 sq ft per gallon of mixed material. Broadcast decorative flakes into the wet coat by tossing them upward so they fall randomly, not by throwing them at the floor.
Step 7: Second coat and final checks
Penetrating: done after the wet-on-wet pass. A true second coat 24 hours later is wasted money on a penetrating sealer because the first coat has cured in the pores and is now repelling the second.
Acrylic: apply the second coat within the recoat window on the label, once the first coat is dry to the touch. Solvent-based acrylics usually get there in 1 to 3 hours and water-based in 3 to 6, and many products allow recoating for up to 24 hours or longer. Roll it perpendicular to the first coat to hide any lap lines. Two thin coats always outlast one thick one. Three coats on exterior concrete is too many; the film gets brittle and traps moisture.
Epoxy: wait the full recoat time, typically overnight, then apply a clear topcoat. Most two-coat kits include a clear acrylic or urethane top layer; upgrading to a polyaspartic or aliphatic urethane topcoat is the best $100 to $200 you can spend on a garage floor because it’s UV stable and resists hot tire pickup. Standard epoxy yellows and chalks in sunlight near the door within a couple of years.
Walk the slab in the shade at a low angle before cleanup. You’re looking for dry spots that look dull against the sheen, drips along edges, and bubbles. Dull spots get a quick touch-up while the coat is still within its recoat window. Bubbles in a solvent acrylic can be melted out with a light mist of xylene from a sprayer while the film is soft.
Cure times from the table are minimums. I keep patio furniture off acrylic for 3 days and cars off an epoxy garage floor for a full week, because a hot tire on day 3 will leave a permanent print.
What it costs by project
Material prices move around by region and brand, but these are realistic 2020s numbers for the common jobs. Pro prices assume cleaning and sealing on sound concrete; stripping or crack repair adds to them.
| Project | Typical size | Sealer and quantity | DIY material cost | Hired, typical |
|---|---|---|---|---|
| Two-car driveway | 600 sq ft | Silane/siloxane, 3-5 gallons | $120-250 | $600-1,200 ($1-2/sq ft) |
| Stamped patio | 300 sq ft | Solvent acrylic, 2 coats, 2-3 gallons | $120-200 | $450-900 |
| Pool deck | 500 sq ft | Acrylic with grit, 2 coats, 4-5 gallons | $200-350 | $750-1,500 |
| Two-car garage | 450 sq ft | DIY epoxy kit plus polyaspartic topcoat | $200-400 | $1,500-3,500 ($3-7/sq ft for full-flake polyaspartic) |
| Basement floor | 600 sq ft | Water-based acrylic or urethane, 2 coats | $150-300 | $900-1,800 |
| Front walk and steps | 150 sq ft | Silane/siloxane, 1 gallon | $40-70 | $200-350 minimum charge |
Tool costs on top: a 2-gallon chemical-resistant sprayer runs $40-80, roller covers about $8 each (buy three; solvent acrylics ruin them), and pressure washer rental about $60-100 a day if you don’t own one.
Pro-applied penetrating sealers are a thin-margin job and pros often use the same products you can buy, so the DIY savings are real. Garage floor coatings are the exception. A contractor using 100% solids epoxy, a diamond grinder, and polyaspartic topcoats delivers a floor a DIY kit can’t match, and the price reflects that.
Resealing schedule and upkeep
Sealed concrete doesn’t need much, but it isn’t permanent.
Penetrating sealers last 5 to 10 years on driveways and longer on vertical surfaces. The signal to reseal is water soaking in and darkening the surface within a minute instead of sitting on top, or salt scaling starting to show at the garage apron. Reapply right over the old coat after a pressure wash.
Acrylics on exterior stamped concrete need a maintenance coat every 2 to 3 years, sooner in full sun or under heavy foot traffic. Dull, chalky, or white-hazed spots mean it’s time. Don’t wait until it’s peeling, because a worn but intact acrylic can be cleaned and recoated in an afternoon, while peeling acrylic has to be stripped.
Epoxy garage floors last 5 to 10 years in a home garage. Sweep grit off regularly, since sand under tires acts like sandpaper on the coating, and recoat with a fresh topcoat when the gloss wears through in the tire paths.
Clean sealed concrete with a hose and a deck brush, or a pressure washer under 2,000 psi with the wand kept moving. Hot steam cleaners and high-pressure turbo nozzles will lift acrylic films, so skip those. Avoid rock salt on sealed driveways where you can; calcium chloride or magnesium chloride products are gentler, and sand gives grip without chemistry.
Troubleshooting
| Symptom | Likely cause | Fix |
|---|---|---|
| White or cloudy haze after drying (blushing) | Moisture trapped under a film sealer, or coat applied too thick | Solvent acrylic: mist xylene on the haze and let it re-flow. Water-based: strip and reapply on a dry slab |
| Bubbles or pinholes in the film | Applied to hot concrete in sun; air escaping the slab as it cools | Apply in morning or shade. Light xylene mist softens solvent acrylic bubbles; otherwise sand and recoat |
| Peeling in sheets | New sealer over an incompatible old one, dirty surface, or curing compound still present | Strip completely, clean, repeat the water test, reseal |
| Peeling in patches under tires | Hot tire pickup on acrylic or thin water-based epoxy | Strip the garage floor and switch to epoxy with a polyaspartic topcoat |
| Dark blotches or streaks | Puddles that dried, or uneven absorption on patched concrete | Penetrating: usually fades in weeks. Acrylic: xylene wash to even the film |
| Still tacky after 48 hours | Too thick, too cold, or high humidity | Wait for warm dry weather; a thin solvent wipe can help acrylic. Epoxy that stays soft was mis-mixed and must be scraped |
| Water stopped beading after 6 months | Normal for penetrating sealers; worn film on acrylic | Penetrating: not a problem unless water soaks in and darkens. Acrylic: clean and apply a maintenance coat |
| Slippery when wet | Glossy acrylic with no grit | Add polymer anti-slip to a fresh maintenance coat |
| White powder under the film | Efflorescence sealed in | Strip, clean with efflorescence remover, let dry fully, reseal |
| Fisheyes (round bare spots) | Oil or silicone contamination | Degrease that spot, scuff, touch up within the recoat window |
| Roller marks and lap lines | Dry edge, heavy coat, or surface too hot | Second coat rolled perpendicular; thin it and work smaller sections |
When to call a pro
Call a concrete contractor if cracks are wider than 1/4 inch, one side sits higher than the other, or a section has sunk, because that’s a soil or structural problem no sealer touches. Call a flooring or garage coating contractor if the plastic-sheet test shows moisture coming up through an interior slab, which needs a moisture-mitigation epoxy primer and often a vapor test with proper equipment, or if you want a 100% solids epoxy or polyaspartic garage floor with full flake and a warranty.
FAQ
Is cement sealer the same as concrete sealer?
Yes. Cement is one ingredient in concrete, and most people use the two words interchangeably when shopping. The same silane/siloxane, acrylic, or epoxy products apply, and they also work on cement-based pavers, mortar joints, and stucco in most cases.
How can I tell if my concrete is already sealed?
Pour water on it. Bare concrete darkens and absorbs the water within a minute or two; sealed concrete makes the water bead or sit on the surface. A rag with xylene held on the surface for 30 seconds will soften a solvent acrylic and tell you which family you’re dealing with.
How soon can I seal new concrete?
Wait 28 days. Some penetrating sealers allow earlier application, but a film sealer on green concrete traps curing moisture and turns milky. Also confirm the finisher didn’t leave a curing compound on the surface, since that has to come off first.
Do I need two coats?
Penetrating sealers need one coat applied wet-on-wet until the slab stops absorbing. Acrylics need two thin coats. Epoxy needs a base coat plus a topcoat. More coats of anything is not better; thick films trap moisture and peel.
Will sealer stop my concrete from cracking?
No. Sealer slows water and salt intrusion, which prevents spalling, scaling, and surface pitting from freeze-thaw. Cracks come from soil movement, shrinkage, and loads, and sealing doesn’t change any of that. Fill cracks with a flexible polyurethane sealant before you seal so water can’t get under the slab.
Can I seal a concrete floor inside the house?
Yes, with a water-based acrylic or water-based urethane for a stained or decorative floor, or a silicate densifier for a dusty utility floor. Run the plastic-sheet moisture test first. Interior slabs without a vapor barrier underneath will push moisture up through any film sealer and lift it.
How long does concrete sealer last?
Penetrating sealers give 5 to 10 years on horizontal exterior concrete. Solvent-based acrylics last 2 to 5 years, water-based acrylics 1 to 3. A DIY epoxy garage floor runs 5 to 10 years; a professionally ground and coated polyaspartic floor 10 to 15 or more.
Does every slab need sealing?
Driveways and walks in freeze-thaw climates where salt is used, yes, because scaling is expensive to repair and sealer is cheap. Stamped and colored concrete, yes, because the sealer is what holds the color and sheen. A plain patio in a mild dry climate can go unsealed for decades; the main benefit there is easier stain cleanup.