
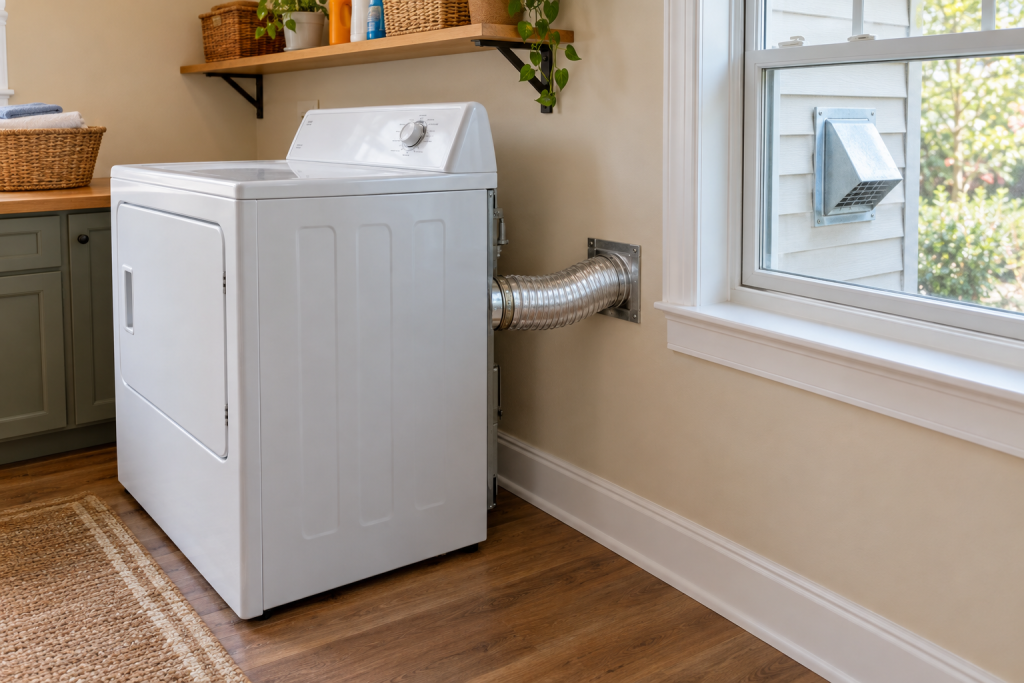
Clothes dryer vent cleaning means clearing lint from four places: the lint trap housing, the flexible transition hose behind the dryer, the rigid duct in the wall, and the exhaust hood outside. A $30 rotary brush kit and a drill handle all of it in about an hour, and you should do it once a year.
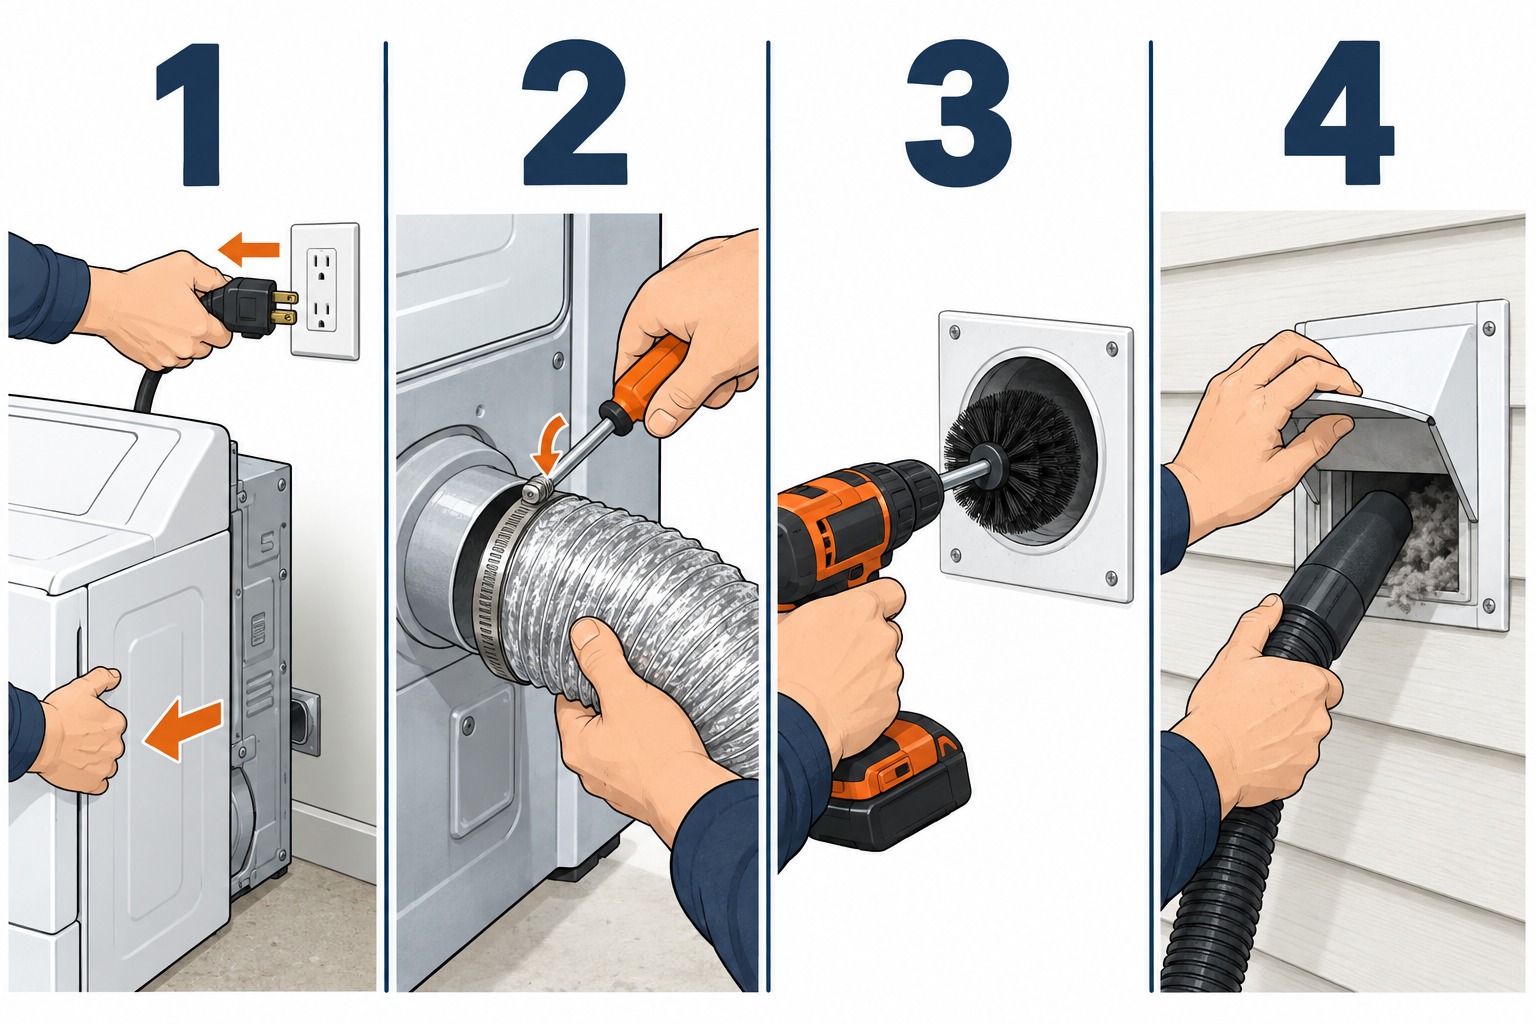
Quick steps: clean a dryer vent and duct
- Unplug the dryer (and shut the gas valve on a gas unit), then pull it 2-3 feet from the wall.
- Loosen the clamp and pull the transition hose off the dryer and the wall pipe.
- Vacuum the dryer’s exhaust port and the lint trap slot from inside the cabinet.
- Feed the rotary brush into the wall duct and run it on a drill, adding rods as you go.
- Clean the exterior hood, free the damper flap, and vacuum the lint the brush pushed out.
- Reconnect with a clean or new transition duct, sealed with foil tape, not screws.
- Run the dryer on air fluff and confirm strong airflow at the outside hood.
Tools and materials
- Dryer vent brush kit with 4-inch brush and flexible rods (12 ft minimum, 24 ft for long runs)
- Cordless drill with variable speed
- Shop vacuum with crevice tool and 2.5-inch hose
- 1/4-inch and 5/16-inch nut driver for hose clamps
- UL 181 foil tape (not cloth duct tape)
- New 4-inch semi-rigid aluminum transition duct, 8 ft or shorter, if the old one is foil or damaged
- Two 4-inch worm-gear clamps
- Flashlight and dust mask
- Replacement exterior vent hood (optional, $10-20)
Calculators for this job
Safety first
Unplug an electric dryer before touching anything behind it. On a gas dryer, turn the shutoff valve on the yellow flex connector a quarter turn until the handle sits across the pipe, and never yank the appliance hard enough to strain that connector.
Why a clogged duct is worth an hour of your time
Lint is dry, fluffy and oily from fabric softener. The U.S. Fire Administration counts roughly 2,900 home dryer fires a year, and failing to clean the dryer is the single biggest cause. That is the part people skip because the lint screen looks fine.
A blocked exhaust duct also makes every load take longer. A dryer that used to finish towels in 50 minutes and now needs two cycles is almost always pushing against a plugged vent, not failing internally. Clearing it restores airflow and cuts your electric or gas bill at the same time.
Signs it is time to clean your dryer vent
You do not need to guess. Any one of these tells you lint buildup is restricting the vent:
- Clothes come out hot but still damp, or need a second cycle.
- The top of the dryer and the laundry room feel hot while it runs.
- A burning smell appears mid-cycle.
- The exterior flap barely opens, or you see lint matted around it.
- The dryer shuts off early with a vent or airflow warning (Samsung shows a “Clean Filter” or airflow indicator, LG and Whirlpool have similar “Check Vent” lights).
- More than a year has passed since the last cleaning.
If you see three of those at once, do the cleaning this weekend. A duct that far gone is not just slow, it is hot.
Step 1: Shut off the dryer and pull it away from the wall
Unplug the dryer. For a gas dryer, find the shutoff valve where the yellow or stainless flex line meets the black iron pipe. Turn the lever a quarter turn so it sits perpendicular to the pipe. Leave the flex connector attached unless you have room to spare; most connectors give you 18-24 inches of travel, which is enough.
Walk the dryer out from the wall by rocking it side to side. Pull it 2-3 feet so you can get behind it with a flashlight. If the floor is vinyl, slide a flattened cardboard box under the front feet so the leveling legs do not gouge it.
Look at what you have back there before touching anything. You will see the 4-inch exhaust collar on the back of the dryer, a flexible transition hose, and the point where it meets the wall pipe or a periscope-style wall box.
Pro tip
Take a phone photo of the hose routing and clamp positions before you disconnect anything. Thirty seconds now saves ten minutes of guessing at reassembly, especially with offset or periscope ducts.
Step 2: Disconnect and inspect the transition duct
Loosen the worm-gear clamp at the dryer collar with a 5/16-inch nut driver (some are 1/4-inch), then slide the hose off. Do the same at the wall end. If the hose is attached with screws, remove them and plan to reconnect with tape and clamps instead; screw tips inside a dryer duct snag lint and start the next clog.
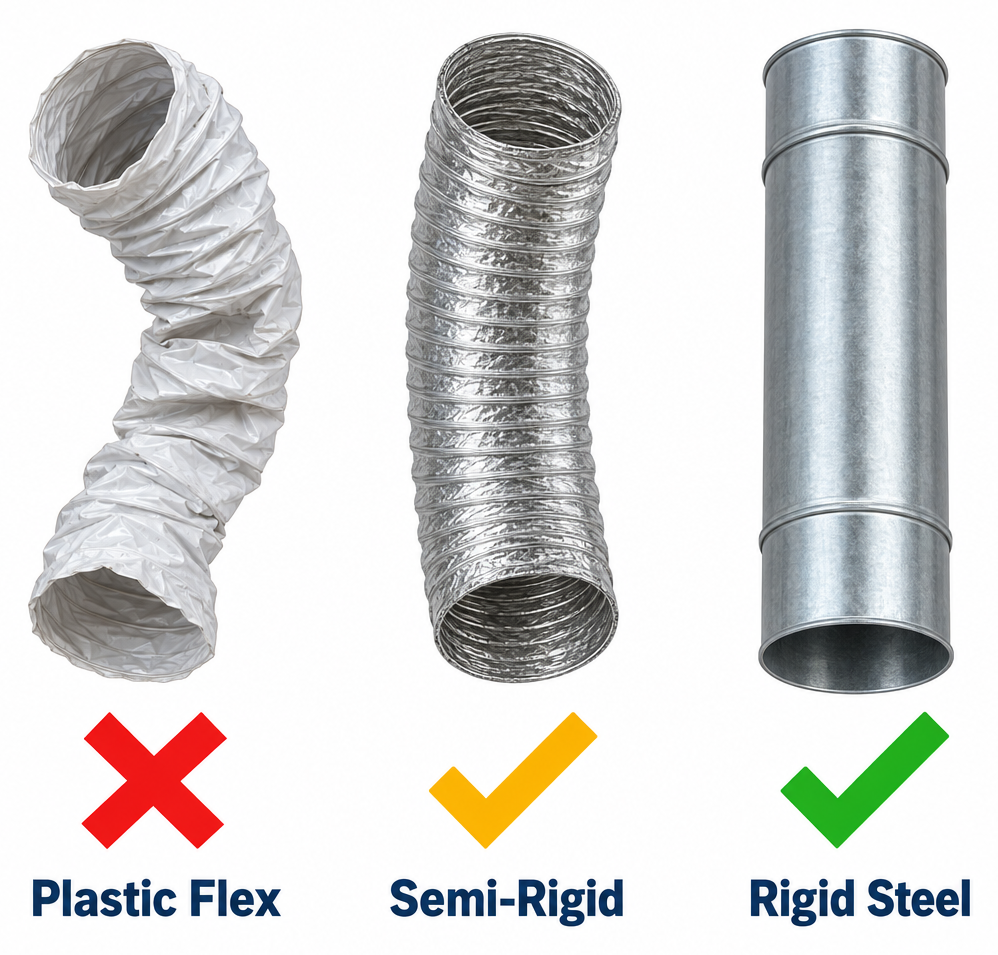
Now judge the hose. Three types show up behind dryers:
| Type | What it looks like | Verdict |
|---|---|---|
| White or silver plastic/vinyl flex duct | Slinky-thin, crushes flat | Replace. Plastic or vinyl flex duct is not code-compliant and the most common fire finding. |
| Semi-rigid aluminum (metal) | Corrugated metal, holds its shape | Keep if clean and undamaged. Code-acceptable for the transition section. |
| Rigid aluminum or galvanized steel pipe with adjustable elbows | Smooth, sectional | Best option. Clean and reuse. |
A semi-rigid aluminum duct costs about $12 for 8 feet. If the old hose is foil, crushed, or longer than 8 feet, replace it. The 8-foot limit is the residential code maximum for a transition duct, and longer runs behind the dryer are usually kinked anyway.
To clean a hose you are keeping, take it outside, stretch it to full length, and run the brush through it by hand. Shake it hard and vacuum both ends. If you can hold it up to the light and see clear through, it is done.
Step 3: Clean the dryer’s exhaust port and lint trap housing
Shine the flashlight into the exhaust collar on the back of the dryer. There is nearly always a wad of lint sitting in the blower housing just inside. Pull what you can reach by hand, then push the shop vac crevice tool in as far as it goes. A 2-foot flexible vacuum attachment ($8-10) reaches the blower wheel itself.
Move to the front. Pull the lint screen and vacuum the slot it sits in. The trap housing below the screen collects an astonishing amount of lint, coins and dryer sheets. Push the crevice tool straight down until it stops, then work it side to side. A long, flat lint brush made for this slot gets what the vacuum misses.
While the screen is out, wash it. Fabric softener leaves a film that blocks airflow even when the screen looks clean. Scrub it under warm water with a drop of dish soap and a soft brush, then let it dry completely. If water beads on the screen instead of running through, it needed this.
Check the moisture sensor too. On most dryers it is two or three metal strips inside the drum near the lint screen opening. Wipe them with rubbing alcohol on a cloth. A film on those strips makes the dryer think clothes are dry before they are, which gets blamed on the vent.
Step 4: Brush out the wall duct
This is the step most people never do, and it is where the serious buildup lives.
Assemble the brush kit. Thread the 4-inch brush onto one rod, then chuck the far end of the rod into the drill. Most kits (Gardus LintEater, Deflecto, Holikme) use 3-foot flexible rods that screw together. Wrap a turn of electrical tape around each joint so a rod cannot unscrew inside the duct and get stuck. That happens, and fishing out a lost rod is miserable.
Set the drill to its low speed range and clockwise rotation. Feed the brush into the wall pipe and start the drill at a slow, steady pace. Push in about a foot, pull back six inches, push in again. Let the bristles do the work. Forcing the brush through a 90-degree elbow at high speed is how people punch a hole in old aluminum pipe.
When the first rod is nearly swallowed, stop the drill, unchuck it, screw on the next rod, re-chuck, and keep going. Count rods as you add them. If the duct runs 20 feet to the outside wall, you need seven rods to reach the hood.
You will know you have reached the end when the brush pops out through the exterior flap or hits the hood screen. Pull the whole assembly back slowly with the drill still spinning clockwise. Lint will spill out the wall opening behind the dryer, so have the vacuum ready.
Run the brush through twice. The second pass pulls the lint the first pass loosened but did not carry out.
Pro tip
Hook the shop vac hose to the wall duct opening with a few wraps of tape while you brush from the outside hood inward. The vacuum pulls loosened lint toward you instead of leaving it to settle in the low point of the run. On a long or roof-terminated duct, this halves the number of passes.
If the duct runs up and out through the roof
Some townhouses and interior laundry rooms vent straight up through a roof jack. Brush from inside exactly the same way, then go on the roof to clear the cap. If the roof is steep or two stories up, stop. Clean what you can from below and hire a vent cleaning service for the rooftop end; it is a $150-250 job and not worth a fall.
Step 5: Clean the exterior hood and damper
Go outside and find the vent hood. It is a 4-inch cap on the siding, usually within 10 feet of the laundry room, with either a single hinged flap or three louvered slats. Some older homes have a plastic cap with a mesh screen.
Pull out every scrap of lint the brush pushed through. Swing the flap or louvers by hand and make sure they drop closed under their own weight. A flap that sticks open lets cold air and mice in; one stuck shut cooks the dryer.
If there is a screen, remove it or replace the whole hood. Screens are prohibited on dryer terminations by the residential code because lint cannot pass through them. A new hood with a proper damper costs $10-20 and swaps out with four screws and a bead of exterior caulk.
Vacuum the last foot of duct from the outside while you are there. Then check the gap between hood and siding. If daylight shows, caulk it.
Step 6: Reconnect the transition duct
Slide one end of the transition duct over the dryer collar and tighten a worm-gear clamp snugly, not crushingly. Wrap the joint with foil tape. Do the same at the wall pipe. If the wall connection is a crimped male end, remember the crimped end always points in the direction of airflow so lint slides over the joint instead of catching on it.
Route the duct with as few bends as possible. A gentle sweep beats a tight elbow. If the dryer sits close to the wall and the hose keeps kinking, buy an adjustable rigid periscope ($15-25) that lets the dryer sit within 3 inches of the wall with a straight path.
Never use sheet-metal screws through any part of a dryer duct. Never use cloth duct tape either; the adhesive dries out within a year and the joint falls apart behind the dryer where you will not see it.
Push the dryer back, watching the hose so it does not crush. Plug it in. On a gas unit, turn the valve back parallel to the pipe, and if you ever disconnected the flex line, check the fitting with soapy water for bubbles before running the dryer.
Step 7: Test the airflow
Run the dryer on air fluff or timed dry with no heat for five minutes. Go outside and hold your hand in front of the hood. You should feel a strong, steady push of air a foot away from the flap, and the flap should sit fully open. Weak, puffing airflow means a blockage remains, a joint has come apart, or the hose is kinked behind the dryer.
Then run a real load. A full load of towels on high in a properly vented dryer finishes in 45-60 minutes. If it was taking 90 before, you will see the difference immediately.
That is your expected result: cool laundry room, no burning smell, towels dry in one cycle, and a firm blast of air at the hood.
How long and how many bends your duct can have
This is the part the ranking guides skip, and it explains a lot of stubborn clogs. The International Residential Code caps a dryer exhaust duct at 35 feet of 4-inch rigid metal pipe. Every 90-degree elbow subtracts 5 feet from that allowance and every 45-degree elbow subtracts 2.5 feet. A run with three 90s is really only allowed 20 feet of straight pipe. The transition hose behind the dryer is limited to 8 feet on top of that.
If your duct exceeds those numbers, lint builds faster than any brush can keep up with, and cleaning twice a year becomes the minimum. Dryer manufacturers publish their own limits in the install manual, and some allow more with a dryer booster fan. A longer run is also a strong argument for rerouting the duct to a nearer exterior wall, which is a job for a handyman or HVAC contractor at $300-600.
Troubleshooting
| Symptom after cleaning | Likely cause | Fix |
|---|---|---|
| Weak airflow at hood, clothes still damp | Lint remains past a bend, or hose kinked behind dryer | Pull dryer out and check the hose, then brush again with vacuum attached |
| Brush stuck in duct | Rod unscrewed or brush jammed in an elbow | Reverse the drill slowly while pulling; next time tape the rod joints |
| Lint blowing out behind the dryer | Joint came apart or tape failed | Reseat the duct, clamp, and wrap with foil tape |
| Exterior flap stays shut while running | Damper hinge corroded or painted over | Free it with penetrating oil or replace the hood |
| Dryer still stops early with vent warning | Blockage inside the dryer blower, or a thermal fuse already blew | Vacuum the blower housing; if the dryer heats but will not run, the thermal fuse needs replacing |
| Burning smell persists | Lint sitting on the heating element inside the cabinet | Remove the back or front panel and vacuum the element housing, or call an appliance tech |
| Water or mildew in the duct | Uninsulated run through cold attic or crawlspace, condensation collecting | Insulate the duct and make sure it slopes toward the exterior |
How often to repeat this
Once a year covers a typical family of four with a short, straight duct. Clean every six months if any of these apply: five or more loads a week, a duct longer than 15 feet or with more than two elbows, a lot of pet hair, or a dryer that vents through the roof. Clean the lint screen every single load regardless. That screen catches most of the lint, and the duct cleaning handles the rest.
Put a reminder on your calendar. The job is easy, but nobody remembers it on their own until the towels stop drying.
When to call a pro
Call a dryer vent cleaning service ($100-200) if the duct terminates on a roof you cannot safely reach, if the brush hits a hard stop and will not pass after several tries, or if airflow at the hood stays weak after a full cleaning, which usually means a crushed or separated duct inside the wall. Call a licensed HVAC contractor to reroute a duct that exceeds 35 feet, and a licensed plumber or gas fitter if a gas flex connector is kinked, corroded, or you smell gas after reconnecting.
FAQ
How do I clean a dryer vent?
Unplug the dryer, pull it out, and disconnect the transition hose. Vacuum the exhaust port and lint trap housing, then run a 4-inch rotary brush on a drill through the wall duct all the way to the exterior hood. Clear the hood, reconnect the hose with foil tape and clamps, and test for strong airflow outside. The whole job takes under 90 minutes with a $30 brush kit.
What does a dryer vent look like on the outside of a house?
It is a 4-inch cap mounted on the siding or foundation, usually low on the wall near the laundry room. Most have a single hinged metal or plastic flap that opens when the dryer runs, or three horizontal louvers that lift together. Some homes vent through a hooded cap on the roof instead. Lint stuck around the opening is the giveaway if there are several similar caps.
How long can a dryer vent hose be?
The flexible transition hose behind the dryer is limited to 8 feet by the residential building code. The rigid duct inside the wall can run up to 35 feet, minus 5 feet for every 90-degree elbow and 2.5 feet for every 45. Longer runs need a booster fan or a shorter route, and they clog much faster.
Does clearing out the lint make a dryer better?
Yes, noticeably. A clear vent lets hot, moist air leave the drum at full speed, so loads dry in one cycle instead of two, the dryer runs cooler, and the heating element and thermal fuse last longer. It also removes the most common cause of dryer fires. Most people see drying time drop by 20-30 percent on heavy loads after their first full vent cleaning.
Can I clean a dryer vent with just a vacuum?
A shop vac handles the lint trap housing, the dryer’s exhaust port and the first foot or two of the wall duct. It will not reach a 15-foot run or pull packed lint off the duct walls. The rotary brush is what makes the job complete, and the vacuum is best used alongside it to catch what the brush loosens.