
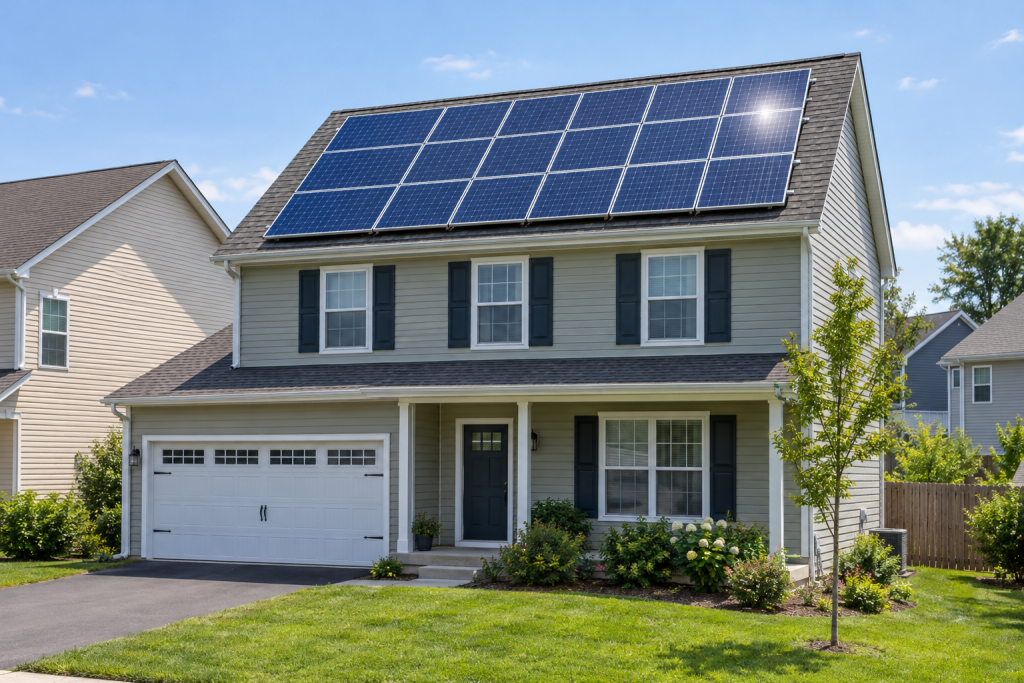
You can install a grid-tied rooftop solar array yourself for roughly $1.00 to $1.50 per watt in equipment, about half of what an installer charges, if you can handle a ladder, a drill, and a permit application. The job runs in nine stages: design and permit, mark rafters, flash and lag the mounts, set rails, hang panels, wire the DC side, land the AC side at the panel, pass inspection, then wait for the utility to flip you on. The physical roof work takes two or three days; the paperwork around it takes six to twelve weeks.
Quick steps: install rooftop solar panels
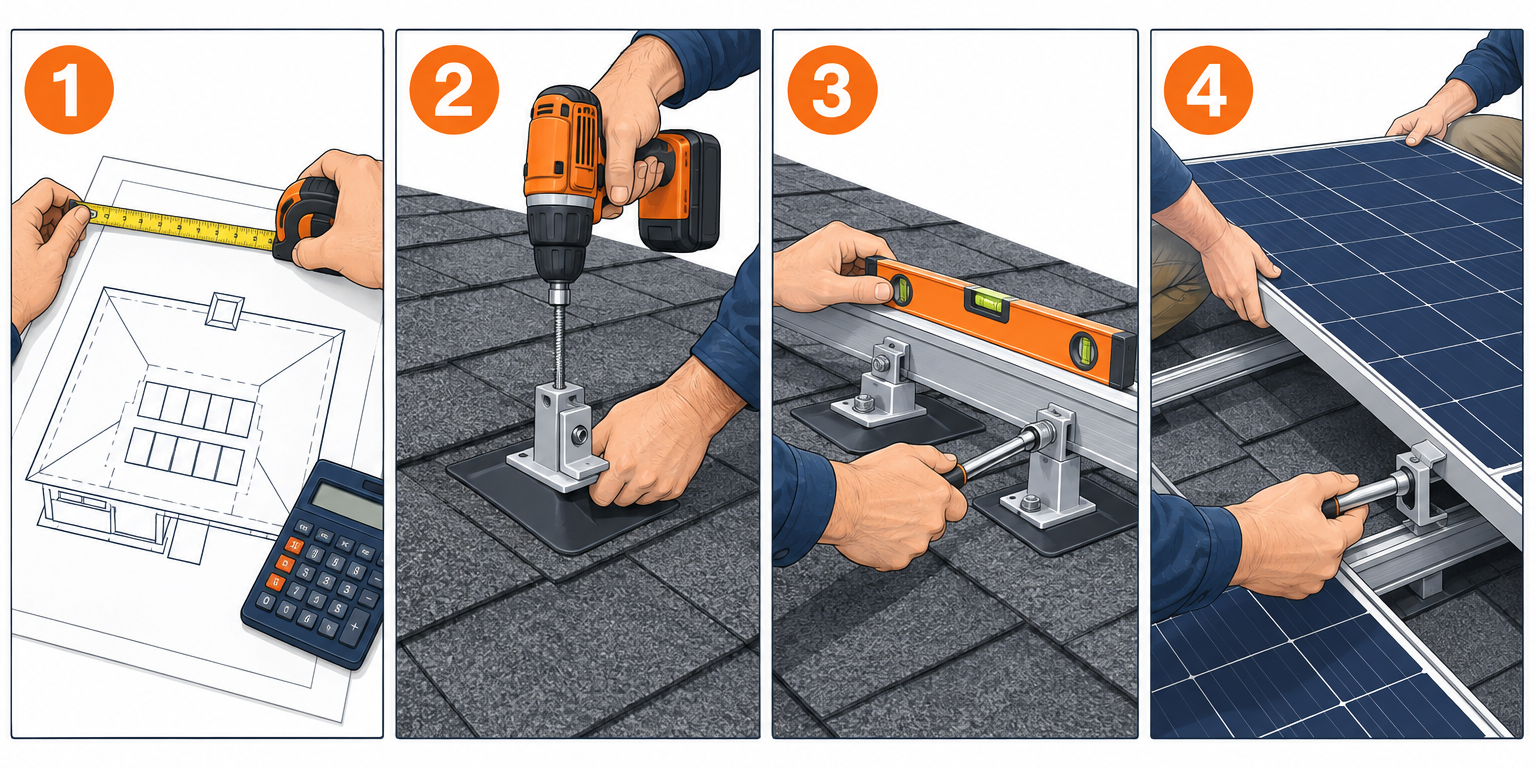
- Size the array with PVWatts and your last 12 utility bills, then draw a plan set.
- Pull building and electrical permits and file the utility interconnection application.
- Mark rafters, snap chalk lines, and install flashed roof attachments on every rafter crossing.
- Bolt rails to the attachments, level them, and bond them with grounding lugs.
- Mount microinverters or optimizers on the rails and run the trunk or string wiring.
- Set panels with mid and end clamps, torqued to spec.
- Run conduit to the inverter or combiner, then to a lockable AC disconnect and a PV breaker.
- Call for inspection, submit the signed-off permit to the utility, and wait for permission to operate.
Tools and materials
- Solar panels (400-450 W residential modules, roughly 68 x 44 inches, 48-55 lb each)
- Microinverters (Enphase IQ8 series) or a string inverter with rapid shutdown devices
- Rail kit (IronRidge XR100 or Unirac SolarMount), splices, mid clamps, end clamps
- Flashed roof attachments with 5/16 x 3-1/2 inch stainless lag screws (one per rafter crossing)
- Polyurethane roof sealant (Geocel 2300 or equivalent)
- 10 AWG PV wire, MC4 connectors and crimper, 6 AWG bare copper for the array ground
- 3/4 inch EMT or PVC conduit, weatherproof junction box, roof-top transition box
- Lockable AC disconnect (60 A, NEMA 3R), PV backfeed breaker sized to the plan
- Rapid shutdown and PV system placards (red, engraved or UV-stable)
- Cordless drill, 1/4 inch pilot bit, 1/2 inch socket, torque wrench (in-lb range)
- Chalk line, 4 ft level, tape measure, roofing hammer or small pry bar
- Fall arrest kit: harness, temporary ridge anchor, 50 ft lifeline, rope grab
- Multimeter rated CAT III 600 V, non-contact voltage tester
Calculators for this job
Safety first
Fall protection on any roof over 6 feet. Panels make lethal DC voltage the moment light hits them, so keep them face-down or covered until wired, and never open an MC4 under load. Turn off the main breaker and verify dead with a meter before touching the service panel.
Step 1: Size the system and draw the plan
Pull your last 12 months of electric bills and add up the kilowatt-hours. A typical US home lands between 9,000 and 12,000 kWh a year. Divide that by the annual production per installed kilowatt in your area, which you get from NREL’s free PVWatts calculator. Phoenix returns about 1,700 kWh per kW on a south-facing roof; Seattle returns closer to 1,100.
Worked example: 10,500 kWh used, 1,400 kWh per kW from PVWatts, so you need 7.5 kW. At 420 W per panel that is 18 panels. Each panel covers about 21 square feet, so you need roughly 380 square feet of clear roof plus fire setbacks.
Check the roof before you buy anything
Walk the roof and the attic. You need:
- A south, southwest, or southeast slope with no shade from 9 a.m. to 3 p.m. in winter. East and west roofs produce about 15 to 20 percent less.
- Shingles with at least 10 years of life left. Pulling an array to reroof costs $2,000 to $5,000 in labor, so replace a tired roof first.
- Rafters or trusses in sound condition. Measure their size and spacing. Most homes are 2×6 or 2×8 at 24 inches on center; older homes often run 16 inches.
- A pitch between 15 and 40 degrees. Flatter roofs need tilt legs, steeper roofs need more rope work.
A standard array with rails adds about 3 pounds per square foot. Nearly any code-built roof carries that, but most permit offices still want a stamped structural letter. Expect to pay an engineer $300 to $600 for one.
Fire setbacks decide your layout
The International Residential Code, section R324, requires a 36 inch wide pathway from eave to ridge on each roof plane holding panels and an 18 inch clear strip below the ridge. Some jurisdictions still enforce the older 36 inch ridge setback. Call your building department before you draw anything, because a half-row of panels lost to a setback changes your inverter count.
Draw the plan set to scale. You need a site plan, a roof layout with panel and attachment positions, a single-line electrical diagram, and the spec sheets for every component. Many online kit sellers include permit-ready drawings in the price, and a drafting service will produce a set for $200 to $400 if you give them the dimensions.
Pick your inverter type
| Inverter type | Best for | Cost (7 kW) | Downsides |
|---|---|---|---|
| Microinverters (Enphase IQ8) | Shaded or multi-plane roofs, DIY wiring | $2,700-3,400 | Many parts on the roof, higher cost per watt |
| String inverter with optimizers (SolarEdge) | Single plane, moderate shade | $2,000-2,800 | Proprietary, wall-mounted inverter needs space |
| Plain string inverter plus rapid shutdown (SMA, Fronius) | Full-sun single plane, lowest cost | $1,800-2,500 | High DC voltage strings, one shaded panel drags the string |
For a first-time installer, microinverters win. Every panel becomes a 240 V AC source, there are no 500 V DC strings on the roof, and rapid shutdown is built in. You trade about $500 to $800 in extra hardware for a wiring job that looks like a long extension cord.
Step 2: Pull permits and file with the utility
You need two things before any hardware goes up: a building permit (often with a separate electrical permit) and an interconnection agreement with your utility. Submit both the same week because the utility review usually takes longer.
The permit packet includes your plan set, the structural letter, and the equipment listings. Fees run $150 to $500 in most counties. Some states, including California, cap residential solar permit fees and require a checklist-based expedited review for systems under 10 kW.
The interconnection application asks for the inverter model, the system size in AC kilowatts, and a copy of the single-line diagram. Most utilities offer a net metering or net billing tariff for systems under 10 to 25 kW. Read the current tariff carefully; several utilities have cut the export credit in the last few years, which changes how much of your bill the array actually erases.
Check whether your utility or state requires a licensed electrical contractor on the interconnection paperwork. Many do. In that case the practical path is to do the roof and array yourself, then hire an electrician for the service panel work and the signature. That costs $800 to $1,800 and keeps your warranty and insurance clean.
Pro tip
Order panels and racking only after the permit is approved. Plan reviewers routinely move attachment points or shrink the array for setbacks, and returned pallets of panels cost 15 to 25 percent in restocking and freight.
Step 3: Mark rafters and install the roof attachments
This is the step that determines whether the roof leaks in year six. Take the full day it needs.
Start in the attic. Measure the rafter spacing and note where each rafter meets the eave, then transfer those positions to the roof surface from a fixed reference like the chimney or a plumbing vent. Confirm from the top by tapping with a hammer and listening for a solid sound, or drive a small finish nail through the shingle where you expect wood. A miss feels like it falls through. Patch any missed hole with a dab of sealant.
Snap chalk lines along the rafter centers and along each rail row. Attachments sit on every rafter the rail crosses in most wind zones, which means every 48 inches on 24 inch framing. Your plan set and the racking manufacturer’s span tables set the exact spacing; in high-wind coastal zones it can drop to 32 inches.
Setting a flashed attachment on composition shingles
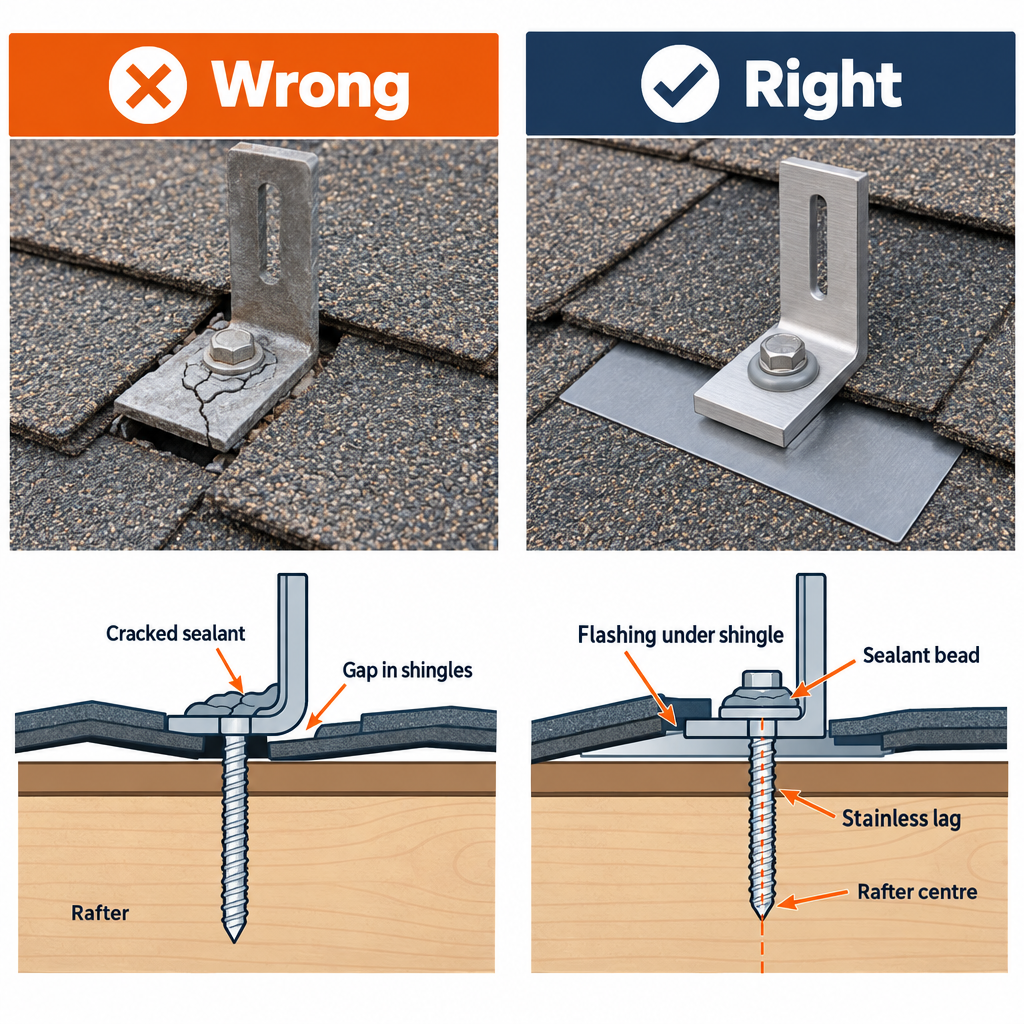
- Choose the spot so the flashing’s top edge slides under the course above and the lag lands in the upper third of the shingle below.
- Lift the shingle above with a flat bar and break the sealant strip. Pull any nails that block the flashing.
- Drill a 1/4 inch pilot hole at least 2-1/2 inches into the rafter center. Check the angle; a lag that angles out of the rafter has almost no pullout strength.
- Fill the pilot hole with sealant and run a bead under the flashing’s lag area.
- Slide the flashing up under the shingle, set the stanchion or L-foot, and drive the 5/16 inch stainless lag with a 1/2 inch socket. Stop when the washer compresses the sealant; do not strip the wood.
- Press the shingle back down over the flashing’s top edge.
Each attachment takes a careful installer 8 to 12 minutes. A 7.5 kW array needs 36 to 48 of them, so budget most of a day.
Tile and metal roofs use different hardware. Standing seam metal takes S-5! style clamps with no penetrations at all, the easiest roof of any. Concrete tile needs tile hooks or replacement flashed tiles and takes about twice as long.
Pro tip
Keep a tube of sealant and a roll of blue tape in your pouch. Mark every attachment that gave you doubt about rafter contact, then verify from the attic at lunch with a flashlight. A lag that missed shows as a bright screw tip sticking through the sheathing.
Step 4: Set and level the rails
Rails come in 14 and 17 foot lengths and splice together with internal connectors. Lay them along the chalk line and bolt each one loosely to its attachments using the 3/8 inch T-bolts or L-foot bolts supplied in the kit.
Set the lowest rail first. Tension a string line from end to end and shim the L-feet up or down until the rail follows the string. Rails on IronRidge and Unirac systems allow about 1 inch of vertical adjustment at each foot. Repeat for the top rail of the row, then measure the rail-to-rail spacing in three places. Panel manufacturers specify where clamps can land, usually within a band 8 to 16 inches from each corner along the long side. For a 68 inch panel in landscape orientation, the two rails sit roughly 40 to 44 inches apart.
Tighten every attachment bolt to the printed spec, generally 20 to 30 foot-pounds for 3/8 inch hardware. Then check that no rail end hangs past the last attachment farther than the cantilever limit, which is about 18 to 24 inches for most residential rails.
Grounding the rail
Modern rails are UL 2703 listed, which means the clamps bond each panel frame to the rail. You still need one grounding lug per continuous rail run, and the rails need to be bonded to each other across splices with a bonding jumper or a listed splice. Run 6 AWG bare copper from lug to lug and down to the inverter or junction box. Microinverter systems ground through the trunk cable’s equipment grounding conductor, but the rail lugs are still required.
Step 5: Mount inverters and run the array wiring
For microinverters, bolt one unit to the rail beside each panel position using the supplied T-bolt and torque it to about 20 foot-pounds. Snap the trunk cable connectors into each microinverter and clip the cable to the rail every 2 feet. Cap any unused drop with a sealing cap, or water intrusion will take out the connector in a year.
Enphase limits how many microinverters share one 20 A branch, somewhere between 11 and 16 depending on model. A 7.5 kW system with 18 panels needs two branches. Each branch terminates in a rooftop junction box, then runs in conduit to the combiner or the load center.
For string systems, mount optimizers the same way, then connect panels in series. Each string of 8 to 12 panels reaches 350 to 500 V DC in full sun. Plan the string so positive and negative leads from the first and last panel land at the same end of the row. Run 10 AWG PV wire for home runs, use only the same brand of MC4 connector on both halves, and crimp with the manufacturer’s tool. Mismatched or hand-squeezed MC4s are the leading cause of rooftop arc faults and fires.
Keep all wiring 2 inches above the roof surface, clipped to the rails, with no sagging loops where water can sit. Every exposed conductor must be sunlight-resistant PV wire or USE-2.
Pro tip
Before a single panel goes on, photograph every microinverter serial number in place and sketch the layout. Enphase and SolarEdge monitoring need the map, and reading serials under installed panels means lying on your stomach with a flashlight.
Step 6: Hang the panels
Panels weigh about 50 pounds and catch wind like a sail. Hoist them with two people on a ladder hoist or a rope and pulley, never over the shoulder on an extension ladder. Pick a calm morning; a 15 mph gust will take a panel out of your hands.
Set the first panel in the corner, plug its MC4 leads into the microinverter or the string before you clamp it, and slide it against the end clamps. Tighten each clamp to the exact spec. IronRidge UFO clamps are 80 inch-pounds, which is far lighter than most people guess. Overtightening cracks the glass edge or strips the rail channel.
Work across the row, dropping a mid clamp between each pair. Keep a consistent 1/2 to 3/4 inch gap between panels so the clamp seats on both frames. Check the row’s top edge with a string line every four panels; small errors stack up and the last panel ends up a full inch out of line.
On each panel, confirm:
- Both MC4 connectors clicked and the locking tabs engaged.
- No wire touches the roof or hangs below the frame.
- The frame sits flat on both rails with no rocking.
- The clamp bolts are torqued and the torque mark is visible.
Finish each row with end clamps and trim the rail ends with a reciprocating saw if they stick out more than 1/2 inch. Snap on the rail end caps.
Ground mounts and flat roofs
If your roof fails the shade or structural test, a ground mount is a legitimate alternative. The standard DIY version uses 2 or 3 inch schedule 40 steel pipe set in concrete piers below frost depth, with the same rails and clamps on top. Add $1,500 to $3,000 for pipe, concrete, trenching and the underground conduit run, and expect the permit office to want a separate foundation detail.
Flat roofs use ballasted racks that tilt the panels 10 degrees and hold them down with concrete pavers instead of penetrations. They need a structural check for the extra 5 to 8 pounds per square foot of ballast and generally stay out of DIY territory because the wind calculations are unforgiving.
Step 7: Run conduit and land the AC side
Everything from the rooftop junction box to the utility meter is standard residential electrical work governed by NEC Articles 690 and 705. The pieces in order:
- Rooftop junction or transition box where the trunk cable or PV wire enters conduit.
- Conduit run down the roof and wall. Use 3/4 inch EMT outdoors or schedule 40 PVC. DC runs over 500 V must be metal conduit inside the house.
- String inverter or microinverter combiner on an exterior wall or in the garage, at eye level, out of direct afternoon sun.
- Lockable, visible AC disconnect within 10 feet of the meter, or wherever your utility specifies.
- A backfeed breaker in the main panel, or a line-side tap, or a supply-side connection in a new sub-panel.
The 120 percent rule
This is the calculation that stops most DIY plans at the panel. NEC 705.12 says the sum of the main breaker and the PV breaker cannot exceed 120 percent of the busbar rating. A 200 A panel with a 200 A main allows a PV breaker up to 40 A, which supports about 7.6 kW of AC inverter output. The PV breaker must sit at the opposite end of the bus from the main, with a label saying so.
If your inverter output needs more than 40 A on a 200 A panel, or your panel is a 100 A or 125 A unit, you need a line-side tap, a main breaker derate, or a new panel. Each of those is a licensed electrician job in nearly every jurisdiction, and the derate often needs a load calculation.
Labels
Inspectors fail more solar jobs for missing placards than for anything else. You need, at minimum:
- A rapid shutdown placard at the service entrance with the specific wording from NEC 690.56.
- “PV system disconnect” on the AC disconnect.
- A directory at the main panel showing the location of all disconnects.
- Conductor voltage and current labels at every DC junction box on string systems.
- “Do not add loads” and “backfeed breaker, do not relocate” labels at the PV breaker.
Buy a placard kit for $30 to $60 that matches your inverter type. Handwritten labels fail inspection.
Step 8: Commission and pass inspection
With the main breaker off and the AC disconnect open, check the DC side on string systems. Measure the open-circuit voltage of each string in sun. It should land within 5 percent of the panel count multiplied by the datasheet Voc, adjusted for temperature. A string that reads one panel low has a dead connector; a string that reads zero has a reversed MC4 somewhere.
Measure the insulation resistance to ground if you have a megohmmeter, or at least confirm no continuity between either conductor and the grounding system. On microinverter systems, there is no DC string to test; the commissioning app lights up each unit as it finds it.
Then close the main, close the AC disconnect, and turn on the PV breaker. A string inverter takes about five minutes to sync to the grid and start exporting. Microinverters report in through their gateway one at a time over the next hour. Confirm every inverter shows production before you call for inspection.
The inspector will check:
- Attachment count and spacing against the plan.
- Torque marks on clamps and lag heads.
- Clearance of wiring above the roof.
- Rapid shutdown function, usually by opening the AC disconnect and watching the inverter power down.
- Conduit support, fittings, and grounding at every box.
- Every label.
Keep the permit, plan set, and equipment manuals on site. A clean, labeled job with the paperwork in a folder passes on the first visit about nine times out of ten.
Step 9: Get permission to operate
Send the signed inspection card and the final inspection report to your utility. They review the paperwork, sometimes send a field tech to verify the disconnect location, and swap your meter for a bidirectional one if yours doesn’t already measure exports. Then they issue permission to operate, usually by email.
This wait is 2 to 6 weeks for most utilities and longer in a few territories. Running the system before PTO violates the interconnection agreement, and the utility can refuse the credit for anything exported early. Leave the AC disconnect open and locked until the letter arrives.
What the finished system looks like
A properly installed 7.5 kW DC array in a moderate climate produces 9,000 to 11,000 kWh a year, peaks around 6 kW AC on a clear spring afternoon, and shows every panel within a few percent of its neighbors on the monitoring app. Production drops 10 to 25 percent in winter from short days and panel tilt, climbs through April, and dips slightly in July heat because panel output falls about 0.3 percent per degree Celsius above 25.
What it costs: DIY versus installed
| Item | DIY (7.5 kW) | Installer (7.5 kW) |
|---|---|---|
| Panels (18 x 420 W) | $2,700-4,200 | included |
| Microinverters and gateway | $2,900-3,600 | included |
| Rails, attachments, clamps | $1,400-2,000 | included |
| Wire, conduit, disconnect, breaker, boxes | $600-1,000 | included |
| Permits and structural letter | $450-1,100 | included |
| Electrician for tie-in (optional) | $800-1,800 | included |
| Fall protection kit and tool rentals | $300-600 | n/a |
| Total | $9,200-14,300 | $19,000-27,000 |
Installer pricing in 2025 generally lands between $2.50 and $3.50 per watt before incentives. The federal residential clean energy credit under Section 25D paid 30 percent of the total project cost, including DIY equipment, but the 2025 federal budget law ends it for systems placed in service after December 31, 2025. Check the current status with the IRS before you count on it, and look at your state and utility rebates separately, since several pay a flat amount per watt regardless of who installs.
Common mistakes and troubleshooting
| Symptom | Likely cause | Fix |
|---|---|---|
| Roof leak at an attachment after rain | Lag missed the rafter, or flashing set over the shingle instead of under | Pull the attachment, fill the hole with sealant, reset on the rafter with the flashing under the course above |
| One panel shows zero in monitoring | Unplugged or cross-threaded MC4, dead microinverter | Check the connector click, swap the microinverter with a working neighbor to isolate |
| Whole string reads low voltage | A shaded panel or one bypass diode failed | Shade check at noon; replace the panel if a diode is shorted (reads about 1/3 panel Voc low) |
| String inverter shows ground fault | Pinched PV wire on a rail edge or water in a junction box | Megger each string, open every box and look for green corrosion or moisture |
| Inverter trips on overvoltage | Long wire run raising grid voltage at the inverter, or utility voltage already high | Upsize the AC conductor one gauge, ask the utility to check the transformer tap |
| Inspection failed for labels | Missing rapid shutdown placard or breaker directory | Buy the placard kit, install every label, call for re-inspection |
| Panels rattle or hum in wind | Clamps under-torqued or rail cantilever too long | Re-torque every clamp to spec, add an attachment at long overhangs |
| Production 20 percent below PVWatts | Shade you missed, wrong tilt, or dirty panels | Walk the array at 9 a.m. and 3 p.m. in December; rinse panels with a hose in dry climates |
The single most expensive mistake is one that doesn’t show up for years: a lag screw in the sheathing only. It holds fine until the first ice storm or 60 mph gust, then pulls through and takes the rail with it. Verify every attachment from the attic before the panels go on.
When to call a pro
Hire a licensed electrical contractor if the 120 percent rule fails on your panel, if you need a line-side tap or new service, or if your utility requires a contractor license on the interconnection form. Hire a roofer for any slate, clay tile, or roof you can’t stand on comfortably. Hire a structural engineer if rafters are undersized, cracked, or sistered, or if you are adding more than 4 pounds per square foot. Battery storage, backup circuits, and any system over 10 kW belong to a solar contractor in nearly every jurisdiction.
FAQ
Can you legally install solar panels yourself?
Yes in most of the US, as long as you pull the permits and pass inspection as the homeowner. A handful of states and many utilities require a licensed electrician for the service panel connection or the interconnection signature. Call your building department and utility before buying hardware.
How long does it take to install solar panels?
Plan on two to three days of roof work for a 6 to 8 kW system with two people, spread over weekends if needed. The full timeline from permit application to permission to operate runs six to twelve weeks, almost all of it waiting on reviews.
How many panels does a house need?
Divide your annual kilowatt-hours by the PVWatts production figure for your roof, then divide by panel wattage. A 10,500 kWh home with 1,400 kWh per kW of production needs about 7.5 kW, or 18 panels at 420 W.
Will solar panels damage my roof?
Not when every attachment lands in a rafter with a proper flashing. The failures come from lags in sheathing, flashings set on top of shingles, and panels installed over roofs with fewer than 10 years of life left.
Can a system work during a power outage?
Not a standard grid-tied system. Inverters shut off when the grid drops to protect line workers. You need a battery with an islanding transfer switch, or specific microinverters paired with a system controller, to run loads during an outage. That adds $10,000 to $20,000 and is contractor work.
How much does a DIY solar install save?
A 7.5 kW DIY system costs about $9,000 to $14,000 in equipment, permits, and a tie-in electrician, versus $19,000 to $27,000 installed. The savings are mostly labor and overhead, roughly $8,000 to $14,000, in exchange for two or three days on the roof and your own paperwork.