
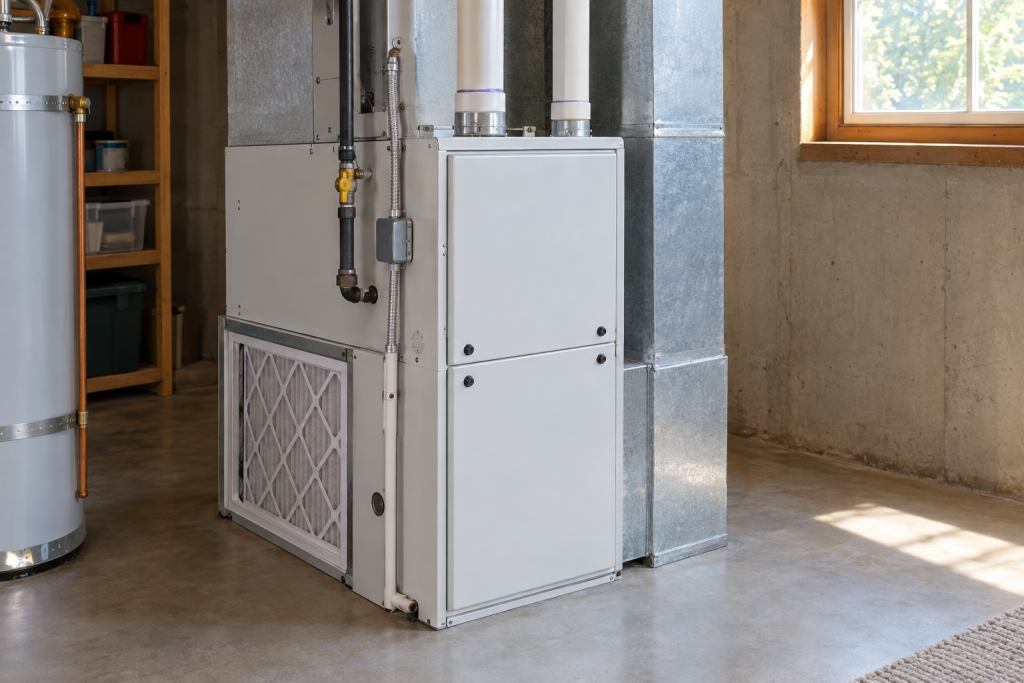
A gas furnace needs a new filter, a clean flame sensor and blower, clear vents and a working condensate drain before every heating season. We can handle eight of these ten tasks ourselves in an afternoon for under $50; the burner, heat exchanger and gas pressure checks belong to a licensed HVAC tech.
Quick steps: furnace maintenance
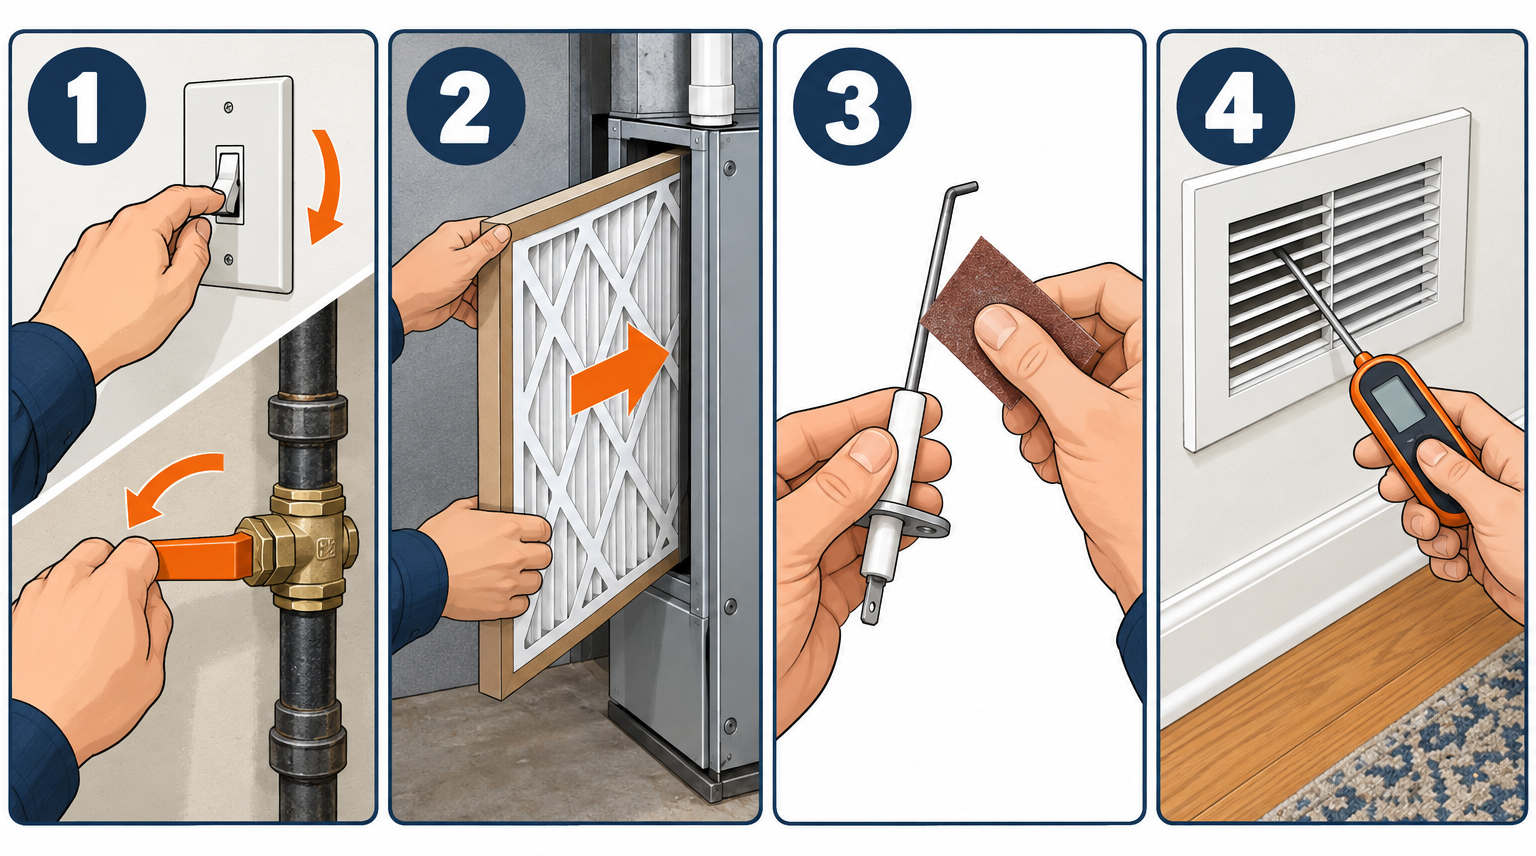
- Flip the furnace power switch off and close the gas valve.
- Replace the air filter with the correct size and MERV rating.
- Vacuum the burner and blower compartments, then wipe the blower wheel.
- Pull the flame sensor and polish it with fine sandpaper or a Scotch-Brite pad.
- Inspect the hot surface igniter for cracks without touching the element.
- Flush the condensate trap and drain line on a high-efficiency furnace.
- Check the flue, intake and exhaust pipes inside and at the exterior wall.
- Restore power and gas, run a heat cycle, and measure temperature rise.
Tools and materials
- Replacement filter (check the size printed on the old one, MERV 8-11)
- Shop vacuum with crevice and brush attachments
- 1/4-inch and 5/16-inch nut drivers
- Flashlight or headlamp
- 400-grit sandpaper or a Scotch-Brite pad
- Clean lint-free rag
- Probe or infrared thermometer
- Distilled white vinegar (1 cup) for the condensate trap
- Replacement 9-volt or AA batteries for the thermostat and CO detector
- Digital multimeter (optional, for checking the igniter)
Safety first
Switch off the furnace at the service switch (looks like a light switch on or near the cabinet) and turn the gas shutoff valve perpendicular to the pipe before opening any panel. Never touch the igniter element with bare fingers, and if you smell gas, leave the house and call the gas utility.
Step 1: Shut off power and gas
Find the service switch, usually a single-pole light switch mounted on the furnace cabinet or on a nearby joist. Flip it off and confirm the blower does not start when the thermostat calls for heat.
The gas shutoff is a lever or ball valve on the black iron pipe feeding the furnace. When the handle runs across the pipe instead of along it, the gas is off.
Now remove the upper and lower panels. Most cabinets use 5/16-inch hex screws or thumb latches, and the lower panel pushes a safety switch that kills power when it’s removed. We still shut off at the switch because that interlock fails more often than people think.
Step 2: Replace the air filter
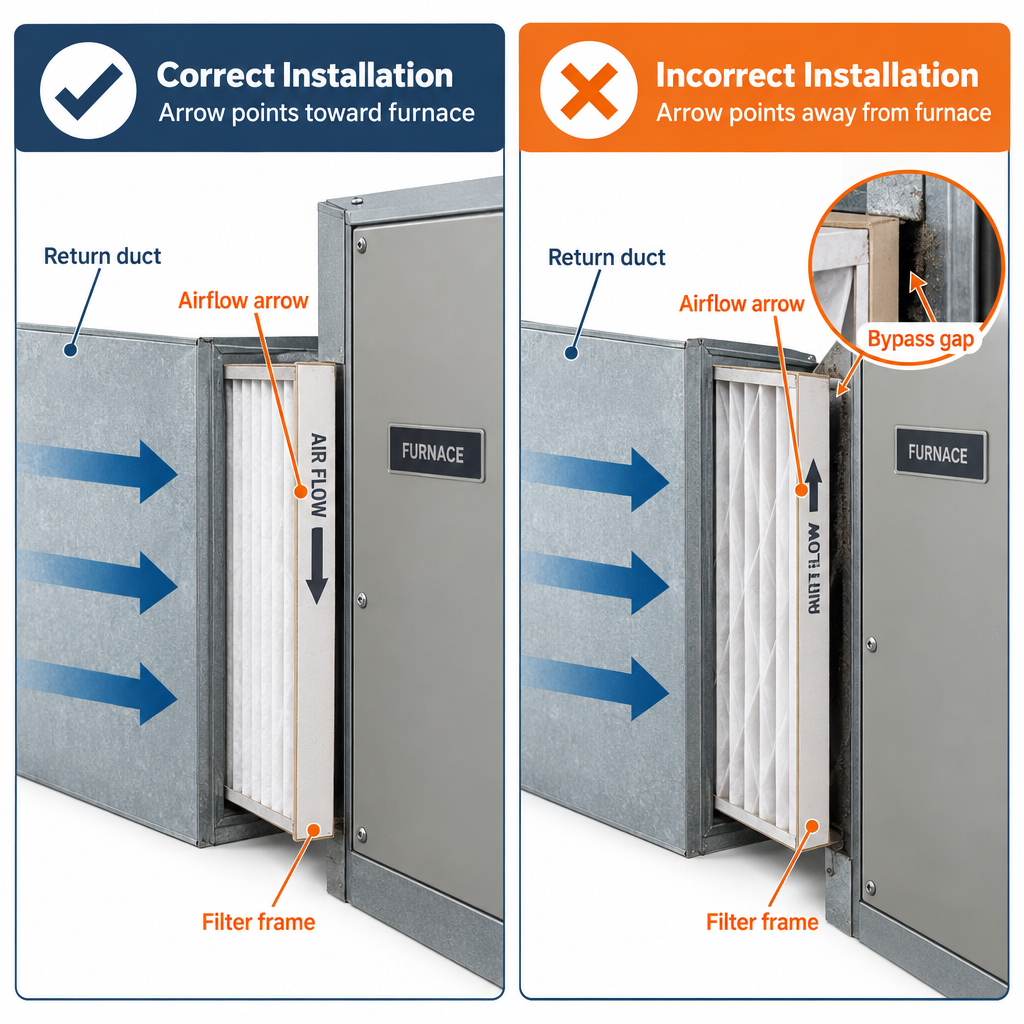
The filter sits in a slot where the return duct meets the furnace, or in a cabinet-mounted media box. Note the airflow arrow on the frame; it points toward the furnace, not the return.
Match the size printed on the old filter exactly. A filter that’s a half inch short lets dirty air bypass it and coat the blower wheel.
| Filter type | Replace every | Typical cost each |
|---|---|---|
| 1-inch fiberglass | 30 days | $2-5 |
| 1-inch pleated (MERV 8-11) | 60-90 days | $6-15 |
| 2-inch pleated | 3 months | $10-20 |
| 4- to 5-inch media (MERV 11-13) | 6-12 months | $25-50 |
Homes with pets, smokers or a remodel underway should cut those intervals in half. A dirty filter is the number one cause of a furnace cycling on its high-limit switch, and it’s a $10 fix.
Pro tip
Write the install date on the filter frame with a marker and set a phone reminder. We see more “furnace won’t stay on” calls from forgotten filters than from any failed part.
Skip the MERV 16 “hospital grade” filters unless the system was designed for them. Most residential blowers can’t pull enough air through that dense media, which starves the heat exchanger and shortens its life.
Step 3: Clean the blower and both compartments
Vacuum loose dust from the burner compartment first, keeping the nozzle away from the igniter and flame sensor. Then move to the lower blower compartment.
The blower wheel is a squirrel cage inside a drum-shaped housing. Shine a light into the fins. If you see a felt-like coating thicker than a credit card, airflow is already down 10 percent or more.
Wipe the accessible fins with a rag and vacuum the housing. Pulling the whole blower assembly for a deep clean takes two mounting bolts and a wiring plug, but we leave that to the pro visit unless the buildup is severe.
While we’re in there, check the blower motor. Spin the wheel by hand; it should turn freely with no scraping. Older PSC motors have oil ports that take 2-3 drops of 20-weight non-detergent oil once a year. ECM motors are sealed and need nothing.
Look at the capacitor on the side of the blower housing if there is one. A bulged top or oily residue means it’s failing, and that’s a $15 part a tech swaps in ten minutes.
Step 4: Clean the flame sensor
The flame sensor is a thin metal rod on a white ceramic base, held by one 1/4-inch screw on the burner assembly, opposite the igniter. It sits in the flame path of the last burner.
Remove the screw, pull the sensor straight out, and gently polish the rod with 400-grit sandpaper or a Scotch-Brite pad. Light pressure, five or six strokes. Wipe it with a dry rag and reinstall.
A coated sensor can’t read the flame’s microamp signal, so the control board shuts the gas off two or three seconds after ignition. That’s the classic “lights, then dies, then tries again” pattern. Cleaning fixes it nine times out of ten.
Step 5: Inspect the igniter
Most furnaces made after 1990 use a hot surface igniter next to the first burner, originally a flat gray silicon carbide element; thin silicon nitride igniters appeared in the late 1990s and early 2000s and became common on later models. It glows orange before the gas valve opens.
Look for hairline cracks or white spots with a flashlight. Don’t touch the element; skin oil creates hot spots that crack it on the next cycle.
If you own a multimeter, unplug the two-wire connector and read resistance. A healthy silicon carbide igniter reads roughly 40-90 ohms. An open circuit means it’s dead. Replacement igniters cost $20-60 and are a reasonable DIY swap, but confirm the part number against the furnace model first.
Older furnaces with a standing pilot should show a steady blue flame about 1 inch tall. A yellow, lazy pilot means dirt in the orifice, and that’s a tech job.
Step 6: Flush the condensate trap and drain
High-efficiency condensing furnaces (90 percent AFUE and up, with white PVC venting) produce a quart or more of acidic water per hour. It leaves through a plastic trap and a 3/4-inch PVC drain line, sometimes feeding a condensate pump.
Unscrew the trap or pull its hoses, dump the sludge, and rinse it in the sink. Pour one cup of vinegar through the drain line, then a quart of warm water, and watch for it to exit at the floor drain or pump.
A clogged trap trips the pressure switch, and the furnace locks out with a flashing error code. If the same drain serves the “air conditioning” evaporator coil above the furnace, a summer slime clog can shut down the heat in October.
Check the pressure switch hose too. It’s the small rubber tube running from the inducer motor to a round switch. Cracks or kinks cause the same lockout, and a replacement tube costs a few dollars at any HVAC supply.
Step 7: Check venting and combustion air
Standard furnaces vent through a metal flue pipe into a chimney or B-vent. Inspect every joint for rust, gaps or white corrosion streaks, and make sure the pipe rises at least 1/4 inch per foot toward the chimney.
Condensing furnaces vent through two PVC pipes to an outside wall. Walk outside and clear leaves, nests, snow or shrubs within 12 inches of both terminations. A blocked intake is the most common cause of a furnace that quits during a blizzard.
If the furnace shares a closet with a water heater, confirm the louvered door or vent grilles are open. Combustion air starvation produces soot and carbon monoxide, and it shows up as a yellow, lifting flame.
Step 8: Test the thermostat and measure temperature rise
Replace the thermostat batteries if it takes them, then restore gas and power. Set the thermostat 5 degrees above room temperature and listen for the sequence: inducer motor, igniter glow, burner ignition, blower start about 30-60 seconds later.
Let it run 10 minutes. Measure the air temperature at the nearest supply register and at the return grille, then subtract. Compare the result to the “temperature rise” range on the furnace data plate, typically something like 35-65°F.
A rise above the range means weak airflow: a dirty filter, closed registers, or a sluggish blower. A rise below it points to a gas pressure problem or a wrong blower speed, both tech-level fixes.
Pro tip
Check the burner flames through the sight glass while it runs. Steady blue cones with small orange tips are normal. Flames that flutter or roll out of the burner box when the blower kicks on usually mean a cracked heat exchanger, so shut it down and call a pro that day.
Step 9: Clear registers, returns and the furnace area
Open every supply register, including rooms you don’t use. Closing more than a couple raises static pressure and pushes the furnace toward the high limit.
Vacuum return grilles and pull furniture off them. Keep 3 feet of clear space around the cabinet, with no paint cans, gasoline or cat litter stored nearby; the blower pulls those fumes into the burner.
Reverse any “ceiling fan” to run clockwise on low. It pushes the warm layer at the ceiling back down and lets us run the thermostat a degree or two lower.
Step 10: Test carbon monoxide and smoke detectors
Press the test button on every CO detector and replace units older than 7 years, since the sensors expire. Put one within 10 feet of each bedroom door and one on the furnace level.
This is the step that matters most. A heat exchanger can crack without any obvious sign, and the detector is one of the most important warnings we get, alongside unusual smells, soot buildup, yellow or flickering flames, rattling or popping noises, frequent cycling and flu-like symptoms in the house.
What a pro tune-up should include
A proper annual service runs 60-90 minutes and costs $100-200 in most US markets, with multi-system service plans at $150-300 per year. Anything under 30 minutes is a filter change and a sales pitch.
| Task | DIY | Pro tune-up |
|---|---|---|
| Filter, blower, flame sensor cleaning | Yes | Yes |
| Condensate trap flush | Yes | Yes |
| Heat exchanger inspection with camera or combustion analyzer | No | Yes |
| Manifold gas pressure check and adjustment | No | Yes |
| Burner removal and cleaning | No | Yes |
| Inducer motor and pressure switch test | Partial | Yes |
| Capacitor and motor amp draw readings | No | Yes |
| Safety control and limit switch test | No | Yes |
Ask for the combustion readings in writing. CO in the flue, oxygen percentage and temperature rise tell us more about the furnace than any checklist of “inspected” boxes.
Troubleshooting
| Symptom | Likely cause | Fix |
|---|---|---|
| Burners light, then shut off within seconds | Dirty flame sensor | Clean with 400-grit sandpaper |
| Furnace runs 3-5 minutes, stops, restarts repeatedly | Clogged filter tripping high limit | New filter, open registers |
| Inducer runs but no ignition, pressure switch code | Blocked condensate trap or vent | Flush trap, clear exterior pipes |
| Clicking but no glow | Cracked igniter | Test resistance, replace |
| Loud bang at startup | Delayed ignition from dirty burners | Pro burner cleaning |
| Blower hums but won’t spin | Failed run capacitor | Replace capacitor (tech) |
| Cold air from registers | Thermostat fan set to On, or no ignition | Set fan to Auto, check error code |
| Rotten egg smell | Gas leak | Leave, call gas utility |
When to call a pro
Call a licensed HVAC technician for any gas pressure adjustment, a heat exchanger inspection, a furnace over 15 years old that hasn’t been serviced, flames that roll out of the burner box, soot around the cabinet, or a CO detector alarm. For a gas smell, leave the house first and call the gas utility or fire department from outside, never from inside the home.
FAQ
What maintenance should be done on a furnace?
Replace the filter on schedule, clean the blower and flame sensor, inspect the igniter, flush the condensate trap, check all venting, and run a test cycle with a temperature rise measurement. A pro adds burner cleaning, gas pressure, combustion analysis and heat exchanger inspection once a year.
What is the average cost of a furnace cleaning?
A standalone furnace tune-up and cleaning typically costs $100-200 in the US. Service plans that bundle furnace and “air conditioner” visits run about $150-300 a year, and a blower assembly deep clean adds $200-500 or more if it’s not included.
Is furnace maintenance necessary?
Yes. A neglected furnace loses efficiency as dust builds on the blower and heat exchanger, and the most common winter breakdowns (flame sensor, filter, condensate) are all preventable in an hour. Most manufacturers also require documented annual service to keep the heat exchanger warranty valid.
How often does a furnace need to be maintained?
Professional service once a year in early fall, plus filter changes every 1-3 months for 1-inch filters or every 6-12 months for 4-inch media. Furnaces older than 15 years, or homes with pets and heavy dust, benefit from a mid-winter filter and flame sensor check as well.