
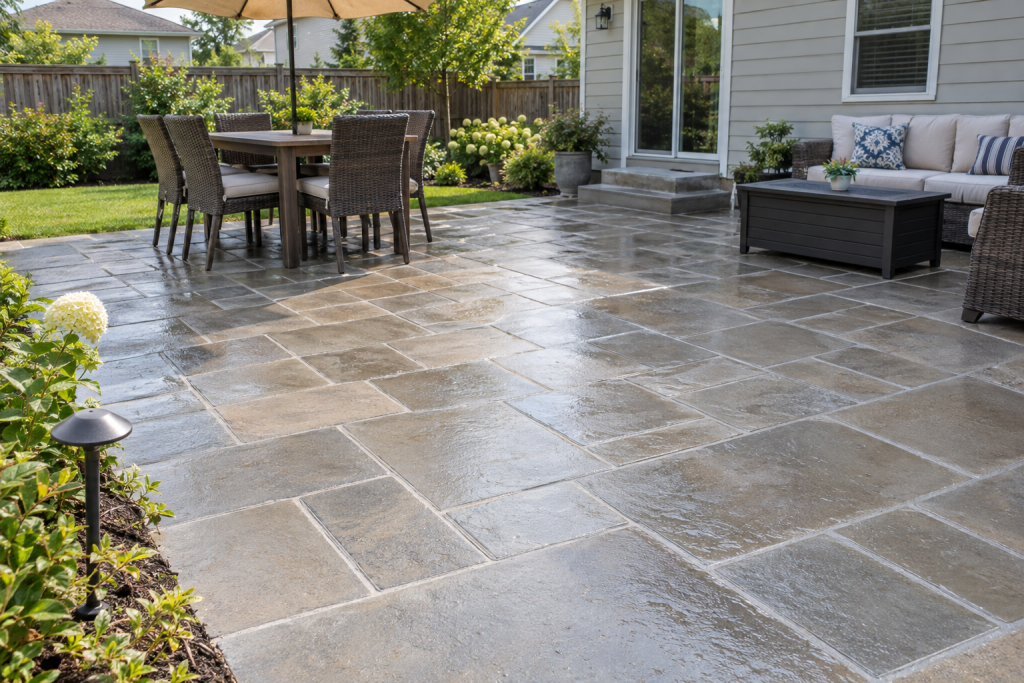
Polymeric sand locks pavers in place by hardening when you wet it, so the job comes down to dry joints, a bone-dry surface, and three light showers of water instead of a flood. Get those three things right and a 300 square foot patio takes an afternoon, costs roughly $120 to $200 in sand, and holds up for five to ten years before it needs attention.
Quick steps: polymeric sand on pavers
- Pick a dry day, confirm the pavers and joints are fully dry and no rain is due for 24 hours.
- Clear joints to at least 1 inch deep, or two-thirds of paver height on an existing patio.
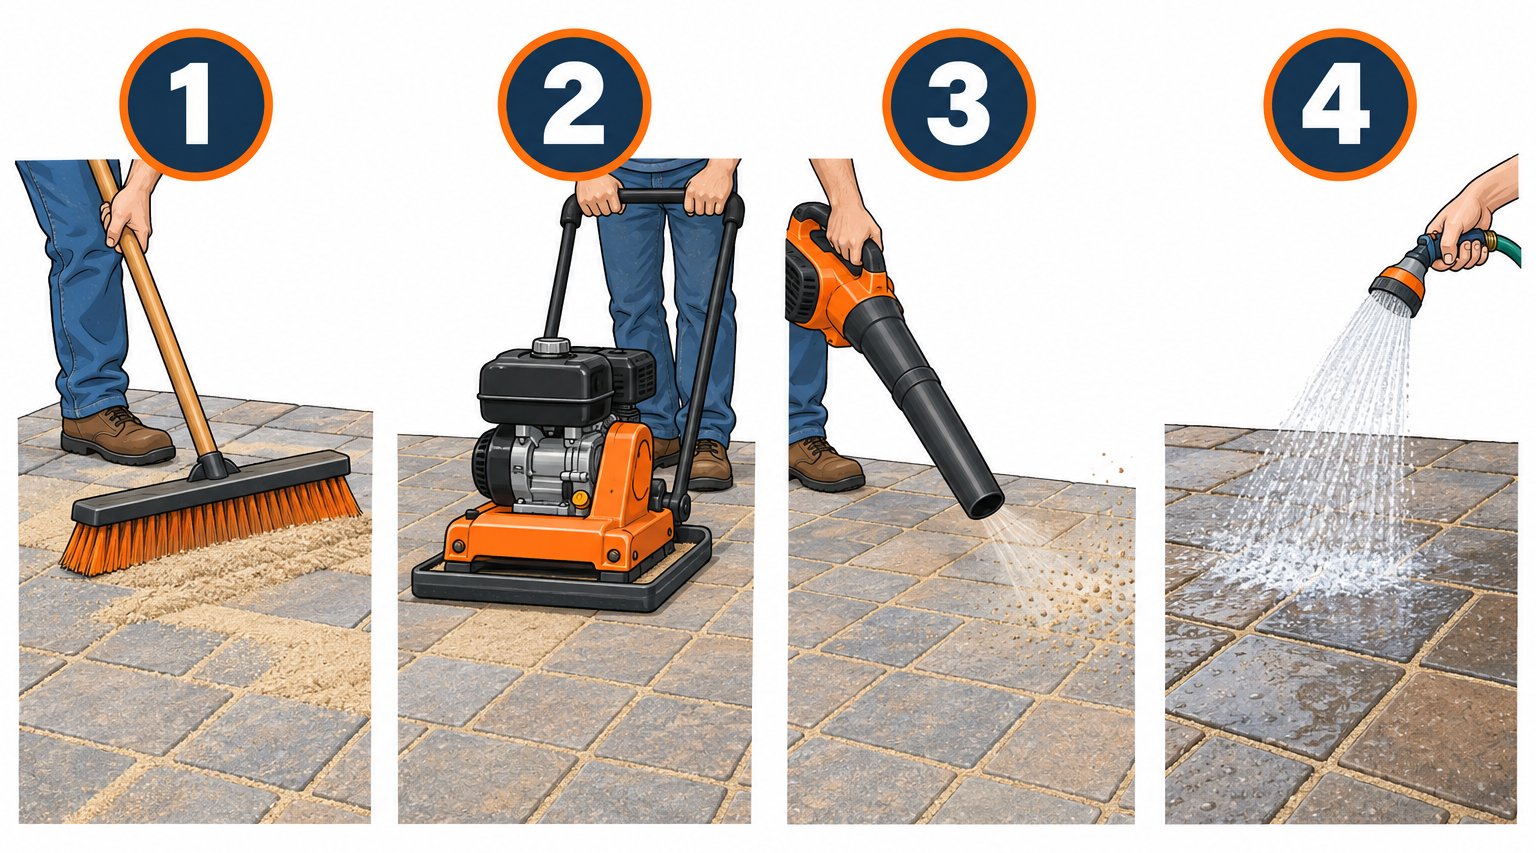
- Pour sand in piles and sweep it into the joints with a stiff push broom until they are full.
- Run a plate compactor with a paver pad (or tap with a rubber mallet), then refill and re-sweep.
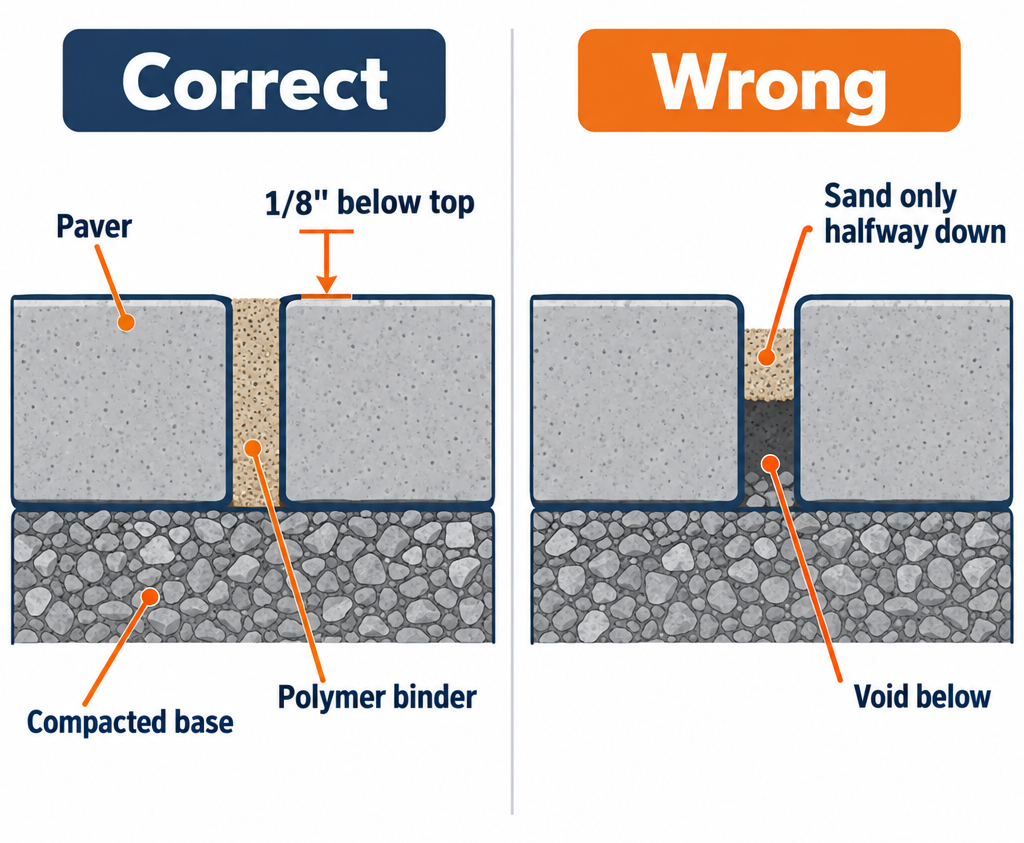
- Finish joints 1/8 inch below the paver edge and blow every grain off the surface with a leaf blower.
- Water 20 sq ft at a time with three light shower passes, pausing a few minutes between each.
- Blow off standing water, keep foot traffic off for 24 hours and cars off for 48 to 72.
Tools and materials
- Polymeric sand, 40 or 50 lb bags (one bag per 50-100 sq ft on standard pavers, one per 10-25 sq ft on wide flagstone joints)
- Stiff-bristle 24 inch push broom plus a soft-bristle finishing broom
- Leaf blower, handheld, 150 cfm or more
- Plate compactor with urethane paver pad (rental $70-100 per day) or a 3 lb rubber mallet for small areas
- Garden hose with an adjustable nozzle that has a shower setting
- Pressure washer, 2,000 psi or more, with a 25 degree or turbo nozzle (existing patios only)
- Joint scraper or flathead screwdriver for stubborn debris
- Wet/dry shop vacuum (optional, for pulling old sand out of joints)
- Utility knife, tape measure, 5 gallon bucket
- N95 dust mask, safety glasses, knee pads, work gloves
Calculators for this job
Safety first
Polymeric sand is fine silica dust mixed with a polymer or cement binder. Wear an N95 and glasses while pouring, sweeping and blowing, and never rinse the leftover slurry toward a storm drain, a lawn, or a pool.
How polymeric sand actually works
Regular jointing sand is just graded sand. Polymeric sand is the same sand with a dry binder blended in, usually a water-activated polymer, sometimes with a bit of Portland cement in the older or cheaper formulas. Dry, it pours and sweeps like any sand. Add water and the binder dissolves, coats the grains, then cures into a firm, slightly flexible joint as it dries.
That flexibility is the whole point. A mortar joint cracks the first winter the pavers heave. A cured polymeric joint moves a little with the pavers, sheds rain, and resists ants, washout, and weed seeds far better than loose sand.
Two things cause almost every failure you will read about online. First, the surface was damp or the joints were shallow, so the binder never cured properly and the sand washed out. Second, the installer watered too hard or left sand dust on the paver faces, which cures into a white haze. Everything below is built around avoiding those two mistakes.
Start with your joint width
Joint width decides which bag you buy, how much you need, and whether polymeric sand is even the right material. Measure a handful of joints across the patio with a tape, because flagstone and tumbled pavers vary a lot.
| Joint width | Product class | Typical products | Notes |
|---|---|---|---|
| Under 1/8 inch | Narrow-joint or “fine” polymeric | Quikrete PowerLoc, Techniseal SmartSand, most big-box bags | Joints this tight often need a finer grind; coarse sand bridges and leaves voids |
| 1/8 to 1 inch | Standard polymeric | Sakrete Polymeric Sand, Techniseal EZ Sand, Alliance Gator Super Sand, SEK PolySweep | The sweet spot for concrete pavers, brick, and most interlocking stone |
| 1 to 2 inches | Wide-joint polymeric | Alliance Gator Maxx G2, Techniseal HP NextGel, Dominator Polymeric | Bag will say “wide joint” or quote a maximum of 2 to 4 inches |
| 2 to 4 inches | Heavy-duty wide-joint polymeric | Gator Maxx G2, HP NextGel, Dominator (check the max on the bag) | Flagstone and irregular stone; expect far lower coverage per bag |
| Over 4 inches | Not polymeric sand | Resin jointing compound, mortar, or a stone dust/decomposed granite fill | Polymeric sand slumps and cracks in gaps this wide |
Always read the bag. Maximum joint widths change between product generations, and two bags on the same shelf can differ by a factor of four. If you have a mix of widths, buy for the widest joint on the patio.
Pro tip
Joints narrower than 1/8 inch are the ones that cause the most callbacks, not the wide ones. The sand bridges across the top and leaves a void underneath that washes out in a month. On tight joints, sweep in two directions, vibrate the pavers, sweep again, and do not stop until the sand refuses to go any deeper.
Polymeric sand vs regular sand vs the alternatives
Polymeric sand wins for most paver patios, walkways, and driveways. It is not always the right call, so here is the honest side-by-side before you buy.
| Option | Cost per 50 lb (approx.) | Joint range | Holds up for | Weeds and ants | Best for |
|---|---|---|---|---|---|
| Polymeric sand | $22-60 depending on brand | 1/8 to 4 inches | 5-10 years | Strong resistance | Pavers, brick, cut stone on a drained base |
| Regular jointing / mason sand | $5-10 | Any | Re-sweep every 1-2 years | Poor; both move in fast | Budget jobs, temporary paths, areas you will lift later |
| Stone dust / screenings | $5-8 bagged, $30-50 per ton bulk | 1/4 inch and up | 2-4 years | Fair; packs hard but weeds root | Flagstone with huge gaps, rustic paths |
| Organic-binder sand (EnviroSAND type) | $35-55 | 1/4 to 4 inches | 5-8 years | Good | Permeable patios, pool decks, areas near plantings |
| Resin jointing compound (Gator Nitro, Romex type) | $100-140 per bucket | 1/8 to 4 inches and beyond | 10+ years | Excellent | Driveways, commercial walks, wide flagstone joints |
| Mortar or grout | $10-15 bagged | 3/8 inch and up | 10+ years on a concrete slab, 1-3 winters on sand base | Excellent | Pavers set on a concrete slab only |
Prices are rough big-box and hardscape-supplier figures at the time of writing and swing by region, so check locally before you budget.
Polymeric sand: pros and cons
Pros: hardens enough to stop washout and ant tunnels, stays flexible through freeze-thaw, comes in multiple colors, sold everywhere, and a first-timer can install it in a day.
Cons: unforgiving of moisture during installation, can haze if you rush the cleanup, needs a minimum joint depth of about 1 inch, and fails on a base that holds water. It also costs four to eight times what plain sand does.
Regular jointing sand: pros and cons
Pros: cheapest option, zero technique required, nothing to cure, easy to lift and relay pavers later. Fine, angular mason or paver sand (not play sand) packs surprisingly well.
Cons: washes out of sloped joints in one heavy rain, invites ants and weeds, and tracks onto the pavers and into the house. You will be re-sweeping it every spring.
Stone dust: pros and cons
Pros: cheap in bulk, compacts firm, looks right in wide flagstone gaps where sand looks wrong.
Cons: stains light pavers, holds water, and grows weeds like a seed tray once it gets dirt in it. Many paver manufacturers tell you not to use it in joints at all.
Organic-binder sands: pros and cons
Pros: plant-based binder, no haze risk, re-wets and self-heals small cracks, safe to use right next to garden beds and ponds.
Cons: softer than polymeric, pricier, and it does not love steady sprinkler overspray.
Resin jointing compounds: pros and cons
Pros: strongest, longest-lasting joint you can sweep in. Handles vehicle traffic and wide joints, and most types can be installed on a damp surface.
Cons: two to three times the cost per square foot of polymeric sand, a short working time once the bucket is open, and it is permanent enough that lifting a paver later means cutting the joint.
Mortar: pros and cons
Pros: rock hard, permanent, no washout.
Cons: on a sand-set patio it cracks the first winter and the broken pieces are miserable to remove. Only use it on pavers bonded to a concrete slab.
Pro tip
The verdict: on any paver surface set on a compacted gravel base with joints between 1/8 and 2 inches, buy a mid-range polymeric sand such as Sakrete, Techniseal, Gator Maxx G2 or PolySweep and install it on a dry weekend. Go to a wide-joint polymeric or a resin compound for flagstone gaps over 2 inches, a resin compound for driveways that see daily turning traffic, and plain jointing sand only if you know you will be lifting pavers within a year.
How much polymeric sand you need
Coverage depends entirely on joint width and paver thickness. A bag that covers 100 square feet of tight-jointed concrete pavers covers 10 square feet of flagstone. Use these figures for 2 3/8 inch thick pavers and round up.
| Joint width | Approx. coverage per 50 lb bag | Bags for 300 sq ft | Sand cost for 300 sq ft at $30/bag |
|---|---|---|---|
| 1/8 inch (6×9 in. pavers) | 80-100 sq ft | 3-4 | $90-120 |
| 1/4 inch (6×6 in. pavers or tumbled) | 50-70 sq ft | 5-6 | $150-180 |
| 1/2 inch | 30-40 sq ft | 8-10 | $240-300 |
| 1 inch | 15-20 sq ft | 15-20 | $450-600 |
| 2 inch flagstone | 8-12 sq ft | 25-38 | $750-1,140 |
Every manufacturer posts a coverage calculator and the numbers differ by brand, so plug your paver size and joint width into the one for the bag you are buying. Then add one extra bag. Running out with 20 square feet of open joints left, on a dry day, with the compactor rented, is the most common way a good install goes bad.
For comparison, a hardscape contractor typically charges $1.00 to $1.50 per square foot to clean and re-sand an existing patio with polymeric sand, so $300 to $450 for that same 300 square feet, and $1.50 to $3.00 per square foot if sealing is included. Doing it yourself saves most of that, but only if you do not have to redo it.
The weather window
Most installation failures trace back to the forecast. Polymeric sand needs a dry surface, dry joints, and enough dry time afterward for the binder to set.
| Condition | Go | No-go |
|---|---|---|
| Air and surface temperature | 50-90°F, ideally overnight above 40°F | Below 32°F (most bags list 32°F as the floor, and a few list 50°F), or over 95°F in full sun |
| Rain | None for 24 hours after watering; 48 hours is safer | Rain in the forecast before the joints cure |
| Surface moisture | Pavers bone dry to the touch, joints dry to full depth | Dew still on the pavers, damp joints, patio washed in the last 24 hours |
| Humidity | Below about 70 percent | Thick, muggy air slows curing and worsens haze |
| Wind | Calm to light breeze | Gusts that blow sand across the surface or dust into your neighbor’s pool |
| Sprinklers | Off for 48 hours | Any irrigation zone that hits the patio |
Morning dew counts as moisture. On a humid summer day the practical window is often late morning through mid-afternoon, which is why the whole job needs to move quickly once you start.
Step 1: Check the base and pick the day
Before you buy a bag, confirm the patio drains. Walk it after a rain. If water puddles on the surface or seeps up from the joints hours later, the base is holding water, and polymeric sand will go soft and wash out no matter how well you install it.
The fix for standing water is a base problem, not a sand problem. Low spots mean the bedding sand has washed or settled, and those pavers need to come up and be relaid. On a bigger scale, a patio laid directly on clay with no gravel base will keep failing, and no joint product changes that.
Also check joint depth. Push a screwdriver into a few joints. For a new install on 2 3/8 inch pavers, the sand should go full depth to the bedding layer. On an existing patio, you need at least 1 inch of clean depth, or two-thirds of the paver height, whichever is more. Polymeric sand skimmed 1/4 inch over old sand cracks and peels within a season.
Then pick the day using the weather table above. Plan to start by mid-morning so you can finish watering by early afternoon with hours of warm, dry air to follow.
Step 2: Clear and dry the joints
New patio
If the pavers were just laid and compacted on a clean bedding layer, this step is quick. Blow out any leaf litter and bedding sand that got kicked up onto the surface. Confirm the joints are empty to the bedding and completely dry. If you ran a compactor over a damp patio or it rained since laying, wait a full dry day.
Existing patio
Old sand, weeds, moss, and dirt have to come out to at least 1 inch deep. A pressure washer is the fastest way. Use a 25 degree fan tip or a turbo nozzle at 2,000 psi or more, hold it a few inches off the surface, and work the joints at a slight angle so you blast the old material out rather than driving it deeper.
Old polymeric sand is harder. Cured joints can usually be cut out with the turbo nozzle, especially if you let hot water soak in first. Really stubborn joints need a joint scraper or a 4 inch angle grinder with a diamond tuckpointing blade, run slowly to avoid chipping paver edges. Pull the loosened material out with a wet/dry vac rather than sweeping it back in.
Kill weeds first if the joints are green. A vinegar and water spray or a standard glyphosate product a week before the job means you are washing out dead roots instead of fighting live ones.
Pressure washing leaves the patio soaked, and that is the catch. Depending on sun and humidity, a washed patio needs 24 to 48 hours to dry to full joint depth. Do not trust the surface. Stick your finger or a paper towel an inch into a few joints. If it comes out damp, wait.
Pro tip
Pressure wash on Friday evening, let the patio bake Saturday, and sand on Sunday. Trying to wash and sand the same day is the number one reason a re-sand job hazes or fails.
While the joints dry, check paver height. Any paver more than 1/4 inch higher or lower than its neighbors is a trip edge and a spot where sand washes out. Lift it, add or remove bedding sand, and tap it level with a rubber mallet.
Step 3: Spread and sweep the sand
Open the bag with a utility knife and pour it in piles across the patio, not in one spot. A 50 pound bag poured in one place takes forever to spread and packs the joints unevenly.
Use a stiff push broom and sweep at a 45 degree angle to the joint lines. Sweeping parallel to the joints skips over them. Work the whole area in one direction, then come back across it at the opposite angle, then along the joints. You will see the sand disappear into the joints and the surface start to look sandy and gray.
Keep adding sand and sweeping until the joints are full to the top and the broom stops moving sand into them. On an existing patio with 1 inch of depth, that happens fast. On a new patio with full-depth joints, you will be surprised how much the first pass swallows.
Do not use a leaf blower at this stage. It blows sand out of the joints faster than it fills them. And do not spray or mist anything yet; a damp broom or a sprinkle “to settle it” ruins the surface.
Step 4: Compact and top up
Dry polymeric sand bridges in the joints, leaving voids underneath. Vibration settles it. Run a plate compactor fitted with a urethane paver mat over the whole patio with the joints still full. The mat is not optional; a bare steel plate scuffs and chips pavers, and most rental counters have the pad for a few dollars extra.
Make two passes in perpendicular directions. Watch the joints as you go. They will visibly drop as the sand settles, sometimes by half an inch.
On a patio under about 100 square feet, or on flagstone that would rock under a plate, use a 3 pound rubber mallet instead. Tap the center of each paver two or three times and the sand settles the same way, just slower.
Pour more sand and sweep again, repeating the angled passes until the joints no longer take any. On joints under 1/4 inch, expect to do this cycle twice. Do not skip it. Every soft, sunken joint you find next spring is a joint that was not vibrated and topped up.
Step 5: Blow the surface clean
Now the fussy part that decides whether you get haze. Every grain of polymeric sand left on a paver face will bond to it when you water, and it dries as a white film.
Sweep the joints down to about 1/8 inch below the top edge of the paver, or just below the chamfer on beveled pavers. Use the soft-bristle broom for this so you do not pull sand back out. A joint filled flush to the top looks neat for a day, then the high sand crumbles and spreads across the surface.
Then blow. Hold a leaf blower with the nozzle angled low, about 30 degrees to the surface, and walk the patio in overlapping lines so the dust rolls off the pavers rather than straight down into the joints. Blow toward a lawn or gravel edge, not into the house or the pool. Look across the surface at a low angle in the sun; any dusty shimmer on the paver faces means another pass.
Tumbled and textured pavers trap dust in their pits. Hit those with the blower from two directions, and run a soft broom over them one more time before the final pass.
When you can wipe a dark paver with a dry finger and pick up no dust, you are ready to water.
Step 6: Water it in
Set the hose nozzle to shower. Not jet, not mist, not the flat fan. You want a gentle rain that wets the sand without moving it. Water in sections of 20 to 30 square feet so you can control each area before the binder on top starts to skin over.
Pass one: shower the section lightly for 20 to 30 seconds until the surface of the sand darkens and water stops beading. Move on to the next section.
Pass two: come back after 2 or 3 minutes and shower the first section again, a little longer, until water begins to pool briefly in the joint and then soak away.
Pass three: another couple of minutes later, a final shower to make sure water has reached the bottom of the joint. On a 1 inch joint that is about 1 to 2 quarts of water per linear foot of joint spread over the three passes.
Stop when water stops soaking in and starts sitting on top or running across the surface. Flooding is the mistake here. Too much water floats the binder out of the sand, carries it onto the pavers, and leaves a soft joint with a hazy surface. Too little, and the bottom of the joint never cures, so it crumbles out from below in a year.
Watch the runoff. Milky white water running across the pavers means binder is leaving the joints. Ease off and blow that water off right away.
Pro tip
Keep the leaf blower running next to you while you water. As soon as a section is done, blow the standing water and any milky residue off the paver faces toward the lawn. That thirty seconds of blowing is what separates a clean finish from a hazed one, and most bags now recommend it.
On a hot, sunny day, work in the shade first and the sun second, and never let a section sit half-watered. The surface binder skins quickly and water poured on later will not penetrate evenly.
Step 7: Cure, protect, and seal later
The joints will feel firm within an hour and hard by the next morning, but the binder keeps curing for several days. Keep people and pets off for 24 hours. Keep cars, wheelbarrows, and furniture off for 48 to 72 hours. Leave sprinklers off for two days.
If rain hits inside the first 24 hours the joints can soften and the surface can wash. Covering with a tarp helps against light rain as long as you tent it so it does not sit on the sand. If it pours, let everything dry, check for washouts, and top up and re-water the damaged joints with fresh sand.
Hold off on any sealing until the joints have cured fully. Most sand manufacturers want you to wait at least 30 days before applying a paver or concrete sealer, and some joint-stabilizing sealers are meant to replace polymeric sand entirely rather than go over it. When you do seal, a breathable, solvent or water-based paver sealer applied at the rate on the can will keep the joints from darkening and slow down the weeds that eventually drift in.
Choosing a polymeric sand color
Most brands come in two or three colors: a tan or beige, a gray, and sometimes a near-black or ivory. The color matters more than people think, because the joints make up 5 to 15 percent of the visible surface.
Gray on gray pavers reads as one surface and hides dirt. Tan on gray pavers outlines each paver and reads busier. On multi-tone blends, pick the color closest to the darkest tone in the blend; it disappears better than a light sand ever will.
Two things to know. First, cured color is a shade darker than the dry sand in the bag, and it darkens more when wet. Second, colors vary between brands and even between bag lots, so buy all the bags for one job at once. Test a square foot in a corner if you are torn, water it, and look at it the next day in full sun.
Troubleshooting
| Symptom | Likely cause | Fix |
|---|---|---|
| White haze or film on paver faces | Sand dust left on surface, or overwatering floated binder onto pavers | Wait 2 to 3 days, then scrub with a 1:1 white vinegar and water mix or a dedicated polymeric haze remover; stubborn haze needs a paver efflorescence cleaner |
| Joints crumbled or washed out within weeks | Damp joints at install, shallow fill over old sand, or not enough water to cure the full depth | Vacuum out the loose material to 1 inch, let dry, re-sand and re-water properly |
| Sand never hardened | Watered too little, surface skinned before water reached the bottom, or a very old or rained-on bag | If the sand is still clean and dry, re-water carefully; if it is contaminated or lumpy, remove and replace |
| Soft, sunken joints after the first winter | Joints were not compacted and topped up, or the base holds water | Vacuum to 1 inch, re-sand; if water puddles, relevel the bedding first |
| Sand lumps on the surface | Sand got wet before sweeping, or stray grains on the surface were watered | Chip off dry lumps with a plastic scraper, then vinegar scrub; prevent by blowing thoroughly before watering |
| Weeds growing in joints | Seeds landing on top of cured sand and rooting in debris, or a joint that cracked | Pull or spot-spray; keep the surface blown clean and consider sealing after 30 days |
| Ants tunneling through joints | Joint cured poorly or sand was not full depth | Treat the ants, vacuum the damaged joint, re-sand that area |
| Joints cracked along one side | Pavers shifted on a loose edge restraint | Fix the edge restraint, then vacuum and re-sand the cracked joints |
| Joints washing out on a slope | Water ran across the patio before the binder set, or joints over the width limit | Re-sand, water in smaller sections, blow off runoff immediately; use a wide-joint product on big gaps |
| Dark or wet-looking stripes along joints | Normal for 1 to 2 weeks as moisture leaves the joint | Wait; if it persists for a month, the base is holding water |
Do not rush haze cleanup. Scrubbing in the first 24 hours drags half-cured binder around and makes it worse. Give it a few days, then clean on a dry day and rinse toward the lawn.
When to call a pro
Call a hardscape or paver contractor if the patio puddles after rain, if more than a handful of pavers are rocking or sunk more than 1/4 inch, if the edge restraint has let go and the whole field is spreading, or if joints are over 4 inches and you are looking at mortar or resin work on a vehicle driveway. Those are base and structural problems that a bag of polymeric sand cannot fix.
FAQ
Can you put new polymeric sand over old polymeric sand?
No. New sand needs at least 1 inch of clean, dry joint, so the old sand has to be cut or washed out first. A thin skim over old joints cracks and lifts within a season.
How long after installing polymeric sand can it rain?
Most bags call for 24 hours of dry weather after watering, and 48 hours is safer in cool or humid conditions. Vehicles should stay off for 48 to 72 hours.
Does polymeric sand stop weeds and ants?
It resists both far better than loose sand because the cured joint is too firm for ants to tunnel and too dense for weed roots. It is not a guarantee. Seeds will still land on top and root in debris, so keep the surface blown clean and seal after 30 days if weeds are a problem.
Can you use polymeric sand on flagstone?
Yes, as long as you buy a wide-joint product rated for your gap size, usually up to 2 or 4 inches depending on the brand. Expect coverage of roughly 20 to 45 square feet per bag, well under what you get on tight-jointed pavers, and use a mallet rather than a plate compactor on irregular stone.
Can you use polymeric sand on pavers set over a concrete slab?
Only if water can drain out of the joints and off the slab. Pavers on concrete that holds water under them are the classic polymeric sand failure. Weep holes or a slope that drains the slab are essential, and some manufacturers simply tell you not to do it.
How long does polymeric sand last?
Five to ten years on a well-drained base with normal foot traffic. Sprinkler overspray, a driveway that sees daily turning, or standing water all shorten that. You can touch up a few joints at a time without redoing the whole patio.
Does polymeric sand go bad in the bag?
Any moisture gets the binder started, so a bag that has gotten damp or shows hard lumps is done. Store sealed bags on a pallet under cover and use them within a year or so.
Can I install polymeric sand in cold weather?
Most products list 32°F as the minimum air and surface temperature, and the cure slows sharply below 50°F. Spring and fall days above 50°F with dry nights ahead are the ideal window. Never install over frost or onto a surface that will freeze overnight before it has cured.
What temperature is too hot?
Above about 95°F in direct sun, the binder on top skins before water can reach the bottom of the joint. Work in the morning, do shaded areas first, and water in smaller sections.
Can I seal the pavers right after sanding?
Wait at least 30 days unless the sand and sealer come from the same manufacturer and the instructions say otherwise. Sealing too soon traps moisture, which can haze the surface and keep the binder from curing fully.