

Most roof leaks come from a cracked pipe boot, a popped nail, or failed flashing, not the shingles themselves, and all three are fixable in an afternoon with a tube of roofing sealant and a few replacement parts. The hard part is finding the entry point, because water travels along rafters and sheathing before it ever shows up on your ceiling. Start in the attic, confirm with a garden hose, then repair the exact spot.
Quick steps: fix a leaking roof
- Go in the attic during or after rain and trace the wet trail uphill to the entry point.
- Mark the spot, then measure from a known reference like the ridge or a vent to find it from the roof.
- On a dry day, run a hose above the suspect area for 5 minutes per zone while a helper watches inside.
- Replace the pipe boot, reseat or seal popped nails, or swap the damaged shingle or flashing.
- Seal every exposed nail head and lap with polyurethane roof sealant.
- Re-test with the hose before you climb down.
- Tarp the area if you cannot finish the repair before the next storm.
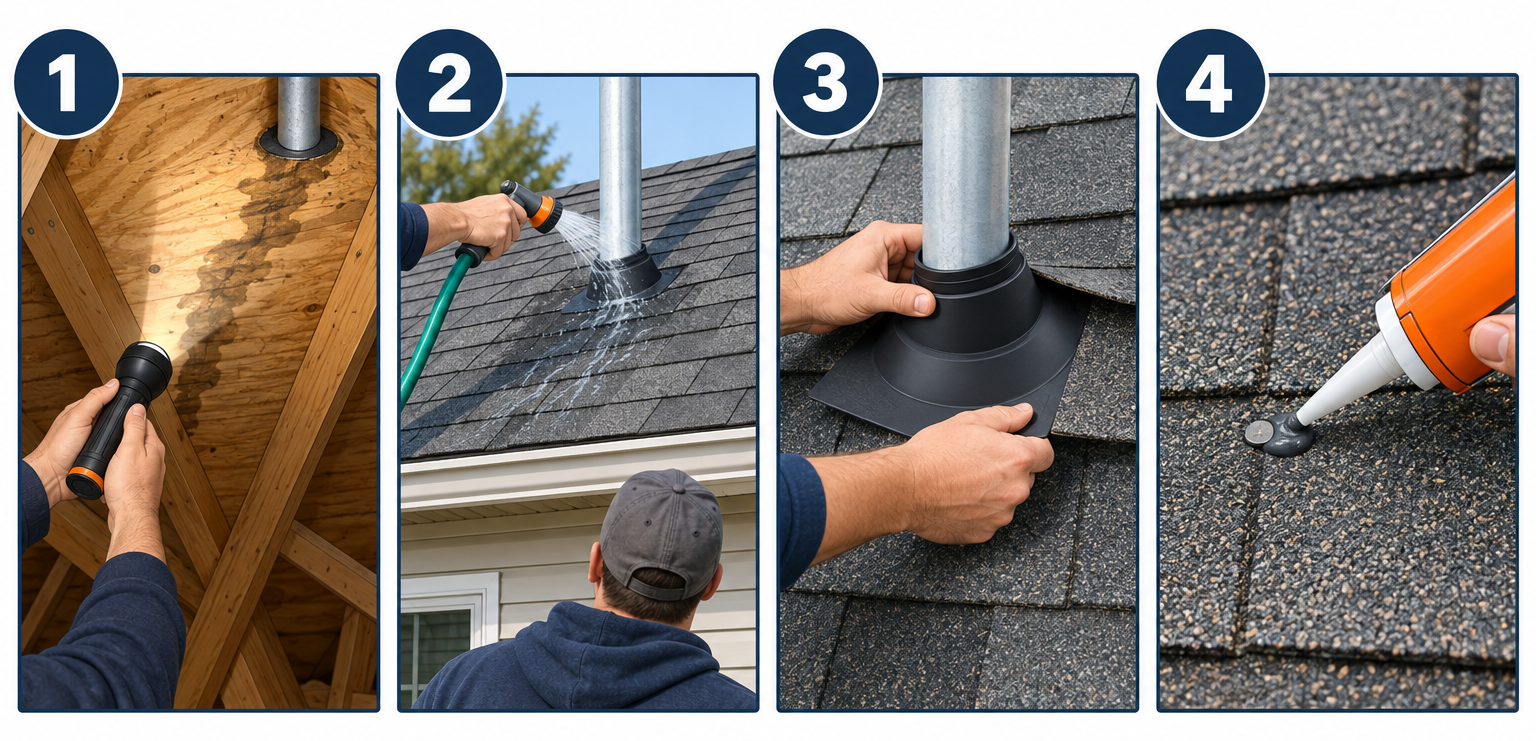
Tools and materials
- Extension ladder rated 250 lb or more, with a stabilizer
- Roof safety harness and rope anchor (any roof pitch above 6/12)
- Flat pry bar and claw hammer
- Utility knife with hook blades
- Caulk gun and polyurethane roof sealant (Loctite PL Roof and Flashing or similar, about $8-10 a tube)
- 1-1/4 inch galvanized roofing nails
- Replacement pipe boot sized to the pipe (1-1/2, 2, 3 or 4 inch), $15-30
- Matching 3-tab or architectural shingles, $35-50 a bundle
- Pre-bent step flashing, 4 x 4 x 8 inch galvanized or aluminum, about $1 each
- Flashlight, chalk or marker, tape measure
- Garden hose and a helper with a phone
- 10 x 12 foot heavy tarp and 1 x 3 furring strips for a temporary cover
Calculators for this job
Safety first
Never work on a wet, frosty or steep roof. Clip into a harness on anything over a 6/12 pitch, keep the ladder 10 feet from power lines, and have someone on the ground the entire time.
Step 1: Find the leak from inside the attic
Go up during the rain if you can, or within an hour of it stopping. Bring a bright flashlight and shine it across the underside of the roof deck at a low angle. Wet plywood looks darker and shinier than the dry boards beside it.
Follow the stain or wet streak uphill. Water almost never drops straight down from the hole. It runs along the sheathing or down a rafter until it hits a nail or a seam, then falls onto the insulation. The entry point is the highest wet spot you can find, and it usually sits within 3 feet of a penetration, a valley, or a wall intersection.
Look for these signs around the entry point:
- Daylight showing through the deck
- A shiny nail tip with a rust ring around it, which means condensation or a nail pop
- Black mold or delaminated plywood, which tells you the leak is months old, not weeks
- Water stains that fan out from one point
Once you find the spot, push a nail or a piece of stiff wire up through the deck so you can locate it from above. If the deck is too thick, measure from a reference point you can also see on the roof, like a plumbing vent or the edge of the gable, and note the distance.
Pro tip
Take a photo of the wet area with your flashlight pointed at it, and a second photo pulled back to show where it sits relative to a vent or chimney. Roofers use the same two-photo method to find leaks on roofs they have never seen, and it saves you a second attic trip.
Step 2: Confirm the source with a hose test
Attic clues narrow the search. A hose test proves it. Pick a dry day, get a helper in the attic with a phone, and start low on the roof, well below the suspect area.
Run the hose at moderate flow for 5 minutes on one small zone. Do not spray upward under shingles, since that forces water where rain never goes and gives you false leaks. Let the water flow downhill the way rain would. Move up the roof in 2 foot increments. When your helper calls out a drip, you have found your source.
Test penetrations one at a time. Soak the pipe boot alone for 5 minutes, then the vent, then the chimney, then the valley. This is slow, but it stops you from replacing a pipe boot when the real problem is the step flashing 4 feet above it.
Mark the confirmed spot with chalk before you shut the water off.
Step 3: Replace a cracked pipe boot
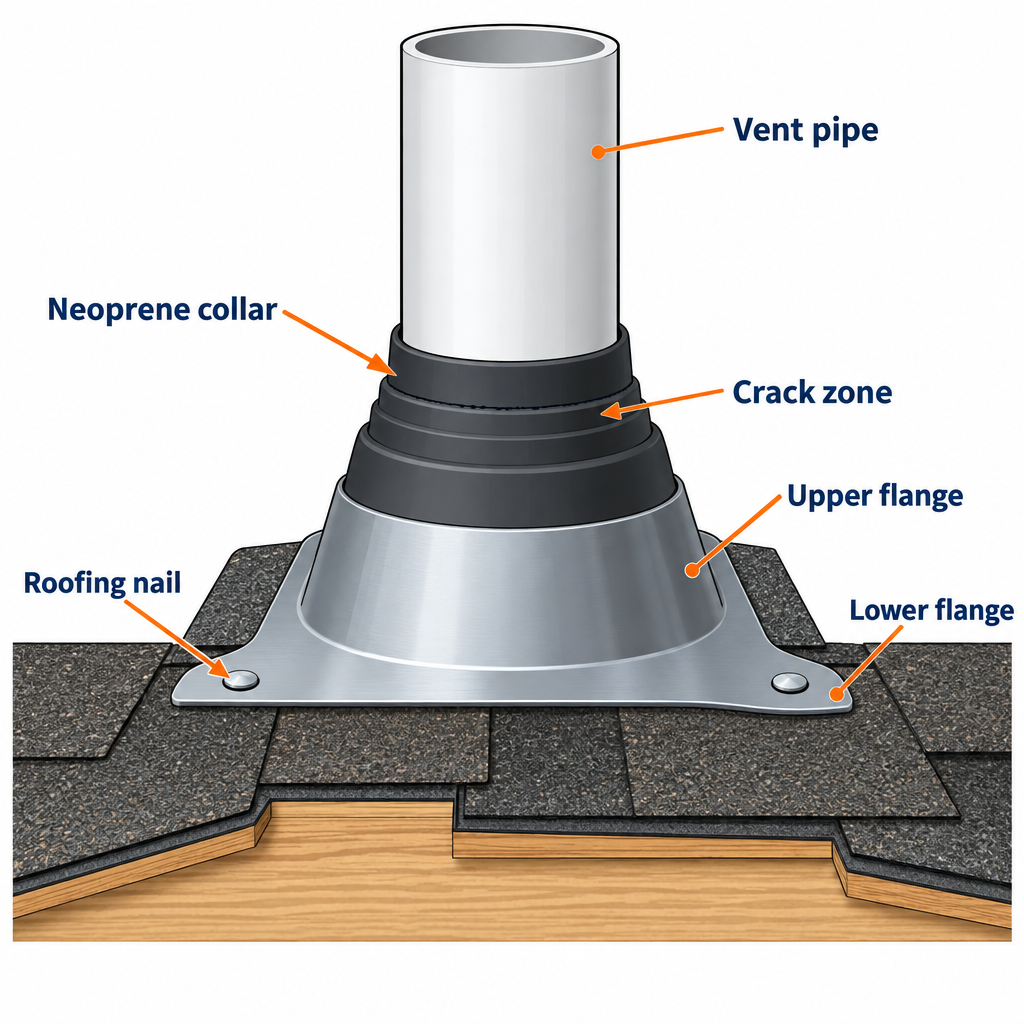
Rubber pipe boots cause more roof leaks than any other single part. The neoprene collar bakes in the sun and splits after 8 to 12 years, long before the shingles wear out. Look for cracks right where the rubber meets the pipe, or a collar that has pulled away and sits loose.
Here is the repair:
- Loosen the shingles above and beside the boot with a flat bar, breaking the self-seal strip. Work gently in cool weather so the shingles do not crack.
- Pull the nails holding the old boot flange, usually four to six of them.
- Slide the old boot up and off the pipe. Cut it if it fights you.
- Clean the deck of old sealant and debris.
- Slide the new boot down the pipe. The flange’s upper half goes under the shingles above, and the lower half sits on top of the shingles below.
- Nail the flange at the corners and sides with roofing nails, placing each nail where a shingle will cover it.
- Seal every exposed nail head and the top edge of the collar with polyurethane sealant.
- Press the shingles back down. A dab of sealant under each tab holds them until the sun reseals them.
Match the boot to the pipe. Most bathroom vents are 1-1/2 or 2 inch, and the main stack is usually 3 or 4 inch. A boot that is too loose will leak within a season. If the old boot is in good shape but the collar is split, a retrofit collar that clamps over the existing boot works too and costs about $20-60.
Step 4: Fix nail pops and exposed nails
A nail pop happens when a nail backs out of the deck, usually from wood expanding and contracting. The raised head lifts the shingle above it, creating a tent that catches wind and water. Exposed nails are the same problem in a different form: a roofer nailed too low and the shingle above does not cover the head.
For a popped nail, lift the shingle above, pull the nail with the flat bar, and drive a new nail 1 inch to the side so it bites fresh wood. Seal the old hole with a thumb-sized blob of sealant. Do not just hammer the old nail back down. It will walk out again within a year.
For an exposed nail that is tight, cover the head with sealant. A 1/4 inch bead that fully buries the head is enough. Check the whole roof while you are up there. Ridge caps, hip caps and the last course at the ridge almost always have a few exposed nails, and these are a common source of mystery leaks that show up only in wind-driven rain.
Step 5: Replace damaged or missing shingles
Cracked, curled or missing shingles leave the underlayment doing all the work. Felt underlayment handles that for a few weeks, not a few years.
To replace a single architectural shingle:
- Loosen the self-seal strip on the shingle above and the one above that. You need to reach the nails from two courses, since each shingle is nailed through the course beneath it.
- Pull the eight nails holding the damaged shingle (four of its own, four from the course above).
- Slide the old shingle out and the new one in, aligning the bottom edge with the neighbors.
- Nail it with four 1-1/4 inch roofing nails on the nail line, about 1 inch above the cutout line or where the manufacturer marks it.
- Replace the nails in the course above through the same holes if the shingle is intact, or move them 1 inch over if the holes are torn.
- Seal the tabs with a quarter-sized dab of sealant under each one.
Work when the roof is between 45°F and 85°F. Cold shingles crack when you lift them and hot shingles tear and scuff. If your shingles are brittle enough that lifting one cracks the three around it, the roof is at the end of its life and you are into replacement territory.
Pro tip
Keep a few spare shingles from the original installation in the garage, or buy one bundle now in the closest match. Shingle colors change between production runs, and a close match today is better than a mismatched patch after the next storm.
Step 6: Repair failed flashing at walls, chimneys and valleys
Flashing is thin metal that bridges the gap where the roof meets something else. When it fails, water goes straight into the house. These are the three spots that leak most.
Step flashing along a wall
Step flashing is a row of L-shaped pieces, each one lapped by a shingle. Leaks happen when the sealant along the siding dries out, a piece rusts through, or the counter flashing over it pulls loose. Pull the siding or trim back enough to see the flashing. Replace rusted pieces one at a time, weaving each new 4 x 4 x 8 inch piece under the shingle above and over the shingle below. Seal the top edge against the wall and refasten the siding.
Chimney flashing
Chimneys use two layers: step flashing against the brick and counter flashing set into the mortar joints above it. The counter flashing lip is usually the first thing to fail. Pull it, clean the mortar groove with a grinder or cold chisel to about 3/4 inch deep, reset the metal, and pack the joint with polyurethane sealant or fresh mortar. If the chimney mortar itself is crumbling, repoint the joints before you reflash, since loose mortar bricks will not hold a counter flashing lip. Also check the cricket, the small peaked diverter behind a chimney wider than 30 inches. A missing cricket lets water pool against the back of the chimney and no amount of caulk fixes that.
Valleys
Valleys carry the most water on the roof. Open metal valleys fail when the metal rusts through or a nail was driven through the center. Closed valleys fail when the shingles crack where they bend. Cover small holes with a patch of matching metal set in sealant, lapped at least 2 inches on all sides. Keep valleys clear of leaves and granules, because debris dams water up under the shingle edges. This is one of the reasons to clean gutters twice a year, and a safe gutter cleaning from a stabilized ladder is far cheaper than a valley repair.
Step 7: Skylights and ice dams
Skylights leak at three places: the sealant between the glass and the frame, the flashing kit around the curb, and condensation that people mistake for a leak. Run the hose on each separately. Frame seals get a bead of exterior silicone after you clean the old sealant out. Flashing kits are specific to the skylight model and usually run $50-400 to replace depending on size and brand, with most kits in the $120-260 range. If the skylight is a 1990s acrylic bubble with a cracked dome, replace the whole unit.
Ice dams are a winter problem. Snow melts over the warm attic, runs down, and refreezes at the cold eave. Water backs up behind the ice and goes under the shingles. The short-term fix is a roof rake to pull snow off the bottom 3 feet of the roof, and calcium chloride in an old sock laid across the dam to melt a channel. The real fix is in the attic: air seal the ceiling, bring insulation up to the level recommended for your climate zone, R-38 to R-60 depending on where you live, and make sure soffit and ridge vents move air. A roof that stays cold does not form ice dams.
Step 8: Tarp the roof if you cannot finish today
If a storm is coming or the damage is bigger than one shingle, tarp it. Lay a heavy tarp so it runs from above the ridge to below the damaged area, with the top edge over the peak. Water that runs under a tarp tucked below the ridge just goes right under it.
Sandwich each edge in a 1 x 3 furring strip and screw through the strip into the deck. Do not use bricks or cinder blocks to hold it down. They slide, and they become projectiles in wind. A properly screwed tarp holds for a few weeks. Document everything with photos before and after if you plan to file an insurance claim.
Troubleshooting
| Symptom | Likely cause | Fix |
|---|---|---|
| Ceiling stain grows only in wind-driven rain | Exposed nails at ridge or loose flashing on one side | Seal ridge nails, check step flashing on the windward wall |
| Drip stops after you seal a boot, returns in a month | Sealant alone over a cracked collar | Replace the boot, not the caulk |
| Wet attic in winter, dry in summer rain | Condensation from poor ventilation, not a leak | Add soffit and ridge vents, seal attic bypasses |
| Leak appears only during snowmelt | Ice dam at the eave | Rake snow, add insulation and ventilation, ice and water shield at reroof |
| Water at the wall below a chimney | Counter flashing lip pulled from mortar | Regrind the joint, reset flashing, repoint loose mortar |
| Stain in the same spot after a shingle swap | Wrong shingle, nail hole torn in the course above | Move nails to fresh wood, seal old holes |
| Rust on multiple nail tips across the attic | Chronic condensation | Fix bathroom fan ducting, improve airflow |
Prevent the next leak
Walk the roof or use binoculars from the ground every spring and fall. Look for curled tabs, bare patches, loose flashing and clogged valleys. Clean the gutters at the same time, since overflowing gutters soak the fascia and the first course of shingles. Trim branches back at least 6 feet from the roof so they do not scrape granules off in wind. Before a forecast storm, clear the valleys, secure anything loose on the roof, and tape a loose tarp and strips in the garage so you are not shopping during the outage. Check attic ventilation once a year by feeling for airflow at the ridge on a hot day. A roof deck that runs 140°F because the attic is sealed ages shingles 5 to 10 years early.
When to call a pro
Call a licensed roofer if the roof pitch is over 8/12, the deck is spongy or soft underfoot, you find rot or mold across more than one rafter bay, the leak runs along a valley you cannot reach safely, or the shingles crack when lifted and the roof is 18 years or older. Call a chimney mason if the chimney itself is leaning, spalling or missing mortar more than 1/2 inch deep. Electrical fixtures with water in them need an electrician before you turn the breaker back on.
FAQ
Can I fix a roof leak from inside the attic?
Only as a stopgap. A bucket, or a piece of tin bent to divert water into a bucket, buys you time during a storm. The actual repair has to happen on the roof surface, because water will keep soaking the deck and insulation.
How much does roof leak repair cost?
A DIY pipe boot or shingle swap runs $20-60 in materials. A pro charges $150-500 or more for the same small repair, $400-1,500 or more for flashing or valley work, and more for skylight replacement. Anything involving deck replacement is quoted by the square foot.
Does roofing cement or sealant actually stop leaks?
Yes, on nail heads, flashing laps and small cracks. No, as a substitute for a cracked boot, a rusted flashing or a missing shingle. Sealant is the finish on a repair, not the repair.
Why does my roof leak only sometimes?
Wind direction, rain intensity and temperature change where water goes. A leak that shows up only in heavy storms from the south is almost always on the south-facing wall flashing or ridge. A winter-only leak is usually ice dams or condensation.
How long can a small leak wait?
Not long. Plywood delaminates after a few months of repeated wetting, insulation loses its R-value when damp, and mold starts within 48 hours. Tarp it the same day and repair it within two weeks.