
To weather strip a door, you seal the three sides of the frame with a compression strip (foam tape, V-strip or a kerf-in gasket) and seal the bottom with a door sweep or an adjusted threshold. One exterior door takes 30 to 60 minutes and $10 to $45 in parts, and the only tools you need are a tape measure, a utility knife, a drill and a hacksaw for the sweep.
Quick steps: weather strip a door
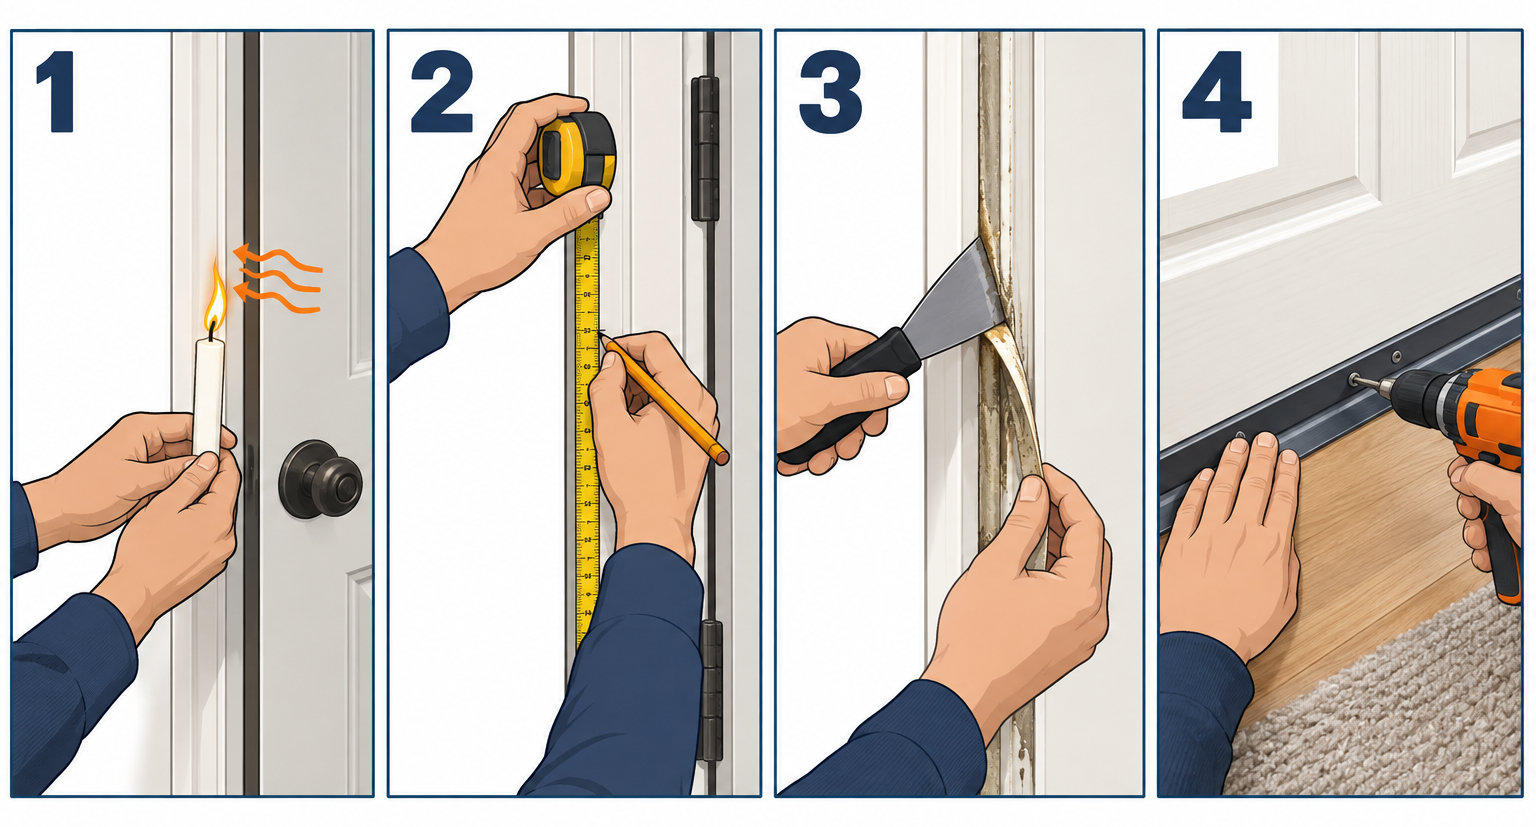
- Find the gaps with a flashlight at night or a dollar bill in the closed door.
- Measure both jamb legs, the head jamb and the width of the door slab.
- Pull the old strip, scrape the adhesive and wipe the surface with rubbing alcohol.
- Cut the head piece first, then the two side pieces, a hair long.
- Press foam tape to the doorstop, or push kerf-in strip into the frame groove.
- Close the door, hold the sweep against the threshold and mark the screw holes.
- Screw the sweep on, then run the dollar-bill test around all four sides.
- If the door won’t latch, back the sweep off slightly or adjust the strike plate.
Tools and materials
- Tape measure and pencil
- Utility knife or heavy scissors
- Flashlight (and a stick of incense or a lit candle for the draft test)
- Stiff putty knife or plastic scraper
- Rubbing alcohol and a clean rag
- Weatherstrip: foam tape (3/16″ x 3/8″ for most doors), vinyl V-strip, or a kerf-in set (two 7′ legs and one 3′ head)
- Door sweep (36″ aluminum with vinyl insert, or a 36″ door shoe)
- Hacksaw and a file for trimming the sweep
- Drill/driver with a #2 Phillips bit and a 1/16″ bit for pilot holes
-
6 x 1/2″ or #8 x 3/4″ screws if the sweep comes without them
- Adhesive caulk or construction adhesive (optional, for stubborn tape ends)
Calculators for this job
Safety first
This job is low risk, but keep the hinge side of the door clear of fingers when you swing it closed during testing. If your house was built before 1978 and the doorstop paint is flaking, wet-scrape rather than sand it and bag the scrapings, because it may contain lead.
Where a door actually leaks
A standard 36″ x 80″ entry door has roughly 232 linear inches of edge where it meets the frame. A gap of only 1/8″ along that edge adds up to about 29 square inches of open air, which is about the same as cutting a 5″ x 6″ hole through your wall and leaving it open all winter.
The leaks concentrate in four places, and each one takes a different fix:
- The doorstop on both jamb legs and the head. The stop is the thin strip of wood or metal the door closes against. Foam tape, V-strip or a kerf-in gasket seals here.
- The hinge side. This side moves least, but old doors pull away from the stop as the hinge screws loosen. Tighten those before you touch any weatherstrip.
- The bottom edge. The gap between the door slab and the threshold is almost always the biggest, and it is where you feel cold air on your ankles. A door sweep or door shoe fixes it.
- The threshold itself. Most residential thresholds have a replaceable vinyl insert that gets crushed flat after about ten years. Some are adjustable with screws under small caps.
If the door frame is loose, rotted or badly out of square, weather stripping will help but it won’t finish the job. Check that the door closes without rubbing and that the reveal (the gap between slab and jamb) is close to even all the way around before you start. A 1/8″ reveal on the latch side and a 1/16″ reveal on the hinge side is normal.
Which weather stripping for doors to buy
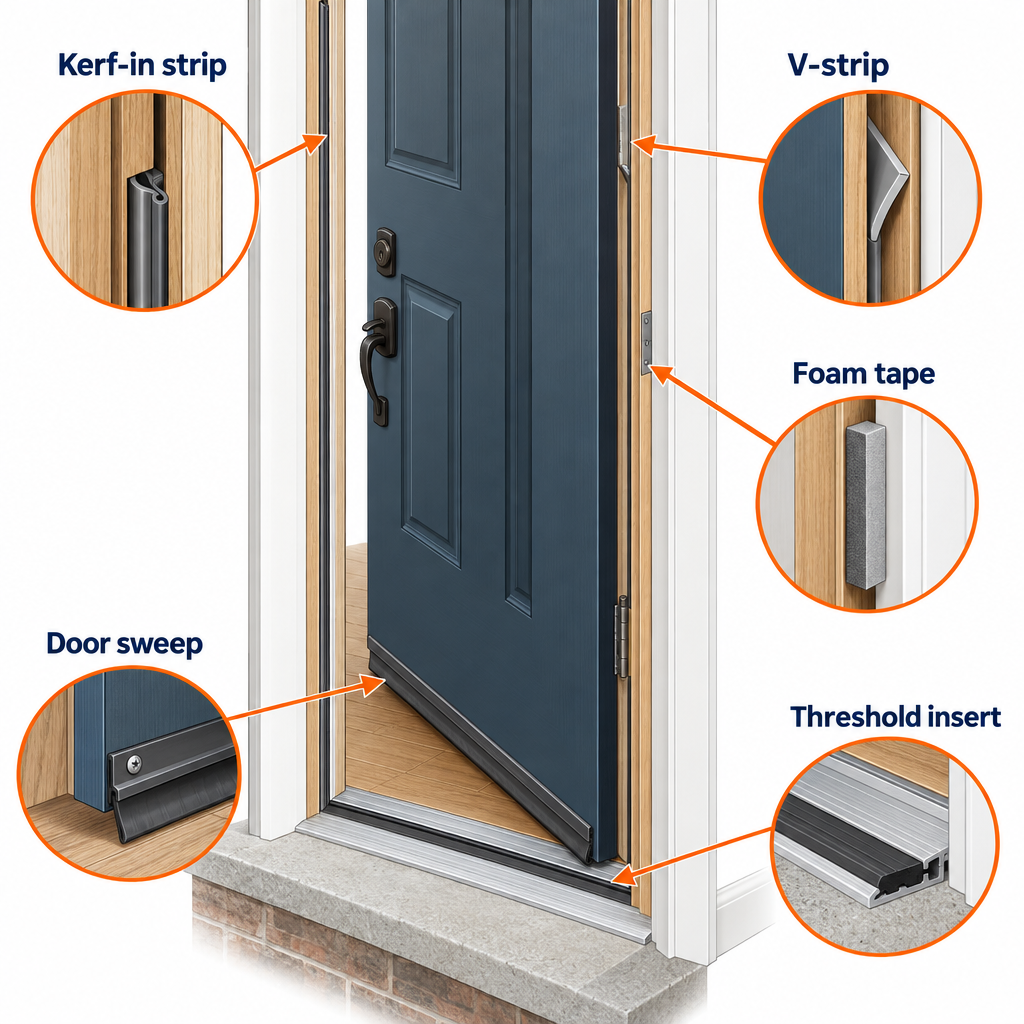
The hardware aisle sells a dozen products under the same name. They are not interchangeable. Here is how the common types compare for a typical exterior door.
| Type | Where it goes | Gap it fills | Install | Lifespan | Cost (per door) |
|---|---|---|---|---|---|
| Closed-cell foam tape (EPDM or PVC) | Face of the doorstop | 1/8″ to 1/2″ | Peel and stick | 2-5 years | $4-10 |
| Open-cell foam tape (gray polyurethane) | Face of the doorstop | 1/4″ to 3/4″ | Peel and stick | 1-2 years | $3-6 |
| Vinyl V-strip (tension seal) | Jamb, between door and stop | 1/16″ to 1/4″ | Peel and stick | 5-8 years | $6-12 |
| Spring bronze V-strip | Jamb, between door and stop | 1/16″ to 1/4″ | Nailed every 1-2″ | 20+ years | $25-45 |
| Kerf-in compression strip (foam core with vinyl skin, or vinyl bulb) | Slot in the stop of a pre-hung door | 1/4″ to 1/2″ | Push into the groove | 8-15 years | $10-25 (set of three) |
| Tubular rubber or vinyl gasket with nailing flange | Face of the stop, screwed or nailed | 1/4″ to 1/2″ | Fasten every 6-8″ | 8-12 years | $10-20 |
| Magnetic strip | Face of the stop, steel doors only | 1/8″ to 3/8″ | Screwed or kerf-in | 10+ years | $15-30 |
| Felt (wool or polyester) | Face of the stop | 1/8″ to 1/4″ | Stapled or glued | 1-2 years | $3-6 |
| Door sweep (aluminum bar, vinyl or brush insert) | Inside face of door at the bottom | 1/4″ to 1″ | 3-4 screws | 5-10 years | $8-20 |
| Door shoe (U-channel with vinyl insert) | Wraps the bottom edge of the slab | 1/8″ to 1/2″ | Screws from below | 10+ years | $15-30 |
| Automatic door bottom | Mortised or surface-mounted at the bottom | Drops to the floor when closed | Screws plus a plunger on the hinge side | 10+ years | $25-60 |
| Replacement threshold insert | Snaps into the aluminum threshold | 1/4″ to 1/2″ | Pull old, press new | 5-10 years | $8-15 |
The short answer on what to buy
For a pre-hung steel or fiberglass door made in the last 30 years, buy a kerf-in replacement set. It slides into the slot your door already has, it looks factory, and it seals far better than tape. For an older wood door with a nailed-on wooden stop, use vinyl V-strip if the gap is small or a nailed tubular gasket if the gap is wide. Use foam tape only when the gap is uneven, the surface is rough, or you need a fix this afternoon and plan to do it properly later.
For the bottom, a plain aluminum door sweep is the fastest fix. A door shoe looks cleaner and lasts longer, but it requires pulling the door off its hinges. Pick an automatic door bottom only when the door opens over carpet or an uneven floor where a sweep would drag.
Match the strip to the gap
Measure the gap first and buy a strip rated for it. Most packaging prints the gap range. A strip that is too thin never touches the door. A strip that is too thick, especially foam tape, makes the door fight you at the latch, and most people respond by simply not latching it, which is worse than no strip at all.
Quick rule for foam tape: the compressed thickness should be about half of the uncompressed thickness. So a 1/4″ gap wants a tape close to 1/2″ thick, and a 1/8″ gap wants 3/16″ or 1/4″. The 3/16″ x 3/8″ roll is the most common size on the shelf for exactly this reason.
Durable versus cheap
Closed-cell foam, EPDM rubber and anything with a vinyl or polyethylene skin shrugs off sun and rain. Open-cell gray foam soaks up water, freezes, and crumbles within a couple of seasons. Felt is a one-winter product. If the door faces south or west and takes full sun, specialty EPDM tape or the kerf-in foam-core strip (Schlegel’s Q-Lon is the one most door manufacturers use) will outlast anything else by years.
Colors and finish
Kerf-in and tubular strips come in white, brown, tan, black and gray. White matches most painted jambs; brown and black match stained wood and dark-bronze patio doors. Foam tape is almost always black, gray or white. Nobody sees the strip when the door is closed, but a black strip on a white jamb looks like dirt from across the room, so match it when you can. A white strip on a white jamb disappears.
Step 1: Find the drafts
Pick a cold or windy day, or make your own wind. Turn on the bathroom exhaust fans and the range hood, and start a load in the dryer. Those fans push air out of the house, so outside air gets pulled in through every gap, and you can feel it. While you are at it, if the laundry room feels drafty, the “clothes dryer vent” flap is often the leak, not the door.
Then work the door three ways:
The flashlight test. At night, have someone stand outside with the door closed and run a flashlight slowly around the frame. From inside, with the lights off, you will see light at every gap. Mark them with a pencil tick on the jamb.
The dollar bill test. Close the door on a dollar bill at a dozen spots around the frame. If it pulls out with no resistance, that spot leaks. If it tears or won’t budge, the existing strip is too tight there. You want firm drag.
The incense test. Light a stick of incense and hold it 2″ from the frame on a windy day. The smoke stream bends toward or away from the gap. This catches leaks at the threshold corners that the other tests miss.
Pay attention to the pattern. A leak along the full length of one side means the strip is worn or missing. A leak only at the top corner of the latch side usually means the door has sagged on its hinges, and that is a hinge-screw fix, not a weather strip fix. Drive a 3″ screw through the top hinge into the stud behind the jamb and recheck before you buy anything.
Step 2: Measure the door and frame
Measure the height of each jamb leg from the threshold to the underside of the head jamb. Measure the head jamb from leg to leg. Measure the width of the door slab across the bottom for the sweep. Write all four numbers down. Standard numbers are 80″ or 81″ for the legs, 36″ for the head and 35-3/4″ for the slab, but a lot of older houses have 30″, 32″ or 34″ doors, and the big-box 36″ sweep gets cut down either way.
If you are buying a kerf-in set, also note which side the hinges are on and whether the stop is wood or a metal-wrapped composite. Kerf-in sets are sold as two 7-foot legs and one 3-foot head, or as a single 17-foot roll. Buy the roll if your door is taller than 7 feet or if you have more than one door to do.
For a sliding patio door, you measure the pile weatherstrip differently. Pull a piece out of the channel and measure three things: the width of the plastic backing (usually 0.187″ or 0.270″), the height of the pile (0.200″ to 0.300″ is typical), and whether it has a center fin. Take the sample to the store or match it online. Guessing the backing width is the number one reason the new pile won’t slide into the channel.
Pro tip
Buy one more roll or set than you think you need. Weatherstrip is one of the few hardware products you can almost always return unopened, and the extra trip across town to finish a door you already took apart costs more than a $12 roll.
Step 3: Remove the old weather stripping
Old foam tape comes off in strips if you pull slowly at a low angle. Whatever stays behind is dried adhesive, and that is the part that makes new tape fail. Scrape it with a stiff putty knife held nearly flat, then wet a rag with rubbing alcohol and rub until the surface squeaks. A citrus adhesive remover works on thick residue, but wipe it off completely with alcohol afterward or the new tape won’t stick.
Kerf-in strip pulls straight out of the groove. Grab one end with pliers and pull in one long motion so the fin doesn’t tear off inside the slot. Run a flat screwdriver down the kerf to clear paint and debris, then vacuum it.
Nailed V-strip or a tubular gasket comes off with a flat bar. Pull the nails rather than snapping them, since a broken nail shank in the stop will keep the new gasket from sitting flat.
Before you move on, close the door and run the dollar bill test once more against the bare stop. You now know the true gap at each spot with nothing in the way, which tells you whether the strip you bought is the right thickness. If the gap is wildly different top to bottom (say 1/8″ at the head and 1/2″ at the bottom), the stop itself is out of line. On a wood stop you can pry it off, close the door, push the stop snug against the door, and renail it. That five-minute fix often does more than any gasket.
Step 4: Install foam tape or V-strip on a wood stop
Foam tape
Start with the head piece. Measure the inside length of the stop at the head, cut the tape with scissors (a utility knife squashes it), and peel back about 6″ of the backing paper. Press the end into the corner where the head stop meets the hinge-side leg, then work along the stop peeling and pressing with your thumb as you go. Peeling it all at once invites the tape to stick to itself.
Place the tape on the face of the stop that the door closes against, not on the edge, and set it about 1/16″ back from the inside edge so the door’s corner doesn’t catch it. Press the whole length firmly for a few seconds. Adhesive on foam tape is pressure-sensitive and it bonds over about 24 hours, so avoid slamming the door for the rest of the day.
Run the side legs full length from the top down and butt them into the head piece. Cut the bottom end so it sits on top of the threshold without being crushed. On the hinge side, keep the tape to the thinner side of what you measured. That side has the least gap and a thick tape there will push the door open against the latch.
The one place foam tape fails is the latch-side corners, because the door hits them at a slight angle every time it closes. If a corner lifts within a week, press a dab of clear adhesive caulk under it and tape it down overnight.
Vinyl V-strip (tension seal)
V-strip doesn’t go on the stop. It goes on the jamb itself, in the gap between the door edge and the stop, with the open side of the V facing out toward the weather. When the door closes it compresses the V, and the V springs back against the door’s edge.
Cut the strip to the jamb height, fold it along the scored center line, peel the backing and press the adhesive side to the jamb about 1/16″ from the stop. Then fold the free leg out so it springs toward the door. On the latch side, cut a notch around the strike plate so the latch isn’t riding on the strip. On the hinge side, run it from the top down and stop at the top edge of the lowest hinge, because the hinge leaves cover that space anyway.
V-strip is the right call for an old door with a small, even gap. It is nearly invisible once installed and it takes no space on the stop, so it never changes how the door latches.
Pro tip
Spring bronze V-strip, nailed with the copper nails it comes with every 1-1/2″, is what the original builder used on most pre-1950 doors. It costs more, but it is the only weatherstrip that will still be working in 30 years, and you can tune the seal by running a putty knife under the spring leaf to bend it out a touch.
Step 5: Install kerf-in weatherstrip on a pre-hung door
Nearly every steel, fiberglass and modern wood entry door sold since the early 1990s has a thin slot, called the kerf, cut into the stop about 1/8″ wide. The weatherstrip has a barbed fin that pushes into the kerf and a hollow bulb or foam-filled pad that the door compresses. Replacing it is the easiest and best-sealing door weatherproofing strip job there is.
Measure the head first and cut the strip with a utility knife on a scrap board. Cut it 1/4″ long. Push the fin into the kerf starting at one end, pressing with your thumb along the length until it seats fully. The extra 1/4″ bunches up slightly and keeps the ends tight into the corners.
Do the two legs the same way, from the head down, with each leg cut about 1/4″ long so the bottom end squeezes against the threshold. The bulb should face the door and sit flush against the stop’s face. If the strip won’t push into the kerf, the kerf is clogged with paint. Run a thin putty knife down it to open it up.
Most kerf-in sets sell as compression foam (a soft foam core wrapped in a polyethylene skin) or as a hollow vinyl bulb. The foam type seals better on a slightly out-of-square door because it conforms. The bulb type is cheaper and stiffer. Either way, buy the product with the same bulb size as the one you pulled out. Standard residential bulbs are about 3/8″ to 7/16″ wide. There are slim-line profiles for doors with tight reveals and a 1/2″ “extra large” profile for doors that have warped.
Close the door and check that it latches without a hard shove. A new strip will feel slightly stiff for a few days until the bulb takes a set. If you have to body-check the door, the strip is too big, not the door.
Steel doors and magnetic strips
Many steel doors come with a magnetic weatherstrip on the latch side and head, similar to a refrigerator gasket, and compression strip on the hinge side. If yours has a magnetic strip, replace it with the magnetic version, because the door was adjusted at the factory to seat against a magnet that doesn’t compress. A foam bulb in that slot will make the door hard to latch.
Step 6: Install a door sweep
A sweep is an aluminum bar with a vinyl or brush insert that screws to the inside face of the door and drags lightly across the threshold. It is the single biggest draft fix on most doors.
Measure the width of the door slab across the bottom. Cut the sweep 1/8″ shorter than that with a hacksaw, cutting through the aluminum and the vinyl together. Smooth the cut end with a file so it doesn’t scratch the jamb.
Close the door. Hold the sweep against the inside face with the vinyl flap just touching the threshold along its whole length. It should bend slightly, not fold over. Most sweeps have slotted screw holes so you can slide it up or down, but set it in the middle of the slots so you have room to adjust later. Mark the holes with a pencil.
Open the door. Drill 1/16″ pilot holes on a wood door, or just drive the self-tapping screws on a steel door. Drive the screws snug, close the door, and test. If the sweep catches on the threshold as the door opens, loosen the screws and raise it 1/16″. If you see daylight under it, lower it.
Pro tip
Hang a sweep with the door closed and a sheet of cardboard between the vinyl and the threshold, then pull the cardboard out. That gives you a consistent light contact along the whole width instead of a sweep that drags at one end and gaps at the other.
Door shoe instead of a sweep
A door shoe is a U-shaped aluminum channel with a vinyl insert that wraps the bottom edge of the door. It gives a cleaner look and sheds water better because the insert hangs below the slab and drips outside. To install one you pull the hinge pins, lay the door on sawhorses, slide the shoe onto the bottom edge and screw it from underneath. Some shoes require you to trim 1/4″ to 1/2″ off the door bottom first, which is a circular saw job with a straightedge clamp. Budget 45 extra minutes for a shoe over a sweep.
Automatic door bottom
For a door that swings over carpet, a sweep either drags or leaves a gap. An automatic door bottom screws to the inside face (or mortises into the bottom edge on a nicer model) and has a spring-loaded seal that drops when the door closes. A small plunger on the hinge side hits the jamb and triggers the drop. Set the drop with the adjustment screw on the plunger end so the seal just touches the floor when closed. They cost $25 to $60 and are the standard fix on interior doors between a garage and a house, where codes want a tight seal against fumes.
Step 7: Fix the threshold
Look at the threshold. If it is aluminum with a vinyl or rubber hump down the middle, that hump is a replaceable insert. When it is flattened, cracked or torn, pull it out of its channel (it usually lifts at one end) and press in a new one. They cost $8 to $15 and come in a few profiles, so bring the old one to match.
If your threshold has four or five small plastic caps along the top, it is adjustable. Pop the caps off with a screwdriver tip. Each one hides a screw that raises or lowers that section of the threshold. On most brands, turning the screw counterclockwise raises the threshold and clockwise lowers it, but turn one a half turn and watch to confirm. Adjust so the threshold just kisses the door bottom with the door closed. Then put the caps back; they keep water out of the screw heads.
Wooden thresholds on older houses are often worn into a dip right where people step. You can fill a shallow dip with exterior wood filler, but if the wood is soft, replace the threshold. A replacement oak or aluminum threshold costs $20 to $50 and installs with three or four screws after you pry the old one up.
Don’t rely on the threshold alone for the bottom seal. The threshold and sweep work together: the threshold insert seals the gap when the door is closed, and the sweep catches the rest and covers any unevenness.
Step 8: Check the fit and adjust the latch
Close the door and run the dollar bill test again at the four corners, the middle of each side and either side of the strike plate. Every spot should give firm drag. Where the bill slides free, the strip isn’t touching. Where the door won’t latch at all, the strip is too thick on that side.
A door that latched fine before and now needs a shove after new weatherstrip has a simple fix. Remove the strike plate, file 1/16″ off the inside edge of the latch hole with a flat file, and reinstall. That lets the latch bolt drop in a hair sooner. If the strike plate is already as far as it will go, move it. Fill the old holes with glued toothpicks or a dowel, let it dry, and drill new pilot holes 1/16″ farther out.
On the hinge side, if the door binds against the new strip, check the hinges. Loose hinge screws let the door drift toward the latch side. Tighten them, and replace any stripped ones with 3″ screws into the framing.
Then wait a day. New foam takes a set, kerf-in bulbs soften slightly, and adhesives cure. The door will close easier tomorrow than it does right now.
Sliding patio doors
Sliders don’t use compression strip. They use pile weatherstrip (fuzzy nylon brush on a plastic backing) in channels on the sliding panel, the fixed panel interlock and the jamb. When it packs down you get wind noise and a draft along the edge.
Pull the sliding panel: open it about halfway, lift it straight up, and swing the bottom out. Some panels need you to loosen the roller adjustment screws at the bottom corners first so the panel drops enough to clear the top track. Lay it flat on a blanket.
Find the old pile on the edges of the panel and in the interlock. Pull it out with pliers. Slide the new pile into the channel, starting at an open end; if both ends are closed, you can cut a small notch in the channel lip with a utility knife to feed it in. Cut to length with scissors. Replace every piece you can reach while the panel is out, because the labor is in the removal, not the strip.
While the door is out, clean the track and lubricate the rollers with silicone spray. Adjust the roller screws so the panel sits square in the frame and the latch lines up. A panel that leans leaves a tapered gap no weatherstrip will seal.
Pile weatherstrip costs $10 to $25 for a roll that does a whole door. The whole job takes about an hour, most of it getting the panel in and out.
French doors and double doors
A pair of swinging doors seals around the outside with the same kerf-in or foam strip as a single door. The problem spot is the center where the two doors meet. That joint is sealed by an astragal, a T-shaped strip attached to one door (the inactive one) that the active door closes against.
If the astragal has a worn vinyl bulb or foam strip, it is usually kerf-in and replaces the same way as the jamb strip. If the gap is at the top or bottom of the center joint, the inactive door’s flush bolts aren’t fully engaged, or the top bolt’s strike hole in the head jamb has worn. Fix those first.
Wind-driven rain on French doors is most often a threshold problem, not a gasket problem. If water comes in at the center bottom, check that the threshold has a drip cap and the sill pan isn’t cracked.
Garage doors
The garage door seals in three places and all three use different products.
Bottom seal. A rubber or vinyl strip slides into an aluminum retainer along the bottom of the door. Most are a T-shape on both edges (sold as “T-type” or “T-end”) and some are a bead or bulb. Measure the retainer and the door width, buy the matching profile, and buy 2 feet more than the door width. Pull the old one out sideways, spray the retainer channel with soapy water, and slide the new one in with a helper holding the free end. Cut it 1″ long at each end and tuck the extra into the channel so it doesn’t shrink out of the corners in cold weather. A 16-foot bottom seal costs $20 to $40.
Side and top. The jamb seal is a vinyl stop molding with a flexible flap nailed to the door jamb, overlapping the face of the door. It is sold as “garage door weatherstrip” in 7- and 9-foot pieces and 16-foot lengths for the top. Pry the old molding off, hold the new one so the flap presses lightly against the closed door, and nail it every 12″ with the color-matched nails it comes with. Push the flap in about 1/8″ past where it first touches the door; it should bend, not fold.
Between panels. Sectional doors have a shiplap joint between panels. If daylight shows through there, the panels have been dented or the hinges are loose. That isn’t a weatherstrip fix.
After replacing the bottom seal, the door bottom is taller by the seal’s thickness. If you have a “garage door opener,” it may now stop short of the floor or reverse when it hits the new seal. Run the down-travel limit adjustment on the opener head a quarter turn at a time until the seal compresses evenly along the floor without triggering the auto-reverse.
What a pro charges
Hiring it out makes sense when you have five or six doors or a door that needs a new threshold and a trim. Expect these numbers in most US markets:
| Job | Parts | Pro labor | Total |
|---|---|---|---|
| Foam tape, one door | $5-10 | $50-100 | $55-110 |
| Kerf-in strip plus sweep, one door | $20-40 | $75-150 | $95-190 |
| Door shoe installed (door pulled) | $20-35 | $100-175 | $120-210 |
| New threshold | $25-60 | $100-200 | $125-260 |
| Sliding door pile and roller service | $15-30 | $125-250 | $140-280 |
| Garage door bottom seal | $25-45 | $75-150 | $100-195 |
| Garage door jamb seal, three sides | $30-60 | $100-175 | $130-235 |
Most handymen have a half-day minimum of $150 to $300, so bundle the doors. A whole-house pass on four exterior doors and a garage door typically runs $350 to $700 installed.
What to use instead of weather stripping
Sometimes you can’t weather strip, because the door is rented, the frame is too rough, or you need something tonight.
- Draft stopper (draft snake). A fabric tube filled with sand or rice that sits on the floor against the door. Blocks the bottom gap only, and you have to move it every time you open the door. $10 to $25, or sew one from a pant leg. The two-sided version with a foam tube on both faces of the door slides with the door and stays put.
- Rope caulk. A soft, gray putty rope you press into gaps on a door you don’t plan to open until spring. Peels off clean in a few months. About $5 a package.
- Removable caulk. A clear, peelable caulk for the same purpose, better looking than rope caulk and fine on painted trim.
- A storm door. Adds a second air barrier in front of the entry door and protects the weatherstrip from weather. $150 to $500 plus installation. It does more for an old wood door than any gasket.
- Thermal curtains. On a drafty patio door, floor-length insulated “curtains on curtain rod” hardware mounted above the frame cuts the cold-air drop at night noticeably. They don’t stop the leak, they slow it.
- Shrink-film kit. The window version works on a fixed patio panel or a door you won’t use all winter. Taped and heat-shrunk, $8 to $15.
- A new door. If the slab is warped more than 1/4″ or the frame has rotted, a pre-hung replacement at $440 to $1,800 installed, and more for premium doors, is the honest fix.
None of these is better than a proper strip on a door you use. They are stopgaps or add-ons.
Troubleshooting
| Symptom | Likely cause | Fix |
|---|---|---|
| Door won’t latch after new strip | Strip too thick, or too much on the hinge side | Swap for a thinner strip on the hinge side; file or move the strike plate 1/16″ |
| Foam tape peels at the corners within a week | Dirty surface, cold install, or door hits the corner at an angle | Clean with alcohol, reapply above 50°F, dab adhesive caulk under the corner |
| Still drafty at the top latch corner | Door sagged on the hinges | Drive a 3″ screw through the top hinge into the stud |
| Sweep drags and the door is hard to open | Sweep set too low | Loosen screws, raise 1/16″, retighten |
| Daylight under the sweep at one end | Threshold worn unevenly or door out of square | Raise that end of the sweep, or adjust the threshold screw at that end |
| Kerf-in strip won’t push into the slot | Kerf clogged with paint or old fin | Run a thin putty knife down the kerf, vacuum, retry |
| Kerf-in strip pops out in the cold | Cut too short or wrong fin size | Recut 1/4″ long; buy the profile matching the old one |
| Pile weatherstrip won’t slide into the patio door channel | Wrong backing width | Measure the old backing (0.187″ vs 0.270″) and rebuy |
| Water comes in at the bottom corners | Threshold insert torn or sill pan gone | Replace the insert; if water pools outside the door, that’s a grading problem |
| Draft on a door that seals perfectly | Leak is around the frame, behind the trim | Pull the casing and foam the gap between jamb and framing with low-expansion foam |
| Garage door reverses after new bottom seal | Opener down-limit set for the old, thinner seal | Adjust the down-travel limit a quarter turn at a time |
| Magnetic strip on a steel door doesn’t grab | Strip replaced with foam, or door drifted | Reinstall the magnetic type; tighten the hinges |
When the leak isn’t the weatherstrip
Pull the interior casing off one side of the door and look at the gap between the jamb and the wall framing. On a lot of houses, especially those built before spray foam was common, that gap is empty or stuffed with a bit of fiberglass that stops nothing. Fill it with low-expansion window and door foam (the regular stuff bows the jamb inward and the door stops closing), let it cure, trim it flush and put the casing back. This 30-minute job is often the biggest single draft improvement on an older door, and the weatherstrip gets the credit.
The same goes for the gap under the threshold. If you can feel air coming up through the threshold itself, the sill wasn’t sealed to the subfloor. Running a bead of exterior caulk along the outside edge where the threshold meets the sill helps; pulling the threshold and setting it in a bed of caulk fixes it.
When to call a pro
Call a door installer or finish carpenter if the frame is rotted, the door is warped more than 1/4″ corner to corner, the jamb is racked so the reveal varies by more than 3/16″, or the threshold is set into a rotted sill plate. Those need a new pre-hung unit or structural repair, and no gasket will seal them. For a garage door, leave spring and cable work to a garage door company; replacing seals is fine, but the torsion spring above the door can cause serious injury.
FAQ
What is the best type of weather stripping for doors?
Kerf-in compression strip is the best choice for any pre-hung door that has a slot in the stop, which covers nearly every steel and fiberglass entry door made since the 1990s. It seals tightly, looks factory, and lasts 8 to 15 years. For older wood doors with a nailed-on stop, spring bronze V-strip is the most durable option and vinyl V-strip is the easiest. Closed-cell EPDM foam tape is the best of the stick-on products because it holds up to sun and water, and manufacturers such as Frost King rate it for 10 years, so it is suitable for long-term installations.
What is the best way to weatherstrip a door?
Seal the three sides of the frame first, then the bottom. Find the gaps with a flashlight or dollar bill, measure them, and match a strip to the gap size. Clean the stop with rubbing alcohol, install the head piece first and the legs second, then screw on a door sweep with the door closed so it just touches the threshold. Finish with the dollar bill test around the whole door and adjust the strike plate if the door latches hard.
What is the weather stripping under a door called?
The strip attached to the bottom of the door is a door sweep (if it screws to the face) or a door shoe (if it wraps the bottom edge). The strip you step over is the threshold, and the rubber hump on top of it is the threshold insert or threshold seal. A spring-loaded version that drops when the door closes is an automatic door bottom.
What to use instead of weather stripping?
For a short-term fix, use a draft stopper on the floor, rope caulk or removable caulk pressed into the gaps, or a shrink-film kit on a door you won’t open until spring. For a long-term alternative, add a storm door, which creates a second air barrier and protects the entry door. Thermal curtains cut the chill from a patio door without sealing it. If the door is warped or the frame is rotted, the real alternative is a replacement pre-hung door.
How often should door weather stripping be replaced?
Foam tape lasts 2 to 5 years, vinyl V-strip and kerf-in strip 5 to 15, and door sweeps 5 to 10. Check every door each fall with the dollar bill test. Replace a strip when it stays flat after you press it, when it’s cracked, or when the dollar bill slides out with no drag.
Can you put weather stripping on top of old weather stripping?
No. Stacking a new strip on a worn one makes the door hard to latch and the old adhesive lets go underneath the new tape. Pull the old strip, scrape the adhesive, clean with alcohol and start fresh. On a kerf-in door, the slot only holds one strip anyway.
Should weather stripping go on the door or the frame?
On the frame. Compression strips go on the doorstop or in the kerf, and V-strip goes on the jamb. The only products that mount on the door itself are the door sweep, door shoe and automatic door bottom, which handle the gap at the threshold.