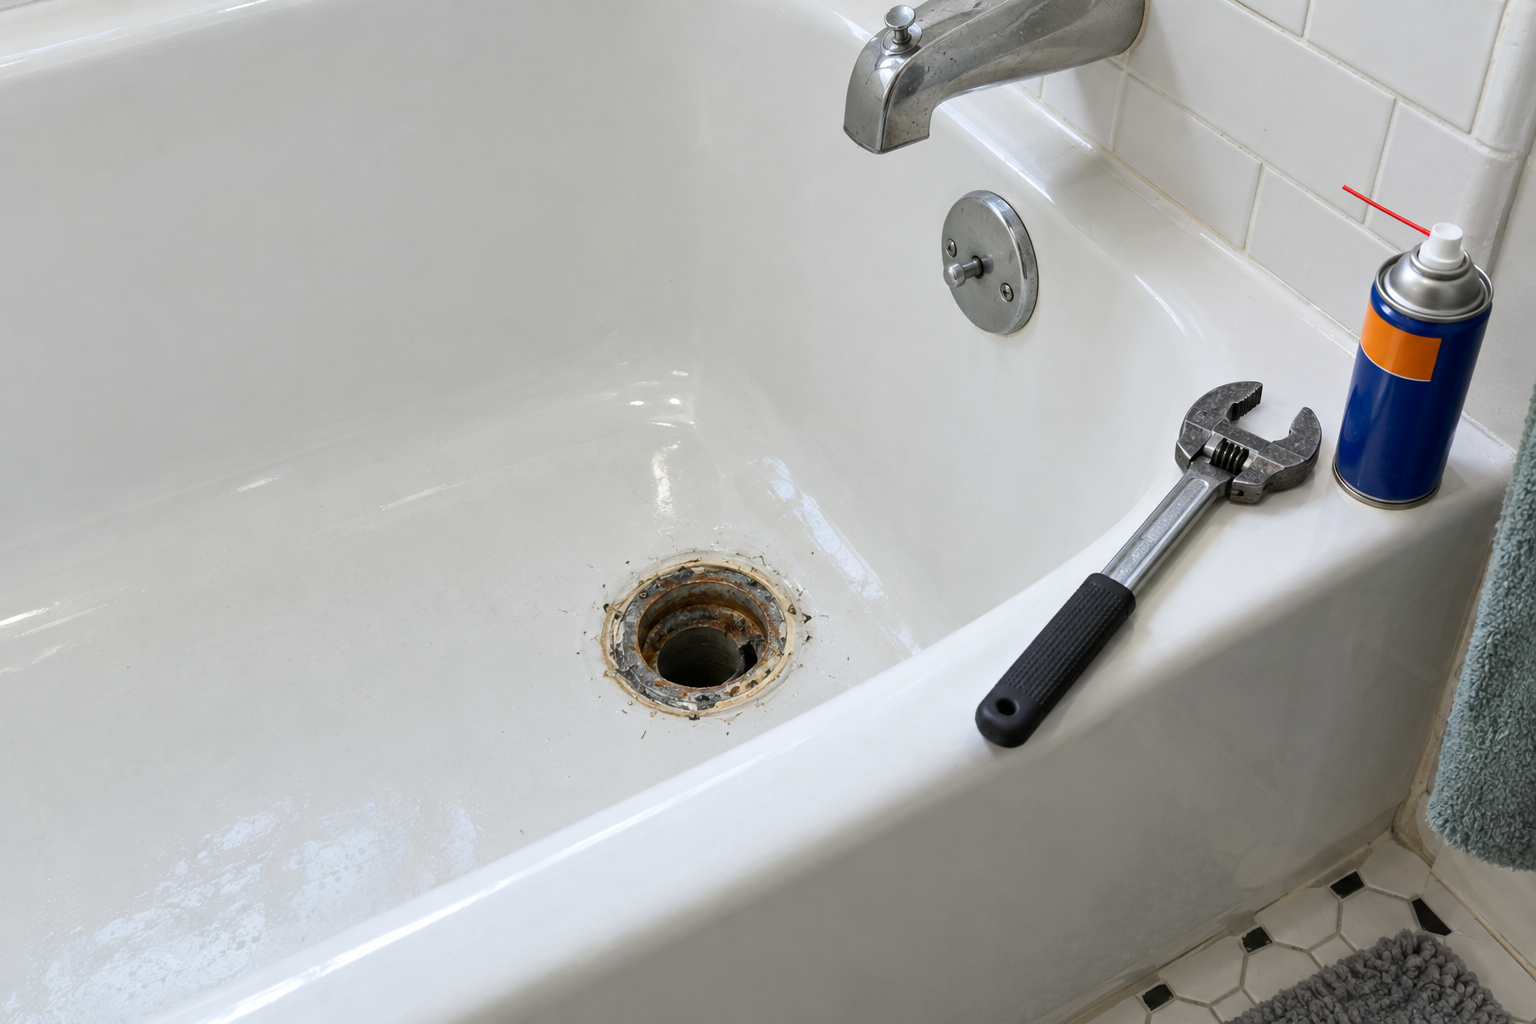
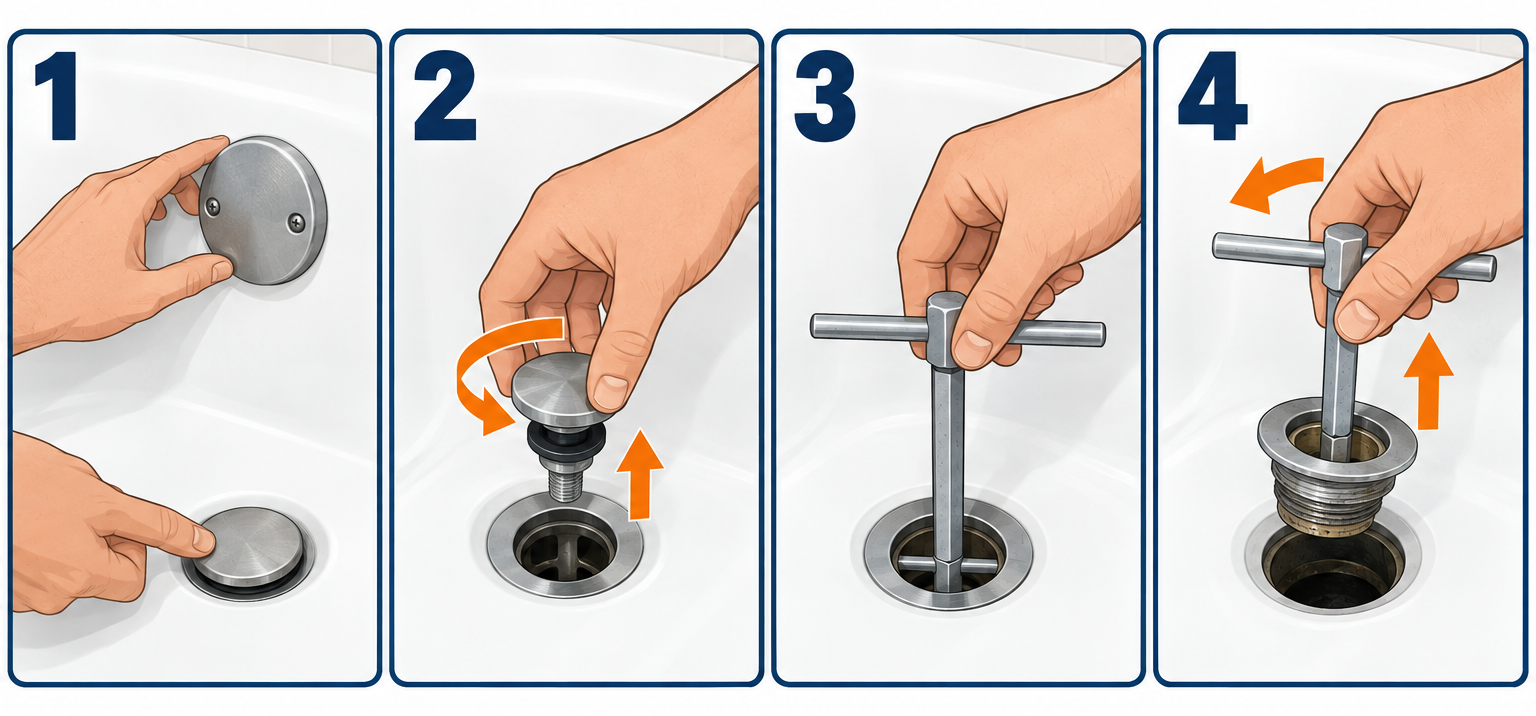
To remove a bathtub drain, pull the stopper first (each type comes out a different way), then unscrew the drain flange counterclockwise with a dumbbell wrench or a tub drain extractor. Most stoppers take five minutes. The flange takes 15 to 45 minutes depending on how corroded it is.
Quick steps: remove a bathtub drain
- Identify your stopper type by looking at the drain and the overflow plate.
- Remove the stopper: twist, unscrew, or pull depending on type.
- For trip lever drains, remove the two overflow plate screws and pull out the linkage.
- Clear hair and gunk from the crossbars so your tool seats fully.
- Fit a dumbbell wrench or drain extractor into the flange and turn counterclockwise.
- Apply heat or penetrating oil if it will not budge, then try again.
- Lift the flange out and scrape old plumber’s putty from the tub.
- Inspect the drain shoe threads before installing the new drain.
Tools and materials
- Dumbbell tub drain wrench (fits 1-1/2 in. flanges) or tub drain extractor
- 3/8 in. ratchet (for the extractor style)
- Flathead and Phillips screwdrivers
- Needle-nose pliers
- Allen key set (some push-pull stoppers use a hex set screw)
- Hair dryer or heat gun
- Penetrating oil (PB Blaster, Liquid Wrench or similar)
- Plastic putty knife and rag
- Hacksaw blade or reciprocating saw with a metal blade (last resort)
- Replacement drain assembly with stopper, if replacing
- Plumber’s putty or 100% silicone (for reinstall)
Calculators for this job
Safety first
Do not pour chemical drain cleaner down the tub before this job. It pools in the trap and splashes back when you pull the flange. Wear safety glasses when using a saw blade, and never hammer on a cast iron or enameled steel tub; the enamel will crack.
Step 1: Identify your drain type
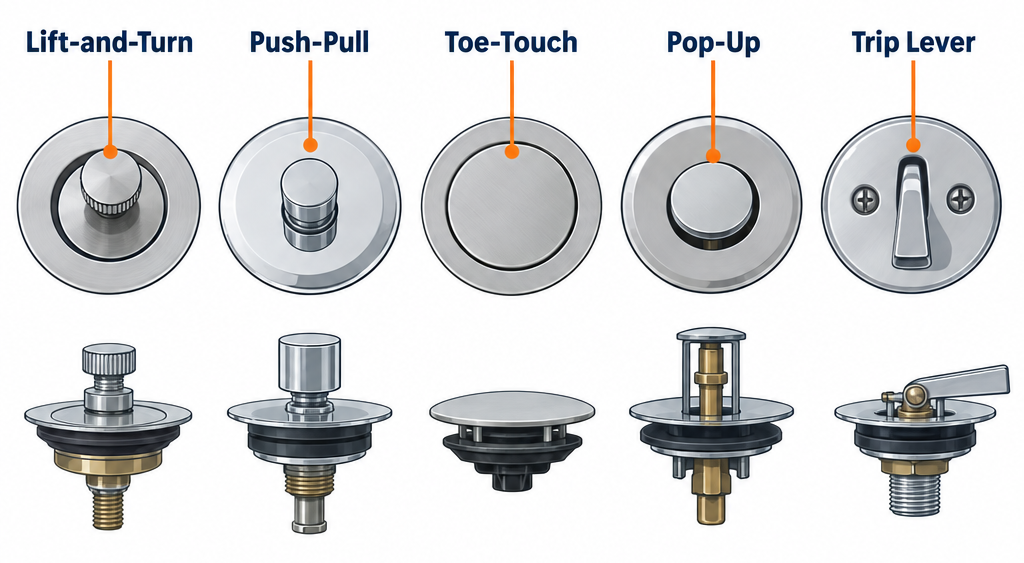
Stand in the tub and look at two things: the stopper in the drain opening and the overflow plate under the spout. Together they tell you which of five systems you have.
| Stopper type | What you see at the drain | Overflow plate | How it comes out | Time |
|---|---|---|---|---|
| Lift-and-turn | Small knob on top of a domed cap | Plain cover, no lever | Lift, hold, unscrew counterclockwise | 2-5 min |
| Push-pull | Smooth knob, no set screw visible | Plain cover | Unscrew knob, remove center screw | 3-5 min |
| Toe-touch | Flat cap, no knob, pops when pressed | Plain cover | Open it, unscrew cap, then shaft | 3-5 min |
| Pop-up | Stopper with no knob, moves with lever | Lever on plate | Wiggle out stopper and rocker arm, then pull linkage | 10-15 min |
| Trip lever (plunger) | Open strainer grate, no stopper | Lever on plate | Remove plate screws, pull plunger out | 10-15 min |
There is a sixth style worth knowing. Flip-It and similar retrofit stoppers simply push into the flange with rubber O-rings. Grab the body and pull straight up. If it fights you, twist slightly while pulling.
If you only need to clear hair or replace a worn stopper, you can stop after Step 2. If the flange is cracked, pitted or leaking under the tub, keep going through Step 3.
Step 2: Remove the stopper
Each type has one trick. Get it wrong and you will round off a screw head or snap a brass post.
Lift-and-turn stoppers
Pull the stopper up to the open position. Hold the stopper body still with one hand and turn the knob counterclockwise with the other. On many models the whole assembly unscrews from the crossbar in the flange after six to ten turns.
If the knob spins freely without lifting anything, look under the cap. There is usually a small set screw. Loosen it with a flathead screwdriver or a 3/32 in. Allen key, lift the cap off, then unscrew the exposed post from the crossbar.
Push-pull stoppers
Pull the stopper up. Wrap a rag around the stopper body and hold it steady, then turn the top knob counterclockwise. It will come off and expose a brass post with a screw head on top.
Back that screw out with a flathead screwdriver. Some brands use a Phillips head or a hex screw instead, so check before you start turning. Once the screw is free, lift the stopper body out of the drain.
Pro tip
If the knob will not unscrew because the whole post spins, slide a second flathead screwdriver into the slot on the post while you turn the knob. This locks the post so the threads actually separate instead of spinning as one unit.
Toe-touch stoppers
Press the stopper so it pops to the open position. Grip the top cap and turn counterclockwise. The cap comes off and reveals a spring-loaded shaft. Grab the base of that shaft with needle-nose pliers and unscrew it from the crossbar.
These work on a spring and the spring is the first thing to fail. If your toe-touch stopper no longer stays down, the fix is a new stopper, not a repair. They cost $10 to $20.
Pop-up stoppers
Flip the overflow lever to the open position so the stopper rises. Grab the stopper and pull up while wiggling side to side. A curved rocker arm is attached underneath. Keep pulling at a gentle angle and the rocker arm will come out through the drain opening.
Now remove the two screws on the overflow plate. Pull the plate forward and the linkage rod follows it out of the overflow pipe. Set the whole assembly aside. If you are reinstalling it later, note the orientation of the rocker arm so the stopper sits level.
Trip lever drains
There is no stopper to remove at the drain. The plunger sits inside the overflow pipe behind the wall of the tub. Remove the two overflow plate screws, then pull the plate straight out. The linkage and brass plunger come with it. Wiggle gently if it hangs up on the elbow inside the pipe.
The drain opening itself has a flat strainer. Some are held by a single center screw; some are threaded onto the flange. Remove the screw or unscrew the strainer counterclockwise to expose the crossbars.
Hair collects on the plunger and linkage more than anywhere else in a trip lever system. If the tub drains slowly, clean this before you assume the pipe is blocked.
Step 3: Clear the crossbars and choose your tool
Look down into the flange. You should see two crossbars forming an X or a single bar across the center. Pull out any hair wrapped around them with needle-nose pliers. Your tool needs to seat all the way down on those bars, and a wad of hair will stop it short.
Now pick the tool for pulling the flange. This is the choice that decides whether the job takes ten minutes or an hour.
| Tool | Price | Works when crossbars are… | Pros | Cons |
|---|---|---|---|---|
| Dumbbell tub drain wrench | $8-15 | Intact | Cheap, fast, fits two common flange sizes, doubles as the install tool | Useless if crossbars are broken or badly corroded; can round them off |
| Tub drain extractor (expanding) | $15-25 | Intact or broken | Grips the flange wall, so it works on any drain; drives with a 3/8 in. ratchet | Costs more; can deform thin flanges; needs a ratchet |
| Crossed needle-nose pliers and screwdriver | $0 if you own them | Intact and not seized | Free, no trip to the store | Slips easily, limited torque, often breaks the crossbars |
| Hacksaw blade and chisel | $5 | Gone | Always works | Destroys the flange, risk of nicking the shoe threads, 30+ minutes |
The dumbbell wrench is a brass or aluminum bar with cross-shaped ends in two sizes. One end fits most 1-1/2 in. flanges with crossbars, the other fits a smaller pattern. You drop it in, catch the crossbars, and turn it with an adjustable wrench or a screwdriver through the hole in the middle.
The extractor is a tapered, knurled steel plug. You drop it into the flange, fit a 3/8 in. ratchet on top and turn counterclockwise. The taper bites into the inside wall of the flange and the whole thing turns as one.
Pro tip
If you plan to install a new drain the same day, buy the dumbbell wrench. You will need it to tighten the new flange anyway, and the crossed-pliers trick will not get it tight enough to seal. Buy the extractor only if your crossbars are already broken, or if the dumbbell wrench strips them.
Which tool should you choose
For a drain under 15 years old with solid crossbars, use the dumbbell wrench. For anything older, rusted, or with crossbars that have already snapped, go straight to the extractor and skip the frustration. Keep the pliers trick for a quick stopper swap on a tub you know is not seized. Save the saw for when everything else has failed.
Step 4: Unscrew the drain flange
Seat the tool fully. For the dumbbell wrench, the cross should sit flat on the crossbars with no rocking. Slide an adjustable wrench or large screwdriver through the center hole for leverage.
Turn counterclockwise. Expect real resistance on the first quarter turn. Decades-old plumber’s putty hardens, and the brass threads corrode against the shoe. Push down into the drain while you turn so the tool stays engaged. Once it breaks free, the flange spins out in six to eight turns.
Lift the flange out. A ring of gray or tan putty usually comes with it.
Under the tub, what you have just unscrewed from is the drain shoe. It is an elbow fitting with a female threaded opening that points up through the hole in the tub floor. The shoe stays in place. Only the flange comes out.
When the flange will not turn
Stop before you bend the crossbars. Try these in order.
- Warm the flange with a hair dryer on high for three to four minutes, or a heat gun on low for one minute. This softens old putty and expands the brass slightly. Try the tool again while it is warm.
- Spray penetrating oil where the flange threads meet the shoe, down inside the drain. Let it sit 15 minutes, then try again. Repeat once more if needed.
- Tap the tool lightly with a rubber mallet while applying turning pressure. Small shocks break the corrosion bond. Do not strike the tub itself.
- Switch to the extractor if the crossbars start to flex or snap.
When the crossbars are gone
A flange with broken crossbars is common in tubs from the 1970s through the 1990s. The extractor handles most of these. Drop it in, ratchet counterclockwise and let the taper do the work.
If the extractor spins without gripping, the flange is coming out by force. Slip a hacksaw blade (just the blade, held in a blade handle or wrapped in tape) into the drain and cut a vertical slot through the flange wall from the top rim down to just above the threads. Make a second cut about an inch away.
Work a flathead screwdriver or small cold chisel under the rim between the cuts and pry that section inward. Once a piece folds in, the rest of the flange loses its grip on the threads and you can pry it out in pieces with pliers. Go slow near the bottom of the cut. If you score the female threads in the shoe, the new flange will not seal and you are into replacing the shoe from below.
Step 5: Clean the opening and inspect the shoe
Scrape old putty from the tub surface around the hole with a plastic putty knife. Metal blades scratch enamel and acrylic. Wipe the area with a rag and a little rubbing alcohol or mineral spirits to get the surface clean enough for new putty to grip.
Shine a flashlight into the shoe. The threads should be clean and continuous. Rust flakes are normal and can be brushed out. If you see a crack in the shoe, or threads that have crumbled away, the shoe is damaged and needs to be replaced from below through an access panel or the ceiling underneath.
Check the rubber shoe gasket if you can see it. It sits between the shoe and the underside of the tub. A flattened, hardened gasket is the usual reason a tub leaks at the drain even after a fresh flange goes in. You cannot reach it from above, which is why it is the point where this job stops being a 20 minute fix.
Step 6: Install the new drain (if you are replacing it)
A new drain assembly comes with a flange, a rubber gasket for the shoe, and a stopper. Most sell for $15 to $40. A full waste and overflow kit with new overflow pipe and linkage runs $30 to $80.
Roll a rope of plumber’s putty about 3/8 in. thick and wrap it under the lip of the new flange. For cultured marble, acrylic or any porous or plastic tub, use 100% silicone instead; putty oils stain porous stone and can soften some plastics. Check what the tub manufacturer allows.
Thread the flange into the shoe by hand until snug. Then use the dumbbell wrench to turn it another quarter to half turn. Putty should squeeze out around the rim. Scrape away the excess. Do not overtighten: a cracked flange or a crushed shoe gasket are both common results of a drain that went in with a cheater bar.
Reinstall the stopper the same way it came out, in reverse. Fill the tub a couple of inches, pull the plug and check under the tub for drips if you have access.
If you are doing this as part of a tub refresh, it is the right moment to change the bathtub faucet too. The tub is already empty and the putty is already out.
Repair or replace: which does the drain need
| Problem | Fix the stopper | Replace the flange | Replace the shoe and overflow |
|---|---|---|---|
| Stopper will not hold water | Yes, new stopper $10-20 | No | No |
| Slow drain, hair on stopper | Yes, clean it | No | No |
| Rust ring, pitted or flaking flange | No | Yes, $15-40 | No |
| Crossbars broken, stopper will not thread in | No | Yes | No |
| Leak under tub after new flange | No | No | Yes, gasket or shoe, $30-80 in parts |
| Overflow leaks when tub is full | No | No | Yes, overflow gasket |
| Visible crack in shoe or threads stripped | No | No | Yes |
Rust on the visible flange is cosmetic until it pits through. Some people try to clean rust from metal drains and keep them, but a brass flange that has rusted is usually chrome plating over brass and the plating is gone for good. A new flange costs less than an hour of scrubbing.
Common mistakes that turn this into a plumber call
Turning the wrong direction. Flanges are standard right-hand thread. Counterclockwise loosens, every time, no matter what the stopper did.
Using a screwdriver as a lever across the crossbars with nothing to spread the load. The bars snap and now you need the extractor you were trying to avoid buying.
Skipping the heat. Three minutes with a hair dryer solves half of all stuck flanges.
Hammering on the tub to shock the threads loose. Enamel on cast iron and steel tubs chips at the edge of the drain hole, and that chip rusts within a month.
Reusing the old shoe gasket under a new flange. New drain kits include a gasket for a reason.
Cutting too deep with the saw blade. The threads in the shoe are the one thing you cannot replace from above.
Troubleshooting
| Symptom | Likely cause | Fix |
|---|---|---|
| Stopper knob spins but nothing loosens | Set screw under the cap, or post spinning with knob | Find and loosen the set screw; hold the post with a second screwdriver |
| Crossbars snapped off | Corroded brass, too much leverage | Switch to a tub drain extractor |
| Extractor spins inside flange | Flange wall too thin or already cracked | Cut the flange with a hacksaw blade and pry it out |
| Flange turns but will not lift out | Threads still engaged, or putty holding the rim | Keep turning until free, then pry gently under the rim with a plastic blade |
| Shoe moved or dropped when flange came out | Shoe was loose or the overflow pipe fitting let go | Reach it from the access panel or below; the shoe must be reconnected before reinstalling |
| New flange leaks at the tub | Gasket flattened, putty missing, or flange not snug | Remove, add fresh putty, check gasket, retighten a quarter turn |
| Tub still drains slowly after stopper removed | Clog in trap or overflow linkage | Clean the plunger and linkage; snake the trap through the overflow opening |
| Trip lever plunger stuck in overflow pipe | Corrosion or hair wedge | Work it up and down while pulling; spray penetrating oil down the overflow |
When to call a pro
Call a plumber if the drain shoe is cracked, the threads are stripped, the shoe pulls loose from the overflow pipe, or you find water damage under the tub. All of these need access from below through a panel, closet wall or the ceiling beneath the bathroom. Expect $150 to $350 for a shoe and overflow replacement with access, more if drywall has to be opened. A slab foundation with the shoe set in concrete is a plumber job from the start.
FAQ
How do you remove a bathtub drain without the special tool?
Cross two needle-nose pliers in the flange so the jaws sit on opposite crossbars, then slide a screwdriver between the handles and turn counterclockwise. It works on drains that are not seized. For anything stuck, a $15 dumbbell wrench or a $20 extractor saves the crossbars and your afternoon.
How do you remove a drain plug from a bathtub that has no screws?
Push-pull and lift-and-turn stoppers hide the screw under the knob. Hold the stopper body and unscrew the knob counterclockwise to expose it. Flip-It style stoppers have no screw at all; pull straight up while twisting.
Which way do you turn a tub drain to remove it?
Counterclockwise, looking down into the tub. The flange has standard threads. If it will not move, heat and penetrating oil come before more force.
Can I remove the tub drain without removing the overflow?
Yes. The flange unscrews from the shoe independently. The overflow plate only needs to come off on pop-up and trip lever drains, and only because the linkage runs down to the plunger or rocker arm that sits in the way.
What size is a standard bathtub drain flange?
Most flanges are 1-1/2 in., which is why the dumbbell wrench fits nearly every tub. Older and some imported tubs use a slightly different pattern, which the second end of the dumbbell wrench covers. Measure the inside of your old flange before buying a replacement.
How much does it cost to have a plumber remove and replace a tub drain?
A professional flange and stopper replacement typically runs $230 to $1,170 according to Angi, with other sources putting a typical job at around $350; doing it yourself costs roughly $15 to $90 in parts. If the shoe or overflow needs work from below, expect $150 to $350 plus any drywall repair.
Do I need plumber’s putty or silicone under the new flange?
Plumber’s putty on enameled steel, cast iron and most fiberglass tubs. 100% silicone on cultured marble, natural stone and any tub whose manufacturer prohibits putty. Silicone needs 24 hours to cure before you fill the tub; putty seals immediately.