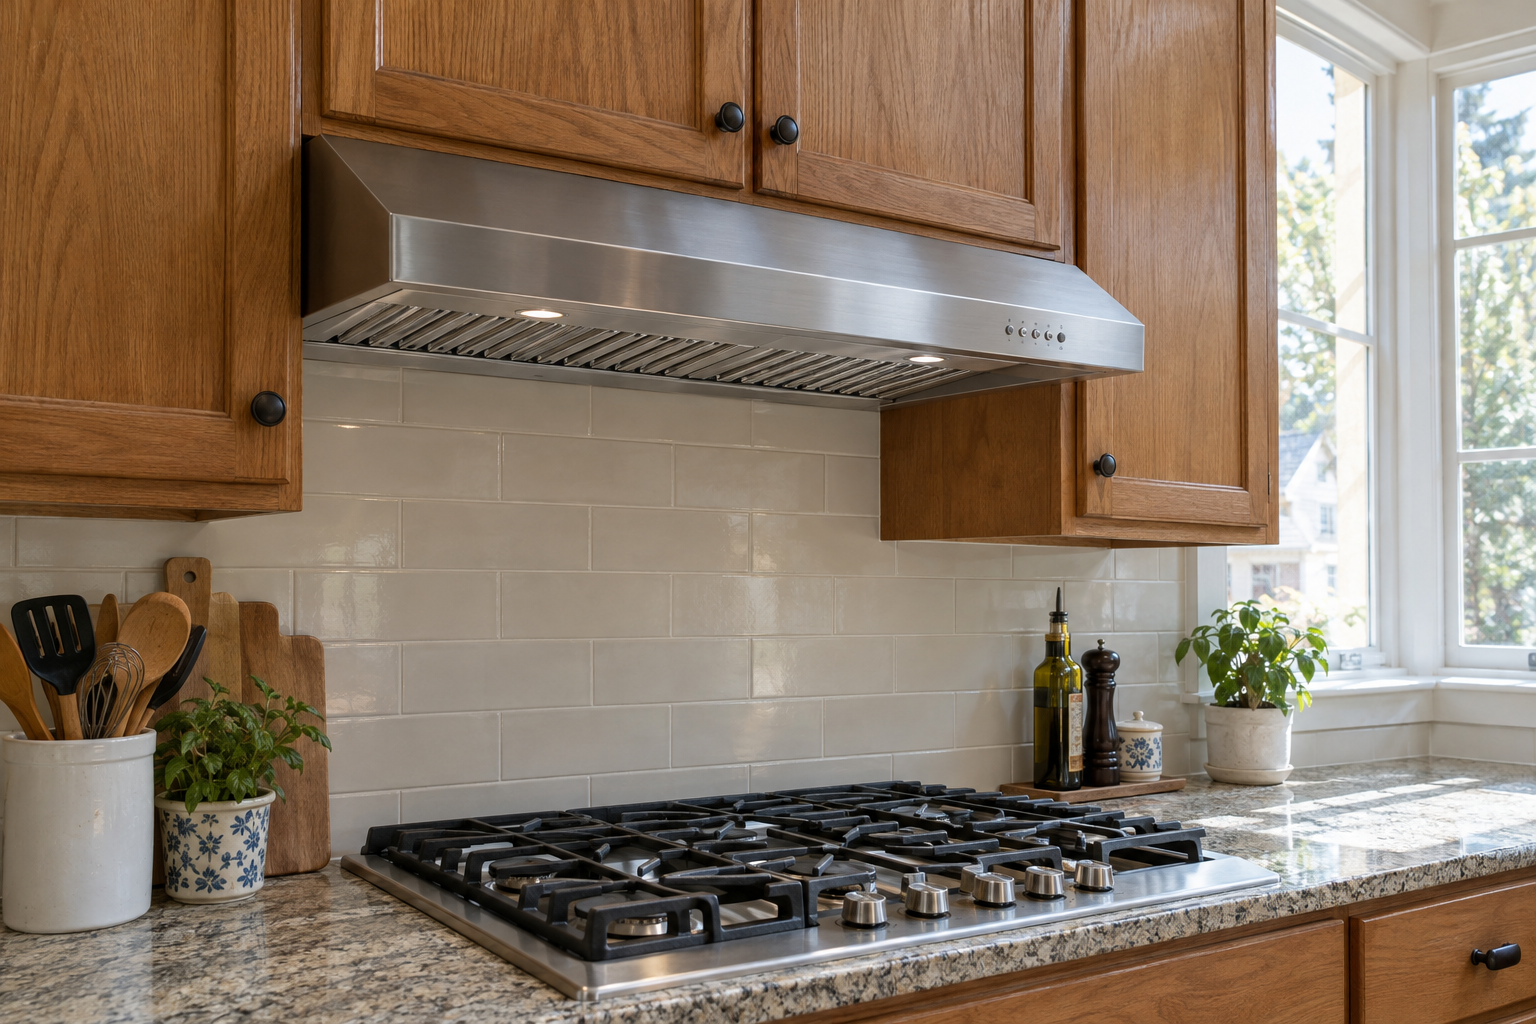
A vent hood installation comes down to five jobs: set the height, cut the duct opening, run and seal the duct, wire a 120-volt circuit, and hang the hood on screws driven into studs or cabinet framing. A straight swap of an under-cabinet hood takes about an hour. A new wall-mount chimney hood with a fresh duct run through an exterior wall is a half-day job for two people.
Quick steps: install a range hood
- Choose a hood the same width as the range and plan the shortest duct route outside.
- Kill the circuit at the breaker and confirm it is dead with a non-contact tester.
- Remove the old hood and mark the new mounting height on the wall or cabinet bottom.
- Cut the duct opening and the wiring hole, then run rigid metal duct to a wall or roof cap.
- Wire the hood: black to black, white to white, bare or green to the ground screw.
- Hang the hood on its mounting screws, level it and tighten into studs.
- Connect the duct to the hood’s damper collar and seal every joint with foil tape.
- Install the filters and chimney cover, restore power, and test fan speeds and lights.
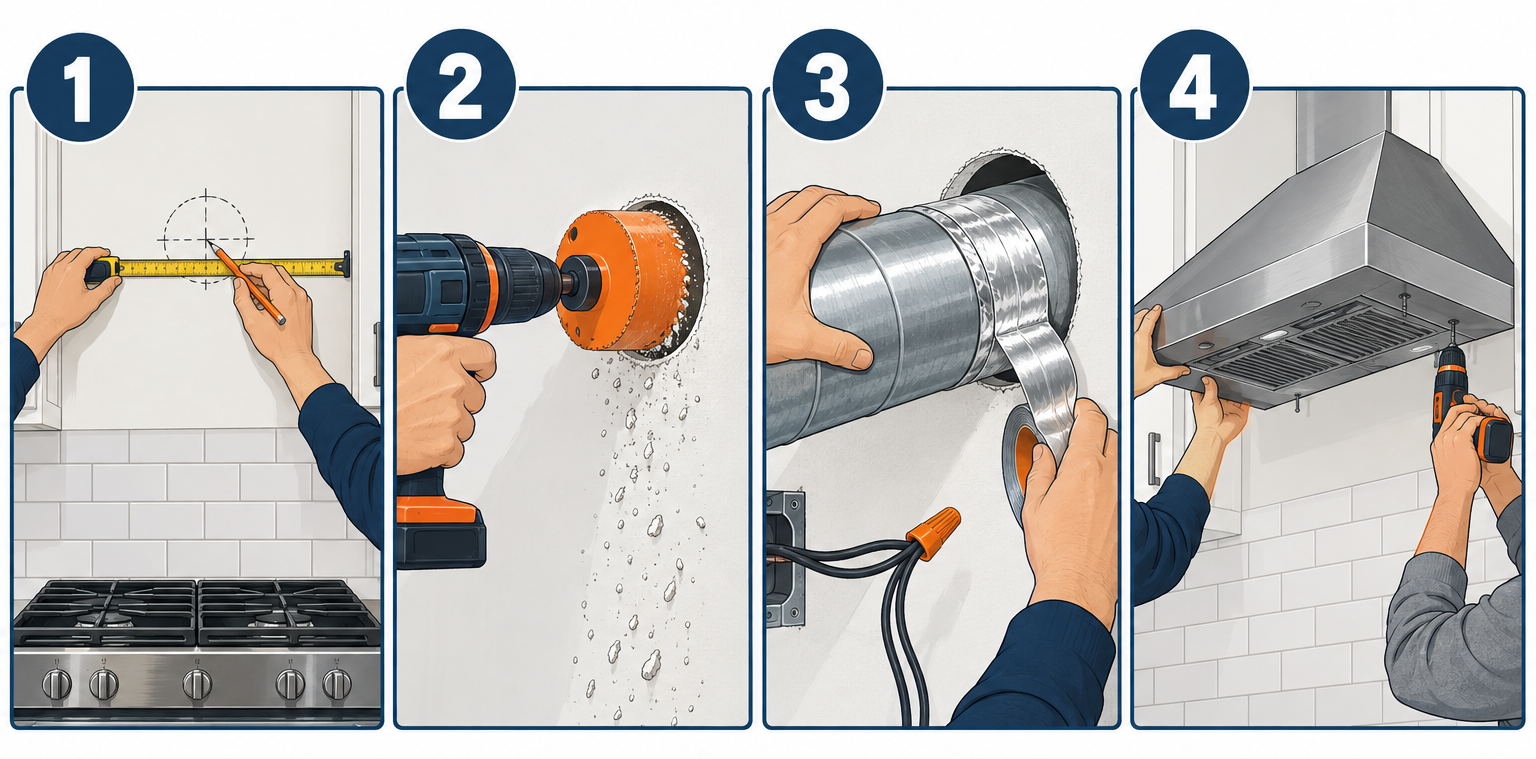
Tools and materials
- Range hood sized to the cooktop (30 or 36 inches wide for most kitchens)
- Rigid galvanized duct, 6-inch round or 3-1/4 x 10-inch rectangular, plus transition if needed
- Wall cap or roof cap with a backdraft damper, matched to the duct size
- UL 181-listed foil tape (not cloth duct tape)
- 14/2 NM-B cable with ground for a hardwired hood, or a 15-amp receptacle for a plug-in model
- Wire nuts, a 3/8-inch cable clamp, and a non-contact voltage tester
- Stud finder, 4-foot level, tape measure, pencil and painter’s tape
- Drill/driver with 1/8-inch pilot bit, 3/4-inch spade bit and a hole saw or jigsaw
- Reciprocating saw or oscillating multitool for cutting through drywall and sheathing
- #10 x 2-1/2-inch wood screws or 1/4-inch lag screws for studs, toggle bolts for hollow spots
- Exterior-grade silicone or polyurethane caulk for the wall cap
- Safety glasses, work gloves and a second person for a chimney hood
Calculators for this job
Safety first
Turn off the breaker feeding the hood and test the wires with a non-contact tester before touching them. If the hood has a cord, unplug it. Wear eye protection when cutting overhead, and never hang a 40-pound chimney hood alone.
Step 1: Pick the right hood and plan the duct route
The hood should be at least as wide as the cooktop. A 30-inch range gets a 30-inch hood. Going 6 inches wider on each side captures more smoke, which matters over a gas range or a high-output burner.
For airflow, the Home Ventilating Institute’s rule of thumb is 100 CFM per linear foot of range for a wall or under-cabinet hood, and 150 CFM per foot over an island. That means roughly 250 to 300 CFM for a standard 30-inch electric range. Gas cooks hotter, so size by burner output instead: about 1 CFM for every 100 BTU of total burner rating. A 60,000 BTU gas range wants a 600 CFM hood.
Check our local code before buying anything over 400 CFM. The International Residential Code (section M1503) requires makeup air for hoods that exhaust more than 400 CFM, which usually means a motorized damper in a dedicated outside air duct. That add-on costs $500 to $1,500 installed for a passive damper or $1,200 to $3,000 for a powered system, and it pushes the job toward a pro.
Ducted or ductless
Ducted hoods push grease, moisture and odors outside. Ductless (recirculating) hoods pull air through a charcoal filter and blow it back into the kitchen. If an outside wall or an accessible attic sits within 15 feet of the range, go ducted. It is the only setup that actually removes heat and humidity.
Ductless is the right call for rentals, condos with concrete ceilings, and interior walls with no practical path outside. Just know that the charcoal filters cost $15 to $40 and need replacing every three to six months.
Plan the shortest, straightest duct run
Grab a flashlight and look at the wall behind the range. The best route is straight back through the exterior wall. Second best is straight up through the cabinet and attic to a roof cap. The worst is a long horizontal run with multiple elbows through soffits or joist bays.
Every hood manual publishes a maximum equivalent duct length. Most land between 35 and 100 feet depending on the blower. Count each 90-degree elbow as about 15 feet of straight duct and each 45 as about 8 feet, then add the wall cap. A 6-foot run with two 90s and a cap already totals around 40 feet equivalent. Stay under the limit or the fan will sound loud and move little air.
Match the duct size to the hood collar. Most hoods up to 400 CFM use a 6-inch round collar or a 3-1/4 x 10-inch rectangular one. Hoods from 600 to 900 CFM want 7-inch or 8-inch round duct. Never reduce the duct below the collar size. Reducing a 6-inch duct to 4-inch cuts the open area by more than half and the blower will struggle.
Pro tip
Push a straightened wire coat hanger through a 1/4-inch test hole where we want the duct to exit the wall. If it hits a stud, a pipe or a wire, we move 2 inches and try again before cutting a 6-inch hole in the wrong place.
Step 2: Shut off the power
Find the breaker for the existing hood or the kitchen lighting circuit, switch it off, and tape the handle so nobody flips it back on. Turn on the hood’s light and fan to confirm nothing happens. Then hold a non-contact voltage tester against the wires once the junction cover is open.
If this is a new install with no existing circuit, we need a 15-amp, 120-volt circuit run to a junction box behind the hood location. Range hoods draw little power, typically under 3 amps for lights and blower, so 14/2 NM-B cable on a 15-amp breaker is standard. The hood can share a general lighting circuit in most jurisdictions, but it cannot tap the range or any small-appliance countertop circuit. The National Electrical Code (422.16) also allows cord-and-plug hoods if the receptacle is on an individual branch circuit and sits where the cord can reach it without an extension.
Running a new circuit from the panel is where DIY often stops. Most areas require a permit for new wiring and some require a licensed electrician. If we are extending an existing lighting circuit a few feet inside the wall cavity, that is usually permitted as a homeowner job with an inspection.
Step 3: Remove the old hood
Pull the grease filters out first; they slide forward or pop out of spring clips. Behind them we find the junction box cover, usually a small plate held by one or two screws. Open it, test the wires, then untwist the wire nuts and separate the hood wires from the house wires.
Loosen the cable clamp so the house cable can pull free. Now find the mounting screws. Under-cabinet hoods hang from two to four screws driven up into the cabinet bottom. Some have keyhole slots so the hood slides off once the screws are backed out a quarter inch. Have a helper support the hood while we remove the last two screws.
Wall-mount chimney hoods are heavier, 30 to 60 pounds. Remove the decorative chimney sleeve first (two to four small screws at the top), then the hood body lifts off a wall bracket. Set it on a towel on the stove so the finish does not scratch.
Inspect what is left. An existing duct that is rigid metal, the correct size and reasonably clean can stay. Replace anything made of flexible foil or vinyl, anything with a lot of grease buildup, and anything smaller than the new hood’s collar. Flex duct is not permitted for range hoods under the IRC; it must be smooth-wall metal.
Step 4: Mark the mounting height
Hood height is measured from the cooking surface to the bottom edge of the hood. Most manufacturers specify 24 to 30 inches over an electric cooktop and 27 to 30 inches over gas. A few high-CFM hoods allow up to 36 inches. Lower than the minimum is a fire risk over gas and will discolor the hood. Higher than the maximum lets smoke escape around the edges.
Our rule: use the minimum height the manual allows unless the cook is over 6 feet tall. Capture drops fast as the hood goes up.
For an under-cabinet hood, the height is set by the cabinet. If the cabinet bottom sits at 18 inches above the countertop and the cooktop is flush, the hood body (usually 5 to 6 inches tall) lands around 24 inches above the burners. If the math leaves us too low over a gas range, the fix is a shorter hood body or a filler strip to raise the cabinet, not ignoring the spec.
For a wall-mount hood, measure up from the cooktop to the chosen height and strike a level line across the wall with a 4-foot level. Then find the centerline of the range and mark a plumb line. Most templates reference these two lines.
Tape the paper template from the box to the wall, aligning its marks with our lines. Punch through the screw locations and the duct cutout with an awl or a pencil. Use a stud finder to mark studs across the area and extend their centerlines above and below the hood footprint with painter’s tape.
Account for the backsplash
If a tiled or peel and stick backsplash is going in, decide now whether the hood sits on top of it or the backsplash butts up to it. Most installers finish the wall first, then mount the hood over it, so the hood can be swapped later without disturbing the tile. Account for the backsplash thickness when choosing screw length.
Step 5: Cut the duct and wiring openings
Through the cabinet (vertical duct)
Center the duct hole on the hood’s collar location, not on the cabinet. Transfer the template to the inside of the cabinet floor and drill a 1/2-inch starter hole at one edge. Cut the opening with a jigsaw, keeping the blade just outside the line. For round duct, a 6-1/4-inch hole gives clearance for a 6-inch collar. For 3-1/4 x 10 rectangular, cut 3-1/2 x 10-1/4 inches.
Continue up through the cabinet top (and any shelf in the way) and into the ceiling drywall. Probe the ceiling cavity with a stiff wire to locate the joist bay before cutting the ceiling. If a joist lands dead center, shift the entire hood a few inches or use an offset in the duct run, never notch a ceiling joist.
Drill a separate 3/4-inch hole for the electrical cable, about 4 inches from the duct hole. Keep cable at least 1 inch from the duct so heat and vibration cannot wear the sheathing.
Through the exterior wall (horizontal duct)
Mark the duct center on the interior wall inside the hood footprint, above the hood’s rear knockout. Drill a 1/4-inch reference hole straight through to the outside. Go outside and confirm the exit point clears siding trim, electrical meters, hose bibs and anything else. The IRC requires exhaust terminations at least 3 feet from any operable window, door or other opening, and above grade.
Back inside, draw the cutout with the template or by tracing the duct. Cut the drywall with a jab saw or multitool. Clear insulation. Then drill four corner holes from inside through the sheathing and siding so we can trace the exact opening outside. Finish the siding cut from the outside with a reciprocating saw or a 6-1/4-inch hole saw on an arbor extension. Brick and stucco need a masonry core bit or a series of hammer-drill holes; many homeowners hand that part to a mason.
Through the roof
A roof cap is the best option when the range sits on an interior wall and the attic is accessible. Drive a long screw up through the ceiling drywall and attic floor at the duct center, go into the attic, and find it. Check for rafters and wiring, then drill a pilot hole through the roof deck. From the roof, cut the opening with a jigsaw, slide the cap’s flange under the upslope shingles, and seal with roofing cement under the flange and at exposed nail heads. Anyone uncomfortable on a roof should stop here and hire a roofer for this part only; it typically costs $240 to $600, and more on steep or complex roofs.
Step 6: Run and seal the duct, then set the wall cap
Start at the hood end and work outward. Install any transition piece (rectangular collar to round duct, for example) directly onto the hood’s damper collar. Push each duct section into the next with the crimped end pointing in the direction of airflow so grease cannot catch on the seams.
Secure each joint with three #8 sheet metal screws spaced around the pipe, then wrap the joint with two overlapping turns of foil tape. Skip screws on the final joint at the hood collar if it will need to come apart for a future hood replacement; tape alone holds there. Use duct straps or hanger wire every 4 feet in attic runs so the pipe does not sag.
Cloth duct tape fails within a year from heat and grease. It also is not listed for this use. Use UL 181 foil tape only, pressed down hard with a plastic squeegee.
The wall cap slides into the duct from outside. Dry-fit it first. The cap’s damper flap should swing freely and close on its own; flip it a few times. Run a heavy bead of exterior polyurethane or silicone caulk around the back of the flange, press it to the siding, and screw it down with the stainless screws provided. Caulk the top and sides of the flange to the siding and leave a small weep gap at the bottom. On lap siding, a vinyl mounting block or a cedar block creates a flat surface so the flange seals.
Hoods vent in the same family of duct as a clothes dryer vent, but the two systems must never share a pipe or a cap. Lint plus grease is a chimney fire waiting to happen.
Pro tip
Use a wall cap with a spring-loaded damper rather than a gravity flap when the duct exits a windy side of the house. Gravity flaps rattle and let cold air backdraft into the kitchen. A $35 spring damper cap stops the clatter and the draft.
Step 7: Wire the hood
Feed the house cable through the cabinet floor or wall hole and into the hood’s junction box knockout. Leave 8 inches of cable inside the box. Strip 6 inches of outer sheathing and install the 3/8-inch cable clamp so the clamp bites on the sheathing, not on the insulated conductors.
Inside the box we find a black, a white and a green or bare lead from the hood. Connect black to black (hot), white to white (neutral), and bare copper to the green hood lead or the green ground screw. Twist each pair clockwise with pliers before spinning on a wire nut, then tug each wire to confirm it holds. Fold the wires neatly and replace the cover.
Plug-in hoods are simpler. For under-cabinet models, the cord usually exits the top of the hood into the cabinet above, so a receptacle gets mounted on the cabinet back wall. For chimney hoods, the receptacle hides inside the chimney sleeve above the hood body. The cord must reach without an extension.
Hoods with electronic controls are sensitive to a weak neutral. A loose white wire causes flickering LED lights or a touchpad that does nothing.
Step 8: Mount the hood
Under-cabinet hoods
Hold the hood up against the cabinet bottom, centered on the range, and mark the mounting holes. Most hoods have keyhole slots at the rear and round holes at the front. Drill 1/8-inch pilot holes, then drive the screws about three-quarters of the way in. Lift the hood, slide the keyholes over the screw heads, and let it hang while we drive the front screws fully. Tighten the rear screws last.
Use screws that bite into solid wood. Particleboard cabinet floors are weak; if the hood is heavy, add a 1/2-inch plywood pad inside the cabinet and run the screws through both layers. Owners who have upgraded to custom cabinets ikea style with filler panels should check where the actual cabinet box sits behind the panel before driving screws.
Some under-cabinet hoods can also be screwed to the back wall through slots in the hood’s rear flange. Use these when the cabinet bottom is flimsy.
Wall-mount chimney hoods
The hood body hangs from a steel bracket or two to four screws set in the wall at the template marks. Pre-drill into studs and use 1/4 x 2-1/2-inch lag screws or the #12 wood screws supplied. Where a mounting hole lands between studs, use a 1/4-inch toggle bolt rated for at least 50 pounds. Two of the four fasteners should always be in studs.
Set the bracket level and torque the lags until the washer seats. Then, with a helper, lift the hood onto the bracket. Most have adjustment screws that let us shift the body left or right about an inch and tilt it plumb. Secure the safety screws through the back of the hood into the bracket so the hood cannot be lifted off accidentally.
Install the upper chimney bracket near the ceiling next. Measure the distance between the top of the hood body and the ceiling, set the bracket at the height the manual calls out (usually 1 to 2 inches below ceiling), and lag it into a stud or top plate.
Island hoods
Island hoods hang from the ceiling joists on a frame, and their 50 to 80 pound weight sits entirely on four lag screws. Each lag must go into a joist, not just drywall. The frame telescopes to set hood height; set it at 30 to 36 inches above the cooktop and lock the set screws. Wiring comes down through the frame from an attic junction box. This is a two-person job and often a three-person job.
Step 9: Connect the duct at the hood
With the hood hanging, join the duct to the collar. On a vertical run, the duct drops onto the collar from above; on a horizontal run, a short section pushes onto the rear collar through the wall opening. Make sure the hood’s built-in damper flap opens freely and is not pinched by the duct or sitting backward.
Tape this final joint with foil tape in two full wraps. If a gap remains between the duct and the cabinet or wall cutout, stuff it loosely with fiberglass insulation or seal with fire-rated caulk. Open gaps let the blower pull conditioned air from the wall cavity and whistle.
Ductless hoods skip the duct entirely. Instead, snap the charcoal filter onto the blower housing (it usually twists a quarter turn onto the motor intake) and slide the recirculating diverter or louver into the top or front vent so air blows back into the room rather than into a dead collar.
Step 10: Finish, power up and test
Slide the telescoping chimney sleeves over the hood body and extend the inner section up to the upper bracket. Secure with the small screws provided. Install the grease filters, which should click into their clips firmly.
Peel the protective film off stainless surfaces now, before any heat. Hood manufacturers apply this film tightly and it bakes on if the lights run for a few hours with it in place.
Flip the breaker back on. Run through every fan speed and both light settings. Then do a real capture test: boil a pot of water on a front burner at full tilt and watch the steam. On the medium fan setting, all of it should pull up into the hood. Steam curling out the front means the hood is too high, too narrow or the duct is choked.
Go outside and feel for airflow at the cap on high speed. The damper should swing open fully and snap shut when the fan stops. Hold a tissue near each duct joint inside the cabinet to check for leaks.
Last, check the manual’s noise rating. A 300 CFM hood on low should run around 1 to 3 sones, about the level of a quiet refrigerator. A loud rattle or a roar means duct problems, not a bad motor.
Under-cabinet vs. wall-mount vs. ductless: what changes
| Factor | Under-cabinet ducted | Wall-mount chimney | Ductless (any style) |
|---|---|---|---|
| Mounting | Screws up into cabinet floor | Bracket lagged into wall studs | Same as the hood style, no duct opening |
| Duct opening | Through cabinet and ceiling, or rear wall | Through wall behind chimney, or ceiling | None |
| Typical weight | 15-25 lb | 30-60 lb | Same as ducted versions |
| Install time | 1-3 hours | 3-5 hours | 1-2 hours |
| Hood cost | $100-400 | $250-900 | $100-500 |
| Removes heat and moisture | Yes | Yes | No, filters odors and some grease only |
| Ongoing filter cost | Wash metal filters | Wash metal filters | $15-40 charcoal filter every 3-6 months |
| Code notes | Smooth metal duct, outside termination | Same, plus makeup air over 400 CFM | Must be a listed ductless model |
Ducted installations win on performance in every category. The air that leaves the house takes humidity, cooking odors and fine grease with it, which keeps cabinets cleaner and paint from yellowing. Ductless hoods knock down odors and catch grease on the mesh filter, but they return hot, moist air to the room. Treat ductless as a compromise for kitchens where cutting a duct is truly impossible.
Converting a ducted hood to ductless
Many hoods ship convertible. The kit includes a charcoal filter and a plastic diverter cover for the collar. If a hood is installed ducted and we later want recirculating (or the reverse), the swap takes 20 minutes with the filters out. Not every model converts, so confirm the spec sheet before buying if that flexibility matters.
Common mistakes that cause callbacks
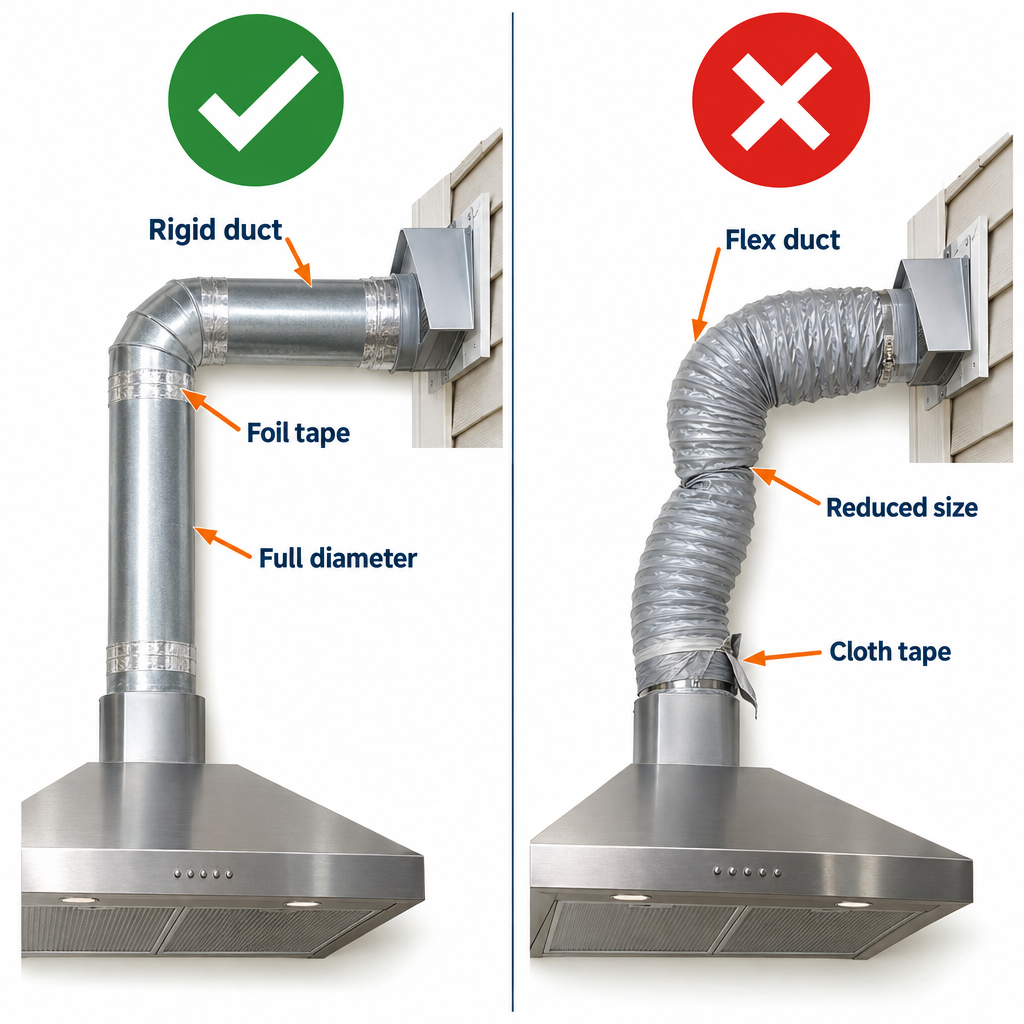
Wrong height over gas. A hood at 22 inches over a gas range gets scorched and risks igniting grease on the filters. Respect the manual’s minimum.
Undersized duct. Running a 6-inch hood into an existing 4-inch bathroom-fan duct roughly halves airflow and makes a 400 CFM hood perform like a 180 CFM hood. Replace the duct.
Flex duct. The ribbed interior collects grease and adds huge resistance. It also is not permitted for range hoods. Rigid metal only.
Cloth duct tape. It dries, peels and leaks within a year. Foil tape with the UL 181 mark is the only tape that lasts.
Backward damper. The flap in the hood collar must open upward or outward. Installed upside down, it stays shut and the fan just hums.
Venting into the attic. Some older installs terminate the duct in the attic. That dumps grease and moisture onto insulation and roof framing. Code requires a roof or wall cap outside.
Screws into drywall only. A chimney hood held by four plastic anchors in drywall will sag and eventually fall. Studs or rated toggles, no exceptions.
Skipping makeup air on a big hood. A 900 CFM hood in a tight new house can backdraft a gas water heater. Jurisdictions enforce the 400 CFM makeup air rule for exactly this reason.
Troubleshooting
| Symptom | Likely cause | Fix |
|---|---|---|
| Fan runs but moves almost no air | Damper stuck shut, backward damper, or crushed duct | Open the collar and free or flip the flap; inspect duct for dents and reroute |
| Loud rattling or clapping sound | Gravity damper at the wall cap bouncing in wind | Replace with a spring-loaded damper cap or add a second damper at the hood |
| Steam escapes around the front edge | Hood mounted too high or too narrow for the range | Lower the hood to minimum height or step up one width size |
| Whistling or hissing in the cabinet | Air leaks at duct joints or gap around the cutout | Re-tape joints with foil tape; stuff or caulk the cutout gap |
| Lights flicker, controls act erratic | Loose neutral or ground in the junction box | Shut off power, redo wire nuts, confirm ground is connected |
| Grease dripping from the hood edge | Filters clogged or installed upside down | Wash filters in hot soapy water or the dishwasher, reinstall with the drain edge down |
| Cold draft from the hood when off | Wall cap damper not sealing | Clean the flap seat, replace a warped flap, or add a backdraft damper in the duct |
| Odors linger after cooking | Ductless charcoal filter saturated, or exhaust too short a run time | Replace charcoal filter; run the fan 10 minutes after cooking |
| Hood vibrates against the cabinet | Mounting screws loose or no gasket between hood and cabinet | Tighten screws; add a strip of foam weatherstrip along the top edge |
| Breaker trips on startup | Shorted wire at the cable clamp or wrong circuit | Inspect for nicked insulation at the clamp; verify the hood is not on a 20A appliance circuit shared with heavy loads |
Cost breakdown
For a straightforward replacement of an under-cabinet hood using the existing duct and wiring, the whole job runs $120 to $450: that is the hood plus a roll of foil tape and a few screws. A new wall-mount chimney hood with a new duct through an exterior wall runs $350 to $1,200 in parts, with the hood taking most of that. The wall cap costs $15 to $120 depending on type, a 10-foot section of 6-inch galvanized duct runs $80 to $140, and elbows are $10 to $18 each.
Hiring the work out adds labor. Expect $200 to $500 for a swap, and $600 to $1,500 for a new duct run through a wall or roof. A new electrical circuit from the panel adds another $250 to $600 depending on distance. Makeup air systems for hoods over 400 CFM add $500 to $1,500 for a passive damper, $1,200 to $3,000 for a powered system, and $3,000 to $5,000 or more for a tempered mechanical system. Permits, where required, usually run $50 to $200.
Caring for the new hood
Wash metal mesh or baffle filters every month if we cook daily. Baffle filters go in the dishwasher; aluminum mesh filters discolor in the dishwasher, so soak them in hot water with a squirt of degreaser instead. A clean filter maintains full airflow and prevents grease fires.
Wipe stainless with a microfiber cloth along the grain. Avoid chloride cleaners, which pit the finish. Charcoal filters cannot be washed; replace them on the schedule in the manual.
Once a year, pull the filters and look up at the blower wheel. Grease buildup on the blades throws the wheel out of balance and causes the hum that owners blame on the motor. Clean it with degreaser and a toothbrush. Outside, check that the wall cap damper swings freely and that birds have not nested in the hood of the cap.
Most hoods from Broan-NuTone, Cosmo, ZLINE, Ciarra and similar brands carry a one-year parts warranty, with some extending motor coverage to three or five years. Keep the receipt and the serial number sticker, which usually sits inside the hood behind a filter. Warranty service nearly always requires that the hood was installed per the manual, so following the height and duct specs protects more than performance.
When to call a pro
Call a licensed electrician if the hood needs a new circuit from the panel or if the existing wiring is aluminum, ungrounded or shared with a 20-amp appliance circuit. Call an HVAC contractor for any hood over 400 CFM that needs a makeup air system, and for duct runs that must cross trusses or exceed the manual’s equivalent length. Call a roofer or mason for roof caps on steep roofs and for cutting through brick, stucco or stone. Gas range installs that require moving the gas line are plumber or gas fitter work with a permit.
FAQ
How high should a range hood be above the stove?
Most manuals call for 24 to 30 inches above an electric cooktop and 27 to 30 inches above gas, measured from the burner surface to the bottom of the hood. Use the lowest height the manufacturer allows for the best capture. Going above 36 inches on a residential hood wastes most of its airflow.
Do I need a permit for vent hood installation?
A like-for-like replacement using the existing duct and circuit rarely needs one. A new duct penetration through a wall or roof, a new electrical circuit, or a hood over 400 CFM that triggers makeup air requirements typically does. Call the local building department before cutting; the call takes five minutes.
Can a range hood share a duct with a bathroom fan or dryer?
No. Code requires range hood exhaust to run in its own dedicated duct to its own outside termination. Sharing with a dryer mixes lint and grease, and sharing with a bath fan pushes cooking grease into the bathroom when the hood’s damper leaks.
What size duct does a range hood need?
Match the hood collar. Hoods up to about 400 CFM use 6-inch round or 3-1/4 x 10-inch rectangular. Hoods from 600 to 900 CFM use 7-inch or 8-inch round. Never step down to a smaller duct than the collar, and never use flexible duct.
Is a ductless range hood worth installing?
It is worth it compared to no hood at all. The mesh filter catches grease and the charcoal filter cuts odors. It does nothing for heat and humidity, and charcoal filters cost $15 to $40 every few months. If a duct route outside exists, ducted is the better long-term choice.
How long does it take to install a range hood?
An under-cabinet replacement with existing duct and wiring takes about an hour. A wall-mount chimney hood with a new duct through an exterior wall takes three to five hours with a helper. Add two to four hours if the duct goes through the roof or the attic.
Can I plug a range hood into a regular outlet?
Yes, if the hood is a cord-and-plug model and the receptacle is accessible, usually inside the cabinet above or inside the chimney sleeve. The receptacle should be on an individual branch circuit per NEC 422.16. Do not use an extension cord or plug into a countertop small-appliance outlet.