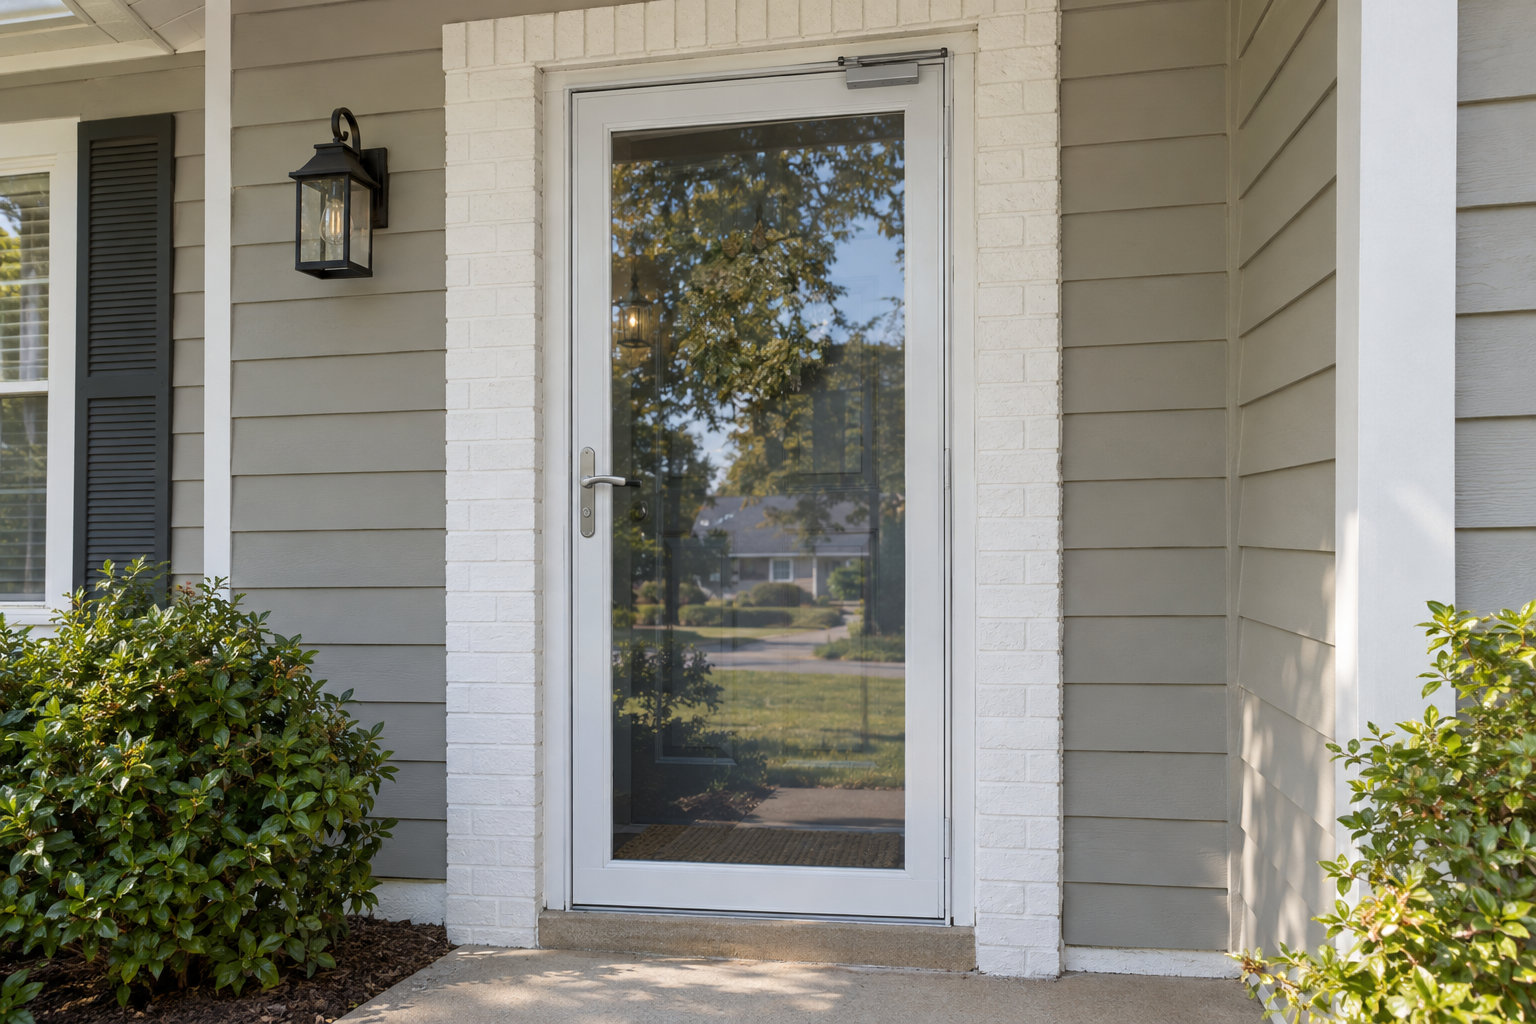
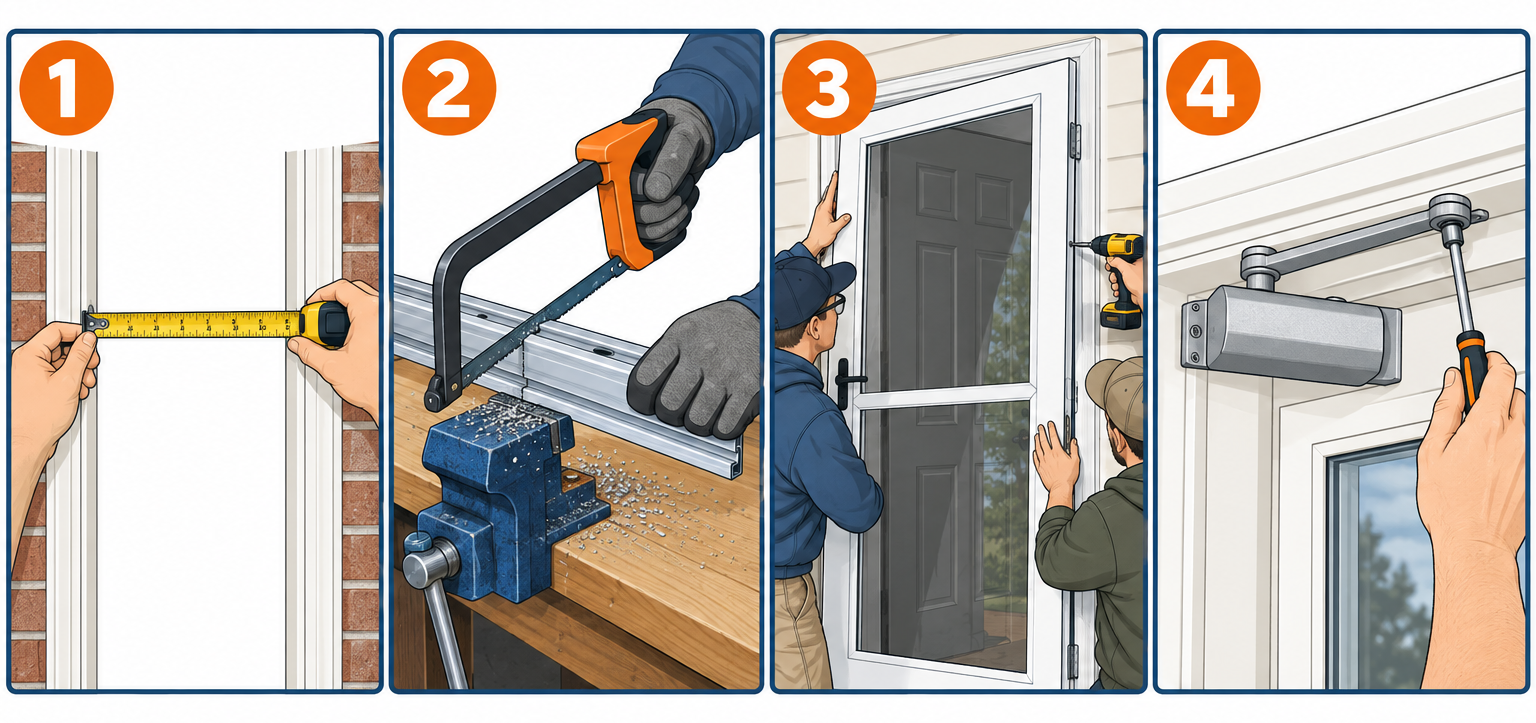
To install a storm door, you measure the opening inside the exterior brick molding, buy a door sized to it, and screw a cut-to-length hinge rail, drip cap and latch rail to that molding. Then you set the bottom sweep, mount the handle and dial in the closer. A first-timer with a drill, a hacksaw and a level can hang a new storm door, or change a screen door that’s worn out, in about half a day.
Quick steps: install a storm door
- Measure width and height inside the brick molding and buy the matching size.
- Remove the old storm or screen door and fill old screw holes.
- Choose the hinge side and cut the hinge rail to length at the sill angle.
- Fasten the hinge rail to the door, then set the door in the opening, plumb, and screw it to the brick molding.
- Install the drip cap and latch-side rail with an even gap around the door.
- Slide the bottom expander down to the sill and screw it in place.
- Mount the handle, lock and strike, then the closer(s).
- Adjust closer speed and test the swing, latch and seal.
Tools and materials
- Storm door kit (sized to your opening; hardware and closer included)
- Cordless drill/driver with 1/8 in, 3/16 in and 1/4 in bits and #2 Phillips bit
- 25 ft tape measure
- 24 in or 4 ft level
- Fine-tooth hacksaw (24-32 TPI blade) or miter saw with a nonferrous blade
- Sliding T-bevel or speed square (for the sill angle)
- Center punch or awl
- Flat bar and utility knife (for removing an old door)
- Composite or cedar shims
- Painter’s tape and a pencil
- Exterior wood filler or paintable caulk
- Safety glasses and work gloves
Calculators for this job
Safety first
Wear safety glasses when cutting aluminum; the chips are sharp and fly. Storm doors can weigh up to 100 lb, so get a helper to hold the door while you set the first screws, and keep the glass panel out of the frame until the door is hung if your kit allows it.
Step 1: Measure the opening and buy the right size
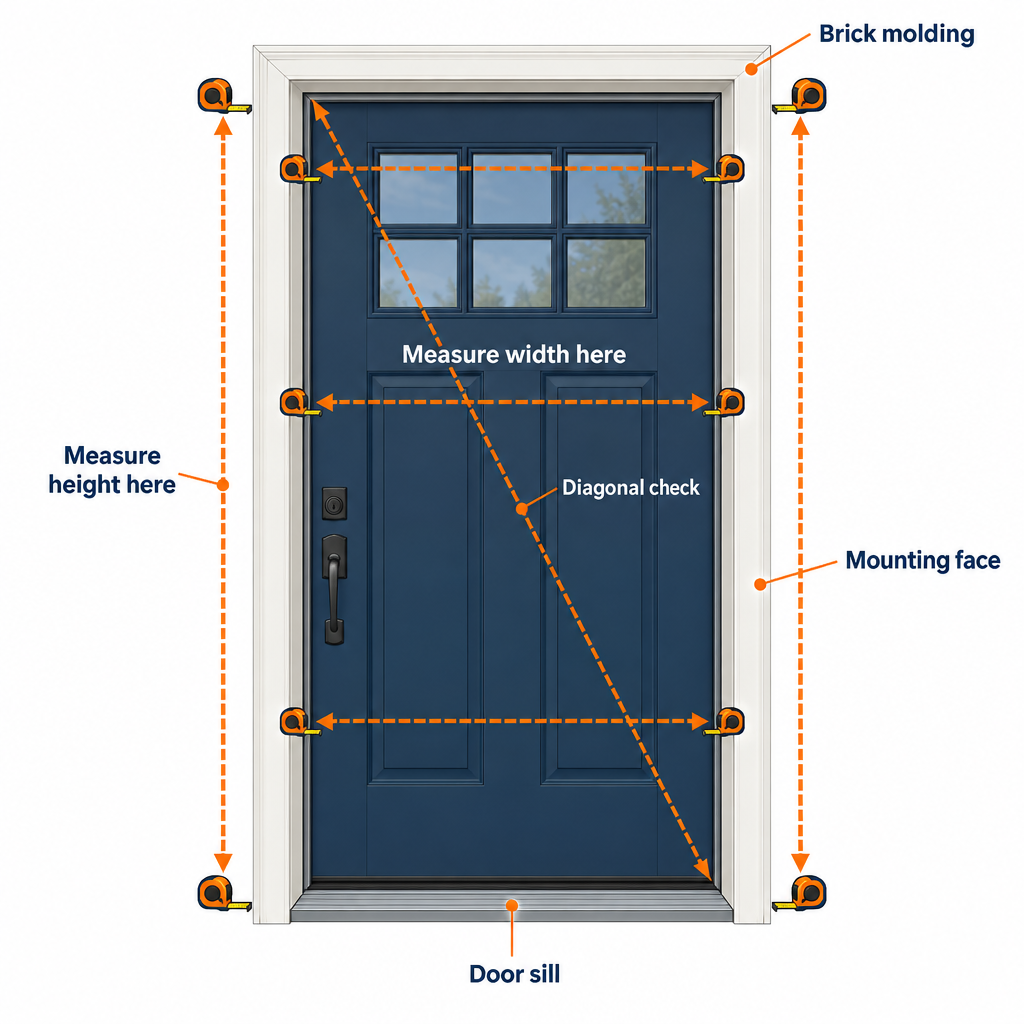
Most sizing mistakes happen here, so measure before you shop. A storm door mounts to the face of the exterior brick molding (the trim that frames your entry door on the outside), so you measure the opening between those trim pieces, not the entry door itself.
- Width: Measure between the inside edges of the brick molding at the top, middle and bottom. Write down the smallest number.
- Height: Measure from the top of the sill to the underside of the top brick molding on both the left and right sides. Use the shorter one.
- Square check: Measure both diagonals, corner to corner. If they differ by more than about 1/4 inch, the opening is out of square and you’ll lean on shims and the adjustable expander more than usual.
- Mounting surface: You need flat, solid brick molding roughly 1 inch wide on the hinge and latch sides. Rounded, rotted or narrow trim won’t hold the rails.
- Handle clearance: Measure from the face of the brick molding to your entry door’s handle and deadbolt thumb turn. The inside handle of the storm door has to clear them. Manufacturers list the required clearance on the carton or spec sheet, so compare before you buy.
Storm doors are sold by nominal size. Each size covers a small range of openings, and the bottom expander takes up extra height. The exact range varies by brand, so match your numbers to the size chart on the box.
| Nominal storm door size | Where you’ll usually find it |
|---|---|
| 30 in x 80/81 in | Older homes, side and back entries |
| 32 in x 80/81 in | Side doors, garage-to-yard doors |
| 34 in x 80/81 in | Some older front entries |
| 36 in x 80/81 in | The most common modern front entry |
| Custom/special order | Openings over 36 in wide or shorter/taller than standard |
If your width lands between sizes, or the opening is wildly out of square, don’t force a standard door. Either order a custom size or fix the trim first. A badly racked opening often points to framing problems, and our guide on “doorway framing” covers how to check the rough opening.
Pick the door type while you’re at it
| Type | What it is | Typical big-box price | Best for |
|---|---|---|---|
| Full-view | One large glass panel; swap in a screen panel seasonally | $200-$500 | Showing off a nice front door, mild climates |
| Mid-view / high-view | Glass on the upper half or two-thirds, solid lower panel | $150-$400 | Homes with kids and pets (lower panel takes the abuse) |
| Retractable screen | Glass slides down or a screen rolls out of the frame | $300-$600+ | Switching between screen and glass without storing panels |
| Ventilating (self-storing) | Two glass panels and a screen that slide in tracks | $200-$450 | Homeowners who want ventilation all year |
| Security storm door | Steel frame with expanded metal or bars | $250-$700+ | Added security; heavier, so hang it with care |
Larson, Andersen, Pella and EMCO are the brands you’ll see at Home Depot and Lowe’s. Most mid-range models are “universal” or reversible, meaning you choose the hinge side on site.
Pro tip
If your entry door faces south or west with no overhang, skip a full-view glass door with a dark entry door behind it. Heat trapped between the two can warp vinyl trim and fade finishes. Pick a door with a screen option you’ll actually use in summer.
Step 2: Remove the old storm or screen door
If you’re replacing an existing unit, start by propping the old door open and detaching the closer. Pull the closer’s pin at the door bracket, then unscrew the jamb bracket. If there’s a wind chain, unhook it.
Next, remove the screws holding the drip cap at the top. Support the door and remove the hinge-rail screws along the hinge side, working from bottom to top so the door doesn’t swing loose. Finally, unscrew the latch rail. Old aluminum rails sometimes stick to the trim with paint or caulk; score the joint with a utility knife and work it free gently with a flat bar so you don’t split the brick molding.
When the opening is bare, fill the old screw holes with exterior wood filler. The new rails rarely land on the same holes, and new screws driven into an old stripped hole won’t bite.
Step 3: Prep the brick molding and check the sill
Look the trim over closely. Push a screwdriver into the brick molding near the sill; if it sinks in easily, the wood is rotted and needs replacing before you hang anything. Scrape off loose paint and old caulk, and sand down high spots so the rails sit flat.
Then check the sill slope. Most exterior sills tilt outward a few degrees to shed water. Set a sliding T-bevel on the sill against the side brick molding and lock it. You’ll transfer that angle to the bottom of the hinge rail so it sits tight to the sill instead of leaving a wedge-shaped gap.
This is also a good time to look at the seals on your entry door. A storm door helps with drafts, but it won’t fix a leaky main door. If daylight shows around the slab, tackle “weather stripping for doors” before the storm door goes on.
Step 4: Choose the hinge side and cut the hinge rail
The general rule is to hinge the storm door on the same side as the entry door. That way both doors open in the same direction and you can walk straight through. Flip that rule if a handrail, wall, porch post or prevailing wind would make the door swing into trouble. A door that opens into the wind gets ripped open and bent.
On a reversible door, the instructions tell you which end is the top once you pick a side. Lay the door flat on a padded surface or the carton.
Now cut the hinge rail (often a Z-shaped aluminum bar). Measure your opening height, subtract the amount the manufacturer specifies, and mark the rail. Most brands have you cut from the bottom so the factory-finished top stays square to the drip cap. Set your T-bevel angle on the mark so the bottom matches the sill slope.
Pro tip
Wrap painter’s tape around the cut line before you saw. It keeps the hacksaw from skating across the anodized finish, and you can draw the angle right on it. Clamp the rail and let the blade do the work; forcing it bends thin aluminum.
Deburr the cut with a file or sandpaper. Then attach the hinge rail to the door with the supplied screws, following the hole spacing in the instructions. On many kits the rail is pre-attached and you only trim it.
Step 5: Hang the door in the opening
This is the two-person step. Have your helper lift the door into the opening, hinge side tight against the brick molding and the top of the hinge rail snug under the top trim. Slip a couple of shims under the door bottom to hold it up and set the gap the instructions call for.
Put your level on the hinge rail, not on the trim. Brick molding is often out of plumb, but the door has to be plumb or it will swing open or shut on its own. When the bubble is centered, drill a pilot hole at the top hole with a 1/8 inch bit and drive the first screw. Check plumb again, then drive a screw near the bottom.
Open and close the door a few times. It should swing freely without rubbing the latch-side trim. If it’s good, drill and drive the remaining hinge-rail screws. Snug them firmly but stop when the head seats; overdriving strips the wood and dimples the aluminum.
Step 6: Install the drip cap
The drip cap (also called the header or rain cap) is the horizontal piece at the top. It sheds water away from the top of the door and gives the door something to close against.
Close the door and set the drip cap on top of the brick molding, centered over the door, with the gap specified in the instructions between the cap and the door’s top edge. Drill pilot holes and screw it in. Some kits require you to trim the drip cap to width first; measure between the hinge rail and the latch-side brick molding, and cut it the same way you cut the hinge rail.
If water pours off the roof directly onto the door every time it rains, the drip cap won’t keep up. A short run of “house gutter” over the entry fixes that and keeps the stoop from icing in winter.
Step 7: Install the latch-side rail
Cut the latch rail to length if needed, using the same sill angle as the hinge rail. Hold it against the latch-side brick molding and close the door against it.
You want an even reveal between the door edge and the rail from top to bottom, usually around 1/8 inch. Too tight and the door binds in summer heat; too loose and the weatherstripping won’t seal. Drill and screw the top and bottom first, check the gap, then fill in the middle screws. Many latch rails have slotted holes so you can fine-tune later.
Step 8: Set the bottom expander and sweep
The expander is the aluminum channel with a vinyl or rubber sweep that slides onto the bottom of the door. It covers the gap between the door and the sloped sill.
With the door closed, slide the expander down until the sweep just touches the sill along its full length. You should be able to pull a sheet of paper out from under it with light drag. Mark the position, open the door, and drive the screws through the expander’s slotted holes into the door. If your sill is uneven, angle the expander slightly so the sweep makes contact end to end.
Step 9: Mount the handle, lock and strike
Handle sets vary by brand, but the process is close to the same. Push the spindle through the door from the outside, attach the inside handle and latch mechanism, and screw them together through the door. Install the keyed deadbolt if your door has one.
Close the door and mark where the latch lines up with the latch rail. Mount the strike plate there. Most strikes have slotted holes, so drive the screws loosely, test the latch, adjust the strike up or down, then tighten. The latch should catch with a light push and not rattle.
Now confirm the clearance from Step 1. Close the entry door and the storm door, then turn both handles. If they touch, you may need the spacer or extension kit the manufacturer offers, or a different handle style.
Step 10: Install and adjust the closer
The pneumatic closer is the tube that pulls the door shut. Full-view and heavier doors often come with two, one near the top and one near the bottom.
Screw the jamb bracket to the inside of the door frame (the entry door jamb or the latch-side brick molding, depending on your kit) at the height the instructions show. Attach the door bracket, then pin the closer into both brackets. Leave the hold-open washer on the rod; slide it against the tube when you want the door to stay open for carrying groceries.
Adjust the speed with the screw on the end of the closer tube. Turning it clockwise usually slows the close; counterclockwise speeds it up. Aim for a door that closes fully and latches without slamming. If you have two closers, adjust them equally so the door doesn’t twist.
Expected result: The door hangs plumb, swings without rubbing, closes and latches on its own, and shows an even gap all the way around. The sweep touches the sill, and you can’t see daylight around the frame with the door shut.
How to change a screen door panel or swap glass for screen
If all you need is to change the screen door insert, you don’t have to rehang anything. Most full-view and interchangeable doors hold the glass and screen panels with turn buttons, clips or a removable top retainer strip.
- Open the door and remove the retainer strip or rotate the clips on the inside.
- Tilt the glass panel out at the top and lift it out of the bottom channel. Store it flat or on edge on a padded surface.
- Set the screen panel into the bottom channel, tip it in, and reinstall the retainer or clips.
On a retractable screen door, the screen lives in a cassette at the top of the door. A torn retractable screen usually means ordering a replacement cassette from the manufacturer by model number. If your old door has a ripped fixed screen, you can rescreen the panel with new fiberglass mesh and a spline roller for about $15-$25 instead of buying a new door.
Storm door installation cost: DIY vs. pro
| Item | DIY | Professional install |
|---|---|---|
| Storm door (mid-range) | $200-$450 | $200-$450 (or contractor markup) |
| Supplies (shims, filler, bits, hacksaw blade) | $15-$40 | Included |
| Labor | Your afternoon | Roughly $150-$350 |
| Haul-away of old door | Free (aluminum is recyclable) | Often $25-$50 or included |
| Typical total | $215-$490 | $350-$800+ |
Big-box stores sell installation as an add-on, and handymen typically charge a flat rate per door. Custom sizes, rot repair and security doors push the labor up.
Troubleshooting
| Symptom | Likely cause | Fix |
|---|---|---|
| Door swings open or closed on its own | Hinge rail not plumb | Loosen screws, re-plumb with a level, reshim and refasten |
| Door rubs the latch rail | Latch rail set too tight or hinge rail sagging | Move the latch rail out via slotted holes; tighten top hinge screws |
| Latch won’t catch | Strike misaligned | Loosen strike screws, slide it up or down, retighten |
| Door slams shut | Closer adjusted too fast | Turn the closer adjustment screw clockwise in small increments |
| Door won’t close fully | Closer too slow, or sweep dragging | Speed up closer; raise the expander slightly |
| Daylight at the bottom | Expander set too high or sill slope not matched | Lower expander; angle it to follow the sill |
| Gap at the top of the hinge side | Hinge rail cut short | Recut a new rail or use the shim strip some kits include |
| Handles collide | Not enough clearance from entry door hardware | Install manufacturer’s spacer kit or change handle style |
| Screws spin without tightening | Stripped or rotted brick molding | Fill with wood glue and toothpicks, or replace the trim |
When to call a pro
Call a handyman or door installer if the brick molding is rotted, missing or under 1 inch wide, if the opening is out of square by more than 1/4 inch, or if your doorway needs a custom-size door. Call a carpenter if the sill or framing around the entry door is soft or sagging, since that’s a structural repair and not a storm door problem. Brick, stone or stucco openings without wood trim also need special mounting brackets or masonry anchors that are easier to get right with experience.
FAQ
How long does storm door installation take?
Plan on half a day (roughly four to six hours) for your first door, including measuring, removing the old one and adjusting the closer. Experienced installers finish in about 90 minutes.
Which side should the storm door hinge on?
Hinge it on the same side as your entry door unless a wall, railing or strong prevailing wind makes that side a problem. A door that opens with the wind behind it is the most likely to get bent.
Can I install a storm door without brick molding?
Not with a standard kit. The rails need a flat wood surface about 1 inch wide. If your door sits in brick or stone with no trim, add wood brick molding first or buy a mounting kit designed for masonry.
Do I need a permit for storm door installation?
Most US municipalities don’t require a permit to add or replace a storm door because nothing structural changes. If you live in a historic district or HOA, check their rules on style and color first.
How do I stop my storm door from blowing open in the wind?
Make sure the closer is snug and the hold-open washer isn’t engaged. Add a wind chain or a closer with a built-in wind stop if the door doesn’t have one. In high-wind areas, the door’s latch and deadbolt should be used every time.
Can I change a screen door into a glass storm door?
Only if the door is designed for interchangeable panels. Fixed-screen doors and old wood screen doors can’t take glass safely; replace them with a full-view or ventilating storm door instead.