Most garbage disposals that “won’t work” are jammed, tripped, or not getting power. That makes most of them fixable in under 30 minutes with a 1/4-inch hex key and a press of the red reset button on the bottom of the unit. This guide walks you through each fix in order, from the 10-second checks to clearing clogs and tracking down leaks, so you end with a running disposal or a clear answer that it needs replacing.
Quick steps: fix a garbage disposal
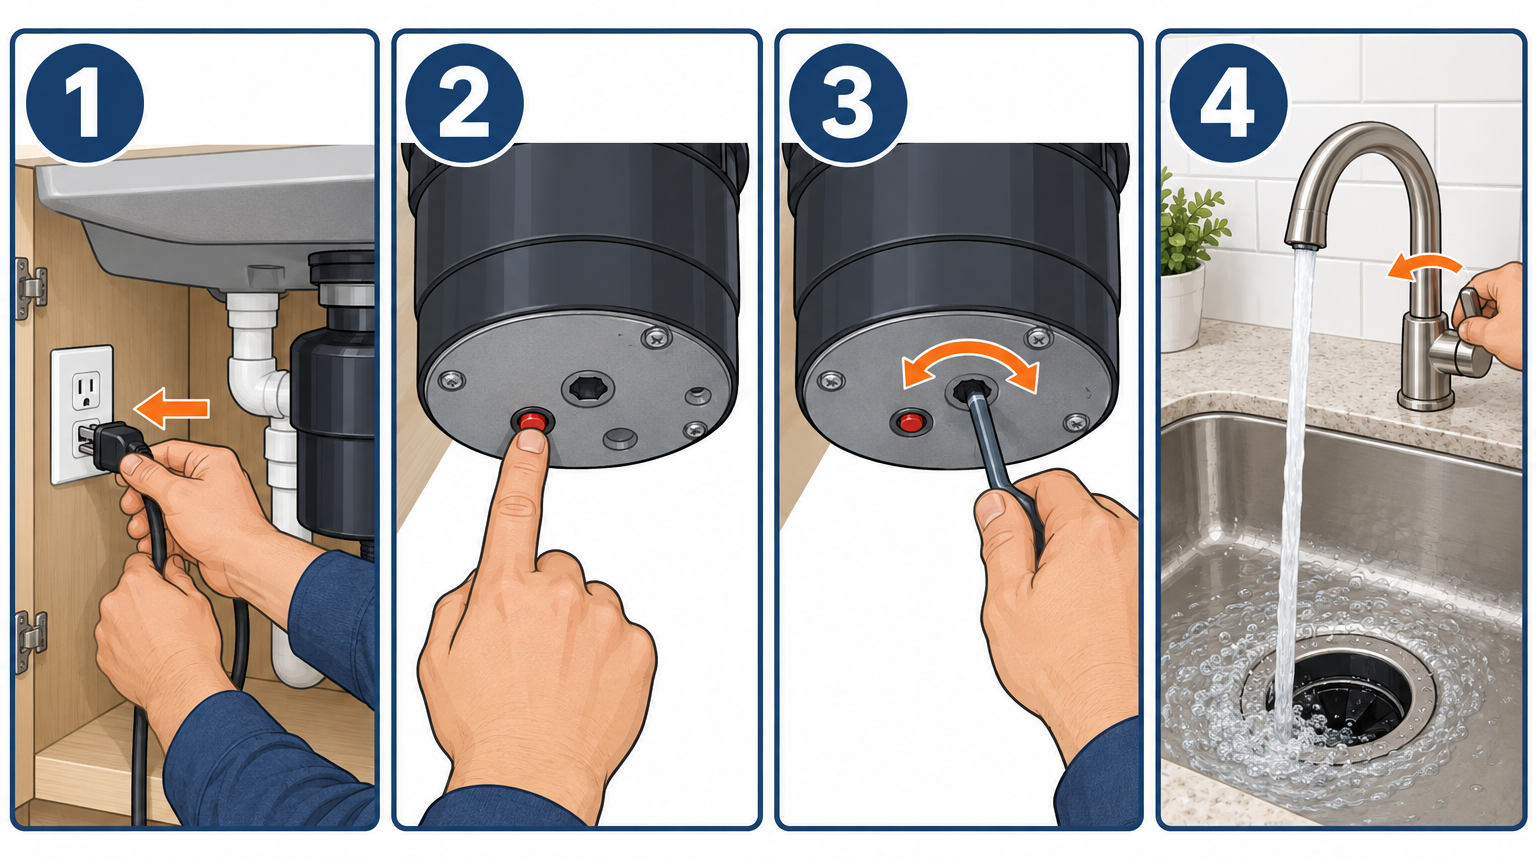
- Turn off power at the switch and unplug the unit or shut the breaker.
- Listen to the symptom: humming, silence, slow drain, or leak.
- Wait 10 minutes, then press the red reset button on the bottom.
- Check the breaker, any GFCI outlet, and the wall or air switch.
- Turn the hex socket under the unit with a 1/4-inch hex key to free a jam.
- Pull debris from the chamber with tongs, never your hand.
- Clear the P-trap or drain line if water still won’t go down.
- Restore power, run cold water, and test.
Tools and materials
- 1/4-inch hex key (Allen wrench), or the jam wrench that came with the unit
- Flashlight or headlamp
- Kitchen tongs or long needle-nose pliers
- Non-contact voltage tester ($15-25)
- Bucket and old towels
- Slip-joint (Channellock-style) pliers for trap nuts
- Sink plunger and a small hose clamp or binder clip
- 1/4-inch hand drain auger, 15-25 ft (optional, about $15-30)
- Plumber’s putty (only if resealing the sink flange)
Safety first
Unplug the disposal under the sink or switch off its breaker before you reach anywhere near it, then confirm it’s dead with a voltage tester. Never put your hand inside the grinding chamber, even with the power off.
Match the Symptom First
Before you grab tools, run the disposal for a second or two and pay attention to what it does. The sound tells you where to start, which saves you from taking apart a drain when all you needed was the reset button.
| What happens when you flip the switch | What it usually means | Start at |
|---|---|---|
| Steady hum, no grinding | Motor has power but the flywheel is jammed | Step 4 |
| Total silence | Tripped overload, breaker, GFCI, or bad switch | Steps 2-3 |
| Runs, then shuts off after a few seconds or minutes | Overheating motor or partial jam | Steps 2 and 4 |
| Runs fine but water backs up | Clog in the trap or drain line | Step 6 |
| Loud metal clanking or rattling | Utensil, bottle cap, or bone in the chamber | Step 5 |
| Water under the sink | Failed seal or loose connection | Step 7 |
If it hums, turn it off right away. A jammed motor that keeps humming overheats fast and will trip its overload or burn out the windings.
Step 1: Cut the Power and Look Inside
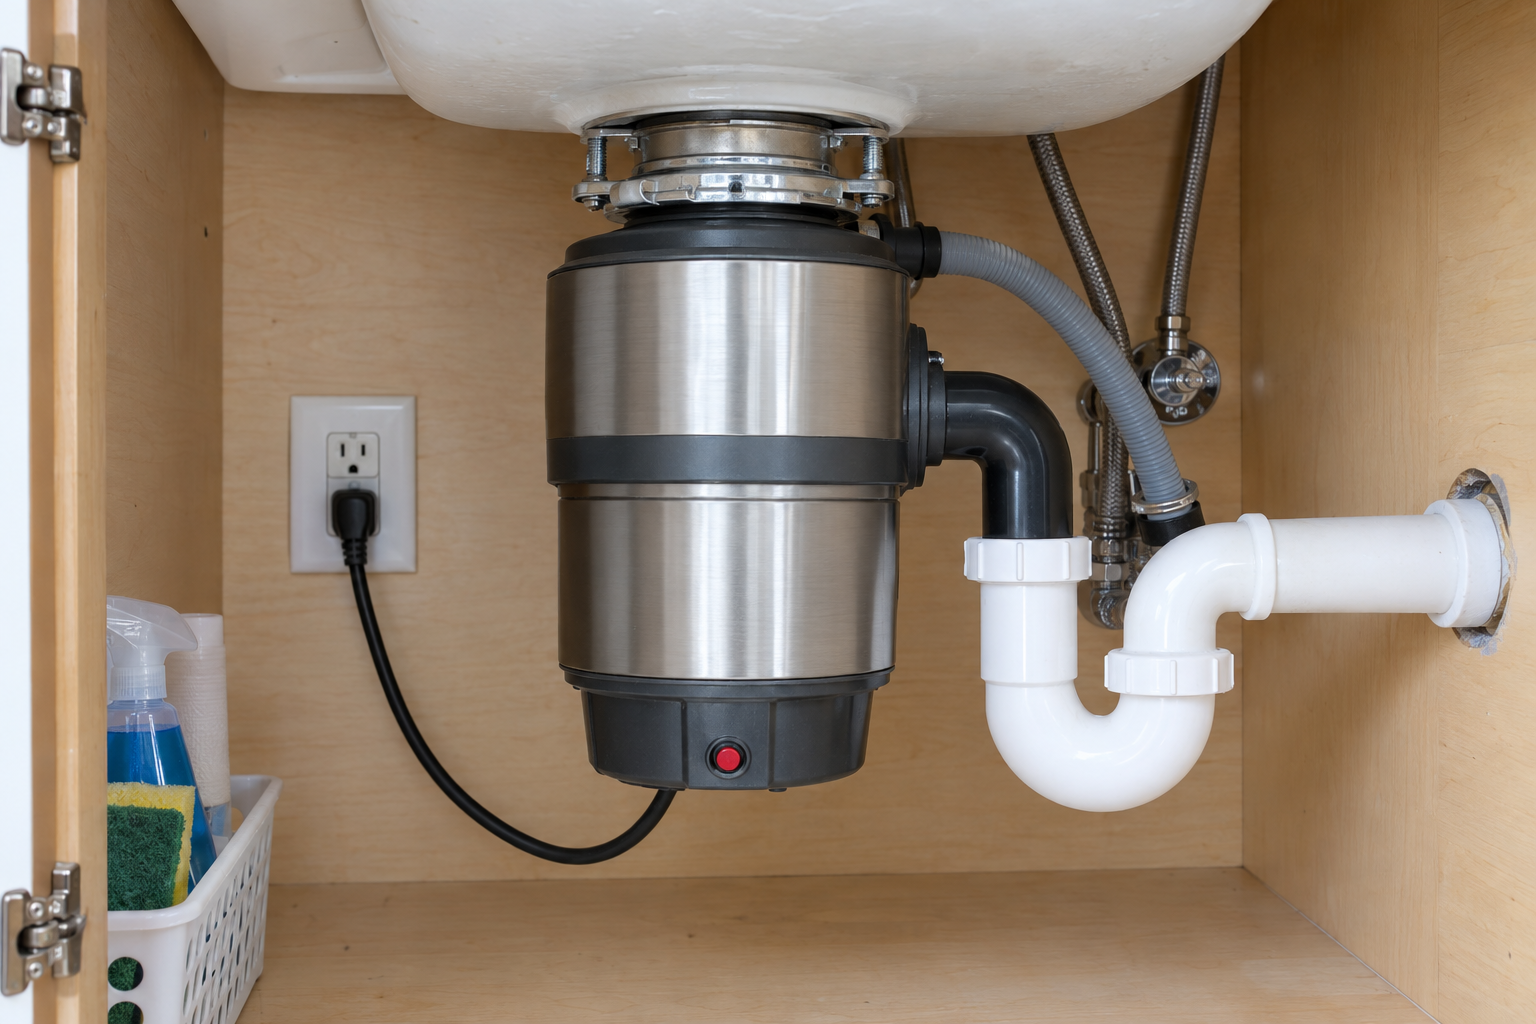
Flip the wall switch off. Then go under the sink and look at how the disposal gets power. Many plug into an outlet under the cabinet. Unplug it. If you see a cable running straight into a metal plate on the bottom of the unit, it’s hardwired, so turn off its breaker at the main panel.
Hold the tester near the cord or the switch to confirm there’s no voltage. Now shine a flashlight down the sink drain. You’re looking for anything that isn’t food: a spoon, a twist tie, a fruit pit, a chicken bone, a piece of glass.
If you spot something, grab it with tongs or pliers. Don’t reach in. The impellers and grind ring have sharp edges, and the chamber can still shift unexpectedly when something jammed lets go.
Step 2: Press the Reset Button
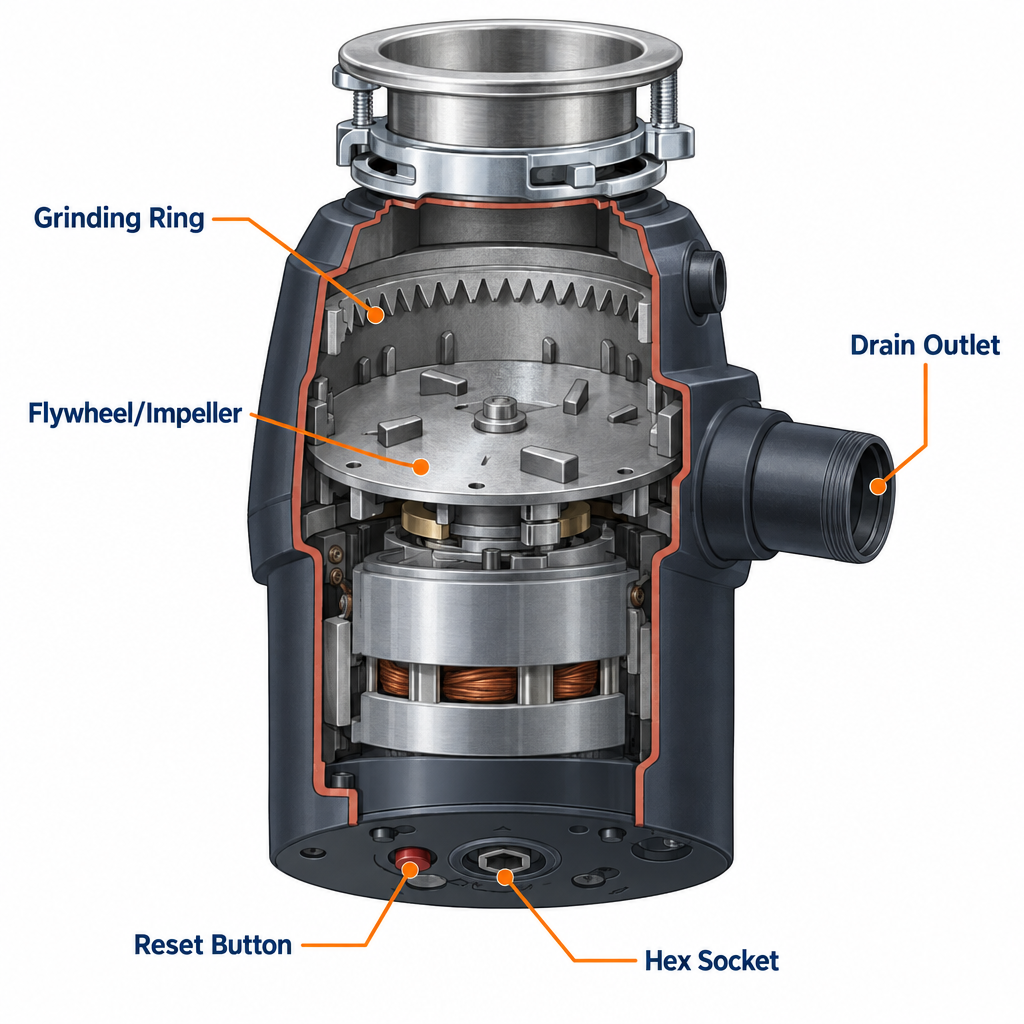
Every common residential disposal has a thermal overload protector, a small button on the bottom of the unit (red on most InSinkErator models, sometimes black or gray on Waste King and Moen). When the motor gets too hot or strains against a jam, this button pops out and cuts power.
Let the motor cool for about 10 minutes first. Then press the button firmly with your finger until you feel a click and it stays in. If it springs back out, the motor is still warm. Give it another 10-15 minutes.
Plug the unit back in or restore the breaker, run cold water, and flip the switch. A disposal that was just overloaded will start right up.
Pro tip
If the reset button keeps tripping within a day or two, don’t keep pressing it. Repeated trips mean a partial jam, overfeeding, or a weak motor. Free the flywheel in Step 4 even if the unit runs, and feed food in smaller batches.
Step 3: Check the Breaker, Outlet and Switch
If the disposal is completely silent and the reset button didn’t help, power isn’t reaching it. Work through the supply in this order:
- Breaker. Find the kitchen circuits in your main panel. A tripped breaker sits in the middle position. Push it fully to off, then back to on.
- GFCI outlet. Many under-sink outlets are protected by a GFCI, which may be the outlet itself or one on the countertop nearby. Press the reset button on its face.
- Outlet test. Plug a lamp or phone charger into the under-sink outlet. Some outlets are split so only one half is switched, so test the half the disposal uses with the wall switch on.
- Air switch. If you have a countertop push button instead of a wall switch, it’s a pneumatic air switch. Under the sink, a thin plastic tube runs from the button to a small control box. Make sure the tube is pushed fully onto both fittings and the box is plugged in.
- Batch-feed stopper. Batch-feed models only run with the special stopper inserted and turned. A missing or chipped stopper magnet means no power.
A dead wall switch is a cheap part, about $3-10, but replacing it means opening a live electrical box. If you aren’t comfortable wiring a switch, that’s a short visit from an electrician.
Step 4: Free the Jam With a Hex Key
This is the fix for that steady hum. Make sure the power is off again. Under the sink, look at the dead center of the disposal’s bottom. You’ll see a small hexagonal socket.
Insert a 1/4-inch hex key, or the offset jam wrench that shipped with the unit. InSinkErator, Waste King, Moen and most store brands all use this size. Work it back and forth. It may take real force at first, so use the long end of the key for leverage.
Keep rocking until the key turns a full circle in both directions with little resistance. That means the flywheel underneath has broken free of whatever was wedged against the grind ring.
No hex socket on yours? Some older units lack one. With the power off, push a wooden spoon handle or broom handle down into the chamber, wedge it against an impeller, and lever it back and forth.
Once it spins freely, move to Step 5 before you restore power. Whatever caused the jam is now loose in the chamber.
Step 5: Clear Out the Grinding Chamber
With the power still off, shine your flashlight in again and fish out the loose debris with tongs. Common culprits are fruit pits, popcorn kernels, small bones, shells, and bits of glass.
Then restore power, press the reset button if it tripped, and run a strong stream of cold water. Flip the switch on. You should hear a smooth whir that rises in pitch and stays steady. Let it run with water for 15-20 seconds to flush out anything you missed.
If you still hear clanking, shut it off and look again. Small metal pieces like a broken bottle cap liner can hide under the impeller plate.
Step 6: Clear a Clogged Drain
A disposal that runs but leaves the sink full has a clog, and the clog is almost always below the disposal, not inside it. Fibrous and starchy scraps are the usual cause. Potato peels, celery, onion skins, rice, pasta, coffee grounds, eggshells and grease all build up in the trap.
Clear the trap
Put a bucket under the curved P-trap. Loosen the two slip nuts by hand or with slip-joint pliers, then pull the trap off. Most kitchen drains use 1-1/2-inch fittings. Dump the gunk, rinse the trap, and check that the washers are seated before you reassemble. Hand-tight plus a quarter turn is enough for plastic nuts.
Snake past the trap
If the trap was clear, the clog is in the trap arm or the pipe inside the wall. Feed a 1/4-inch hand auger into the wall opening, crank it until you feel resistance, and work through it. Never run an auger down through the disposal itself. It can’t get past the impellers and you’ll damage the unit.
Plunge, carefully
On a double sink, plug the other drain with a stopper or wet rag. If a dishwasher drains into the disposal, pinch its drain hose closed with a clamp or binder clip so you don’t blast dirty water into the dishwasher. Then plunge with a cup-style sink plunger.
Skip chemical drain cleaners. They sit in the disposal, eat at its seals, and splash back on anyone who later opens the trap.
Pro tip
If a disposal you just installed won’t drain the dishwasher, you probably left the knockout plug in the dishwasher inlet. Unplug the unit, put a screwdriver into the inlet nipple, and tap it out with a hammer. Then fish the plastic disc out of the chamber.
Step 7: Find and Fix a Leak
Dry the whole unit and every connection with paper towels. Fill the sink a few inches, add a few drops of food coloring, and pull the stopper. Watch for the first drip with your flashlight.
| Leak location | Likely cause | Fix |
|---|---|---|
| Top, where disposal meets sink | Loose mounting ring or failed plumber’s putty | Tighten the mounting ring; if it still drips, remove the unit and reseal the flange with fresh putty |
| Side, dishwasher inlet | Loose hose clamp or cracked hose | Tighten the clamp or replace the hose |
| Side, discharge tube | Worn gasket or loose bolts | Tighten the bolts; replace the rubber gasket ($5-10) |
| Bottom or reset button area | Internal seal failure | Not repairable; replace the disposal |
Bottom leaks are the clearest sign the unit is finished. Water has gotten past the internal seals, and the motor housing will rust from the inside.
Expected Result
When you’re done, the disposal should start instantly, grind with a steady whir, and clear a full sink of water within a few seconds. There should be no humming, no rattling, and no water under the cabinet. The reset button should stay in through normal use.
Once it’s working again, give the sink disposal a thorough cleaning to clear the built-up film that causes odors and slow draining. To prevent the next jam, always run cold water before, during, and for 15-30 seconds after grinding, and feed food in small handfuls.
Troubleshooting
| Symptom | Likely cause | Fix |
|---|---|---|
| Hums, hex key won’t turn even with force | Seized motor bearings | Replace the disposal |
| Hums, hex key turns freely, still won’t spin | Failed motor windings or start switch | Replace the disposal |
| Reset button won’t stay in | Motor still hot, or overload protector failed | Wait 15-20 minutes; if it still pops, replace |
| Trips the breaker the moment it starts | Short in the motor or wiring | Stop using it; call an electrician or replace |
| Runs but grinds slowly | Overfeeding, or a 1/3 HP motor straining | Feed smaller batches; consider a 1/2 or 3/4 HP upgrade |
| Works only sometimes | Loose plug, worn switch, or air switch tube | Reseat the plug; check the tube; replace the switch |
| Bad smell even after cleaning | Food stuck under the splash guard or in the trap | Scrub the underside of the rubber splash guard; clean the trap |
| Water backs up into the other sink bowl | Clog past the tee where both drains meet | Snake the trap arm and wall pipe |
When to Repair and When to Replace
Most disposals last roughly 8-15 years, depending on motor size and how hard they work. Repairs beyond a jam or a reset rarely make sense, because a replacement unit costs less than many service calls.
Replace it if the unit leaks from the bottom, hums with a freely turning flywheel, trips its overload constantly, or is over about 10 years old and rusty. Here’s what you’ll typically pay in the US:
| Option | Typical cost | Notes |
|---|---|---|
| DIY fix (reset, jam, trap) | $0-25 | Hex key, tongs, maybe a gasket |
| 1/3 HP replacement unit | $80-130 | Light use, one or two people |
| 1/2 HP replacement unit | $100-180 | Most common household size |
| 3/4 HP replacement unit | $180-300 | Larger families, fewer jams |
| 1 HP premium unit | $300-450+ | Quieter, grinds almost anything |
| Plumber service call | $100-250 | Diagnosis plus minor repair |
| Professional replacement, installed | $300-600 | Unit plus about 1-2 hours of labor |
Check your warranty before you buy anything. Many brands, including InSinkErator, cover their units for several years, and some models include in-home service.
Swapping a plug-in disposal for one of the same brand is a reasonable DIY job. The mounting ring often stays put, and you reuse the existing drain and dishwasher connections.
When to call a pro
Call a licensed electrician if the breaker trips instantly, you smell burning, the switch or outlet is dead, or you need a new circuit for a hardwired unit. Call a plumber if the drain clogs again within weeks after you’ve cleared the trap, water backs up in more than one fixture, or the leak comes from pipes behind the wall.
FAQ
Why does my garbage disposal hum but not turn?
The motor is getting power, but the flywheel is jammed against the grind ring. Turn it off immediately, cut the power, and free it with a 1/4-inch hex key in the socket on the bottom. Then remove the debris from the chamber before you run it again.
How do I reset a garbage disposal with no button?
Nearly every modern disposal has a reset button on the bottom, but it can be hard to see on some models. Feel around the underside near the hex socket or power cord. If yours truly has none, reset it by cycling its breaker off for a minute and back on.
Can I fix a garbage disposal without the special wrench?
Yes. A standard 1/4-inch hex key from any Allen wrench set fits most units. If you have neither, a wooden spoon handle wedged against the impellers from above, with the power off, does the same job.
Do garbage disposal blades need sharpening?
Disposals don’t have blades. They use blunt swiveling impellers that throw food against a stationary grind ring. Ice cubes help knock buildup off the parts, but they don’t sharpen anything, and nothing needs sharpening.
Is it safe to use drain cleaner in a garbage disposal?
No. Caustic and acid drain cleaners can damage the rubber seals and metal parts and can burn you if they splash back. Clear the P-trap by hand or use a hand auger instead.
How long should a sink disposal fix take?
A reset or a jam takes 10-20 minutes, including cool-down time. Clearing a clogged trap adds about 20 minutes. If you’re past an hour and the unit still hums or leaks from the bottom, it’s time to replace it.