A hissing, slow-filling or constantly running toilet is almost always the fill valve, and you can swap it for a $10 to $20 universal valve in about half an hour with one pair of pliers. If the valve is only a few years old and just dirty, you can often fix it in ten minutes by flushing debris out of the cap instead of replacing it. Here is how to decide which job you have, then do it right the first time.
Quick steps: change a toilet fill valve
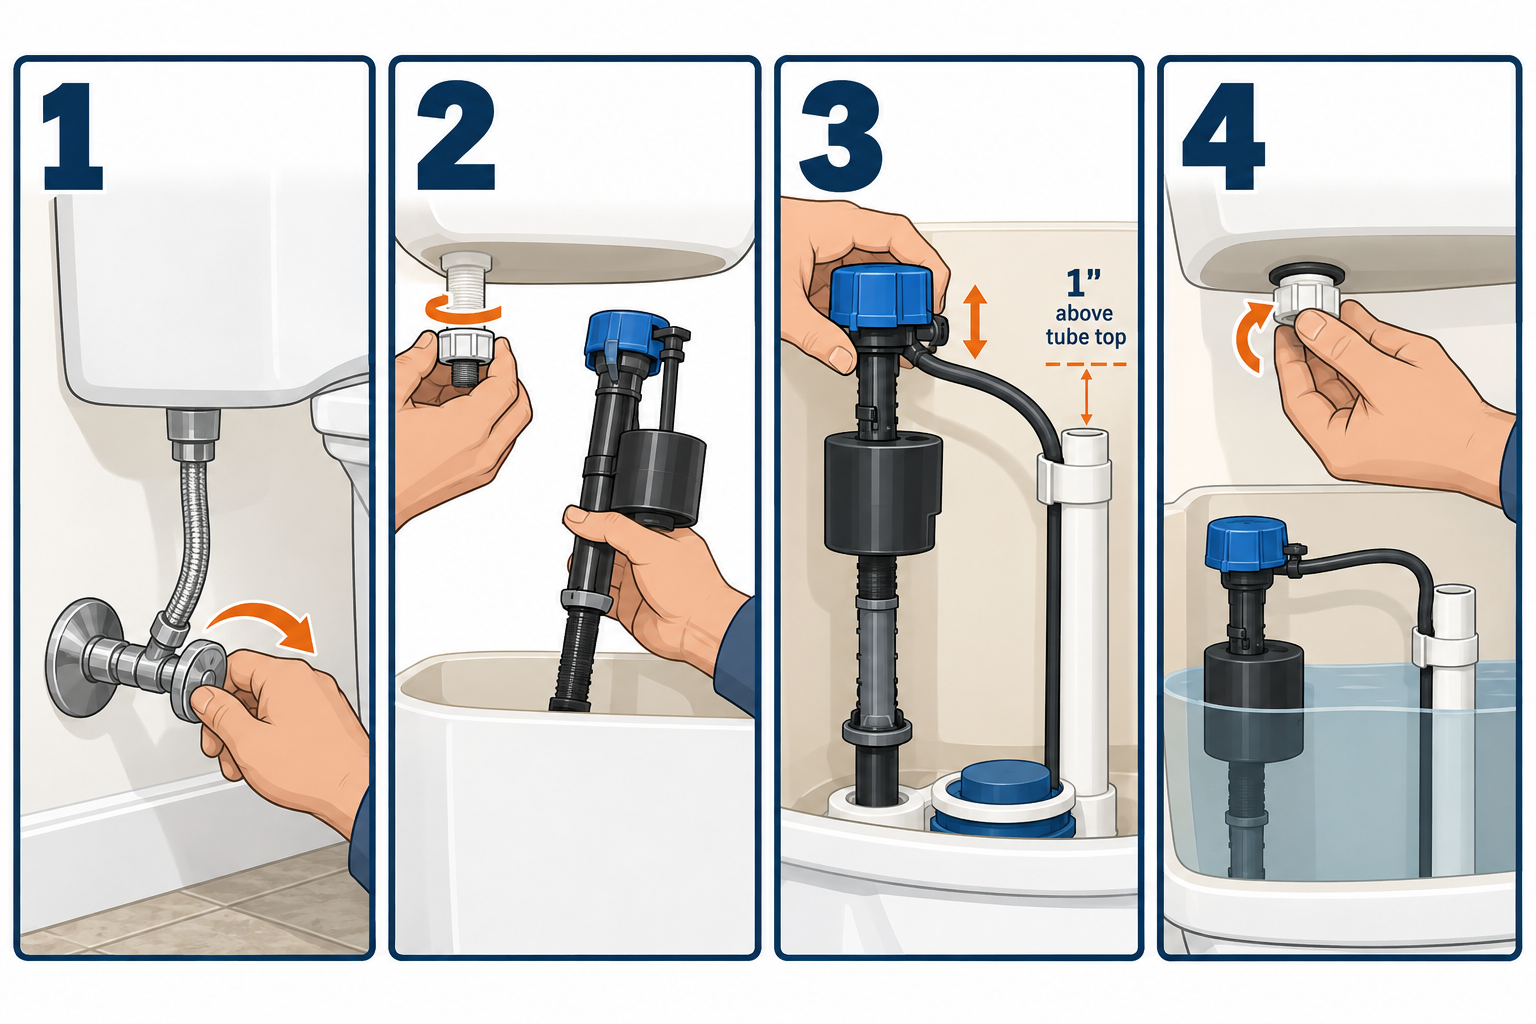
- Shut off the supply valve behind the toilet and flush to drain the tank.
- Sponge out the leftover water and disconnect the supply line from the tank.
- Unscrew the shank nut under the tank and lift out the old valve.
- Adjust the new valve so its critical level mark sits 1 inch above the overflow tube.
- Drop it in, tighten the shank nut hand-tight plus a quarter turn.
- Reconnect the supply line and clip the refill tube to the overflow tube.
- Turn the water on, set the water level 1 inch below the overflow top, flush twice to test.
Tools and materials
- Universal fill valve (Fluidmaster 400A, 400AH PerforMAX, or Korky 528 QuietFill)
- Adjustable wrench or 10-inch slip-joint pliers
- Large sponge and a small bucket or bowl
- Old towel for the floor
- Replacement braided supply line, 3/8-inch compression x 7/8-inch ballcock, 12-inch (optional but smart)
- Fill valve seal kit (Fluidmaster 242 or Korky equivalent) if you are repairing rather than replacing
- Flashlight
Safety first
Turn the supply stop fully clockwise before touching anything, and check that the tank actually stops refilling. If the stop valve won’t close or weeps when you turn it, shut off the main water to the house before you continue.
Fix it or replace it: decide in two minutes
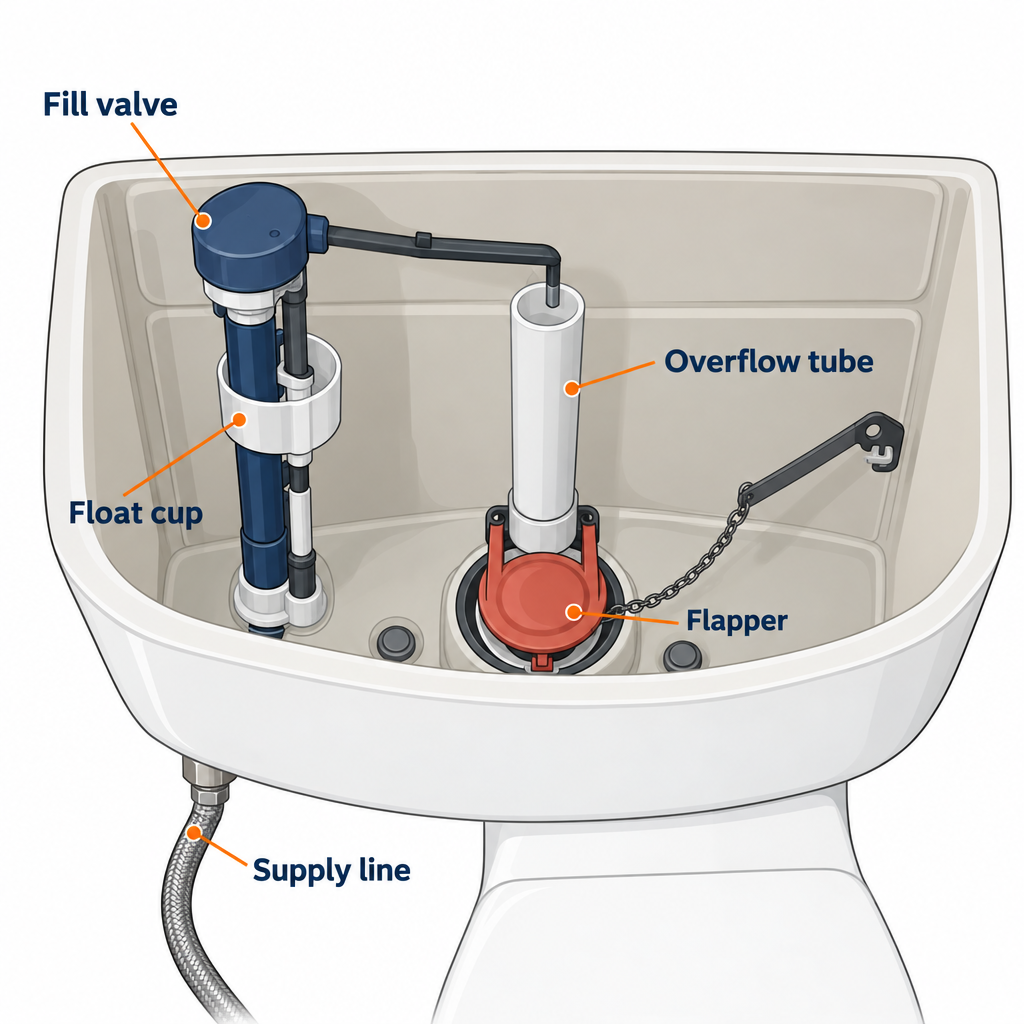
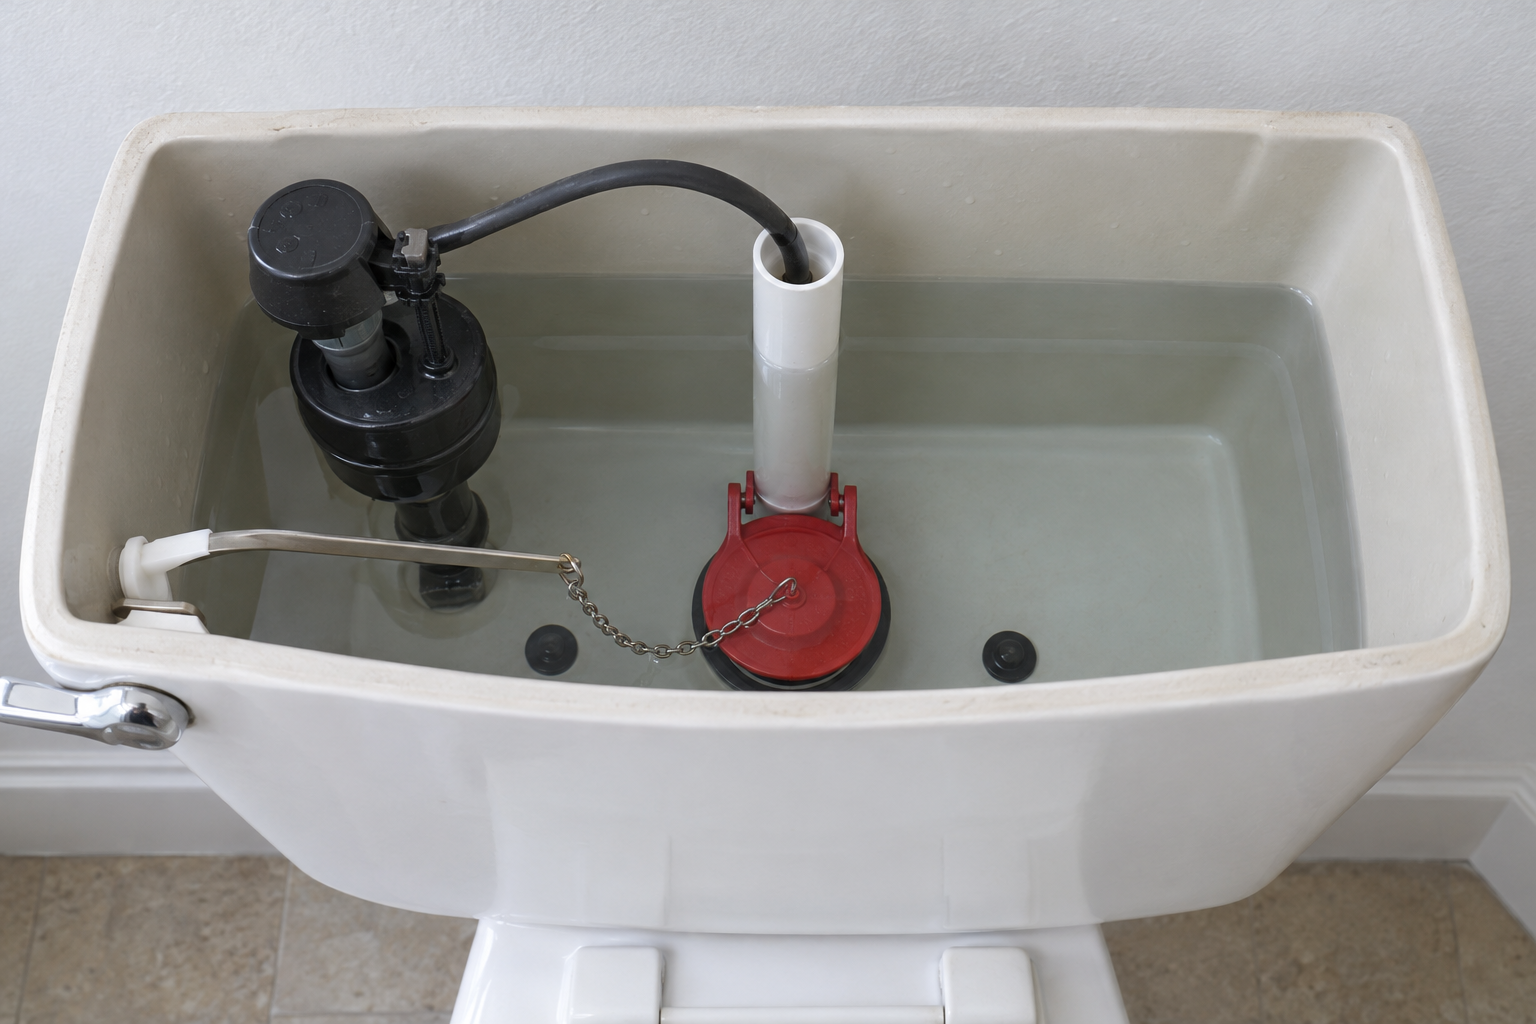
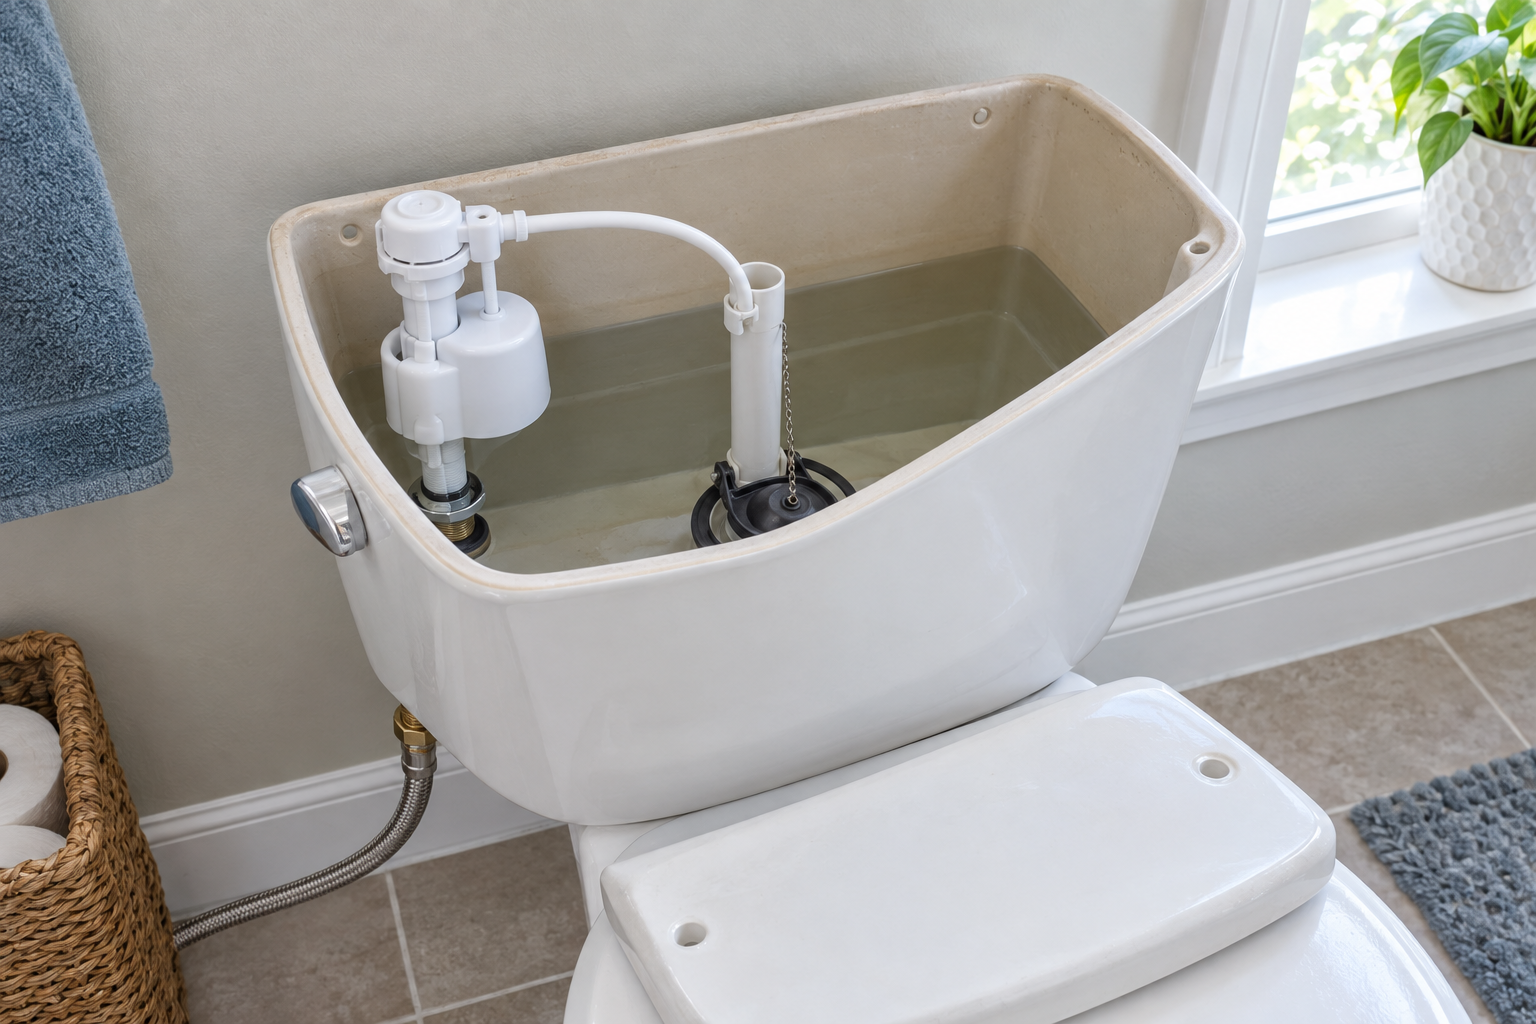
Lift the tank lid and watch one full flush cycle. The fill valve is the tall plastic tower on the left side of the tank with the supply line screwed into its base. The float either rides up and down the tower (cup float) or sits on the end of a metal arm (old-style ballcock).
| What you see | What it means | Fix or replace |
|---|---|---|
| Water runs into the tank for 60+ seconds, then stops | Clogged inlet or worn diaphragm | Clean the valve first, replace if that fails |
| Valve hisses or whistles the whole time | Debris on the seal or a worn seal | Clean and reseal, replace if under $20 valve anyway |
| Water trickles down the overflow tube nonstop | Float set too high or valve not shutting off | Lower the float; replace if it still runs |
| Tank refills on its own every 10 to 30 minutes with no hissing | Leaking “toilet flapper“, not the fill valve | Replace the flapper |
| Valve is a brass or plastic ballcock with a ball on an arm | Decades old, parts are hard to find | Replace with a universal cup-float valve |
| Cracked plastic, mineral crust, or the float won’t move | Valve is done | Replace |
The flapper test matters because people repair toilet inlet valves that were never the problem. Put a few drops of food coloring in the tank, wait 15 minutes without flushing, and look in the bowl. Colored water in the bowl means the flapper is leaking and the fill valve is just doing its job topping the tank back up.
Now for the repair-versus-replace math. A new Fluidmaster 400A runs about $10 at Home Depot, the quieter PerforMAX about $15, and the Korky 528 sits in the same general range. A replacement seal kit costs $4 to $7. So a repair saves you a few dollars and about 20 minutes. Clean the valve if it is under five years old and you want a quick toilet fill valve fix. Replace it if it is older, rusted, or you have already cleaned it once this year.
Step 1: Try the 10-minute cleaning fix first
This works on cup-float valves from Fluidmaster, Korky and most store brands. Grit from a water main repair, well sediment, or resin beads from a failed “water softener system” collect under the cap and keep the seal from closing. That is what causes the hiss and slow fill.
Shut off the supply stop. Flush and hold the handle down until the tank is as empty as it will get. Then:
- Lift the float cup and reach the cap on top of the valve.
- On a Fluidmaster, press down on the cap while lifting the small float arm, then twist the cap and arm counterclockwise about an eighth of a turn. It pops off. Korky caps twist off the same way.
- Flip the cap over and look at the rubber seal. Flat, clean and flexible is good. Pitted, warped, or coated in black grit means replace it with the seal from the kit.
- Hold a cup upside down over the open top of the valve to catch the spray.
- Turn the supply stop on for 3 seconds and off again. Do this three or four times. The water blasts out any debris sitting in the valve body.
- Press the cap back on, lock it with a clockwise eighth turn, and turn the water on.
If the tank now fills in 30 to 45 seconds and shuts off cleanly, you are done. If it still hisses after the flush-out and a fresh seal, move on and replace the whole valve. You have spent ten minutes and nothing else.
Pro tip
Keep the old cap in your pocket while you do the flush-out. If you drop the little rubber seal into the tank, it is the same color as the water and nearly impossible to find.
Step 2: Shut off the water and drain the tank
Turn the oval or football-shaped handle on the stop valve clockwise until it stops. Flush and hold the lever down to dump as much as possible. There will still be an inch or two of water in the bottom of the tank below the flush valve opening. Sponge it into a bucket until the tank floor is dry. The hole you are about to open is at the lowest point of the tank, and every ounce left in there ends up on the floor.
Lay a towel under the supply connection. Old stop valves that have not been turned in years often weep for a few minutes after closing. If yours drips steadily instead of slowing to a stop, you have a second job, and shutting off the house main is the safe way to finish this one.
Step 3: Remove the old fill valve
Unscrew the supply line coupling nut from the bottom of the fill valve shank. Braided lines come off by hand or with a quarter turn of the wrench. Chrome or plastic rigid lines may need pliers and a little wiggle.
Now the shank nut. It is the large plastic or brass nut pressed against the underside of the tank where the valve passes through. Turn it counterclockwise with your pliers. Plastic nuts usually break free with a short twist. If a brass nut is seized with mineral scale, hold the valve body steady inside the tank with your other hand so you are not twisting against the porcelain.
Lift the old valve straight out. Unclip the small rubber refill tube from the overflow pipe as it comes up. Wipe the hole in the tank clean of any old gasket residue with your sponge. A smooth, clean porcelain surface is what the new gasket needs to seal.
While the supply line is off, look at it. A braided stainless line older than about ten years, or any old plastic or chrome line with a crimped end, should be replaced. The new one costs $8 to $15 and it is the one part in this assembly that can flood a house. Buy a 3/8-inch compression by 7/8-inch ballcock, 12 inches long for a standard installation.
Step 4: Set the height of the new valve
This step decides whether the new valve works properly or runs into the bowl forever. Every universal fill valve has a critical level mark, usually stamped “CL” on the body just below the cap. Code requires that mark to sit at least 1 inch above the top of the overflow tube. That gap is what stops tank water from siphoning back into your drinking water supply if pressure drops.
Hold the new valve next to the overflow tube in the tank. Twist the base of the valve to telescope the shank up or down until the CL mark is 1 inch above the overflow top. Fluidmaster 400 series valves adjust from about 9 to 14 inches; Korky 528 goes a bit shorter, down to roughly 7.75 inches, which helps in low-profile tanks. Lock the adjustment by twisting until it clicks.
| Fill valve | Height range | Fill speed | Noise | Typical price |
|---|---|---|---|---|
| Fluidmaster 400A | 9 to 14 inches | Standard | Moderate | About $10 |
| Fluidmaster 400AH PerforMAX | 10 to 15 inches | Up to 2x faster | Quiet | About $15 |
| Korky 528 QuietFill | 7.75 to 13.5 inches | Standard | Quietest | $13-18 |
| Fluidmaster 400H (high performance) | 9 to 14 inches | Fast | Moderate | $15-18 |
| Danco HydroRight or similar dual-flush kits | 9 to 13 inches | Standard | Moderate | $20-35 |
Also check the overflow tube itself. If its top is higher than about 1 inch below the tank lid, you may need to cut it down with a hacksaw so the valve can sit high enough. Mark it, cut it square, and deburr the edge.
Step 5: Install the valve and tighten the shank nut
Slip the cone-shaped rubber gasket onto the shank with the wide end facing up, against the inside of the tank. Set the valve in the hole with the refill nipple pointing toward the overflow tube. Hold it straight up and thread the shank nut on from below.
Hand-tighten until the gasket compresses, then give it one more quarter turn with the pliers. That is all. Overtightening cracks tank bottoms, and a cracked tank means a $200 to $400 tank replacement at best, or $400 to $900 or more for a whole new toilet, instead of a $12 part. If it leaks later, you can always add another eighth turn.
Screw the supply line onto the shank the same way: hand-tight, then a quarter turn. The rubber cone washer inside the coupling nut does the sealing, not the force.
Pro tip
Before you connect the supply line, hold a cup over the top of the new valve and turn the water on for a second with the cap off, exactly like the cleaning step. New valves fail on day one because debris shaken loose from the old supply line lands on the fresh seal.
Step 6: Connect the refill tube and set the water level
Push the small flexible tube from the valve nipple onto the clip that came in the box, and hang the clip on the lip of the overflow tube. The end of the tube must sit above the water line and above the top of the overflow, not down inside it. A tube shoved into the overflow pipe can siphon the tank down after every flush, which keeps the valve cycling and wastes 100 to 200 gallons a day.
Trim the tube so it has a gentle arc with no kink. Too long and it droops into the tank and dribbles; too short and it pops off.
Now turn the water back on and let the tank fill. Watch where it stops. Most tanks have a molded water line on the back wall or the overflow tube. If not, aim for 1 inch below the top of the overflow. Adjust with the float: on Fluidmaster, squeeze the clip on the thin metal rod and slide the float cup up or down. On Korky, twist the adjustment screw on top. Each flush should fill the tank in 30 to 60 seconds and shut off with a clean click, no hiss.
Flush two or three times. Shine a flashlight on the shank nut and the supply connection after each fill. Dry a fingertip and run it around both joints. The job is finished when everything stays dry for a full cycle and the valve is silent between flushes.
Troubleshooting a new or repaired fill valve
| Symptom | Likely cause | Fix |
|---|---|---|
| Still hisses after replacement | Debris on the new seal from the supply line | Pop the cap, flush the valve body, replace cap |
| Water runs over the top of the overflow tube | Float set too high | Lower the float 1/2 inch at a time |
| Tank fills, then refills every few minutes | Refill tube pushed into the overflow, or a bad flapper | Clip tube above the overflow; replace the flapper |
| Fills very slowly | Stop valve not fully open or a clogged inlet screen | Open the stop fully; pull and rinse the screen in the shank |
| Drip at the shank nut | Gasket folded or nut under-tightened | Reseat the gasket, add a quarter turn |
| Drip at the supply coupling | Cracked cone washer or cross-threaded nut | Replace the supply line |
| Valve shudders or hammers when shutting off | High pressure or worn diaphragm | Check house pressure; above 80 psi needs a pressure-reducing valve |
| Short bursts of filling at night | Slow flapper leak | Dye test, replace the flapper |
Water pressure deserves a special mention. Fill valves are rated to about 80 psi, and many homes on municipal supply run higher than that. A $10 gauge threaded onto an outdoor spigot tells you in 30 seconds. If you read above 80 psi, every fill valve you install will fail early, and the fix is a pressure-reducing valve at the main, which is a plumber’s job.
When to call a pro
Call a plumber if the stop valve behind the toilet will not shut off or leaks after you close it, if the tank cracks or the shank hole is chipped, if house pressure reads over 80 psi, or if the supply line fitting is corroded to the stop valve and will not turn. Those jobs involve soldering, replacing a stop, or installing a pressure-reducing valve. Expect $150 to $350 for a stop valve replacement and $300 to $600 for a pressure-reducing valve installed.
FAQ
How do I know if the toilet fill valve or the flapper is the problem?
Hissing, whistling, or a slow fill means the fill valve. Silent refilling every 10 to 30 minutes with no hiss means the flapper. The food coloring test settles it: dye in the tank that shows up in the bowl without flushing is a flapper leak.
Will a universal fill valve fit my toilet?
Yes, in nearly every case. Fluidmaster 400 series and Korky 528 valves fit standard 1-inch tank holes and adjust across the full range of residential tank heights. The only exceptions are a few one-piece toilets and some Kohler models with proprietary valves, so check the tank for a brand label first.
How long does a toilet fill valve last?
Plan on five to seven years for a plastic cup-float valve, less with hard water or high pressure. Valves on well water or sediment-prone supplies often need the cap cleaned every year or two.
Why does my new fill valve still run?
Almost always the refill tube is stuck down inside the overflow pipe and siphoning the tank, or the float is set above the overflow top. Clip the tube to the rim of the overflow and drop the float until the water line sits 1 inch below the top.
Can I change a toilet fill valve without turning off the water?
No. The shank nut opens a hole at the bottom of the tank, and water pours through it the moment you loosen it. Shut the stop valve and sponge the tank dry first.