
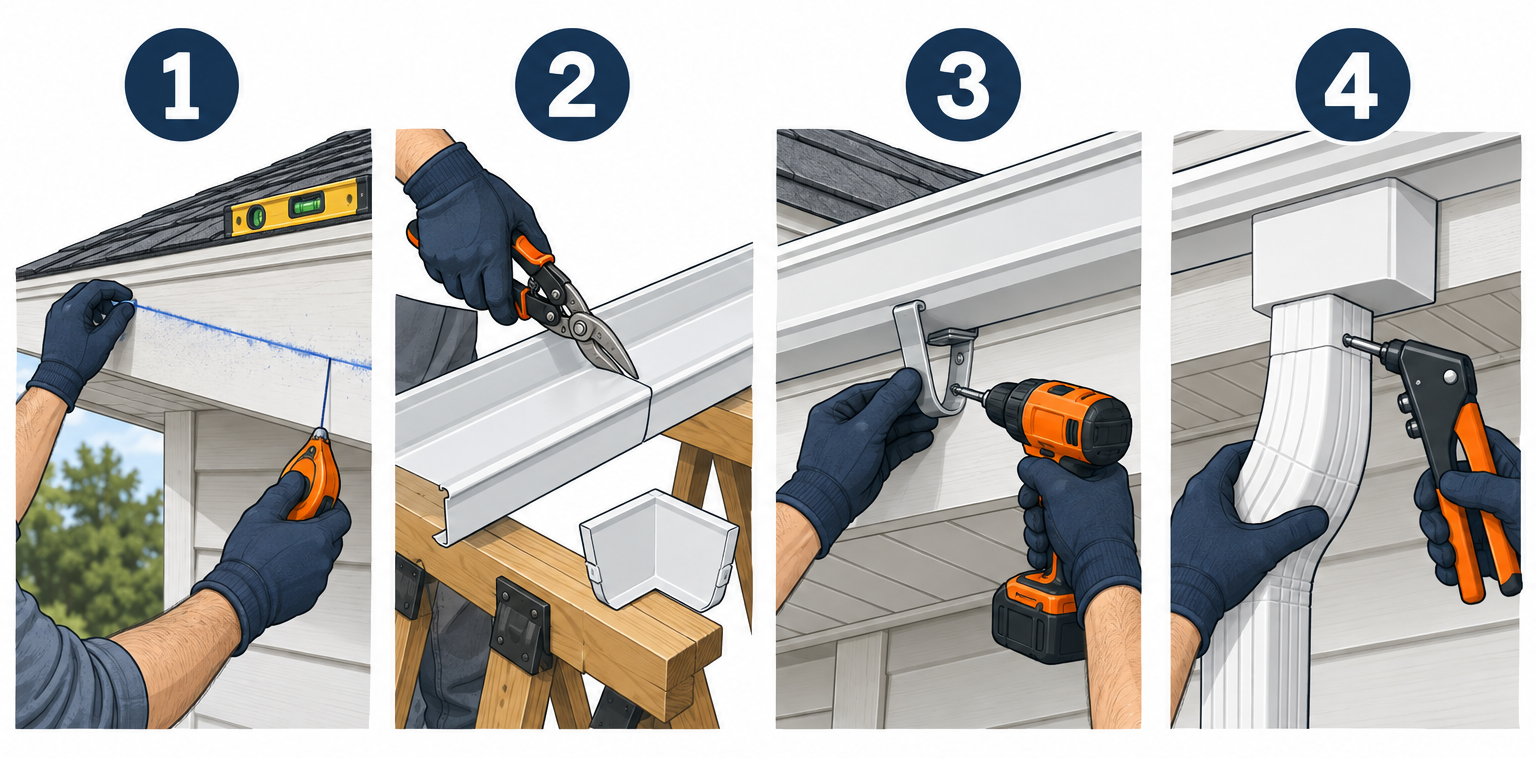
You can install sectional aluminum or vinyl gutters yourself in a weekend. Snap a sloped chalk line on the fascia, screw hidden hangers into the rafter tails every 24 inches, and run downspouts that carry water at least 4 feet from your foundation. Seamless gutters are the exception: they need a truck-mounted roll-former, so that job goes to a pro.
Quick steps: install house gutters
- Measure every roof edge and mark downspout locations.
- Repair or replace any soft or rotted fascia.
- Snap a chalk line that drops 1/4 inch per 10 feet toward each downspout.
- Cut sections and fit end caps, outlets and corners on the ground.
- Hang the gutter on hidden hangers every 24 inches into the rafter tails.
- Join and seal the seams, then let the sealant cure.
- Attach elbows and downspouts with straps every 6-8 feet.
- Add extensions or splash blocks, then water-test every run.
Tools and materials
- Gutter sections (5-inch K-style aluminum, .027-inch gauge, 10-foot lengths, or vinyl equivalent)
- Hidden hangers with screws (one per 24 inches, plus extras)
- End caps (left and right), inside/outside miter corners
- Drop outlets (2×3 or 3×4 to match downspouts)
- Downspouts, A and B elbows, downspout straps
- Gutter sealant (tripolymer or butyl rated for gutters)
- 1/8-inch aluminum pop rivets and rivet gun
- 1/4-inch hex driver and cordless drill/driver
- Chalk line, 4-foot level, 25-foot tape measure, line level
- Fine-tooth hacksaw, aviation snips (left and right cut)
- Crimping tool for downspout ends
- Extension ladder with standoff stabilizer, second ladder or helper
- Splash blocks or 4- to 10-foot downspout extensions
- Work gloves (cut-resistant) and safety glasses
Calculators for this job
Safety first
Keep ladders and long gutter sections at least 10 feet from overhead power lines, since aluminum conducts. Set the ladder at a 4-to-1 angle, extend it 3 feet above the roof edge, and wear cut-resistant gloves because freshly cut gutter edges are razor sharp.
Before You Start: Pick the Right Gutter
Most rain gutter installation failures start with the wrong product, not bad technique. Settle three things before you buy anything.
Material
| Material | DIY friendly? | Lifespan | Material cost (10 ft) | Best for |
|---|---|---|---|---|
| Vinyl | Very (snap-together) | 10-20 years | $8-15 | Mild climates, single-story, tight budgets |
| Sectional aluminum | Yes | 20-30 years | $12-25 | Most homeowners doing it themselves |
| Seamless aluminum | No (needs roll-former) | 20-30+ years | Pro installed only | Fewer leaks, long runs |
| Steel | Hard (heavy, rusts at cuts) | 20+ years | $20-35 | Heavy snow load areas |
| Copper | No (soldered seams) | 50+ years | Pro installed only | High-end and historic homes |
For a first DIY job, sectional aluminum is the best balance. It’s light, cuts with a hacksaw, won’t rust, and the parts are found at every big-box store. Look for .027-inch thickness or heavier. The thinner stock some stores sell dents when you lean a ladder on it.
Vinyl is easier still, but it gets brittle in hard freezes and needs expansion gaps, which most people get wrong (more on that in Step 6).
Size
Standard residential gutter is 5-inch K-style with 2×3-inch downspouts. Go up to 6-inch K-style with 3×4 downspouts if any of these apply:
- A single roof plane drains a large area, such as a long ranch roof or the back of a two-story house
- Your roof is steep (8/12 pitch or more), which sends water off faster
- You live where summer storms dump an inch or more an hour
- Water overshoots your current 5-inch gutters in heavy rain
Bigger gutters cost about 20-30% more but rarely overflow. If you’re on the fence, go 6-inch on the worst-draining side only.
Downspout count
Plan one downspout for every 30-40 feet of gutter. Any run longer than 40 feet should slope from a high point in the middle down to a downspout at each end. Place downspouts where the water can actually go somewhere: not onto a walkway, a patio that slopes toward the house, or the driveway apron where it will freeze.
Rain Gutter Parts You’ll Be Buying
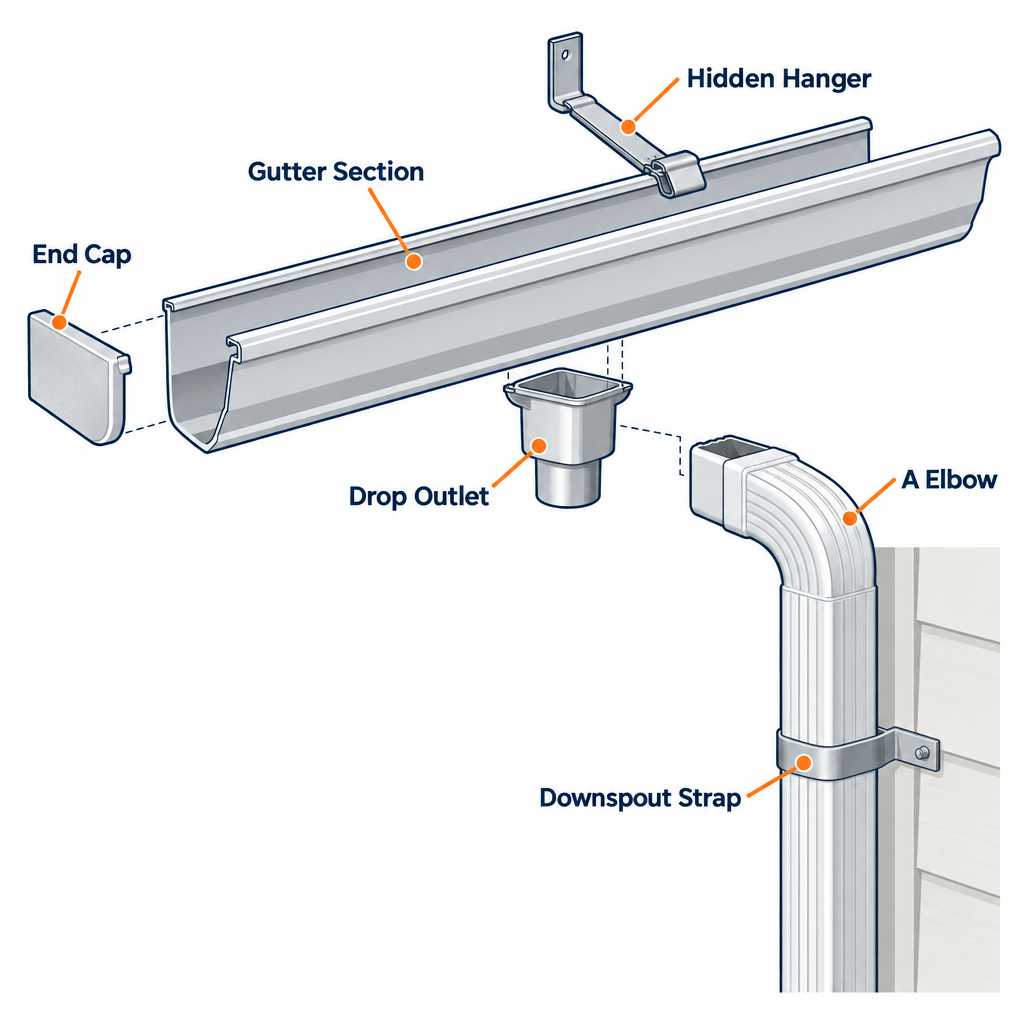
Knowing the names keeps you from making three trips to the store.
| Part | What it does |
|---|---|
| Gutter section | The trough itself, sold in 10-foot lengths |
| End cap | Closes the dead end of a run; comes in left and right |
| Drop outlet | Short collar riveted into a hole in the gutter bottom; the downspout fits over it |
| Inside / outside miter | Pre-formed 90-degree corners where the roof turns |
| Hidden hanger | Clips under the front lip and screws through the back into the fascia |
| A and B elbows | Bend the downspout toward the wall (A) or sideways (B) |
| Downspout strap | Holds the downspout to the siding |
| Splash block / extension | Carries water away from the foundation |
Step 1: Measure the Roofline and Plan Downspouts
Measure each straight run of fascia from corner to corner. Add 1-2 inches per run so end caps can extend slightly past the roof edge. Sketch the house from above and note every run’s length, every inside and outside corner, and each downspout location.
Count materials from the sketch:
- Gutter: total length divided by 10, rounded up, plus one spare section for mistakes
- Hangers: total length in inches divided by 24, plus one for each end and corner
- Outlets and downspouts: one outlet per downspout; measure from the gutter to the ground for downspout length and add 2 feet for elbows and offsets
- Elbows: usually three per downspout (two at the top to wrap under the eave, one at the bottom)
Mark the high point of each run. Water should travel the shortest distance possible to an outlet.
Step 2: Inspect and Repair the Fascia
Gutters full of water and debris are heavy. The fascia board they hang on has to be sound. Push a screwdriver into it every few feet, especially at corners and below roof valleys. If it sinks in more than 1/8 inch, that board is rotten and needs replacing before you hang anything.
Dark stains on the fascia or soffit often mean water has been getting behind the old gutters or past a failing drip edge. If you see staining inside the attic as well, check for “roof leaks” before you close everything up with new gutters.
While you’re up there, check for drip edge flashing along the roof edge. It should overhang the fascia so water drips into the gutter instead of running down behind it. If it’s missing, install gutter apron (a drip edge with a longer lip) under the first course of shingles. Drip edge typically runs about $4-7 per linear foot installed, and it prevents the most common rot problem behind gutters.
Pull off old gutters by unscrewing or prying out the hangers and spikes. Fill old spike holes in the fascia with exterior wood filler or caulk so they don’t wick water.
Step 3: Snap a Sloped Chalk Line
Slope is what makes gutters work. The standard is a 1/4-inch drop for every 10 feet of run. Too little and water pools. Too much and the far end hangs visibly low.
At the high end of the run, make a mark on the fascia about 1/2 inch below the drip edge. This keeps the back of the gutter tucked under the flashing.
Measure to the downspout end and calculate the drop. A 30-foot run needs 3/4 inch of fall. A 40-foot run needs 1 inch. Make the low mark that much lower than the high mark, then snap a chalk line between them.
Pro tip
Don’t trust the fascia to be level. Old houses sag. Hold a line level or 4-foot level along the chalk line to confirm it’s actually falling toward the outlet, because a fascia that’s off by 1/2 inch can cancel out your entire slope.
For runs with a downspout at both ends, mark the high point in the middle and snap two lines falling away from it.
Step 4: Cut and Assemble Sections on the Ground
Do as much work as possible on sawhorses. Everything you finish on the ground is something you don’t have to do from a ladder.
Cutting: Mark the length, then cut the back and bottom with a fine-tooth hacksaw. Finish the front curved lip with aviation snips. File or sand the burr off the cut edge.
End caps: Run a bead of gutter sealant inside the cap’s channel. Press the cap onto the gutter end and tap it home with a rubber mallet. Crimp the edges with pliers or set two or three 1/8-inch pop rivets, then smooth sealant over the inside joint.
Outlet holes: Set the drop outlet upside down on the gutter bottom where the downspout goes and trace around it. Drill a 1/2-inch starter hole inside the traced shape, then cut the opening with snips. Seal the outlet’s flange, push it through from inside, and rivet it at the corners. The flange should sit flat with no lip to catch debris.
Corners: Pre-made miters slide over or under the gutter ends depending on the brand. Overlap them, seal, and rivet the same way. Corners are the most common leak point, so use plenty of sealant here.
Step 5: Hang the Gutter on Hidden Hangers
Snap the hidden hangers into the gutter before you lift it: one every 24 inches, plus one within 6-12 inches of every end, corner and seam. In heavy snow country, tighten that to every 16-18 inches. The hanger clips under the front lip and its screw sits at the back.
With a helper on a second ladder, lift the section and align the top back edge with your chalk line. Slide the back of the gutter up under the drip edge. Drive the first screw at the high end, check the line, then drive the low end. Fill in the rest.
Hanger screws should bite into the rafter tails behind the fascia wherever possible. Rafters are usually 16 or 24 inches on center; you’ll feel the screw grab hard when it hits one. Use the screws supplied with the hangers (typically 1-1/2 to 2 inches) and drive them until the hanger is snug against the fascia. Stop there, or you’ll crush the gutter back.
Step 6: Join Sections and Seal the Seams
On sectional aluminum, overlap sections 6-8 inches. The upstream section goes inside the downstream section, so water flows over the seam instead of into it, like shingles on a roof.
Lay a thick bead of sealant on the overlap, press the pieces together, and set three or four pop rivets through the bottom and back. Smooth a second bead over the inside edge of the joint with a gloved finger. Place a hanger within 6 inches of each seam.
Vinyl works differently. Sections snap into connector pieces, and the connectors have expansion marks molded in. Set the gutter end to the mark that matches the outdoor temperature on install day. Vinyl moves a lot. A 30-foot run can grow or shrink by roughly 3/8 inch between a cold morning and a hot afternoon. If you jam it tight on a cold day, it will buckle or pop off its brackets by July.
Let the sealant cure according to the label, usually 24 hours, before running water through.
Pro tip
Paint the sealant on with gloved fingers, not a brush, and work it into the rivet heads. Most “leaking seam” callbacks are actually water wicking past a rivet that was never covered.
Step 7: Install the Downspouts
Gutters sit out from the wall because of the roof overhang, so the downspout needs two elbows to bring it back to the siding.
- Slide an A elbow onto the drop outlet, pointing toward the wall.
- Hold a second A elbow against the siding and measure the gap between the two. Cut a short piece of downspout to bridge it, adding about 1-1/2 inches for overlap at each end.
- Assemble the offset and rivet each joint.
- Measure from the bottom of the offset to about 12 inches above the ground. Cut the main downspout to that length.
- Attach a bottom elbow pointing away from the house.
The rule for every joint: the crimped (narrow) end of the upper piece goes inside the lower piece. Get it backward and every joint leaks. If you cut a piece and lose the crimped end, recreate it with a crimping tool, which runs about $20-30.
Fasten the downspout to the wall with straps every 6-8 feet, with at least one near the top and one near the bottom. On vinyl or aluminum siding, screw into a stud or use the strap at a corner board so the siding isn’t the only thing holding it. On brick, use masonry anchors. Drill into the mortar joints, not the brick face, which cracks easily and is harder to patch if you ever need to “mortar bricks” back in later.
Step 8: Direct Water Away From the Foundation
A gutter system that dumps water against the house just moves the problem. Each downspout should discharge at least 4 feet from the foundation. Go 6-10 feet if your yard is flat or you have a basement.
Options, from cheapest to most permanent:
- Splash block ($10-20): fine where the ground already slopes away
- Flip-up or roll-out extension ($10-30): good where you mow or walk past the downspout
- Buried 4-inch solid drain pipe to daylight or a pop-up emitter ($50-150 per downspout DIY): the cleanest look and the best protection
If water still sits along the foundation after a storm, the problem is grading or groundwater, and a “french drain” may be the real fix. Where downspouts empty onto a patio or walkway, a “concrete sealer” helps the slab shed water and resist freeze damage.
Step 9: Water-Test Every Run
After the sealant has cured, put a garden hose at the high end of each run and let it flow at full pressure for a few minutes. Watch for:
- Water reaching the outlet steadily without pooling anywhere
- Drips at seams, corners, end caps and outlet flanges
- Water running behind the gutter at the fascia
- Leaks at downspout joints
Mark leaks with tape, let the gutter dry, and add sealant. Standing water more than about 1/4 inch deep 15 minutes after you shut off the hose means the slope is off at that spot. Back out the nearby hanger screws, raise or lower the gutter, and refasten.
Expected result: water runs the full length of every gutter in a steady stream, exits each downspout without leaks, and lands several feet from the house. Nothing drips behind the gutter, and the hangers sit tight against the fascia with no sag between them.
What Gutter Installation Costs
| Approach | Typical cost | Notes |
|---|---|---|
| DIY vinyl | $3-6 per linear foot | Cheapest, shortest lifespan |
| DIY sectional aluminum | $4-10 per linear foot | Includes hangers, sealant, downspouts |
| Pro seamless aluminum | $8-15 per linear foot installed | Most common choice for house gutter installation |
| Pro steel | $10-25 per linear foot installed | Heavy snow regions |
| Pro copper | $25-40+ per linear foot installed | Premium, very long life |
| Gutter guards (add-on) | $1-10+ per foot DIY, more installed | Mesh and micro-mesh do the most |
Pros commonly charge $1,000-2,500 for a typical single-family home in seamless aluminum, and more for two-story homes, complex rooflines or removal of old gutters. Doing it yourself saves the most on a one-story house with simple, straight runs.
Common Mistakes When Installing New Gutters
- No slope, or slope the wrong way. Always confirm with a level, not your eye.
- Hanging into the fascia only. Screws that miss the rafter tails pull out under ice and debris loads.
- Gutter mounted too high. If the outer lip sits above the roof plane, sliding snow and ice will rip it off. The front lip should sit slightly lower than the back.
- Backward overlaps. At seams and downspout joints, upstream always goes inside downstream.
- Downspouts dumping at the foundation. This is how gutters cause wet basements instead of preventing them.
- Gutter behind the drip edge missing entirely. Without flashing or gutter apron, water runs down behind the gutter and rots the fascia.
Troubleshooting
| Symptom | Likely cause | Fix |
|---|---|---|
| Water pools in the middle of a run | Fascia dips or slope too shallow | Reset hangers to correct the slope; check with a level |
| Drips at a seam | Sealant missing or overlap backward | Dry, clean, reseal; reverse overlap if needed |
| Water running behind gutter | Gutter too low or drip edge missing | Raise gutter under drip edge or add gutter apron |
| Overflow at inside corner in heavy rain | Valley sends too much water to one spot | Add a corner splash guard or a downspout near the corner |
| Gutter pulling away from fascia | Screws missed rafters or fascia is rotten | Replace fascia, re-hang into rafter tails, add hangers |
| Downspout joints leaking | Crimped end pointing the wrong way | Reassemble with upper piece inside lower |
| Vinyl gutter buckling in summer | No expansion gap at connectors | Reset sections to the temperature marks |
| Overflowing everywhere in storms | Gutters or downspouts undersized | Add downspouts or upgrade to 6-inch gutter and 3×4 spouts |
When to call a pro
Hire a gutter contractor if you want seamless gutters, the work is above a single story without solid ladder footing, or the fascia rot extends into rafter tails. A roofer should handle drip edge replacement under brittle or multi-layer shingles, and an electrician should de-energize or relocate any service drop running close to the roof edge.
FAQ
How long does gutter installation take?
Two people can hang gutters on a simple one-story house in about a day. Plan two days for a two-story home, multiple corners, or if you need to repair fascia first. A pro crew with a seamless machine often finishes a typical house in four to eight hours.
Is putting guttering up yourself worth it?
On a single-story house with straight runs, yes. You’ll save roughly half the cost of professional installation. On a tall or complicated roof, the ladder risk and the leak-prone seams of sectional gutters usually make seamless pro installation the better value.
How far apart should gutter hangers be?
Every 24 inches is the standard. Drop to 16-18 inches in areas with heavy snow or ice, and always place a hanger within 6-12 inches of every end, corner and seam.
Can I install gutters on a house with solar panels?
Yes, but keep your ladder and hands clear of panel wiring and conduit along the eaves, and don’t let downspouts or straps block panel drainage or racking. Our article on “solar panels” covers roof-edge clearances in more detail.
How do I keep new gutters working?
Clean them at least twice a year, in late spring and again after the leaves drop. Add more cleanings if you have pine trees or overhanging oaks. Our guide to “safe gutter” cleaning covers ladder setup and the tools that keep you off the roof. Gutter guards reduce cleanings but don’t eliminate them.
Should gutters be installed before or after a new roof?
After. Roofers need to set drip edge and the last shingle course without gutters in the way. If you’re re-roofing within the next year or two, wait and install new gutters once the roof is done.